- Saved searches
- Use saved searches to filter your results more quickly
- Prx001/QRoundProgressbar
- Name already in use
- Sign In Required
- Launching GitHub Desktop
- Launching GitHub Desktop
- Launching Xcode
- Launching Visual Studio Code
- Latest commit
- Git stats
- Files
- README.md
- About
- PyQt progressbar
- QProgressBar example
- Progressbar styles
Saved searches
Use saved searches to filter your results more quickly
You signed in with another tab or window. Reload to refresh your session. You signed out in another tab or window. Reload to refresh your session. You switched accounts on another tab or window. Reload to refresh your session.
An easy-to-use and modern round progressbar for Qt Python binding PyQt (PyQt5) 📦
Prx001/QRoundProgressbar
This commit does not belong to any branch on this repository, and may belong to a fork outside of the repository.
Name already in use
A tag already exists with the provided branch name. Many Git commands accept both tag and branch names, so creating this branch may cause unexpected behavior. Are you sure you want to create this branch?
Sign In Required
Please sign in to use Codespaces.
Launching GitHub Desktop
If nothing happens, download GitHub Desktop and try again.
Launching GitHub Desktop
If nothing happens, download GitHub Desktop and try again.
Launching Xcode
If nothing happens, download Xcode and try again.
Launching Visual Studio Code
Your codespace will open once ready.
There was a problem preparing your codespace, please try again.
Latest commit
Git stats
Files
Failed to load latest commit information.
README.md
Custom round progressbar widget implemented in PyQt5 for PyQt5 applications!
An easy-to-use and modern round progressbar for Qt Python binding PyQt (PyQt5) 📦
QRoundProgressbar is a custom progressbar widget inherited from ‘QWidget’ class, and acts as a QProgressBar alternative widget in your PyQt5 application.
The package is available on PyPi so as always use pip for installation:
pip install QRoundProgressbar Usage in your Python application
First of all, as expected, you need to import the package. Import ‘RoundProgressbar’ class from the package:
from QRoundProgressbar import RoundProgressbar
Now the widget is ready to use! There are things you can define for the widget, like the progressbar color, background color, size, thickness and some other things. The package also contains a ‘__main__’ script as shown in the video above so you can test the widget easily:
python -m QRoundProgressbar You can use default values for the widget:
round_progressbar = RoundProgressbar(parent)
Or define the values yourself. Bellow is an example:
round_progressbar = RoundProgressbar( parent=window, color=QColor("darkblue"), size=120, thickness=14, value=80, maximum=100, round_edge=True, bg_circle_color=QColor("pink"), fill_bg_circle=True )
Qt Designer is a very extensible tool, even can support your custom widgets! It means you can interact with your custom widget just as you do with Qt widgets, like QPushButton, QCheckBox, you can drag and drop them on your form, change their sizes, set properties and so on. Qt Designer can load plugins, and you can load your custom widgets through plugins, then your custom widget is available in Qt Designer Widget Box. In C++, using Qt Creator IDE you can create your custom widgets and compile them to a .dll file, then you put the dll file (your plugin) into Qt Designer’s relative path for plugins, and that’s it you can use your widget in Designer. But, here in python the story is a little different. PyQt supports this plugin developement and can integrate Python based Qt custom widgets in Qt Designer. Learn more about integrating PyQt custom widgets in Qt Designer There is the Qt Designer plugin for QRoundProgressbar in package, QRoundProgressbarplugin.py. You can load it to your Qt Designer.
About
An easy-to-use and modern round progressbar for Qt Python binding PyQt (PyQt5) 📦
PyQt progressbar
Still worried about finding Python to do a variety of progress bar beautification?
In this article you learn how to use the QProgressbar and how to create theme variations.
The QProgressBar applications will do some delay operations, which will cause the main thread to get stuck in the UI: The main thread will be waiting for delays, which causes the whole program to hang. That would make the whole program unresponsive.
Threads in PyQt can solve this problem perfectly.
QProgressBar example
This example uses the time module in python to do the delay operation time.sleep() .
It puts the delay operation into the sub-thread to realize the real-time UI refresh of PyQt.
Because the thread is doing the QProgressBar update, it doesn’t cause the main thread to hang.
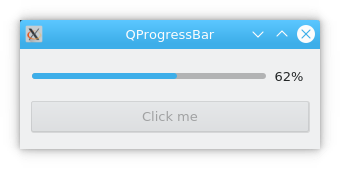
import sys import time from PyQt5.QtCore import QThread, pyqtSignal from PyQt5.QtWidgets import QWidget, QPushButton, QProgressBar, QVBoxLayout, QApplication class Thread(QThread): _signal = pyqtSignal(int) def __init__(self): super(Thread, self).__init__() def __del__(self): self.wait() def run(self): for i in range(100): time.sleep(0.1) self._signal.emit(i) class Example(QWidget): def __init__(self): super(Example, self).__init__() self.setWindowTitle('QProgressBar') self.btn = QPushButton('Click me') self.btn.clicked.connect(self.btnFunc) self.pbar = QProgressBar(self) self.pbar.setValue(0) self.resize(300, 100) self.vbox = QVBoxLayout() self.vbox.addWidget(self.pbar) self.vbox.addWidget(self.btn) self.setLayout(self.vbox) self.show() def btnFunc(self): self.thread = Thread() self.thread._signal.connect(self.signal_accept) self.thread.start() self.btn.setEnabled(False) def signal_accept(self, msg): self.pbar.setValue(int(msg)) if self.pbar.value() == 99: self.pbar.setValue(0) self.btn.setEnabled(True) if __name__ == "__main__": app = QApplication(sys.argv) ex = Example() ex.show() sys.exit(app.exec_())Progressbar styles
The example below uses CSS stylesheet to make variations of the QProgressBar.
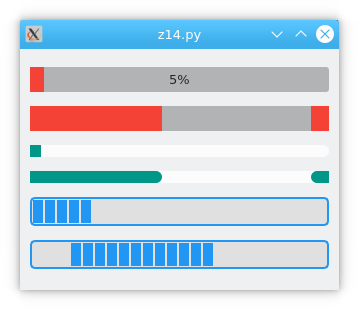
from random import randint import sys from PyQt5.QtCore import QTimer from PyQt5.QtWidgets import QWidget, QApplication, QVBoxLayout, QProgressBar StyleSheet = ''' #RedProgressBar < text-align: center; >#RedProgressBar::chunk < background-color: #F44336; >#GreenProgressBar < min-height: 12px; max-height: 12px; border-radius: 6px; >#GreenProgressBar::chunk < border-radius: 6px; background-color: #009688; >#BlueProgressBar < border: 2px solid #2196F3; border-radius: 5px; background-color: #E0E0E0; >#BlueProgressBar::chunk < background-color: #2196F3; width: 10px; margin: 0.5px; >''' class ProgressBar(QProgressBar): def __init__(self, *args, **kwargs): super(ProgressBar, self).__init__(*args, **kwargs) self.setValue(0) if self.minimum() != self.maximum(): self.timer = QTimer(self, timeout=self.onTimeout) self.timer.start(randint(1, 3) * 1000) def onTimeout(self): if self.value() >= 100: self.timer.stop() self.timer.deleteLater() del self.timer return self.setValue(self.value() + 1) class Window(QWidget): def __init__(self, *args, **kwargs): super(Window, self).__init__(*args, **kwargs) self.resize(800, 600) layout = QVBoxLayout(self) layout.addWidget( ProgressBar(self, minimum=0, maximum=100, objectName="RedProgressBar")) layout.addWidget( ProgressBar(self, minimum=0, maximum=0, objectName="RedProgressBar")) layout.addWidget( ProgressBar(self, minimum=0, maximum=100, textVisible=False, objectName="GreenProgressBar")) layout.addWidget( ProgressBar(self, minimum=0, maximum=0, textVisible=False, objectName="GreenProgressBar")) layout.addWidget( ProgressBar(self, minimum=0, maximum=100, textVisible=False, objectName="BlueProgressBar")) layout.addWidget( ProgressBar(self, minimum=0, maximum=0, textVisible=False, objectName="BlueProgressBar")) if __name__ == "__main__": app = QApplication(sys.argv) app.setStyleSheet(StyleSheet) w = Window() w.show() sys.exit(app.exec_())When creating progressbars, we use the parameter objectName to set the css class name.
layout.addWidget( ProgressBar(self, minimum=0, maximum=0, objectName="RedProgressBar")) layout.addWidget( ProgressBar(self, minimum=0, maximum=0, textVisible=False, objectName="GreenProgressBar")) layout.addWidget( ProgressBar(self, minimum=0, maximum=0, textVisible=False, objectName="BlueProgressBar"))You can see they match the styleSheets class names (on top):