- Program menu in python
- Взаимодействие с меню
- Program menu in python
- Learn Latest Tutorials
- Preparation
- Trending Technologies
- B.Tech / MCA
- Javatpoint Services
- Training For College Campus
- Menu Driven Program in Python
- Introduction To Menu-Driven Program
- Advantages Of Menu-Driven Program
- Perimeter And Area Calculation Of Geometric Shapes
- Menu-Driven Program To Create A Simple Calculator
- Conclusion
- See Also:
Program menu in python
Для создания иерархического меню в tkinter применяется виджет Menu . Основные параметры Menu:
- activebackground : цвет активного пункта меню
- activeborderwidth : толщина границы активного пункта меню
- activeforeground : цвет текста активного пункта меню
- background / bg : фоновый цвет
- bd : толщина границы
- cursor : курсор указателя мыши при наведении на меню
- disabledforeground : цвет, когда меню находится в состоянии DISABLED
- font : шрифт текста
- foreground / fg : цвет текста
- tearoff : меню может быть отсоединено от графического окна. В частности, при создании подменю а скриншоте можно увидеть прерывающуюся линию в верху подменю, за которую его можно отсоединить. Однако при значении tearoff=0 подменю не сможет быть отсоединено.
Меню может содержать много элементов, причем эти элементы сами могут представлять меню и содержать другие элементы. В зависимости от того, какой тип элементов мы хотим добавить в меню, будет отличаться метод, используемый для их добавления. В частности, нам доступны следующие методы:
- add_command(options) : добавляет элемент меню через параметр options
- add_cascade(options) : добавляет элемент меню, который в свою очередь может представлять подменю
- add_separator() : добавляет линию-разграничитель
- add_radiobutton(options) : добавляет в меню переключатель
- add_checkbutton(options) : добавляет в меню флажок
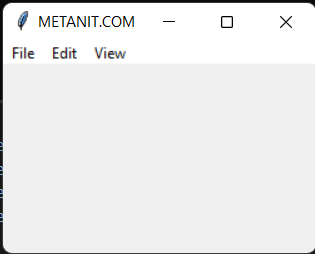
from tkinter import * root = Tk() root.title("METANIT.COM") root.geometry("250x150") main_menu = Menu() main_menu.add_cascade(label="File") main_menu.add_cascade(label="Edit") main_menu.add_cascade(label="View") root.config(menu=main_menu) root.mainloop() Для добавления пунктов меню у объекта Menu вызывается метод add_cascade() . В этот метод передаются параметры пункта меню, в данном случае они представлены текстовой меткой, устанавливаемой через параметр label .
Но просто создать меню — еще недостаточно. Его надо установить для текущего окна с помощью параметра menu в методе config() . В итоге графическое окно будет иметь следующее меню:
from tkinter import * root = Tk() root.title("METANIT.COM") root.geometry("250x150") main_menu = Menu() file_menu = Menu() file_menu.add_command(label="New") file_menu.add_command(label="Save") file_menu.add_command(label="Open") file_menu.add_separator() file_menu.add_command(label="Exit") main_menu.add_cascade(label="File", menu=file_menu) main_menu.add_cascade(label="Edit") main_menu.add_cascade(label="View") root.config(menu=main_menu) root.mainloop() Здесь определяется подменю file_menu, которое добавляется в первый пункт основного меню благодаря установке опции menu=file_menu :
main_menu.add_cascade(label="File", menu=file_menu)
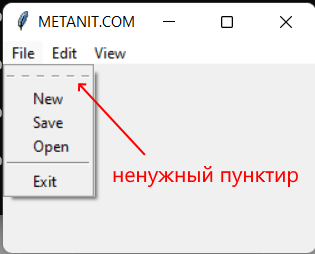
Но обратите внимание на пунктирную линию в подменю, которая совершенно не нужна и непонятно откуда появляется. Чтобы избавиться от этой линии, надо для нужного пункта меню установить параметр tearoff=0 :
Однако так как подпунктов меню может быть много, чтобы для кажлого не прописывать этот параметр, то проще отключить все это глобально с помощью следующей строки кода
root.option_add("*tearOff", FALSE) from tkinter import * root = Tk() root.title("METANIT.COM") root.geometry("250x150") root.option_add("*tearOff", FALSE) main_menu = Menu() file_menu = Menu() file_menu.add_command(label="New") file_menu.add_command(label="Save") file_menu.add_command(label="Open") file_menu.add_separator() file_menu.add_command(label="Exit") main_menu.add_cascade(label="File", menu=file_menu) main_menu.add_cascade(label="Edit") main_menu.add_cascade(label="View") root.config(menu=main_menu) root.mainloop() 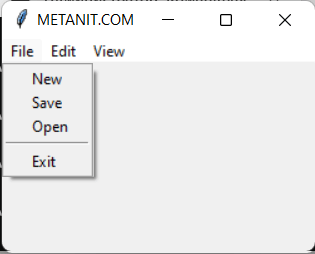
Подобным образом можно создавать и более глубокие иерархии меню:
from tkinter import * root = Tk() root.title("METANIT.COM") root.geometry("250x150") root.option_add("*tearOff", FALSE) main_menu = Menu() file_menu = Menu() settings_menu = Menu() settings_menu.add_command(label="Save") settings_menu.add_command(label="Open") file_menu.add_cascade(label="Settings", menu=settings_menu) file_menu.add_separator() file_menu.add_command(label="Exit") main_menu.add_cascade(label="File", menu=file_menu) root.config(menu=main_menu) root.mainloop() 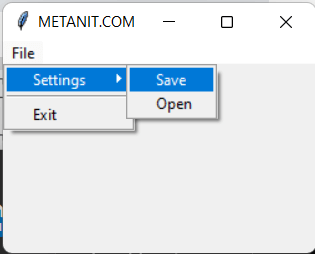
Взаимодействие с меню
Отличительной особенностью элементов меню является способность реагировать на нажатия пользователя. Для этого у каждого элемента меню можно задать параметр command , который устанавливает ссылку на функцию, выполняемую при нажатии.
from tkinter import * from tkinter import messagebox root = Tk() root.title("METANIT.COM") root.geometry("250x150") root.option_add("*tearOff", FALSE) def edit_click(): messagebox.showinfo("GUI Python", "Нажата опция Edit") main_menu = Menu() main_menu.add_cascade(label="File") main_menu.add_cascade(label="Edit", command=edit_click) main_menu.add_cascade(label="View") root.config(menu=main_menu) root.mainloop() Program menu in python
Learn Latest Tutorials


Preparation


Trending Technologies


B.Tech / MCA


Javatpoint Services
JavaTpoint offers too many high quality services. Mail us on h[email protected], to get more information about given services.
- Website Designing
- Website Development
- Java Development
- PHP Development
- WordPress
- Graphic Designing
- Logo
- Digital Marketing
- On Page and Off Page SEO
- PPC
- Content Development
- Corporate Training
- Classroom and Online Training
- Data Entry
Training For College Campus
JavaTpoint offers college campus training on Core Java, Advance Java, .Net, Android, Hadoop, PHP, Web Technology and Python. Please mail your requirement at [email protected].
Duration: 1 week to 2 week
Like/Subscribe us for latest updates or newsletter 


Menu Driven Program in Python

Menu-driven programs are interactive programs that take input from the users and perform actions according to their choice. While making the applications easy to use menu driven programs also make them unambiguous by giving fixed choices to the user.
With this approach, the user can select an operation from a menu and provide input as needed. The program acts according to the input taken from the user. All the data required for completing the tasks are taken from the user. Implementation of some menu-driven programs is available in this article.
Introduction To Menu-Driven Program
A menu-driven program is a programming approach that displays the list of operations the code can perform and asks the user to choose one of them.
User can interact with the Operating System while execution of code through GUI (graphical user interface) or CLI (Command Line Interface).

The image above displays the output of a menu-driven program designed for a shopping store. The program handles product-related information for that store. An interactive command-line interface shows a list of operations that the program can be used for and prompts users to choose an input, and further execution will be based on the input. We will be creating a program similar to the one displayed in the above image in this article.
We can see many applications of the Menu-driven programming approach in our day-to-day life. Microprocessor-controlled appliances like washing machines, microwaves, etc . have systems that follow the same approach. ATMs (Automated Teller Machines) and vending machines also use a menu-driven programming approach. Many software systems also follow the same approach for implementing their functionalities. All these systems take input from users from the single keystrokes and perform actions accordingly.
Let’s take the ATM case, the user gets a list of options that he can perform. He chooses one of them like balance inquiry or cash withdrawal and with some keystrokes, he receives the cash.
The menu-driven system makes it much more interactive and the limited options provided make them precise . The input is taken from users in a single keystroke reducing the chances of errors.
In this article, we will see some examples of how we can implement menu-driven programs.
Advantages Of Menu-Driven Program
- Menu-driven programs have a simple, user-friendly, and interactive interface .
- These are self-explanatory and users can easily operate the systems.
- Menu-driven systems are less prone to errors as they have limited options and users give input in single keystrokes.
- The programming approach is best for beginners.
Perimeter And Area Calculation Of Geometric Shapes
Let’s code a menu-driven program for calculating the area and perimeter of different geometric shapes like circles, triangles, rectangles, and squares . Here, we will get a menu on the command prompt which will display the shapes and the calculations users will be able to perform using the code. The program will ask users for their choices, and required inputs and print the output accordingly.
Here, for displaying the menu continuously and making users interact with the system we will use the while loop in python and for switching into the loop according to the user input nested if-elif-else loops.
- In order to understand how the while loop works in Python, read the following article — Click Here.
- In the following article, you’ll learn more about the if-elif-else loop in Python — Click Here.
Now, let’s see a simple mensuration program that calculates the area and perimeter of different geometric shapes.
Here, I have calculated the perimeter and area of a rectangle using the above code. You can choose any other option available from the menu.
In the above code, methods are defined that take required arguments and calculate the perimeter and area of the specified shapes. For eg, the method per_circle takes the radius of the circle as an argument and calculates the perimeter of the circle using a mathematical formula.
Similar to per_circle several methods are defined that return perimeters and areas of different shapes.
while True loop is used for infinite iterations, it displays the menu repeatedly and the users can choose the operations they can perform. The while loop displays the menu of different shapes and takes input from the user in variable shape_choice .
According to the input from the user in the shape_choice variable, the code executes relevant block form if-elif-else conditional blocks.
When execution enters in any one of the if_elif conditions one more menu is displayed where the user is asked to choose if it wants to calculate the area or perimeter of the chosen shape.
After getting input from the user in the variable choice1 code takes the required arguments for calculation from the user. The appropriate method is called and the result is given to the user.
This is an endless loop, if the user wants to stop execution and get out of the loop it has to give the input of the Exit option in the menu.
The exit condition is handled in the else loop where the break statement is used to terminate the execution of the loop.
Menu-Driven Program To Create A Simple Calculator
Let’s see one more simple example of a menu-driven program that we use in our daily life. The calculator takes different inputs from a user and performs arithmetic operations.
In this code of Calculator , we will use menu driven programming approach that displays the operations the code can perform. Choose one of these operations, give the inputs and get results accordingly.
In the above code, we have displayed a menu of the operations that the calculator can perform. Methods are defined that performing the calculations and displaying results.
while True loop is used for infinite iteration and if-elif-else loop is used for decision making to execute according to the choice made by the user. break statement is used to terminate the execution of the while loop in the final else condition.
Check out this article on Calculator Program in Python to learn more about building a calculator from scratch!
Conclusion
- Menu Driven Programs are used to make the program interactive and take inputs from users.
- while True and if-elif-else loops are used for iteration and decision making respectively.
- The menu displayed on the command prompt makes the user aware of the operations program can perform.
- Taking inputs from the user in a single keystroke makes the menu-driven programming approach easy and precise .