- 2. Organize your Project
- 3. Running your Code
- 4. Testing
- 4.1 Defining a test
- 4.2 Running tests
- 4.3 Test Coverage
- 5. Profiling
- 5. Other useful extension
- Profile Python code
- Profiling for CPython-based interpreters
- Profiling for IronPython
- Feedback
- python-line-profiler (v0.4.0)
- Contents
- Features
- Installation and Requirements
- Extension Settings
- Known Issues
- Release Notes
- Funding
- Saved searches
- Use saved searches to filter your results more quickly
- Profiling
- Saved searches
- Use saved searches to filter your results more quickly
- Profiling
2. Organize your Project
First off you should use a new virtual environment.
Using the virtualenv command line tool you can use virtualenv -p3.9 .venv3.9 to define a new Python 3.9 environment. VSCode should show a prompt asking you whether you want to switch to this environment. Choose ‘yes’. For the project itself I use the following structure:
project_directory +-- my_module | +-- __init__.py | +-- __main__.py | +-- script.py +-- tests +-- __init__.py +-- test_script.py 3. Running your Code
As the project structure uses __init__.py files we need to run the project as a module: python -m my_module . You can also adapt the vscode debug configurations to this module-based approach: In the run/debug tab click on ‘add configuration’, then you can add or edit entries to follow for example the following structure:
"configurations": [ "name": "My Python Module", "type": "python", "request": "launch", "module": "my_module" > ] 4. Testing
I use pytest for testing in vscode. Make sure to configure tests for the python extension and to choose pytest as well as to configure pytest to use your naming convention. For example if you call your test files something like test_script.py where the script part indicates what you are testing you should choose the test name format test_*.py .
4.1 Defining a test
import unittest from my_module.script import add_func class TestScript(unittest.TestCase): def test_add(self): result = add_func(1,2) self.assertEqual(result, 3) 4.2 Running tests
You can run the tests from the terminal via pytest .
Alternatively you can use the vscode extension’s icon and run all the tests by clicking on the run symbol in the corresponding sidebar tab.
4.3 Test Coverage
- run pytest —cov=main_module —cov-report=xml tests
- —cov=main_module enables coverage for the main_module
- —cov-report=xml generates a coverage.xml file that can be used with the vscode extension coverage gutters.
5. Profiling
I use the following in __main__.py :
import cProfile from pstats import Stats, SortKey from my_module.script import add_func def run_script(): print(add_func(2,1)) if __name__ == '__main__': do_profiling = True if do_profiling: with cProfile.Profile() as pr: run_script() with open('profiling_stats.txt', 'w') as stream: stats = Stats(pr, stream=stream) stats.strip_dirs() stats.sort_stats('time') stats.dump_stats('.prof_stats') stats.print_stats() else: start_game()You can then use a tool like SnakeViz to visualize the results in your browser by running snakeviz program.prof .
5. Other useful extension
Profile Python code
Applies to:
 Visual Studio Visual Studio for Mac Visual Studio Code
You can profile a Python application when using CPython-based interpreters. (See Features matrix — profiling for the availability of this feature for different versions of Visual Studio.)
Profiling for CPython-based interpreters
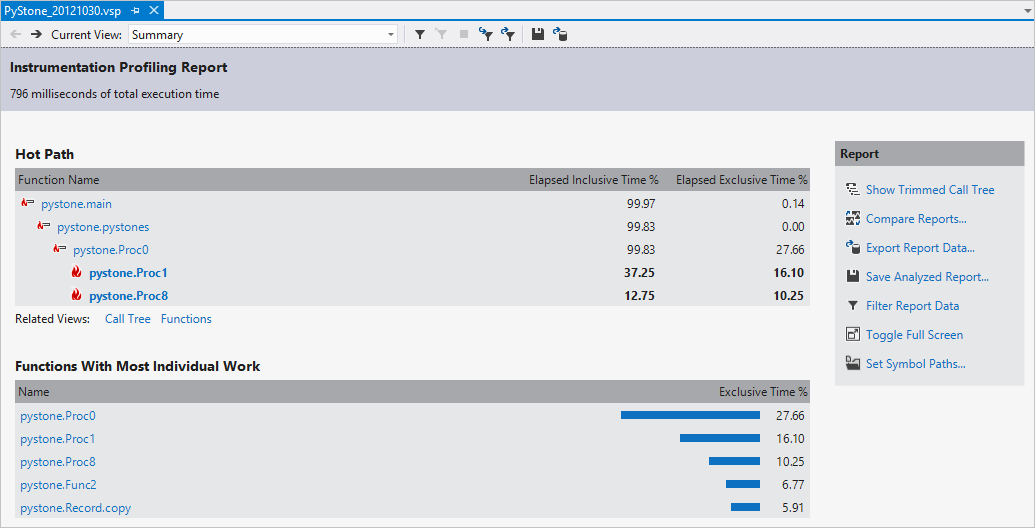
Profiling is started through the Debug > Launch Python Profiling menu command, which opens a configuration dialog:
When you select OK, the profiler runs and opens a performance report through which you can explore how time is spent in the application:
When you profile a Python application, Visual Studio collects data for the lifetime of the process. We do want to hear your feedback on future capabilities. Use the Product feedback button at the bottom of this page.
Profiling for IronPython
Because IronPython isn’t a CPython-based interpreter, the profiling feature doesn’t work.
Instead, use the Visual Studio .NET profiler by launching ipy.exe directly as the target application, using the appropriate arguments to launch your startup script. Include -X:Debug on the command line to ensure that all of your Python code can be debugged and profiled. This argument generates a performance report including time spent in the IronPython runtime and your code. Your code is identified using mangled names.
Alternately, IronPython has some of its own built-in profiling, but there’s currently no good visualizer for it. See An IronPython Profiler (MSDN blogs) for what’s available.
Feedback
Submit and view feedback for
python-line-profiler (v0.4.0)
python-line-profiler is a vscode extension to configure and run line_profiler, then visualize the results in the editor. This is a very buggy beta. If you run into a problem, look at the known issues first. If your issue still isn’t resolved, or you have an outstanding question, submit an issue If you find this useful and would like to see continued development, buy me a beverage by hitting the donate button at the top.
Contents
Features
To use python-line-profiler :
- Highlight a function in the editor, right click and choose Python Line Profiler: Register Function
- In the file explorer, select a script to profile the registered function, right click and choose Python Line Profiler: Run Script
- Once the script is done running, results will be displayed as text decorations showing the number of times each line was called along with total run times. Each line is highlighted in red, with brighter red indicating longer run times relative to other lines.
In the above example, line 92 is the brightest and therefore the most time consuming line of code.
A test script can be used to profile the code if it uses unittest .
Installation and Requirements
This extension requires that Python 3.7+ is installed. It is recommended that the vscode Python extension (ms-python) is installed.
One important thing to note is taht this extension installs libraries into the Python environment configured for the workspace. This is required since it runs scripts under the hood for profiling. It is expected that all the required packages for running a script have been installed into the configured environment. However, to run the code a few packages are needed and will be installed into the environment:
To ensure dependency conflicts are not injected into the environment, specific versions are not pinned.
Extension Settings
python.profile.lineColorOn: true — Turn the line colors on ( true , default) or off ( false ).
python.profile.lineColor: «100,0,0» — A 3-tuple RGB value. Default is «100,0,0» .
Known Issues
This is a very buggy beta. There are probably a lot of issues. Known issues are:
- Registering multiple functions with the same name with only show visualizations on one of the functions
- Visualization seem to disappear when multiple scripts are shown side by side when switching tabs.
- pytest files cannot be used as test scripts (probably).
- No other testing packages can be used either.
- Running a script that also contains a profiling function, then switching to using a different script, returns no results.
Possible issues based on the current code. If you run into these issues, please open an issue:
- Import aliasing ( import numpy as np ) could cause issues.
- Relative imports with more than one level of namespace packages will likely cause problems.
Release Notes
This is a buggy beta. If you’re trying it out, give us some feedback in the issues!
Funding
Donations are appreciated to support the continued development of this project and future projects like it. A recurring donation can be set up using Libra Pay by clicking on the button below.
Saved searches
Use saved searches to filter your results more quickly
You signed in with another tab or window. Reload to refresh your session. You signed out in another tab or window. Reload to refresh your session. You switched accounts on another tab or window. Reload to refresh your session.
Profiling
Clone this wiki locally
If you find yourself with the need to profile the extension, here’s some steps you can take to get a usable profile:
This gets your bits (and only your bits) installed as a package inside of VS Code without having to run the debugger.
The next step is to make those bits non-minified.
Now you have debug bits installed.
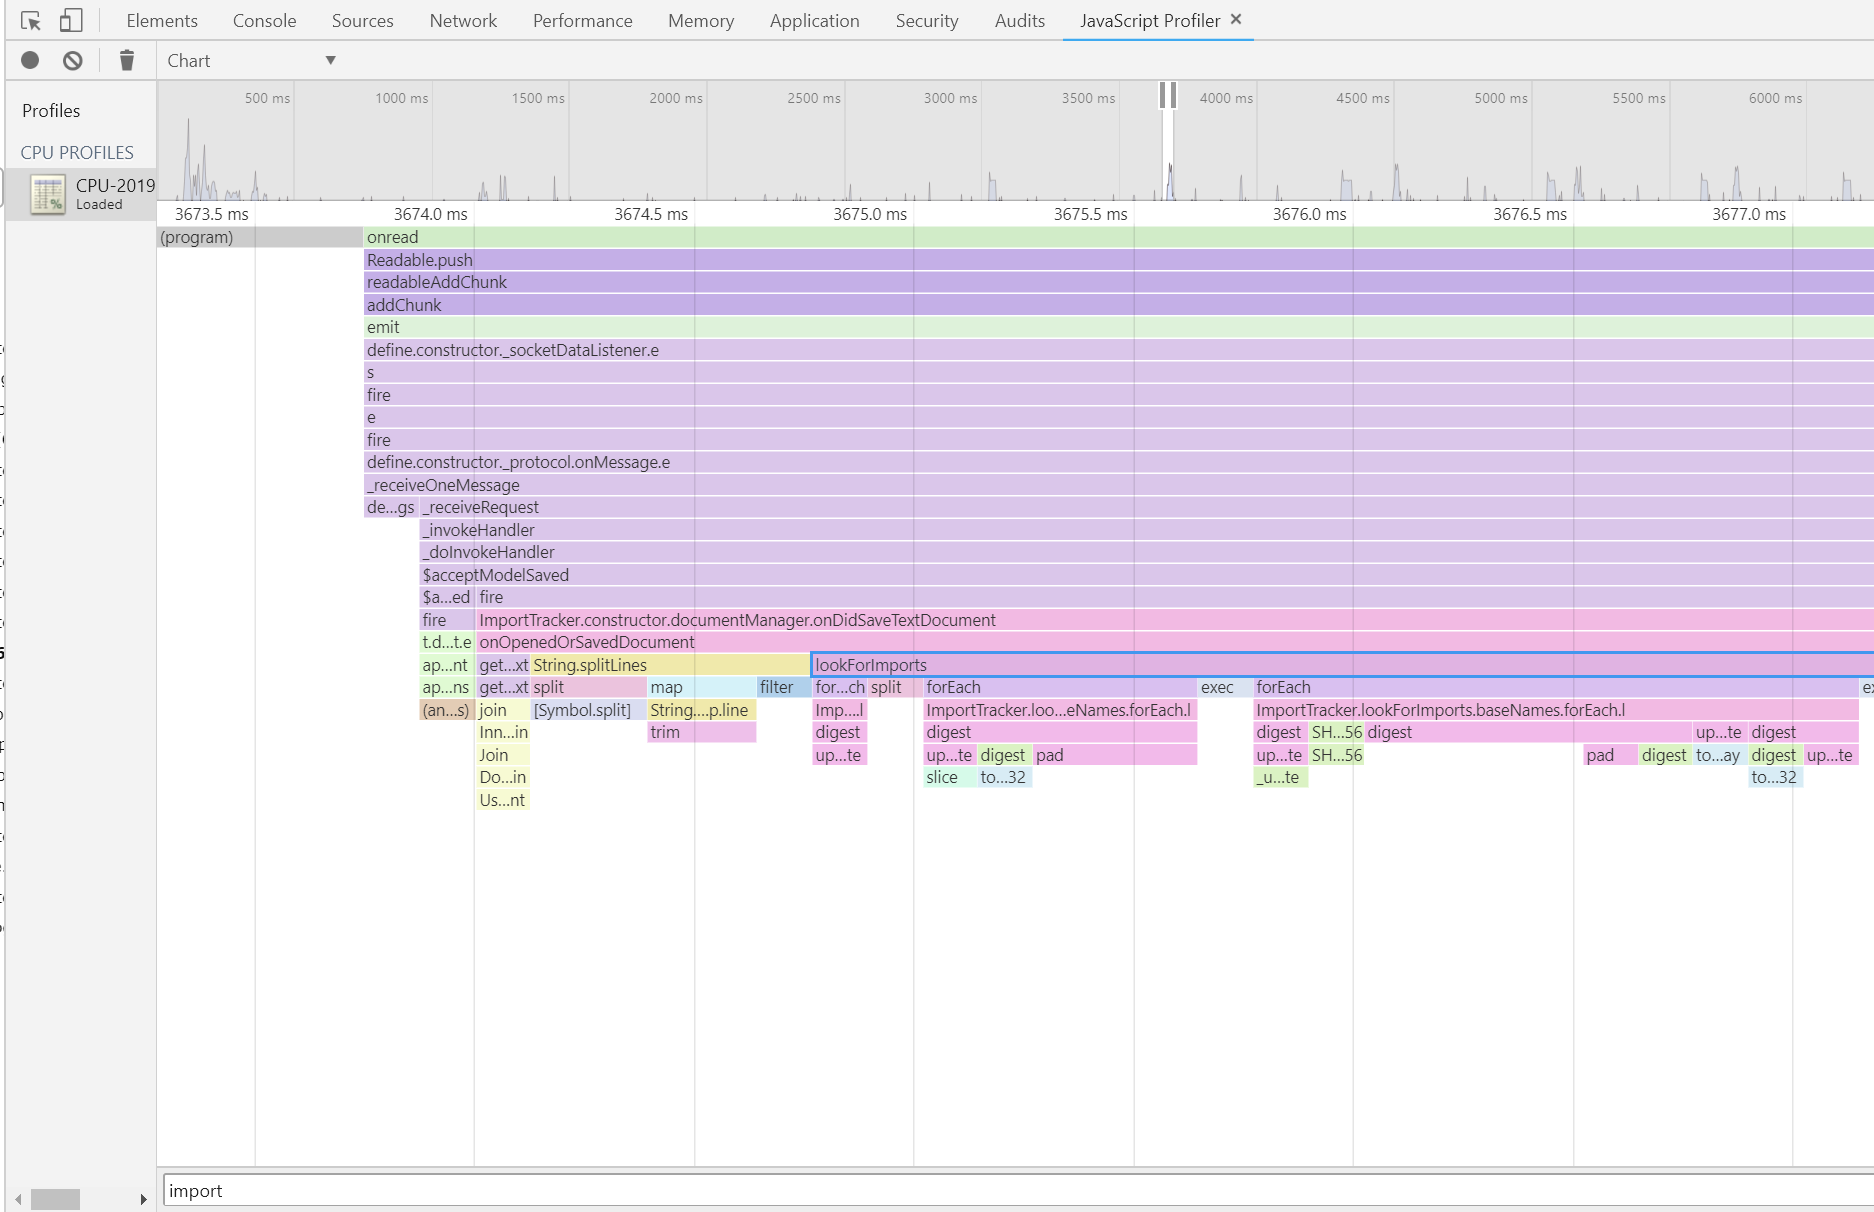
You should generate a profile and save it. You can then load it into any Chrome javscript profiler and look at the results.
I found using the ‘Chart’ view and searching (CTRL+F) for classes/functions I thought might be expensive was a good way to start:
Steps to find the code from the CPU Profiler and a .js.map file
- Get the .cpuprofile file from the user. They can get that file by following this instructions.
- Get the extension version the user used, either from the VS Code marketplace, Azure, or build it yourself.
- Open the .cpuprofile file in the Edge devtools or directly on VS Code to find an identifiable function that we can find on a minimized js file.
These profilers help find the slow functions, which file they’re in, and which line. In this case, the slow function is l and gets called by t.getDependencies , both on extension.js and on line 47.
Also, open it on notepad since neither Edge nor VS Code display the column the function is at. In this case, the l function is on column 256673 .
- Use this tool to find the file and function that causes the performance issue. Open a terminal in the folder where the .js and the .js.map file are located, and run source-map resolve .js.map . In this case, the file in the project with the slow function is planner.js , and the function is dependencies.forEach(. ) .
- Open chrome://inspect in chrome
- Run node .\node_modules\mocha\bin\mocha —inspect-brk —require source-map-support/register —opts ./build/.mocha.functional.opts «—grep=Simple text»
- In the chrome inspector, wait for the node process to show up
- Click the ‘Open Dedicated DevTools for Node’
- Debug breakpoint on entry should hit
- Switch to profiler and start profiling
- Once done the profile can be inspected in that window or saved and opened in another chrome window.
Saved searches
Use saved searches to filter your results more quickly
You signed in with another tab or window. Reload to refresh your session. You signed out in another tab or window. Reload to refresh your session. You switched accounts on another tab or window. Reload to refresh your session.
Profiling
Clone this wiki locally
If you find yourself with the need to profile the extension, here’s some steps you can take to get a usable profile:
This gets your bits (and only your bits) installed as a package inside of VS Code without having to run the debugger.
The next step is to make those bits non-minified.
Now you have debug bits installed.
You should generate a profile and save it. You can then load it into any Chrome javscript profiler and look at the results.
I found using the ‘Chart’ view and searching (CTRL+F) for classes/functions I thought might be expensive was a good way to start:
- Open chrome://inspect in chrome
- Run node —inspect-brk .\node_modules\mocha\bin\mocha —require source-map-support/register —opts ./build/.mocha.functional.opts «—grep=Simple text»
- In the chrome inspector, wait for the node process to show up
- Click the ‘Open Dedicated DevTools for Node’
- Debug breakpoint on entry should hit
- Switch to profiler and start profiling
- Once done the profile can be inspected in that window or saved and opened in another chrome window.