- Making Plots in Jupyter Notebook Beautiful & More Meaningful
- Как рисовать графики в Jupyter Notebook
- Предварительные условия
- Простой сюжет
- Доступные типы
- Гистограмма
- График рассеяния
- Круговая диаграмма
- Форматирование графиков
- Узнать больше
- How to Draw Graphs in Jupyter Notebook
- Prerequisites
- Simple Plot
- Types Available
- Using Matplotlib with Jupyter Notebook
- Installation
- Using Matplotlib with Jupyter Notebook
Making Plots in Jupyter Notebook Beautiful & More Meaningful
As our world has become more and more data-driven, important decisions of the people who could make a tremendous impact on the world we live in, like the governments, big corporates, politicians, business tycoons(you name it) are all influenced by the data in an unprecedented manner. Consequently, data visualization started playing a pivotal role in the day to day affairs than ever before. Hence acquiring skills in this arena is gaining prominence.
In the world of data science, Python is the programming language of choice(the undisputed leader in data science). Hence we would be considering Matplotlib for plotting. Matplotlib is a comprehensive library for creating static, animated, and interactive visualizations in Python. matplotlib.pyplot is a collection of command style functions that enables matplotlib to work like MATLAB. pyplot function can be made to create a figure, create a plotting area in a figure, plot some lines in a plotting area, decorate the plot with labels, etc. Visualizations can be quickly generated using a pyplot.
Let’s create some code in Jupyter notebook to create a normal distribution. For the uninitiated, normal distribution is a continuous probability distribution for a real-valued random variable. It can be easily identified by the bell-shaped curve(Probability Density Function) and its symmetry.
import numpy as np
import matplotlib.pyplot as plt
import scipy.stats as stats
mu = 0
std = 1
x = np.linspace(start=-4, stop=4, num=100)
y = stats.norm.pdf(x, mu, std)
plt.plot(x, y)
plt.show()
The code creates a simple plot of the normal distribution with mean=0 and standard deviation=1. As our primary concern is about making plots more beautiful, the explanation of code about the mathematical aspects will be rather brief. np.linspace() returns evenly spaced samples(number of samples equal to num) over a specific interval[start, stop]. scipy.stats.norm() returns a normal continuous random…
Как рисовать графики в Jupyter Notebook

Отображение данных с помощью графиков Jupyter Notebook Jupyter Notebook – это инструмент номер один для специалистов по работе с данными. Он предлагает интерактивный веб-интерфейс, который можно использовать для визуализации данных, простого анализа и совместной работы Визуализация данных позволяет найти контекст для ваших данных с помощью карт или графиков. В этом учебнике предлагается подробное руководство по взаимодействию с графиками в Jupyter Notebook
Предварительные условия
На вашей машине должен быть установлен Jupyter. Если он не установлен, вы можете установить его, введя следующий код в командную строку:
После завершения установки запустите сервер Jupyter Notebook. Для этого введите в терминале приведенную ниже команду. Страница Jupyter, показывающая файлы в текущем каталоге, откроется в браузере по умолчанию на вашем компьютере
Примечание: Не закрывайте окно терминала, в котором вы выполняете эту команду. Если вы это сделаете, ваш сервер остановится
Простой сюжет
importmatplotlib.pyplotasplt. x= y= 10121416 plt.plot(x,y) plt.show() 
Код предназначен для построения простого линейного графика. Первая строка импортирует графическую библиотеку pyplot из API matplotlib. Третья и четвертая строки определяют оси x и y соответственно Для построения графика вызывается метод plot(). Затем для отображения графика используется метод show() Предположим, что вместо этого вы хотите нарисовать кривую. Процесс тот же. Просто измените значения списка python для оси y
importmatplotlib.pyplotasplt. x= 101112 y= 162536496481100121144 plt.plot(x,y) plt.show() 
Заметьте кое-что важное: в обоих графиках нет явного определения масштаба. Масштаб рассчитывается и применяется автоматически. Это одна из многих интересных возможностей, которые предлагает Juypter, позволяющая сосредоточиться на работе (анализе данных) вместо того, чтобы беспокоиться о коде Если вы также будете бдительны, вы можете заметить, что количество значений для осей x и y одинаково. Если любое из них меньше другого, при запуске кода будет отмечена ошибка, и график не будет показан
Доступные типы
В отличие от линейного графика и кривой выше, другие визуализации графиков (например, гистограмма, столбчатая диаграмма и т.д.) должны быть явно определены, чтобы быть показанными
Гистограмма
importmatplotlib.pyplotasplt. x= 101112 y= 162536496481100121144 plt.bar(x,y) plt.show() 
График рассеяния
importmatplotlib.pyplotasplt x= 101112 y= 162536496481100121144 plt.scatter(x,y) plt.show() 
Круговая диаграмма

Круговая диаграмма немного отличается от всех вышеперечисленных. Особый интерес представляет строка 4, поэтому посмотрите на ее особенности figsize используется для установки соотношения сторон. Вы можете установить любое значение (например, (9,5)), но официальная документация Pandas рекомендует использовать соотношение сторон равное 1
importmatplotlib.pyplotasplt. x= 162536 fig = plt.figure(figsize =())# line 4 plt.pie(x) plt.show()У круговой диаграммы есть несколько параметров, которые заслуживают внимания: labels – Этот параметр можно использовать для присвоения метки каждому срезу круговой диаграммы colors – с помощью этого параметра можно задать предопределенные цвета для каждого из срезов. Вы можете задать цвета как в текстовом виде (например, ‘yellow’), так и в шестнадцатеричном (например, ‘#ebc713’) См. пример ниже:
importmatplotlib.pyplotasplt. x= 162536 fig = plt.figure(figsize =(5. 55. 5)). plt.pie(x, labels=('Guavas''Berries''Mangoes''Apples''Avocado'), colors = ('#a86544''#eb5b13''#ebc713''#bdeb13''#8aeb13')). plt.show() 
Существуют также другие графики, такие как hist , area и kde , о которых вы можете прочитать в документации Pandas
Форматирование графиков
В приведенных выше графиках отсутствуют такие аспекты, как метки. Вот как это сделать Чтобы добавить заголовок, включите приведенный ниже код в свой Jupyter Notebook:
matplotlib.pyplot.title('My Graph Title'matplotlib.pyplot.xlabel('my x-axis label' matplotlib.pyplot.ylabel('my y-axis label'Узнать больше
Вы можете выполнить команду help() в своем блокноте, чтобы получить интерактивную помощь по командам Jupyter. Для получения дополнительной информации о конкретном объекте можно использовать команду help(object) Вы также можете попробовать построить графики, используя наборы данных из файлов csv -файлов. Обучение визуализации данных является мощным инструментом для передачи и анализа ваших результатов, поэтому стоит потратить некоторое время на развитие своих навыков
How to Draw Graphs in Jupyter Notebook

Jupyter Notebook is the number one go-to tool for data scientists. It offers an interactive web interface that can be used for data visualization, easy analysis, and collaboration.
Data visualization enables you to find context for your data through maps or graphs. This tutorial offers an insightful guide to interacting with graphs in Jupyter Notebook.
Prerequisites
You need to have Jupyter installed on your machine. If it’s not, you can install it by entering the following code into your command-line:
You’ll also need the pandas and matplotlib library:
After the installations are complete, start the Jupyter Notebook server. Type the command below in your terminal to do so. A Jupyter page showing files in the current directory will open in your computer’s default browser.
Note: Do not close the terminal window that you run this command in. Your server will stop should you do so.
Simple Plot
In a new Jupyter page, run this code:
import matplotlib.pyplot as plt

x=[1,2,3,4,5,6,7,8]
y=[2,4,6,8,10,12,14,16]

plt.plot(x,y)
plt.show()
The code is for a simple line plot. The first line imports the pyplot graphing library from the matplotlib API. The third and fourth lines define the x and y axes respectively.
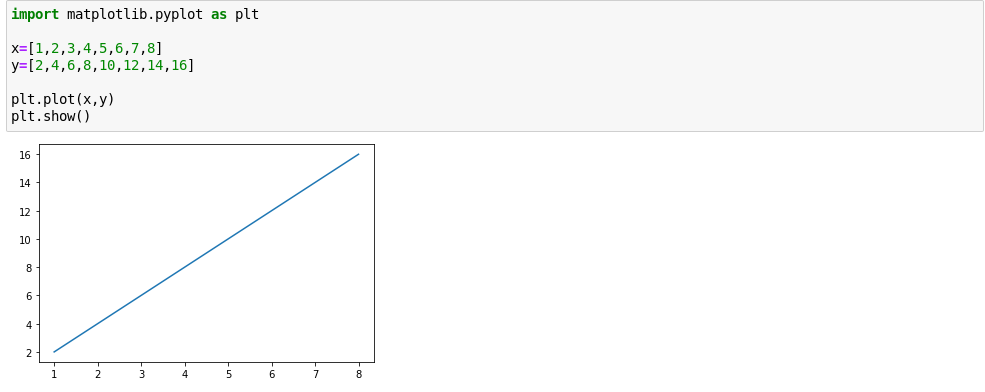
The plot() method is called to plot the graph. The show() method is then used to display the graph.
Suppose you wish to draw a curve instead. The process is the same. Just change the values of the python list for the y-axis.
import matplotlib.pyplot as plt

x=[3,4,5,6,7,8,9,10,11,12]
y= [9,16,25,36,49,64,81,100,121,144]

plt.plot(x,y)
plt.show()
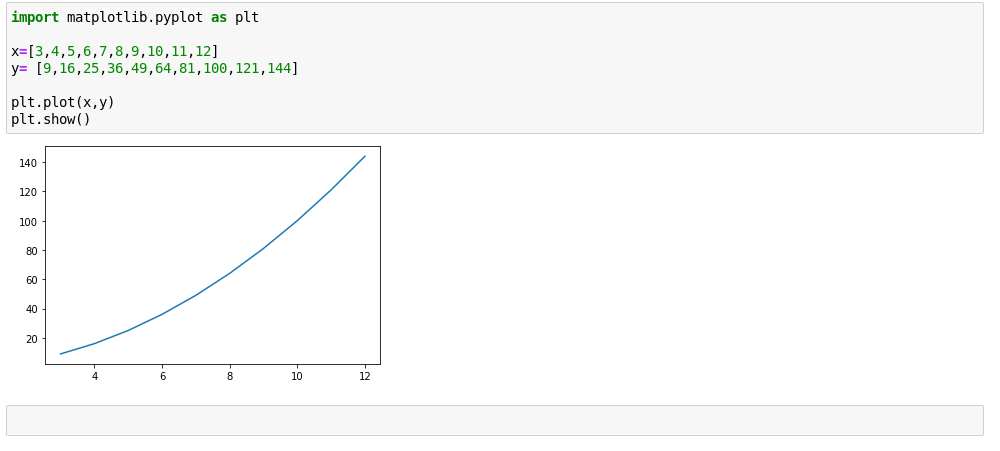
Notice something important: in both graphs, there’s no explicit scale definition. The scale is automatically calculated and applied. This is one of the many interesting features that Juypter offers which can get you focused on your work (data analysis) instead of worrying about code.
If you’re also vigilant, you may observe that the number of values for the x and y axes are the same. If any of them are less than the other, an error will be flagged when you run the code and no graph will be shown.
Types Available
Unlike the line graph and curve above, other graph visualizations (e.g a histogram, bar chart, etc.) need to be explicitly defined in order to be shown.
Using Matplotlib with Jupyter Notebook
The Jupyter Notebook is an open-source web application that allows you to create and share documents that contain live code, equations, visualizations and narrative text. Uses include data cleaning and transformation, numerical simulation, statistical modeling, data visualization, machine learning, and much more. Note: For more information, refer to How To Use Jupyter Notebook – An Ultimate Guide Matplotlib is one of the most popular Python packages used for data visualization. It is a cross-platform library for making 2D plots from data in arrays.To get started you just need to make the necessary imports, prepare some data, and you can start plotting with the help of the plot() function.When you’re done, remember to show your plot using the show() function. Matplotlib is written in Python and makes use of NumPy, the numerical mathematics extension of Python.It consists of several plots like:
Installation
- Install Matplotlib with pip Matplotlib can also be installed using the Python package manager, pip. To install Matplotlib with pip, open a terminal window and type:
- Install Matplotlib with the Anaconda Prompt Matplotlib can be installed using with the Anaconda Prompt. If the Anaconda Prompt is available on your machine, it can usually be seen in the Windows Start Menu. To install Matplotlib, open the Anaconda Prompt and type:

Using Matplotlib with Jupyter Notebook
After the installation is completed. Let’s start using Matplotlib with Jupyter Notebook. We will be plotting various graphs in the Jupyter Notebook using Matplotlib.