- Классы Python для базы данных MySQL: SELECT, INSERT и DELETE с pymysql
- Установка MySQL
- Настройка базы данных MySQL в PhpMyAdmin
- Создаём класс MySQL на Python
- Использование класса MySQL
- Заключение
- Connect Python To MySQL Database With Pymysql And PhpMyAdmin.
- Step One: Install pymysql
- Step 2: Create a Database
- Step 3: Connect to Database using pymysql
- How to connect and create database on MySQL phpMyAdmin using Python
- Python MySQL
- Database Connection
- Python MySQL Example
- Python MySQL Example – creating table
- Python MySQL insert
- Python MySQL select
- Python MySQL update
- Python MySQL delete
- Python MySQL Example – Drop Table
Классы Python для базы данных MySQL: SELECT, INSERT и DELETE с pymysql

Сегодня разберёмся с классами Python на примере MySQL. Эта база данных достаточно производительная, чтобы обрабатывать большое количество запросов. На ней работают как небольшие сайты, так и корпорации типа Amazon (подробнее с историей этой СУБД можно ознакомиться тут ).
- Компьютер или ноутбук
- Редактор кода (У меня PyCharm)
- Python версии 3.9 и выше
- Соединение с интернетом
Установка MySQL
Самый простой способ — задействовать программу OpenServer. Эта программа помогает локально поднимать сервера для сайтов и отображать их в браузере. Мы будем использовать её для быстрого доступа к БД.
1. Скачиваем установочный файл отсюда
2. Запускаем его и следуем всем инструкциям
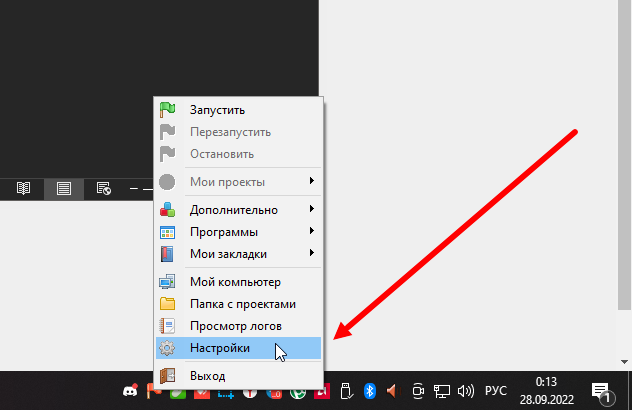
3. Запускаем OpenServer и ищем внизу флажок:

4. Кликаем на него и выбираем пункт настройки:
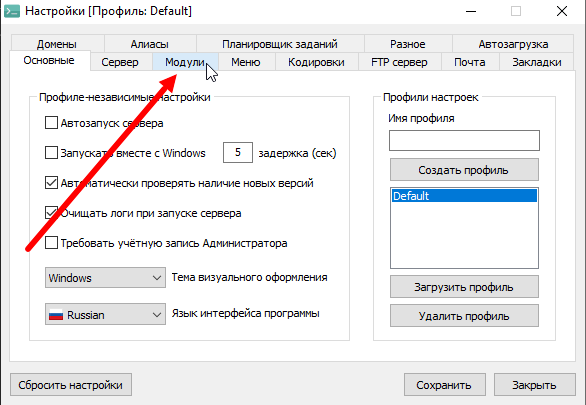
5. Ищем в настройках вкладку модули:
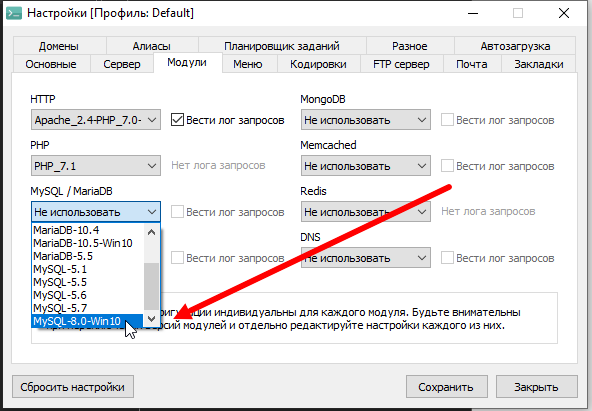
6. Если в выпадающем меню «MySQL/MariaDB» выставлено «не использовать», кликаем и выбираем самую последнюю версию СУБД MySQL:
Настройка базы данных MySQL в PhpMyAdmin
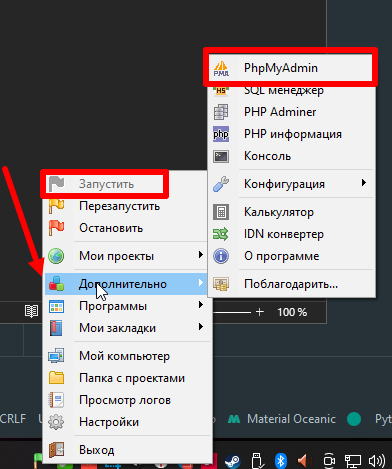
Запускаем сервер в OpenServer, наводим на вкладку «дополнительно» и нажимаем на «PhpMyAdmin»:
Дальше вас перекидывает на сайт, где мы вводим логин «root».
Поле «пароль» остается пустым.
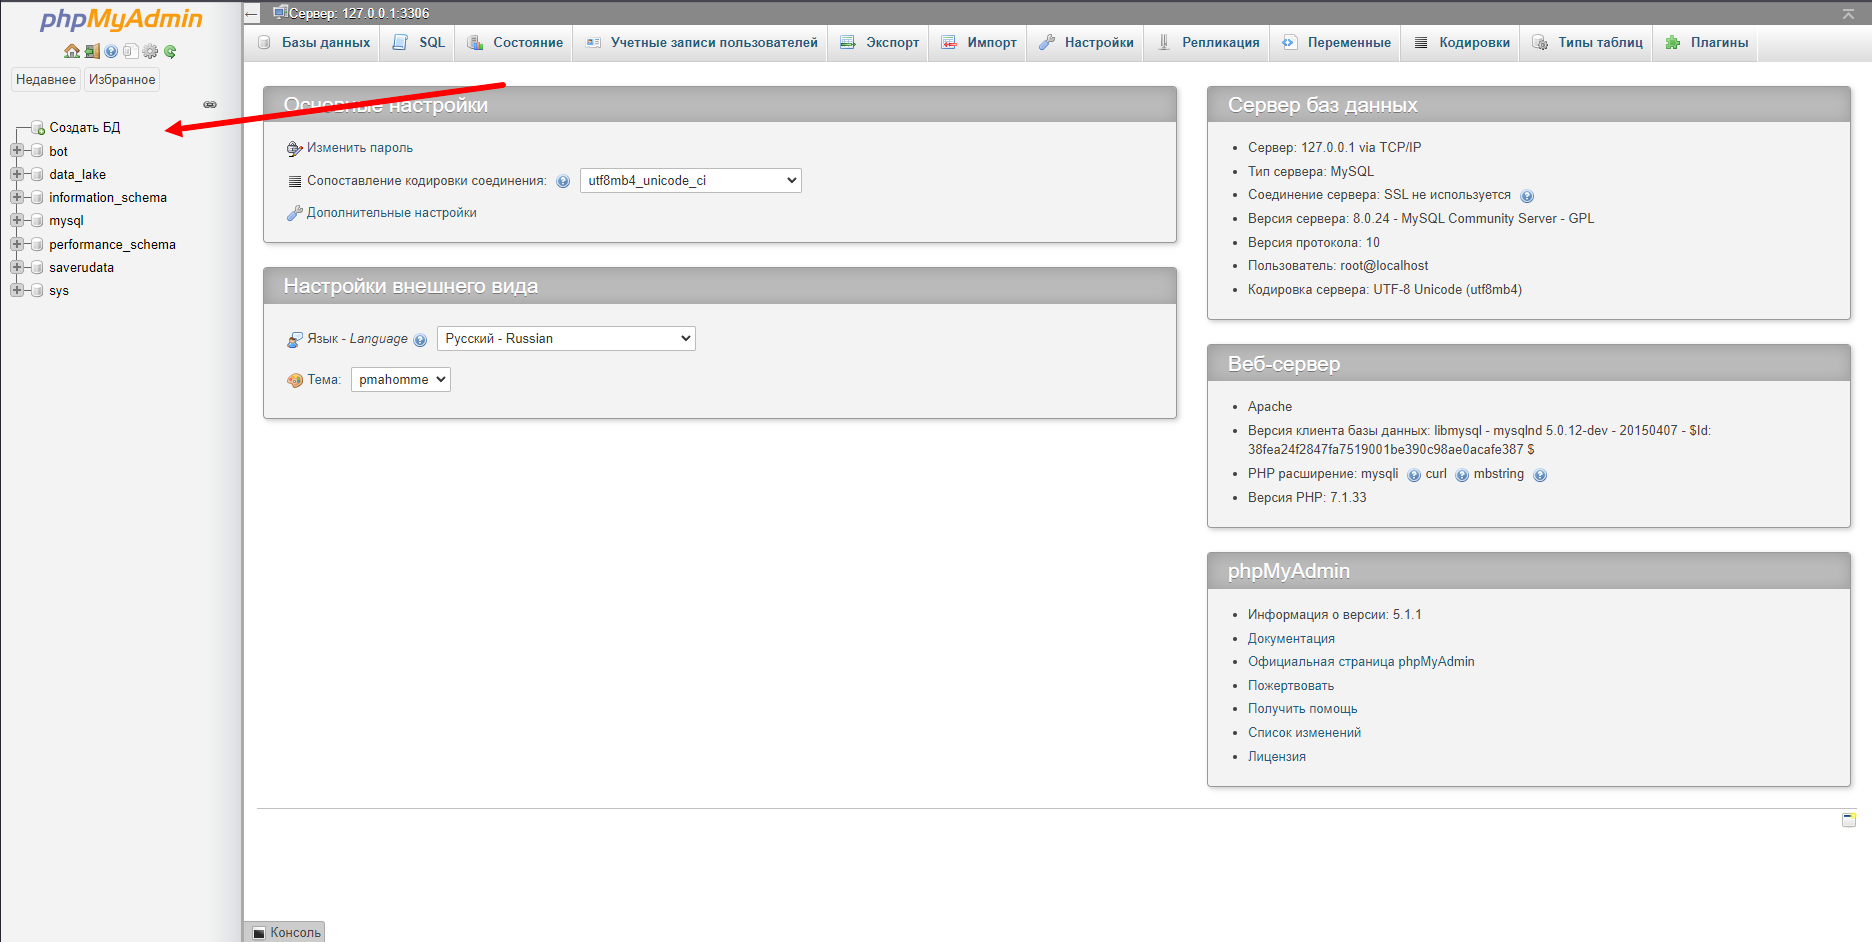
В главном меню нам нужен пункт «создать БД». В этом окне придумываем имя базы данных и нажимаем «создать» (тип кодировки не трогаем, оставляем стандартный). После всех манипуляций у нас есть база данных. Остается создать таблицу внутри:
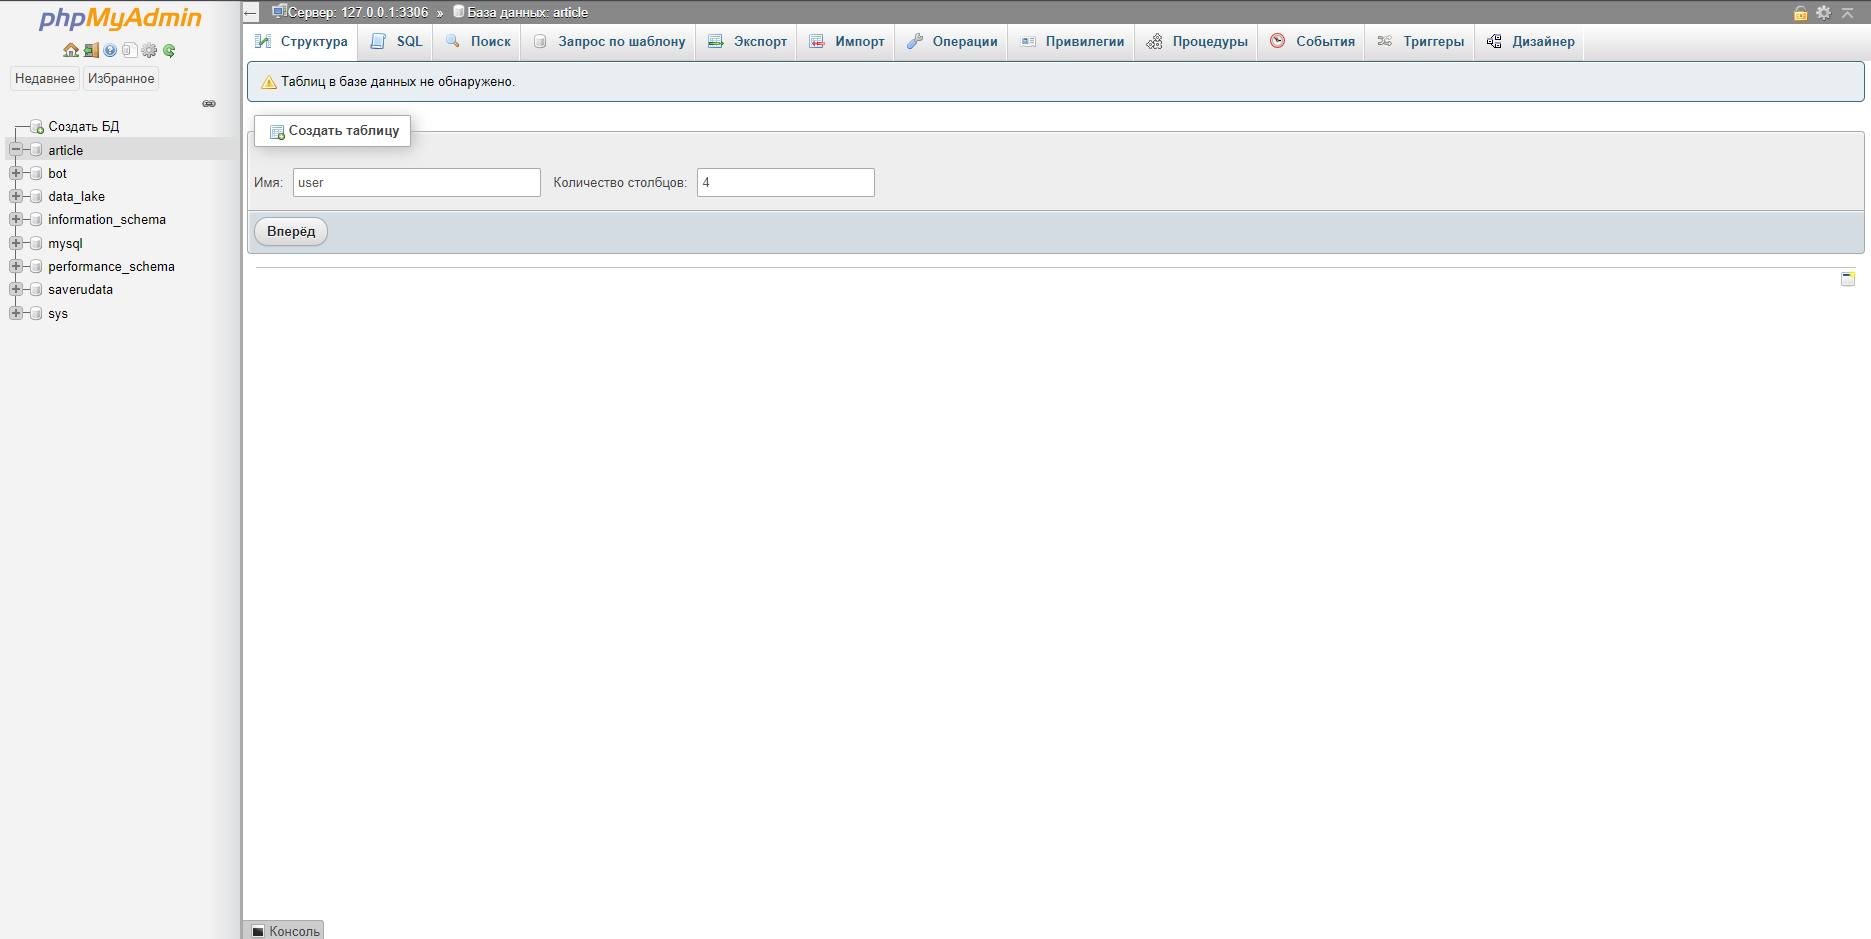
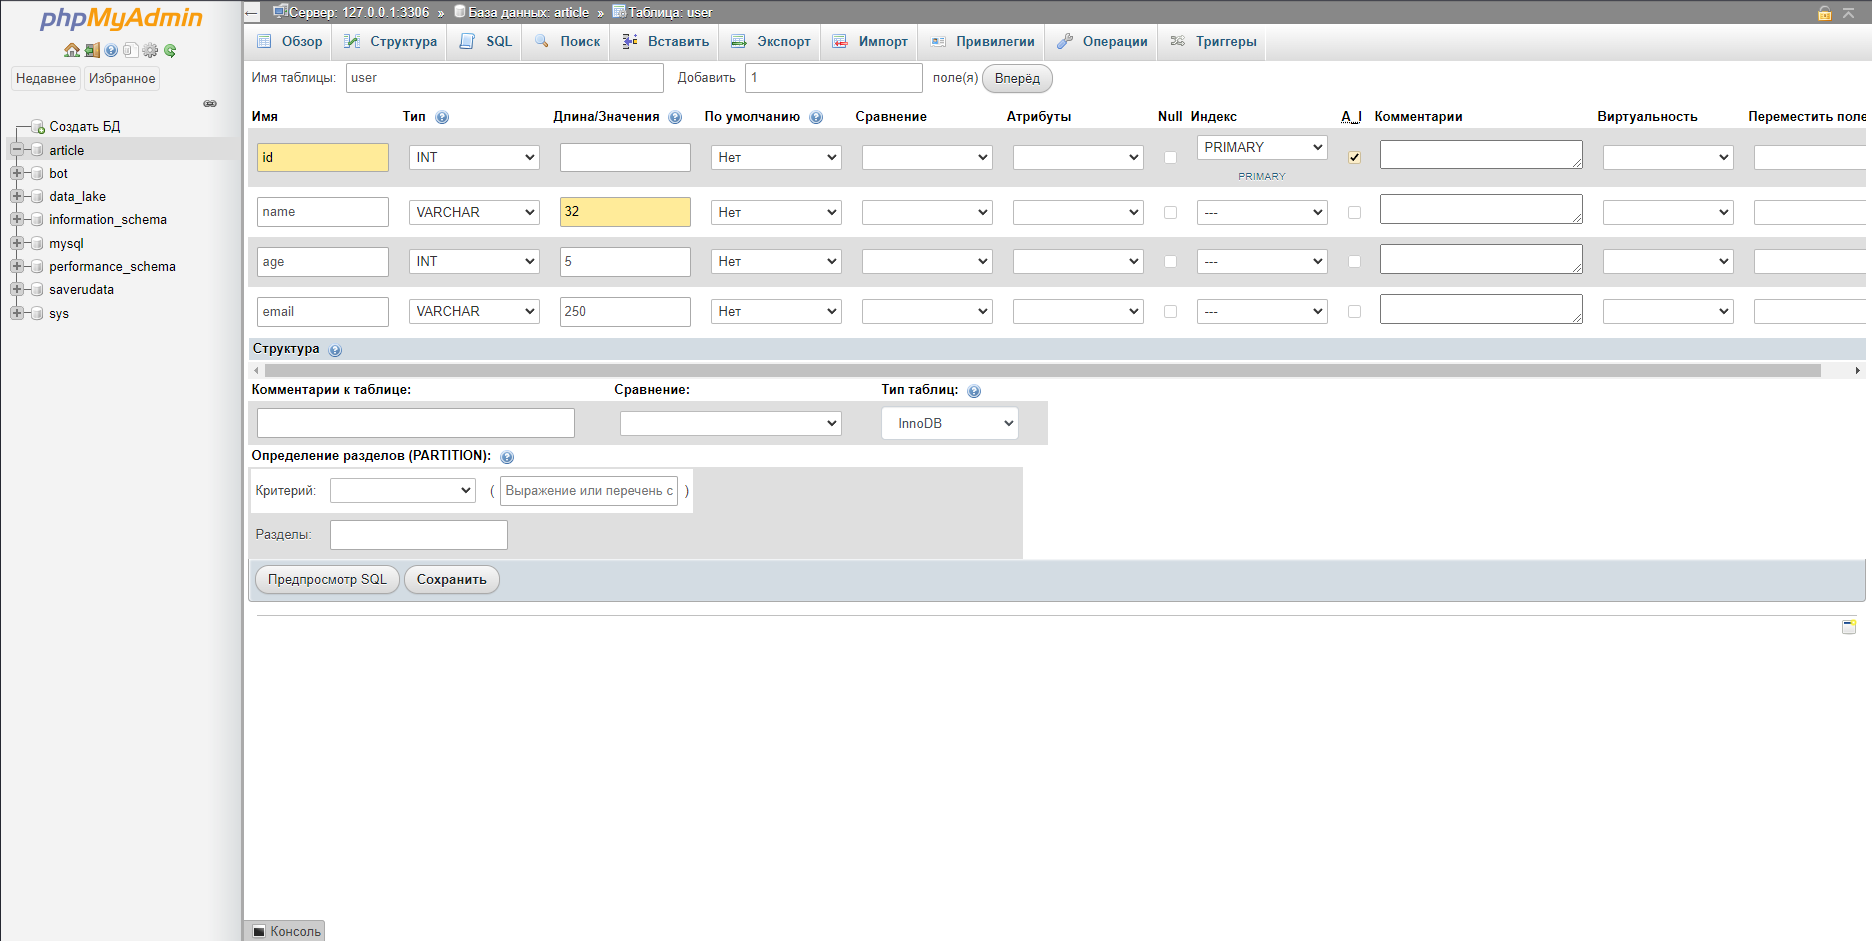
Придумываем имя таблицы и добавляем несколько столбцов.
Нам потребуется 4 столбца, добавляем их и нажимаем «вперед»:
Итак, наша база данных готова. Если вы хотите подробнее углубиться в работу с базой данных на MySQL, посмотрите видео тут .
Создаём класс MySQL на Python
Почему классы удобнее всего использовать для взаимодействия с БД?
У нас будет множество методов для взаимодействия с базой.
Добавление и удаление пользователей, выборка данных, внесение изменений в базу и много чего ещё. Было бы неправильным вызывать каждый раз несколько функций и передавать в них одни и те же параметры и конструкции.
Давайте сформируем класс для базы данных MySQL и добавим для него несколько полезных методов.
import pymysql class MySQL: def __init__(self, host, port, user, password, db_name): self.connection = pymysql.connect( host=host, port=port, user=user, password=password, database=db_name, cursorclass=pymysql.cursors.DictCursor )С импортами тут все ясно — подключаем нашу библиотеку для работы с MySQL.
Что такое __init__? Эта конструкция будет срабатывать при создании объекта класса. Внутрь нее мы передаём аргументы для создания подключения к базе данных. Также, мы передаём поле connection на хранение внутрь класса, чтобы оно не пропало. Далее мы будем активно использовать connection для обращения к базе.
def add_user(self, name, age, email): insert_query = f"INSERT INTO `user` (name, age, email) VALUES (, , )" with self.connection.cursor() as cursor: cursor.execute(insert_query) self.connection.commit() Метод add_user – тут мы будем создавать новую запись с пользователем, передаем его имя, возраст и почту. Внутри insert_query хранится запрос на языке SQL (обычная строка), в него мы и подставляем добавляемые значения.
Для выполнения запроса используем curcor.execute , а для сохранения — connection.commit .
def del_user(self, id): delete_query = f"DELETE FROM `user` WHERE with self.connection.cursor() as cursor: cursor.execute(delete_query) self.connection.commit() Метод del_user – тут мы ищем по ID в базе данных человека и удаляем эту строчку.
def update_age_by_id(self, new_age, id): update_query = f"UPDATE `user` SET age = WHERE with self.connection.cursor() as cursor: cursor.execute(update_query) self.connection.commit() В метод update_age_by_id поступают новый возраст человека и его ID, чтобы было можно его найти.
def select_all_data(self): select_all_rows = f"SELECT * FROM `user`" with self.connection.cursor() as cursor: cursor.execute(select_all_rows) rows = cursor.fetchall() return rows Метод select_all_data делает запрос к базе на получение всех строчек, которые есть в таблице. Результат возвращается в виде объекта, который мы превращаем в список с помощью fetchall .
def __del__(self): self.connection.close() Метод __del__ срабатывает, когда объект уничтожается. Это нужно, поскольку по документации pymysql нужно закрывать сессию подключения к БД после окончания работы. Поэтому внутри этого метода мы обращаемся к connection и вызываем метод close .
Весь класс с методами будет выглядеть так:
import pymysql class MySQL: def __init__(self, host, port, user, password, db_name): self.connection = pymysql.connect( host=host, port=port, user=user, password=password, database=db_name, cursorclass=pymysql.cursors.DictCursor ) def add_user(self, name, age, email): insert_query = f"INSERT INTO `user` (name, age, email) VALUES ('', , '')" with self.connection.cursor() as cursor: cursor.execute(insert_query) self.connection.commit() def del_user(self, id): delete_query = f"DELETE FROM `user` WHERE with self.connection.cursor() as cursor: cursor.execute(delete_query) self.connection.commit() def update_age_by_id(self, new_age, id): update_query = f"UPDATE `user` SET age = WHERE with self.connection.cursor() as cursor: cursor.execute(update_query) self.connection.commit() def select_all_data(self): select_all_rows = f"SELECT * FROM `user`" with self.connection.cursor() as cursor: cursor.execute(select_all_rows) rows = cursor.fetchall() return rows def __del__(self): self.connection.close()Использование класса MySQL
Чтобы начать работу с БД через Python, нам надо передать в объект класса MySQL ряд параметров — IP, порт, логин, пароль и название самой базы данных:
host = '127.0.0.1' port = 3306 user = 'root' password = '' db_name = 'user' bd = MySQL(host=host, port=port, user=user, password=password, db_name=db_name)После этого мы сможем обращаться к методам объекта bd.
Давайте добавим несколько пользователей:
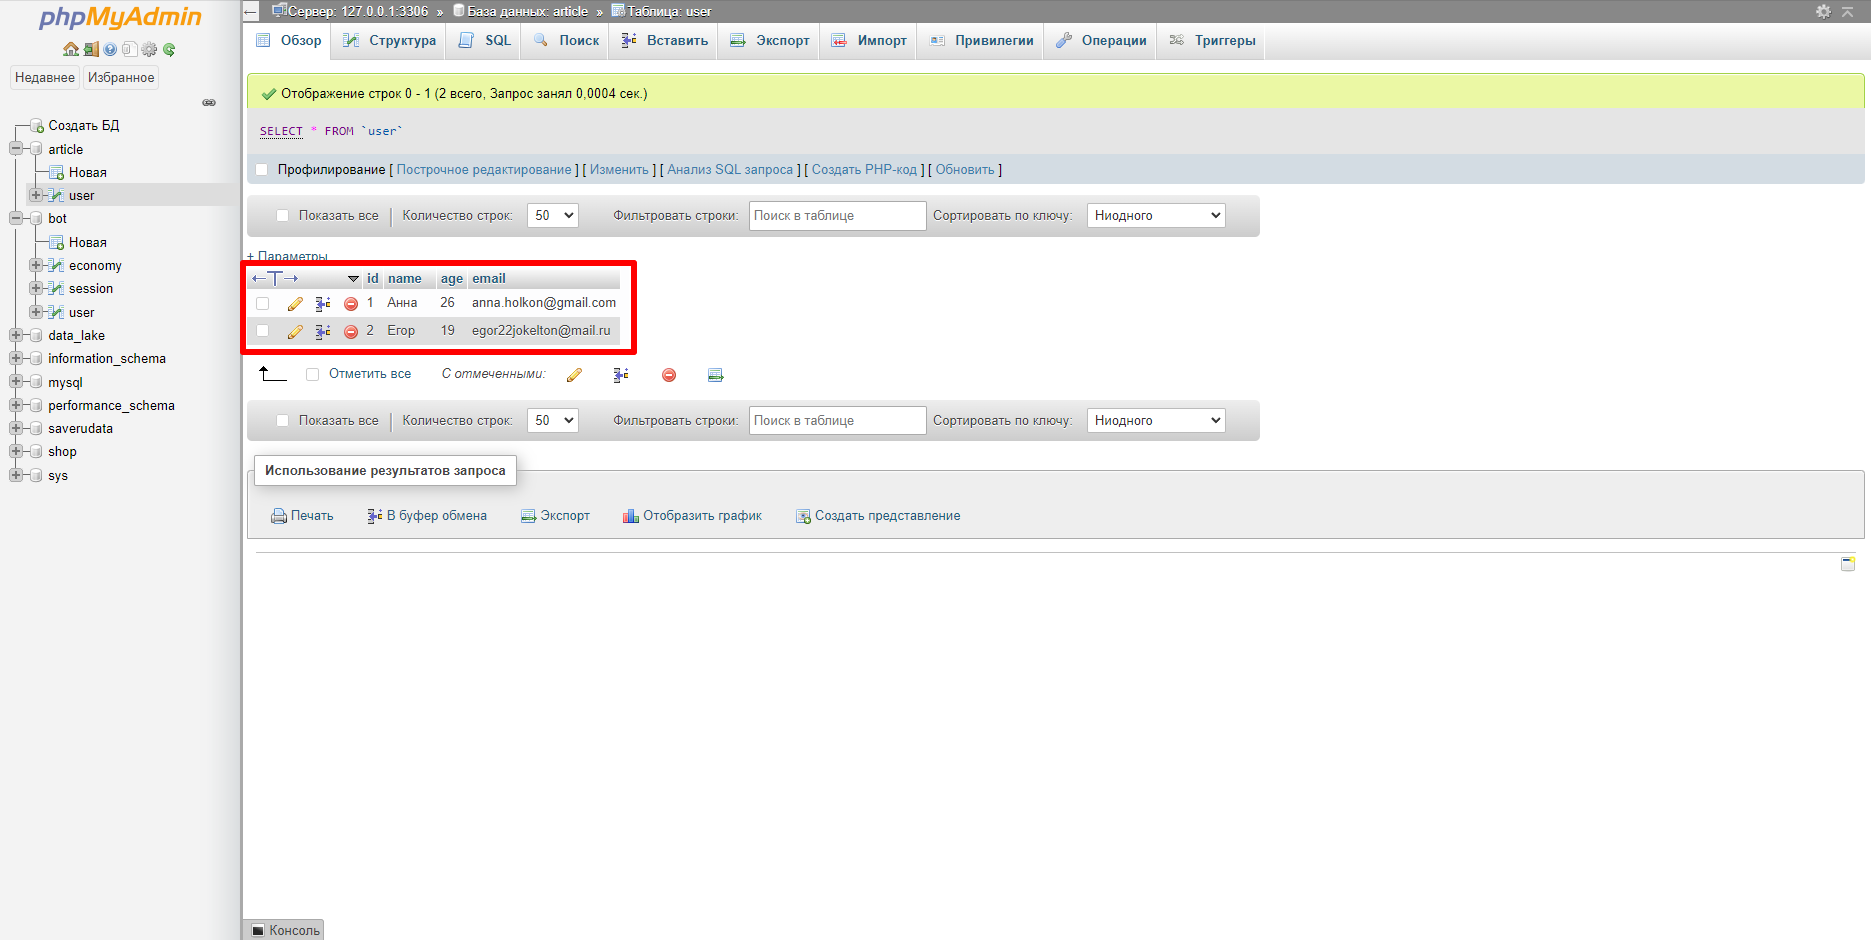
db.add_user('Анна', 26, 'anna.holkon@gmail.com') db.add_user('Егор', 19, 'egor22jokelton@mail.ru')Тем самым мы в таблицу добавили Анну и Егора.
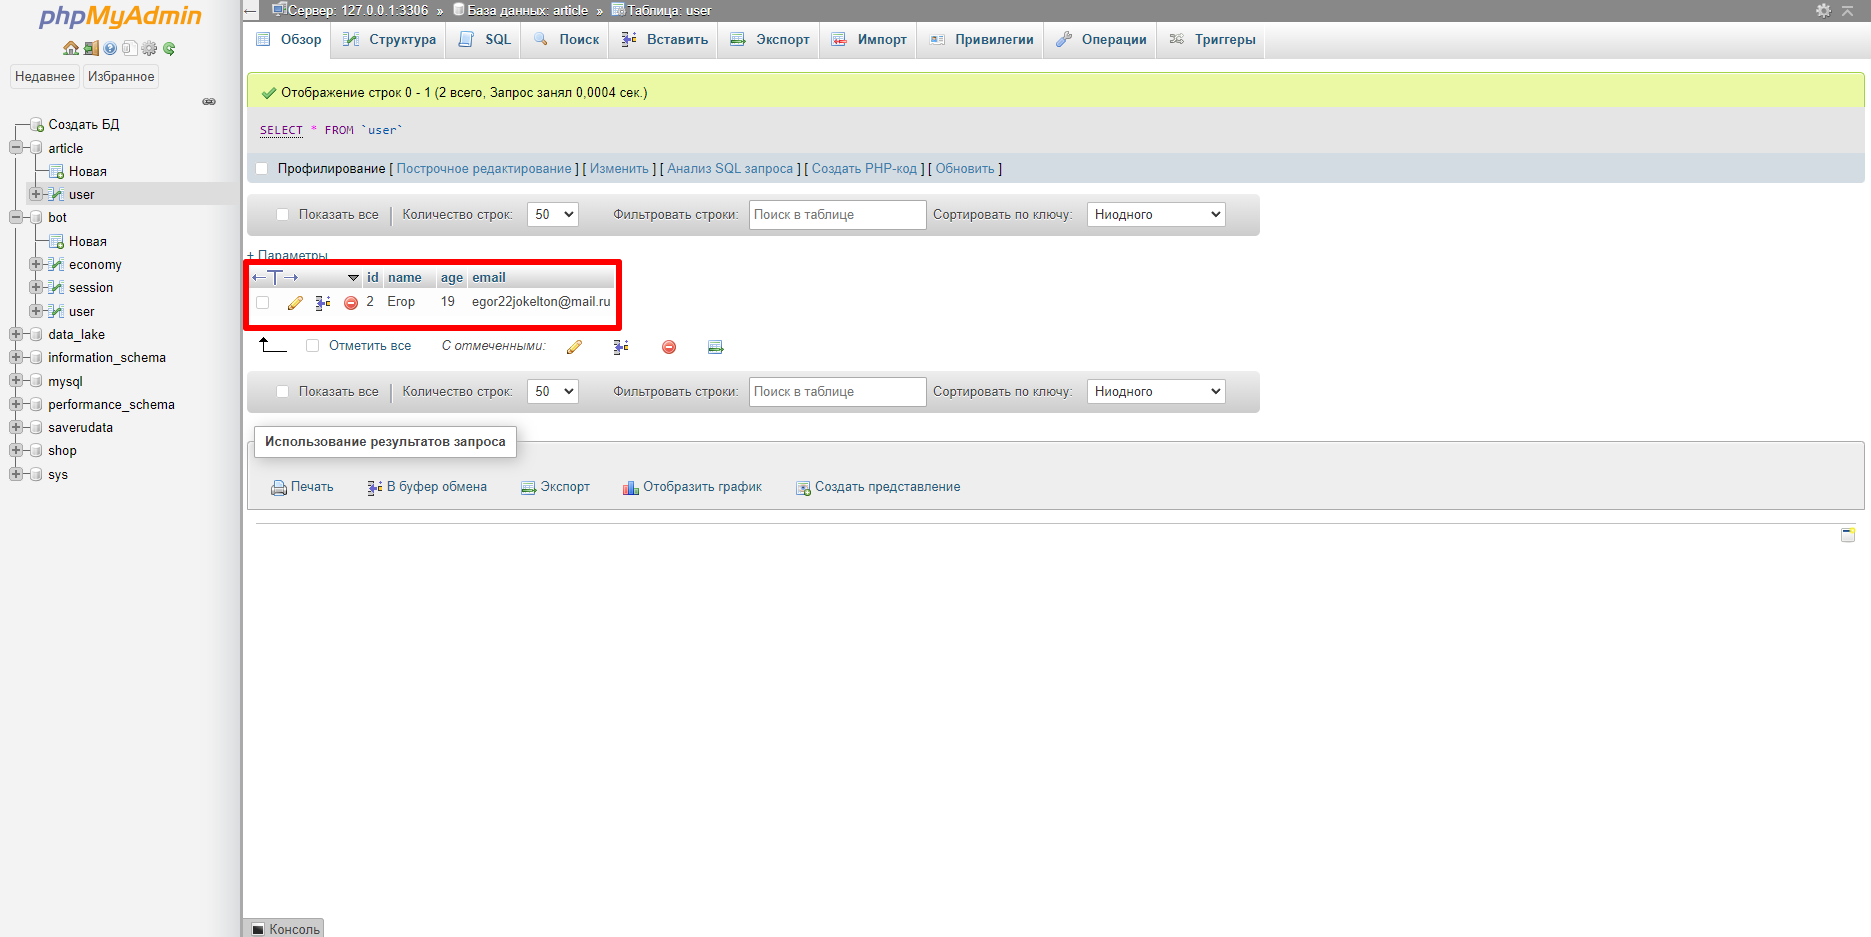
Выводим в консоль весь массив данных с помощью метода select_all_data :
Как это выглядит в PhpMyAdmin:
Удалим пользователя 1 из таблицы:
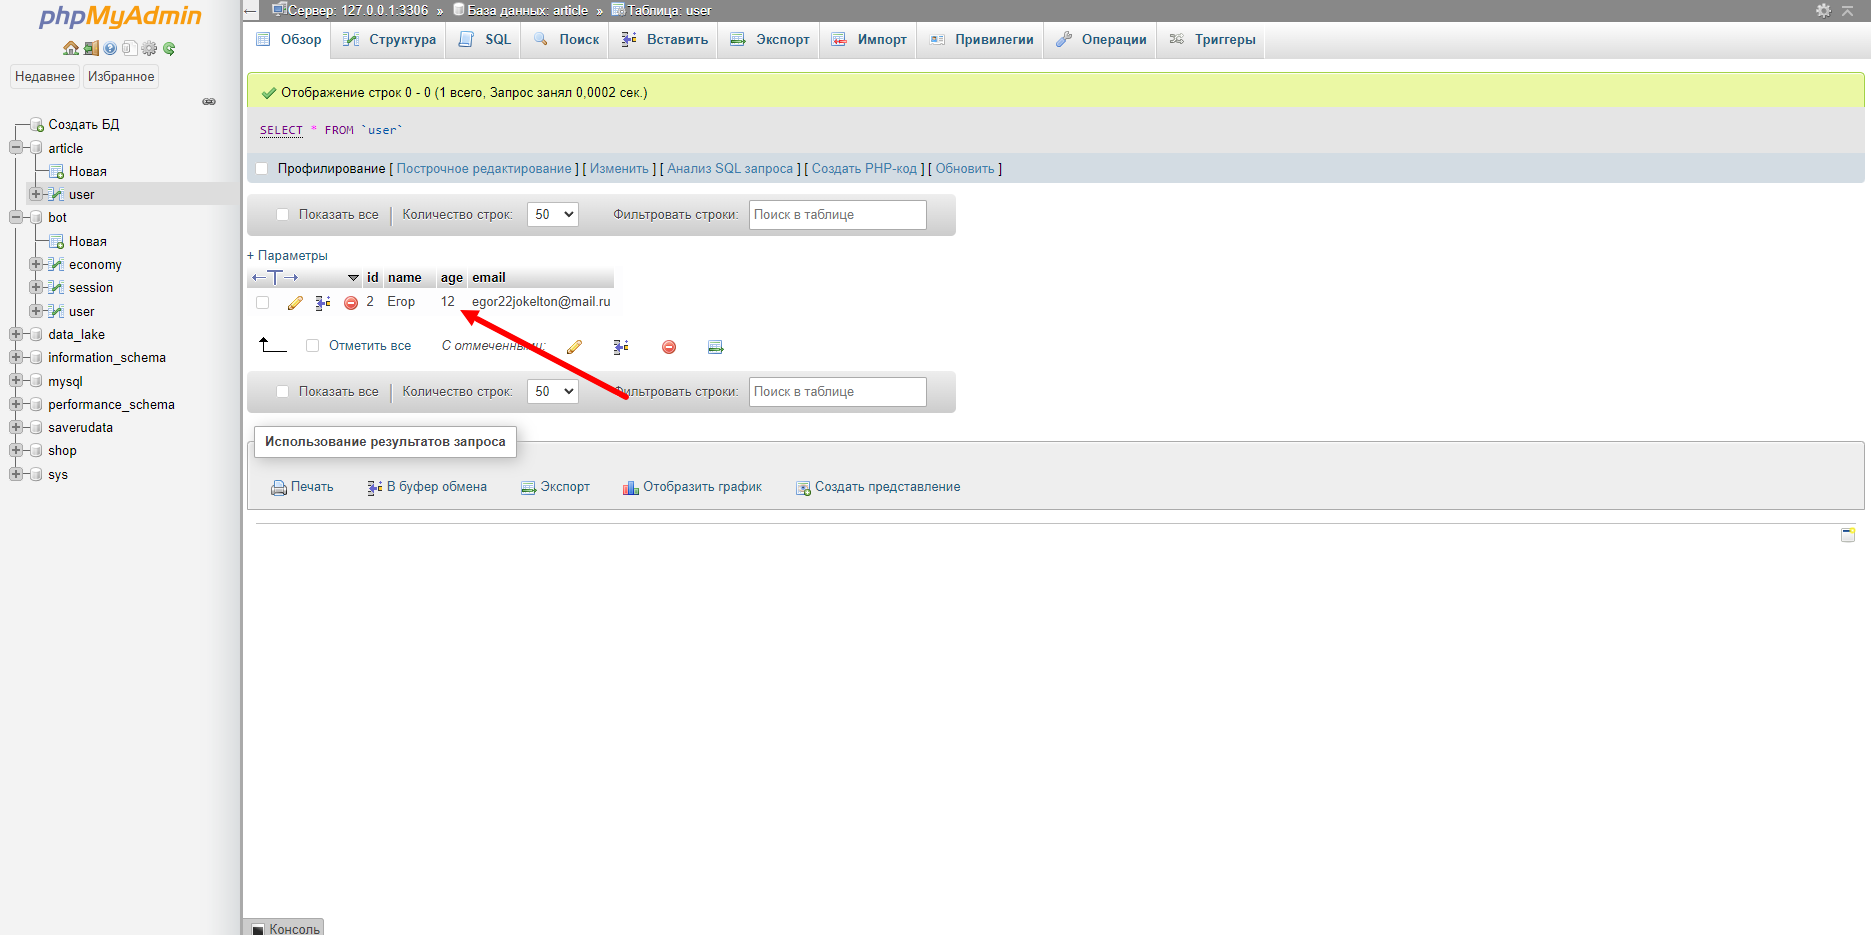
Попробуем поменять возраст второго пользователя:
Егору было 19 лет, стало 12:
Заключение
Мы разобрали создание базы данных на СУБД MySQL, создали класс на Python для управления базой и добавили несколько полезных методов. Для усвоения материала рекомендуем повторить наши манипуляции, а также написать парочку собственных методов.
Думаю, вы заметили насколько лёгким становится управление базой если задействовать классы и методы Python. Теперь вы без труда сможете применить их для управления своей базой данных, а может быть и для автоматизации процессов на реальном проекте.
Connect Python To MySQL Database With Pymysql And PhpMyAdmin.

If we already have a PhpMyAdmin workbench, we can not only connect PHP but also Python to a MySql Database. In this blog, we are going to use the following tools and packages.
- PyCharm — A Python IDE
- MAMP — A local development environment. ( You can also use XAMP )
- PhpMyAdmin — MySQL Workbench.
- Pymysql module — A Python MySQL client library
Let’s assume you have already installed and set up PyCharm, MAMP with PhyMyAdmin.
Step One: Install pymysql
You can install it in two ways
2. Through PYCharm, you can also go to Preferences > Python Interpreter > Click on the + button
Then search for PYMYSQL and Click on install package
Step 2: Create a Database
Create a database called SELECTION_DB using phpMyAdmin.
Step 3: Connect to Database using pymysql
Create a file called example.py and add the below code. Notice the port number in the above PHPMyAdmin picture is 8889 and the host is localhost . That’s what we have put in the parameters below.
import pymysql # database connection connection = pymysql.connect(host="localhost", port=8889, user="root", passwd="root", database="SELECTION_DB")cursor = connection.cursor() # some other statements with the help of cursor connection.close()Click on the run button, to run the python file. As you can see in the terminal, it’s successfully connected.
How to connect and create database on MySQL phpMyAdmin using Python

Welcome to Python MySQL example tutorial. MySQL is one of the most widely used database and python provides support to work with mysql database.
Python MySQL
First of all we have to install python mysql connector package. To install mysql package do the following: go to the Scripts directory in the python. For my case:
D:\Software\Python\Python36-32\Scripts
Open command prompt here. Then give the following command:

You will see as following:
That’s it, python mysql connector package is installed.
Database Connection
I am using xampp for my database. This is an optional step, if you have MySQL already installed then you can skip this step.
Before starting coding run the xampp control panel and start Apache & MySQL. From browser ( http://localhost/phpmyadmin/ ), I have created a database named databaseName which is shown below:

Python MySQL Example
First we have to build connection with the mysql. The following will connect to mysql database in python program.
import pymysql connection = pymysql.connect(host= connection.close() First we have imported the pymysql , then established a connection. The pymysql.connect() takes four arguments. First one is host name i.e. localhost, and the rest three are as they are declared. Using this connection we have created a cursor that will be used for different queries.
Python MySQL Example – creating table
Let’s now create a table named Artist having columns – name, id and track.
connection = pymysql.connect(host= ArtistTableSql = cursor.execute(ArtistTableSql) connection.close()

A table named Artists will be created. You can see it in your browser.
Python MySQL insert
Now our interest is to insert some row entities in the table. First you have to write the queries to insert different data, then execute it with the help of cursor.
import pymysql connection = pymysql.connect(host= insert1 = insert2 = cursor.execute(insert1) cursor.execute(insert2) connection.commit() connection.close()
Python MySQL select
We have inserted two rows in the above code. Now we want to retrieve those. To do this have a look at the following example:
import pymysql connection = pymysql.connect(host= retrive = cursor.execute(retrive) rows = cursor.fetchall() for row in rows: print(row) connection.commit() connection.close() 
It will output:
Python MySQL update
Suppose, you want to rename the name of the first artist from Towang to Tauwang. To update any attribute of any entity do the following:
updateSql cursor.execute(updateSql ) Python MySQL delete
To delete an entity you have to execute the as followings:
deleteSql cursor.execute(deleteSql ) Python MySQL Example – Drop Table
Sometimes you may need to drop any table before creating any new table so that name collision does not take place. To drop the Artists table, you can do this as following:
dropSql cursor.execute(dropSql) Then the Artists table will be dropped from the database databaseName. This is all for python mysql tutorial. For further information you can visit here.