JFreeChart — Pie Chart
In a pie chart, the arc length of each sector is proportional to the quantity that it represents. This chapter demonstrates — how we can use JFreeChart to create Pie Chart from a given set of business data.
Business data
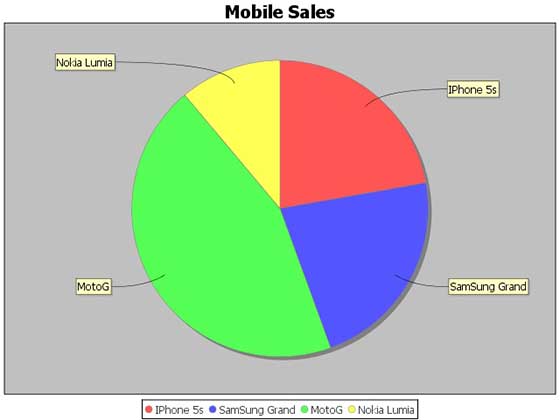
The following example depicts mobile sale with the help of a pie chart. Following is a list of different mobile brands and their sale (units per day).
| S.No | Mobile Brands | Sales (UNITS per day) |
|---|---|---|
| 1 | Iphone 5S | 20 |
| 2 | Samsung Grand | 20 |
| 3 | MOTO G | 40 |
| 4 | Nokia Lumia | 10 |
AWT Based Application
Following is the code to create a Pie Chart by using the above given information. This code helps you to embed a pie chart in any AWT based application.
import javax.swing.JPanel; import org.jfree.chart.ChartFactory; import org.jfree.chart.ChartPanel; import org.jfree.chart.JFreeChart; import org.jfree.data.general.DefaultPieDataset; import org.jfree.data.general.PieDataset; import org.jfree.ui.ApplicationFrame; import org.jfree.ui.RefineryUtilities; public class PieChart_AWT extends ApplicationFrame < public PieChart_AWT( String title ) < super( title ); setContentPane(createDemoPanel( )); >private static PieDataset createDataset( ) < DefaultPieDataset dataset = new DefaultPieDataset( ); dataset.setValue( "IPhone 5s" , new Double( 20 ) ); dataset.setValue( "SamSung Grand" , new Double( 20 ) ); dataset.setValue( "MotoG" , new Double( 40 ) ); dataset.setValue( "Nokia Lumia" , new Double( 10 ) ); return dataset; >private static JFreeChart createChart( PieDataset dataset ) < JFreeChart chart = ChartFactory.createPieChart( "Mobile Sales", // chart title dataset, // data true, // include legend true, false); return chart; >public static JPanel createDemoPanel( ) < JFreeChart chart = createChart(createDataset( ) ); return new ChartPanel( chart ); >public static void main( String[ ] args ) < PieChart_AWT demo = new PieChart_AWT( "Mobile Sales" ); demo.setSize( 560 , 367 ); RefineryUtilities.centerFrameOnScreen( demo ); demo.setVisible( true ); >>
Let us keep the above Java code in PieChart_AWT.java file, and then compile and run it from the command prompted as −
$javac PieChart_AWT.java $java PieChart_AWT
If everything is fine, it will compile and run to generate the following Pie Graph −
If you do not need to embed your chart in any application, then you can create chart images at command prompt. JFreeChart allows you to save chart images in either JPG or PNG formats.
JPEG Image Creation
Let us re-write the above example to generate a JPEG image from a command line. Following are the two APIs provided by JFreeChart library, which you can use to generate either PNG or JPEG image as per your requirement.
- saveChartAsPNG() − API to save image in PNG format.
- saveChartAsJPEG() − API to save image in JPEG format.
import java.io.*; import org.jfree.chart.ChartUtilities; import org.jfree.chart.ChartFactory; import org.jfree.chart.JFreeChart; import org.jfree.data.general.DefaultPieDataset; public class PieChart < public static void main( String[ ] args ) throws Exception < DefaultPieDataset dataset = new DefaultPieDataset( ); dataset.setValue("IPhone 5s", new Double( 20 ) ); dataset.setValue("SamSung Grand", new Double( 20 ) ); dataset.setValue("MotoG", new Double( 40 ) ); dataset.setValue("Nokia Lumia", new Double( 10 ) ); JFreeChart chart = ChartFactory.createPieChart( "Mobile Sales", // chart title dataset, // data true, // include legend true, false); int width = 640; /* Width of the image */ int height = 480; /* Height of the image */ File pieChart = new File( "PieChart.jpeg" ); ChartUtilities.saveChartAsJPEG( pieChart , chart , width , height ); >> Let us keep the above Java code in PieChart.java file, and then compile and run it from the command prompted as −
$javac PieChart.java $java PieChart
If everything is fine, it will compile and run to create a JPEG image file named PieChart.jpeg in your current directory.
Release: JavaFX 2.2

Alla is a technical writer for Oracle. She lives in St. Petersburg, Russia, and develops tutorials and technical articles for Java and JavaFX technologies. Prior to her assignment at Oracle, she worked as a technical writer in different IT companies.
We Welcome Your Comments
If you have questions about JavaFX, please go to the forum.
Using JavaFX Charts
2 Pie Chart
This chapter describes a chart that represents data in a form of circle divided into triangular wedges called slices. Each slice represents a percentage that corresponds to a particular value.
Figure 2-1 shows a pie chart created by using the PieChart class. The colors of the slices are defined by the order of the corresponding data items added to the PieChart.Data array.
Figure 2-1 Typical Pie Chart
Description of «Figure 2-1 Typical Pie Chart»
Creating a Pie Chart
To create a pie chart in your JavaFX application, at a minimum, you must instantiate the PieChart class, define the data, assign the data items to the PieChart object, and add the chart to the application. When creating the chart data, define as many PieChart.Data objects for as many slices you want to appear. Each PieChart.Data object has two fields: the name of the pie slice and its corresponding value. Example 2-1 creates the basic pie chart.
Example 2-1 Creating a Pie Chart
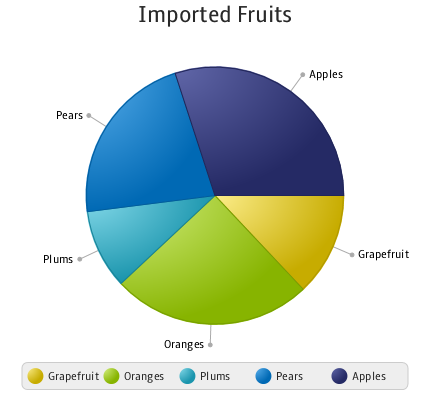
import javafx.application.Application; import javafx.collections.FXCollections; import javafx.collections.ObservableList; import javafx.scene.Scene; import javafx.stage.Stage; import javafx.scene.chart.*; import javafx.scene.Group; public class PieChartSample extends Application < @Override public void start(Stage stage) < Scene scene = new Scene(new Group()); stage.setTitle("Imported Fruits"); stage.setWidth(500); stage.setHeight(500); ObservableListpieChartData = FXCollections.observableArrayList( new PieChart.Data("Grapefruit", 13), new PieChart.Data("Oranges", 25), new PieChart.Data("Plums", 10), new PieChart.Data("Pears", 22), new PieChart.Data("Apples", 30)); final PieChart chart = new PieChart(pieChartData); chart.setTitle("Imported Fruits"); ((Group) scene.getRoot()).getChildren().add(chart); stage.setScene(scene); stage.show(); > public static void main(String[] args) < launch(args); >> The result of compiling and running this application is shown in Figure 2-2.
Figure 2-2 Imported Fruits Charts
Description of «Figure 2-2 Imported Fruits Charts»
In addition to the basic settings, Example 2-1 specifies the title of the chart by calling the setTitle method.
Setting a Pie Chart and a Legend
The default view of a pie chart includes the pie with the labels and the chart legend. The values of the labels are retrieved from the name field of a PieChart.Data object. You can manage the appearance of the labels by using the setLabelsVisile method. Similarly, you can manage the appearance of the chart legend by calling the setLegendVisible method.
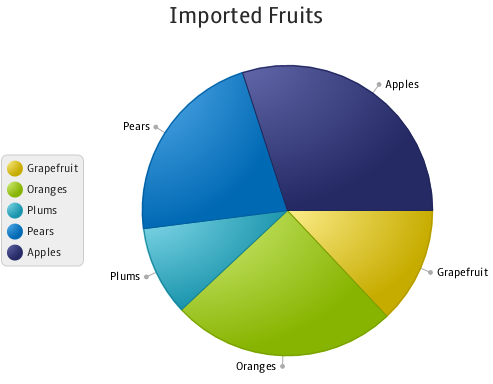
You can alter the position of the labels and the legend. With the setLabelLineLength method, you can specify the length of the line between the circumference of the pie and the labels. Use the setLegendSide method to alter the default position of the legend relative to the pie. Example 2-2 demonstrates how to apply these methods to the chart created in Example 2-1.
Example 2-2 Changing Position of the Labels and the Legend
chart.setLabelLineLength(10); chart.setLegendSide(Side.LEFT);
The result of adding these lines to the application code, compiling, and then running the application is shown in Figure 2-3.
Figure 2-3 Alternative Position of the Chart Legend and Labels
Description of «Figure 2-3 Alternative Position of the Chart Legend and Labels»
Your application might require that you alter the direction in which the slices are placed in the pie. By default, the slices are placed clockwise. However, you can change this by specifying the false value for the setClockwise method chart.setClockwise(false) . Use this method in combination with the setStartAngle method to attain the desired position of the slices. Figure 2-4 shows how the appearance of the pie chart changes when the setStartAngle(180) method is called for the chart object.
Figure 2-4 Changing the Start Angle of the Pie Chart Slices
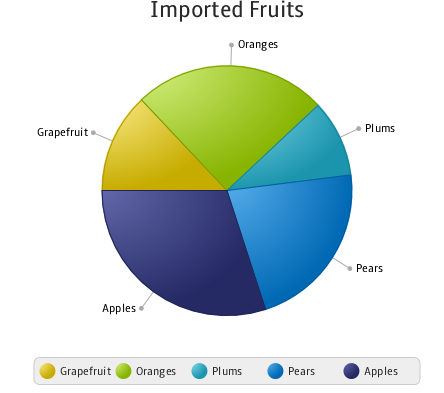
Description of «Figure 2-4 Changing the Start Angle of the Pie Chart Slices»
Processing Events for a Pie Chart
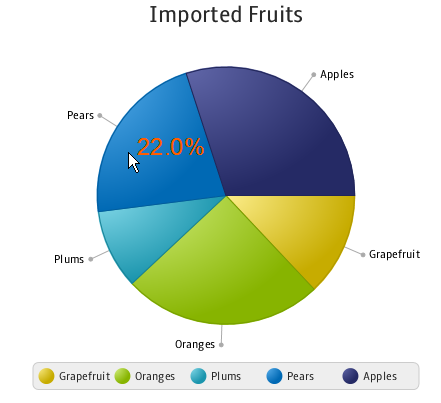
Although a pie chart slice is not a Node object, each PieChart.Data element has a node associated with it, which can be used to analyze events and process them accordingly. The code fragment shown in Example 2-3 creates an EventHandler object to process a MOUSE_PRESSED event that falls into a particular chart slice.
Example 2-3 Processing Mouse Events for a Pie Chart
final Label caption = new Label(""); caption.setTextFill(Color.DARKORANGE); caption.setStyle("-fx-font: 24 arial;"); for (final PieChart.Data data : chart.getData()) < data.getNode().addEventHandler(MouseEvent.MOUSE_PRESSED, new EventHandler() < @Override public void handle(MouseEvent e) < caption.setTranslateX(e.getSceneX()); caption.setTranslateY(e.getSceneY()); caption.setText(String.valueOf(data.getPieValue()) + "%"); >>); > When you add this code fragment to the application code and compile and run it, the application starts reacting to the mouse clicks. Figure 2-5 shows the value displayed for Pears when a user clicks the corresponding slice.
Figure 2-5 Processing the Mouse-Pressed Events for a Pie Chart
Description of «Figure 2-5 Processing the Mouse-Pressed Events for a Pie Chart»
By using this coding pattern, you can process various events or apply visual effects to the whole chart as well as to its slices.
Related API Documentation
Copyright © 2008, 2014, Oracle and/or its affiliates. All rights reserved.
Legal Notices Accessibility Statement