- How to Enable ZIP Extension for PHP on Linux — Ubuntu — ZIP.SO — PHP.INI — Efront — XAMPP/LAMPP
- How to enable ZipArchive for PHP
- How to enable ZipArchive on Windows
- Before you enable ZipArchive
- How to enable ZipArchive on Docker
- How to enable ZipArchive on Linux on Ubuntu
- Don’t forget to restart your web server!
- Wrapping up
- You may also be interested in
- Related Posts
- Scan Your Docker Images and Containers with VirusTotal: A Step-by-Step Guide
- Accelerate Your Performance Testing on Ubuntu with k6 and Postman-to-k6
- Solve the “Cannot read properties of undefined (reading ‘type’)” error with these simple fixes
- About Anto Online
- 3 Comments on “How to enable ZipArchive for PHP”
- Leave a Reply
- Tags
- Latest Posts
- Scan Your Docker Images and Containers with VirusTotal: A Step-by-Step Guide
- Bitbucket for Newbies: Mastering Basic Commands and Collaborating on Code
- Accelerate Your Performance Testing on Ubuntu with k6 and Postman-to-k6
- Solve the “Cannot read properties of undefined (reading ‘type’)” error with these simple fixes
- Solving the ‘tail: inotify resources exhausted’ Error on Ubuntu
- How To Install php-zip on Ubuntu 20.04
- What is php-zip
- Install php-zip Using apt-get
- Install php-zip Using apt
- Install php-zip Using aptitude
- How To Uninstall php-zip on Ubuntu 20.04
- Uninstall php-zip And Its Dependencies
- Remove php-zip Configurations and Data
- Remove php-zip configuration, data, and all of its dependencies
- References
- Summary
How to Enable ZIP Extension for PHP on Linux — Ubuntu — ZIP.SO — PHP.INI — Efront — XAMPP/LAMPP
That contains Apache 2.4.3, MySQL 5.5.27, and PHP 5.4.7.
Follow instructions on the site (All it takes is just download and unzip into /opt/lampp. It’s pre-compiled).
For Apache, you might want to update the root directory of the http server to «/opt/lampp» (edit /opt/lampp/etc/httpd.conf and make sure the following path in the file is correct ServerRoot «/opt/lampp»).
Enable zip extension for php with apache by:
1- Un-commenting zip.so in /opt/lampp/etc/php.ini. (The latest version of XAMPP, as of this article, is compiled with zip support for PHP but you need to follow the few steps mentioned here to enable it and make it work).
2- Un-commenting and updating the path of the extension_dir in php.ini (extension_dir = «/opt/lampp/lib/php/extensions/no-debug-non-zts-20100525»)
3- Downloading zip.so into the Extension Dir.
You can download the modified php.ini, httpd.conf and the zip.so described above here:
Stop and start XAMPP
/opt/lampp/lampp stop
/opt/lampp/lampp start
Now you can download efront and unzip into /opt/lampp/efront..
If you find this section helpful, please send us a note to Mike@bostonIT.com so I can keep on adding quality hands-on articles.
Edit my.cnf. Change localhost to server ip instead of 127.0.0.1
Grant permissions to computers that need access to MySql. For example, to access mysql from two computers with IP addresses 192.168.1.5 and 192.168.1.7 and with user = root and password = password1, do the following:
$ mysql -u root -p
Enter password:
mysql> GRANT ALL ON *.* to root@’192.168.1.5′ IDENTIFIED BY ‘password1 ‘;
mysql> GRANT ALL ON *.* to root@’192.168.1.7′ IDENTIFIED BY ‘password1’;
Then stop and start XAMPP.
If you find this article helpful, please click to like our facebook page below so we can keep on adding quality hands-on articles.
How to enable ZipArchive for PHP

Is your PHP saying that it cannot find the ZipArchive class? Then, this post will show you how to enable the ZipArchive module.
Next, scroll down until you find the heading “Configuration” and then continue until you see the following:

You will know that the ZipArchive class is not enabled if you cannot see: “Zip” configuration “enabled”.
Show compiled in modules using: php -m.
[email protected]:/var/www/html# php -m [PHP Modules] Core ctype date dom zip zlib [Zend Modules]As the PHP module list can get quite large, consider using the grep command to filter your list:
Or you can use “php -m” to show the PHP information in the CLI.
How to enable ZipArchive on Windows
Windows users have it easy! You do not need to do anything if you use PHP 5.3 or newer. So, don’t trust that the code written and evaluated on Windows will work on Linux.
As of PHP 5.3, this extension is built-in. Before, Windows users needed to enable php_zip.dll inside of php.ini to use these functions.
https://www.php.net/manual/en/zip.installation.php
Before you enable ZipArchive
You can enable Zip support during the installation of PHP and after the fact. This post will focus on an after-the-fact ZipArchive installation on Linux. Please read the installing Zip instruction from the PHP manual for more information.
Before you continue, note the following helpful command to get your current version of PHP:
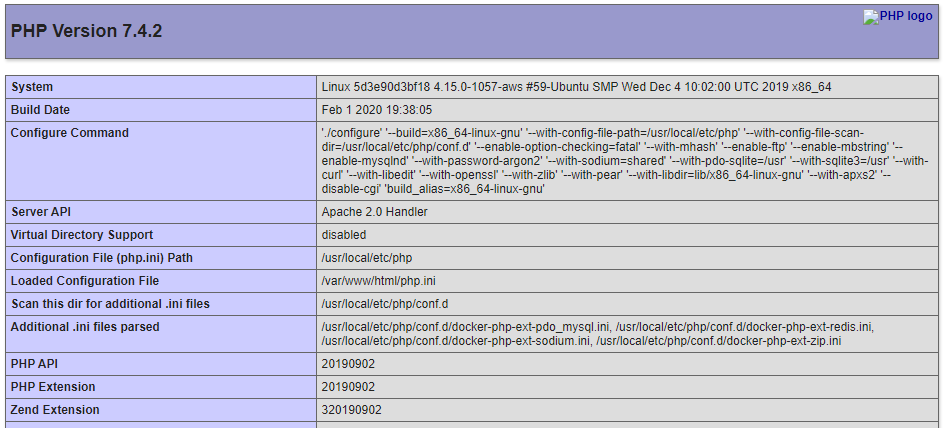
[email protected]:/var/www/html# php -v PHP 7.4.2 (cli) (built: Feb 1 2020 19:39:30) ( NTS ) Copyright (c) The PHP Group Zend Engine v3.4.0, Copyright (c) Zend TechnologiesNote the version in the example above being: 7.4.2. We will, therefore, need to install the Zip module for PHP version 7.4. Please remember to change the version number to match yours if the command requires it!
Also, make sure that your packages are up to date using the “apt-get update” command:
[email protected]:/var/www/html# apt-get update Hit:1 http://security.debian.org/debian-security buster/updates InRelease Hit:2 http://deb.debian.org/debian buster InRelease Hit:3 http://deb.debian.org/debian buster-updates InRelease Reading package lists. DoneLastly, you may need to determine the location of the loaded php.ini file. Please note that the CLI uses its version.
Use the following command to help you:
[email protected]:/var/www/html# php --ini Configuration File (php.ini) Path: /usr/local/etc/php Loaded Configuration File: /usr/local/etc/php/php.ini Scan for additional .ini files in: /usr/local/etc/php/conf.d Additional .ini files parsed: /usr/local/etc/php/conf.d/docker-php-ext-pdo_mysql.ini, /usr/local/etc/php/conf.d/docker-php-ext-redis.ini, /usr/local/etc/php/conf.d/docker-php-ext-sodium.ini, /usr/local/etc/php/conf.d/docker-php-ext-zip.iniHow to enable ZipArchive on Docker
First, run the following command to install Zip and compile PHP correctly to run it.
apt-get install -y libzip-dev zip && docker-php-ext-install zipBelow you will see how to restart Apache or NGINX. Once you install, you have finished.
Note that you will get an “E: Package ‘php-XXX’ has no installation candidate” error if you try to install any of Debian‘s PHP packages. This error is the default intended behavior of the official PHP Docker image.
You can see an example of this behavior below:
[email protected]:/var/www/html# apt-get install php-zip Reading package lists. Done Building dependency tree Reading state information. Done Package php-zip is a virtual package provided by: php7.3-zip 7.3.14-1~deb10u1 [Not candidate version] php7.3-zip 7.3.11-1~deb10u1 [Not candidate version] E: Package 'php-zip' has no installation candidateYou can also get the following error if you specify a specific version.
[email protected]:/var/www/html# apt-get install php7.0-zip Reading package lists. Done Building dependency tree Reading state information. Done E: Unable to locate package php7.0-zip E: Couldn't find any package by glob 'php7.0-zip' E: Couldn't find any package by regex 'php7.0-zip'How to enable ZipArchive on Linux on Ubuntu
The install PHP Zip command:
sudo apt-get install -y php-zipThe output will result in something like this:
[email protected]:/home/user# sudo apt-get install php-zip Reading package lists. Done Building dependency tree Reading state information. Done The following additional packages will be installed: libzip5 php-common php7.3-common php7.3-zip The following NEW packages will be installed: libzip5 php-common php-zip php7.3-common php7.3-zip 0 to upgrade, 5 to newly install, 0 to remove and 48 not to upgrade. 1 not fully installed or removed. Need to get 1,003 kB of archives. After this operation, 7,443 kB of additional disk space will be used.Please note that you may need to specify the PHP version if you upgraded to a recent version of PHP.
Don’t forget to restart your web server!
The configuration file (php.ini) is only read when PHP or the webserver starts. Equally, the php.ini file is only read at invocation for the CGI and CLI versions.
You can restart Apache using:
Likewise, you can restart NGINX using:
Wrapping up
It is easy to get your website zipping files and avoid a fatal error. I hope that you now know how to enable ZipArchive for PHP. No one likes seeing a “Fatal error: Class’ ZipArchive’ not found in”.
You may also be interested in
Anto’s editorial team loves the cloud as much as you! Each member of Anto’s editorial team is a Cloud expert in their own right. Anto Online takes great pride in helping fellow Cloud enthusiasts. Let us know if you have an excellent idea for the next topic! Contact Anto Online if you want to contribute.
Support Anto Online and buy us a coffee. Anything is possible with coffee and code.
Related Posts

Scan Your Docker Images and Containers with VirusTotal: A Step-by-Step Guide

Accelerate Your Performance Testing on Ubuntu with k6 and Postman-to-k6

Solve the “Cannot read properties of undefined (reading ‘type’)” error with these simple fixes
About Anto Online
Having started his career in 1999 as a Desktop Support Engineer, Anto soon changed paths and became a developer. After several years of development experience, he transitioned into a consultant. As an enterprise application consultant for a leading SaaS software provider, Anto specializes in AWS’s serverless technologies. By day, Anto focuses on helping customers leverage the power of serverless technologies. By night, he indulges his passion for cloud computing by playing with Python and trying out things that are currently beyond the scope of his work. Sometimes Anto needs help as there are not enough hours at night. So Anto relies on a team of fellow Cloud enthusiasts to help him out. Each one is a Cloud expert in their own right, and Anto takes great pride in helping them learn and grow. View all posts by Anto Online →
3 Comments on “How to enable ZipArchive for PHP”
Was happy to see a picture with someone scratching his head in front of a Mac ….
but couldn’t find anything on how this extension (and others) can be installed on the standard php install on Mac OS Big SUR. any clue ? great post btw !
Not sure, but please let me know if you resolved it. I will update the post. Thanks for your feedback.
Leave a Reply
You must be logged in to post a comment.
This site uses Akismet to reduce spam. Learn how your comment data is processed.
Tags

Latest Posts
Scan Your Docker Images and Containers with VirusTotal: A Step-by-Step Guide
Bitbucket for Newbies: Mastering Basic Commands and Collaborating on Code
Accelerate Your Performance Testing on Ubuntu with k6 and Postman-to-k6
Solve the “Cannot read properties of undefined (reading ‘type’)” error with these simple fixes
December 19, 2022 May 1, 2023
Solving the ‘tail: inotify resources exhausted’ Error on Ubuntu
December 18, 2022 May 1, 2023
Copyright 2018-2022 Anto Online.
All rights reserved. Please consider the information, scripts and instructions carefully before using it yourself. Make sure you have ample backups! The information, scripts and instructions are provided without warranty. Consult a professional if you are unsure. Anto does not speak on behalf of any company and our opinions are our own.
The feature images have been provided by pexels.com and unsplash.com.
How To Install php-zip on Ubuntu 20.04
In this tutorial we learn how to install php-zip on Ubuntu 20.04.
What is php-zip
This package provides a Zip module for PHP.
PHP (recursive acronym for PHP: Hypertext Preprocessor) is a widely-used open source general-purpose scripting language that is especially suited for web development and can be embedded into HTML.
This package is a dependency package, which depends on Debian’s default PHP version (currently 7.4). Description-md5: 07531b708a43e2ff6f21e6733cf57aa2
There are three ways to install php-zip on Ubuntu 20.04. We can use apt-get , apt and aptitude . In the following sections we will describe each method. You can choose one of them.
Install php-zip Using apt-get
Update apt database with apt-get using the following command.
After updating apt database, We can install php-zip using apt-get by running the following command:
sudo apt-get -y install php-zip Install php-zip Using apt
Update apt database with apt using the following command.
After updating apt database, We can install php-zip using apt by running the following command:
sudo apt -y install php-zip Install php-zip Using aptitude
If you want to follow this method, you might need to install aptitude first since aptitude is usually not installed by default on Ubuntu. Update apt database with aptitude using the following command.
After updating apt database, We can install php-zip using aptitude by running the following command:
sudo aptitude -y install php-zip How To Uninstall php-zip on Ubuntu 20.04
To uninstall only the php-zip package we can use the following command:
sudo apt-get remove php-zip Uninstall php-zip And Its Dependencies
To uninstall php-zip and its dependencies that are no longer needed by Ubuntu 20.04, we can use the command below:
sudo apt-get -y autoremove php-zip Remove php-zip Configurations and Data
To remove php-zip configuration and data from Ubuntu 20.04 we can use the following command:
sudo apt-get -y purge php-zip Remove php-zip configuration, data, and all of its dependencies
We can use the following command to remove php-zip configurations, data and all of its dependencies, we can use the following command:
sudo apt-get -y autoremove --purge php-zip References
Summary
In this tutorial we learn how to install php-zip package on Ubuntu 20.04 using different package management tools: apt, apt-get and aptitude.