- WAMP phpMyAdmin username and password.
- Default phpMyAdmin username and password.
- Как изменить пароль от phpMyAdmin
- Как поменять пароль phpMyAdmin по SSH
- Как поменять пароль в phpMyAdmin
- Стандартные доступы phpMyAdmin
- Securing phpMyAdmin
- What is phpMyAdmin?
- Why Secure phpMyAdmin?
- phpMyAdmin Features
- Before you Begin
- Creating a MySQL User
- Install phpMyAdmin
- Configuring phpMyAdmin To Work With Apache2
- Changing phpMyAdmin Alias
- Setting Up Password Based Authentication
- Restricting Access to a Specific IP Address
- Custom PHP Configuration
WAMP phpMyAdmin username and password.
This is something that caught me off-guard a while back, so I figured that I would write a quick post about it. Hopefully, I can save you some time and confusion!
A couple of years ago, I installed WAMP via a handy installer that did all of the work for me. This installer automatically created Apache, MySQL, PHP and phpMyAdmin on my Windows PC. i.e. I didn’t have to mess around with configuration files or Apache modules and I didn’t have to manually install phpMyAdmin!
As you probably already know, phpMyAdmin is a web-based administration tool for MySQL. It gives you a GUI interface that allows you to create MySQL databases and table structures. When you automatically install WAMP on a Windows PC, phpMyAdmin is usually located at http://localhost/phpmyadmin
Unfortunately for me, I could not login to phpMyAdmin as I did not know what the MySQL username and password was! During the installation process, I was not asked to create a user account. In fact, the only thing that I was asked was which installation path I wanted to use.
Default phpMyAdmin username and password.
If you’re having trouble logging into a fresh install of phpMyAdmin, then simply use the following username and password:
The above login credentials belong to the default MySQL user account that gets created during a new install. Note that you should leave the password field completely blank. Do not actually type in *blank*.
If those details do not work, then you should open up the config.inc.php in your phpMyAdmin folder. Firstly make sure that AllowNoPassword is set to true:
$cfg['Servers'][$i]['AllowNoPassword'] = true;
You can also see what login credentials have been stored:
$cfg['Servers'][$i]['user'] = 'root'; $cfg['Servers'][$i]['password'] = '';
Hopefully, this article saved you some time and confusion!
Как изменить пароль от phpMyAdmin
Изменить или сбросить пароль от пользователя phpMyAdmin можно:
- по SSH. Этот способ подойдёт, если вы забыли пароль пользователя, под которым подключаетесь к phpMyAdmin.
- через интерфейс phpMyAdmin. Подойдёт, если вы знаете пароль и вам нужно его сменить.
В статье мы расскажем про оба способа.
Для сброса пароля по SSH вам понадобится доступ к root-пользователю MySQL. Если вы потеряли root-доступ к серверу баз данных, воспользуйтесь инструкцией.
Учётная запись, под которой вы подключаетесь к phpMyAdmin, — это обычный пользователь mySQL. Ниже мы расскажем, как сменить забытый пароль от такой учётной записи.
Как поменять пароль phpMyAdmin по SSH
ALTER USER 'username' IDENTIFIED BY 'password';SET PASSWORD FOR 'username'@'localhost' = PASSWORD('password');Готово, вы сменили пароль от пользователя phpMyAdmin.
Как поменять пароль в phpMyAdmin
При помощи приложения можно поменять пароль как от учётной записи, под которой вы авторизованы, так и для других учётных записей MySQL.
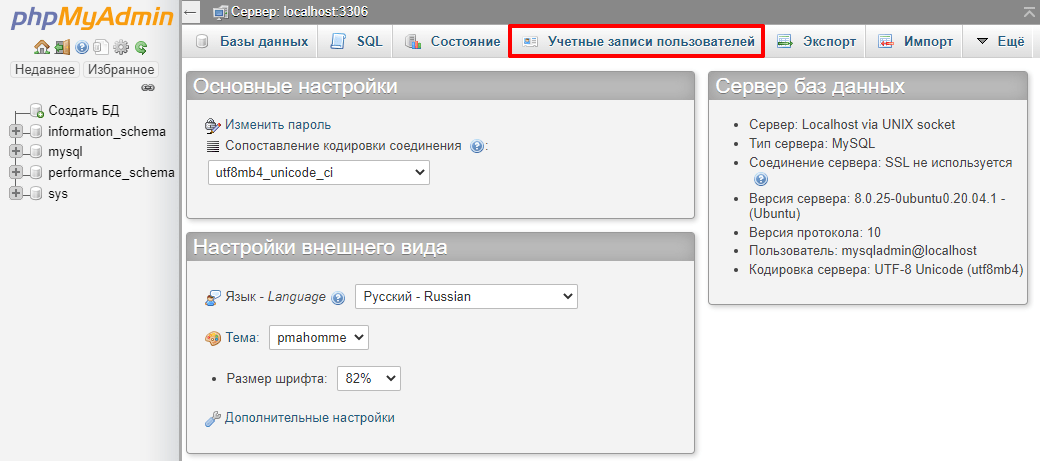
Нажмите Учетные записи пользователей:

Напротив нужного имени нажмите Редактировать привилегии:

Вверху страницы нажмите Изменить пароль:

Введите пароль и подтвердите его, затем нажмите Вперёд:
Готово, пароль от учётной записи изменён.
Стандартные доступы phpMyAdmin
На облачных серверах REG.RU с шаблонами LEMP и LAMP phpMyAdmin устанавливается автоматически. При подключении к такому серверу по SSH вы увидите приветственное окно с доступами:
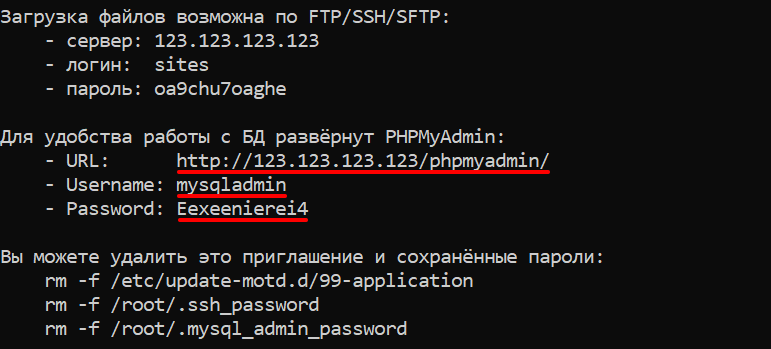
phpMyAdmin default password
Securing phpMyAdmin
Estamos traduciendo nuestros guías y tutoriales al Español. Es posible que usted esté viendo una traducción generada automáticamente. Estamos trabajando con traductores profesionales para verificar las traducciones de nuestro sitio web. Este proyecto es un trabajo en curso.
What is phpMyAdmin?
phpMyAdmin is a free, open source, and cross platform PHP-based web application that offers a simple, powerful and convenient browser based GUI for interacting and working with MySQL databases. It makes the process of creating, modifying and configuring MySQL databases simpler and much more efficient.
Why Secure phpMyAdmin?
phpMyAdmin is widely adopted and used in both production and development environments by developers and system administrators. It is therefore a vital component to secure given the nature of data it is used to create and manage.
phpMyAdmin Features
These are some of the core features of phpMyAdmin:
- Execute standard SQL queries.
- Create, modify and remove users and user permissions.
- Create, modify and remove databases, tables, rows and fields.
- Search for objects in databases and tables.
- Backup your MySQL databases.
Before you Begin
In order to install and secure phpMyAdmin, you need to have a Linux server with the following services running:
The three pieces of software required are also commonly referred to as a LAMP stack. The following steps can be used on Ubuntu 20.04 to install all of the required prerequisite software:
- Install Apache 2.4 from the Ubuntu repository:
sudo apt install mysql-server sudo apt install php libapache2-mod-php php-mysql sudo apt install php-curl php-json php-cgi This steps in this guide were tested only on Ubuntu 20.04. Different distros may require additional steps to successfully complete installation.
Creating a MySQL User
It is always recommended to create a separate database user for each application and to avoid using the root user account.
- To create a new MySQL user, you can login to MySQL with the following command:
CREATE USER 'user'@'localhost' IDENTIFIED WITH caching_sha2_password BY 'password'; GRANT ALL PRIVILEGES ON *.* TO 'user'@'localhost' WITH GRANT OPTION; Install phpMyAdmin
sudo apt-get install phpmyadmin php-json php-curl php-mbstring php-zip php-gd - During the installation process, you will be prompted to Configure the database for phpMyAdmin with dbconfig-common. Select yes to proceed.
- You will also be prompted to specify an application password for phpMyAdmin. Enter a strong unique password to access phpMyAdmin as an administrator, and select OK .
- After installing phpMyAdmin you will need to enable the PHP mbstring module, this can be done by running the following command in the terminal:
sudo systemctl restart apache2 Configuring phpMyAdmin To Work With Apache2
To enable phpMyAdmin access with Apache2, a symlink will need to be created for some configuration files so that phpMyAdmin will be able to access them. This can be completed by entering the following command:
sudo ln -s /etc/phpmyadmin/apache.conf /etc/apache2/conf-available/phpmyadmin.conf Once the symlinks have been created, phpMyAdmin will need to have the configuration files enabled, and apache2 will need to be restarted:
sudo a2enconf phpmyadmin sudo systemctl reload apache2 After restarting Apache2, the homepage for phpMyAdmin, will be freely accessible in your web browser using the following syntax:
Login can be completed using the credentials that were created at the prompt when installing phpMyAdmin.
While not included in this guide or a base installation of phpMyAdmin, it is strongly recommended that SSL/TLS is installed before entering any credentials over http , using only https on port 443 instead.
Changing phpMyAdmin Alias
The first step in securing phpMyAdmin is to change the default directory alias that is used to access phpMyAdmin. By default, any user can access phpMyAdmin by accessing the server URL: https:///phpmyadmin.
This poses a security threat as attackers are aware of the directory name and can access it without restriction. To mitigate this, you can perform the following actions to create a new alias to change the URL where the login page is accessed:
- Open the /etc/phpmyadmin/apache.conf file and use a text editor of your choice to find the Alias section, which appears as below by default:
sudo systemctl reload apache2 The Alias will now be used as the directory used to access the phpMyAdmin home page.
Setting Up Password Based Authentication
As an added layer of security, you can also leverage the apache2 authentication functionality to integrate a username and password authentication form that will be configured to provide an additional layer of protection over the phpMyAdmin directory/URL.
- First, add the AllowOverride option under the directory configuration in the phpMyAdmin apache2 configuration file found in /etc/phpmyadmin/apache.conf . This will allow you to override any apache2 configurations that are specified in the .htaccess file. Your apache.conf file should reflect the following:
sudo htpasswd -c /etc/phpmyadmin/.htpasswd
sudo systemctl reload apache2 Restricting Access to a Specific IP Address
An additional security measure you can take, is to restrict phpMyAdmin access to a specific IP or a set of IP addresses, this is a great security configuration if you have a static IP that does not change, however, if you use a dynamic IP configuration you may find yourself locked out as the IP address changes.
To configure IP based restriction, follow the procedures outlined below:
- IP based access and restriction can be configured in the /etc/phpmyadmin/apache.conf file, under the /usr/share/phpmyadmin directory configuration. To deny access to all IPs and grant access to a specific IP or subnet, add the following configuration illustrated below to the file while taking precaution to substitute the IP address with your own IP or IPs:
sudo systemctl reload apache2 This configuration will deny access to all except those that have or match the IP address you have specified. If an unspecified IP address attempts to access phpMyAdmin, they will receive a Forbidden response.
Custom PHP Configuration
You can also add specific PHP configurations to make phpMyAdmin much more secure by stripping all server or system information and by modifying the cookie authentication parameters.
- To add our custom PHP options, you will need to modify the /etc/phpmyadmin/config.inc.php file. Within the file, you will need to create a section for a custom configuration which contains the below:
These configuration options will change the default cookie validity time, automatically logging users out after a predefined period of time. It will also prevent users from deleting databases and will omit server information from phpMyAdmin.
- After adding the configurations, restart apache2 to apply the changes:
sudo systemctl reload apache2 This page was originally published on Friday, March 26, 2021.