- Можем ли мы использовать PHP в Android Studio?
- Куда идет PHP-файл в Android Studio?
- Подходит ли PHP для Android?
- Как запустить файл PHP на мобильном устройстве Android?
- Могу ли я использовать PHP для мобильных приложений?
- Могу ли я преобразовать веб-сайт на PHP в приложение для Android?
- Какая база данных лучше всего подходит для студии Android?
- Можно ли использовать MySQL в Android?
- Как я могу запрограммировать свой мобильный телефон на PHP?
- Что лучше Android или PHP?
- Какой язык используется для серверной части?
- Какое приложение открывает файлы PHP?
- Может ли Android запускать xampp?
- Как просмотреть видео PHP?
- Android — PHP/MYSQL
- PHP — MYSQL
- Creating Database
- Creating Tables
- Inserting Values in tables
- PHP — GET and POST methods
- Android — Connecting MYSQL
- Connecting Via Get Method
- Connecting Via Post Method
- Example
- PHP — MYSQL part
- Android Part
Можем ли мы использовать PHP в Android Studio?
Теперь вы даже можете писать приложения для Android на PHP. Сотрудники Irontech создали порт PHP для работы на Android, а с помощью Scripting Layer для Android (SL4A) вы можете создавать приложения PHP для Android.
Куда идет PHP-файл в Android Studio?
Перейдите в место, где вы установили сервер WAMP (в моем случае я установил вC: wamp), перейдите в папку www и создайте новую папку для вашего проекта. Вы должны поместить все файлы вашего проекта в эту папку. Создайте папку с именем android_connect и создайте новый файл php с именем test.
Подходит ли PHP для Android?
Когда это касается использования PHP-бэкенда для приложений Android, этофантастический язык программирования.
Как запустить файл PHP на мобильном устройстве Android?
Чтобы использовать его, установите приложение и скопируйте файлы PHP / HTML на свой телефон. По умолчанию приложение использует / sdcard / pws / www /, поэтому, если вы поместите туда свои файлы, оно должно их забрать. Затем запустите приложение, нажмите «Запустить сервер» и перейдите по адресу http://127.0.0.1:8080 с помощью веб-браузера на устройстве Android, и оно должно работать.
Могу ли я использовать PHP для мобильных приложений?
Пять миллионов разработчиков PHP теперь смогут разрабатывать и создавать мобильные приложения для iOS, Android, Windows Phone и BlackBerry. Новинка: посмотрите, как PHP-разработчик создает собственное мобильное приложение за 10 минут.
Могу ли я преобразовать веб-сайт на PHP в приложение для Android?
Невозможно просто преобразовать его. Максимум, что вы можете сделать, это открыть свой веб-сайт в WebView, что плохо, поскольку вы всегда можете использовать для этого веб-браузер. Не ожидайте, что оно будет таким же надежным, как нативное приложение.
Какая база данных лучше всего подходит для студии Android?
Большинство мобильных разработчиков, вероятно, знакомы сSQLite. Он существует примерно с 2000 года и, возможно, является наиболее часто используемым механизмом реляционной базы данных в мире. У SQLite есть ряд преимуществ, которые мы все признаем, одно из которых — его встроенная поддержка на Android.
Можно ли использовать MySQL в Android?
MYSQLиспользуется в качестве базы данных на веб-сервере, а PHP используется для извлечения данных из базы данных. … Часть Android.
| Шаги | Описание |
|---|---|
| 1 | Вы будете использовать Android Studio IDE для создания приложение Android и назовите его PHPMYSQL в пакете com.example.phpmysql. |
Как я могу запрограммировать свой мобильный телефон на PHP?
Если вы хотите запустить PHP на своем локальном устройстве, сначала установите один из веб-серверов с PHP из Google Play:
- Ulti Server: PHP, MySQL, PMA (протестировано)
- KSWEB: сервер + PHP + MySQL.
- PAW Server для Android.
- Битовый веб-сервер (PHP, MySQL, PMA)
- AndroPHP.
- Веб-сервер Palapa.
Что лучше Android или PHP?
Я рекомендую вам пройтикурс Android. … Если вы изучаете Android, вы выучите не только Android, но и Java, XML, а также несколько других компьютерных языков. Если вы изучаете Android, вы наверняка знаете Java и легко понимаете PHP благодаря XML, который вы можете изучить в Android.
Какой язык используется для серверной части?
Ruby, Python и PHPвходят в тройку самых популярных языков Back End. Помимо языков управления базами данных, таких как SQL, существуют и другие серверные языки. Хотя легко предположить, что языки серверной части сложнее выучить из-за их технической природы, это не так.
Какое приложение открывает файлы PHP?
Поскольку файлы PHP представляют собой текстовые файлы, удобочитаемые человеком, все, что вам нужно для их просмотра, — это простой текстовый редактор, напримерБлокнот, Notepad ++, Sublime Text, Vi и т. Д.. Если вам нужно только быстро заглянуть внутрь файла, вы можете использовать Блокнот, и вам не нужно загружать какое-либо другое программное обеспечение.
Может ли Android запускать xampp?
XAMPP недоступен для Android, но есть одна альтернатива с аналогичной функциональностью. Лучшая альтернатива Android — Ulti Server, которая бесплатна. Если это не сработает для вас, наши пользователи оценили более 50 альтернатив XAMPP, но, к сожалению, для Android доступна только одна.
Как просмотреть видео PHP?
Файлы PHP на самом деле могут быть медиафайлами или изображениями, которым было случайно присвоено это расширение. В таких случаях просто переименуйте расширение в правильное, и оно должно правильно открыться в программе, отображающей этот тип файла, например в видеопроигрывателе, если вы работаете с MP4.
Android — PHP/MYSQL
In this chapter , we are going to explain, how you can integrate PHP and MYSQL with your android application. This is very useful in case you have a webserver, and you want to access its data on your android application.
MYSQL is used as a database at the webserver and PHP is used to fetch data from the database. Our application will communicate with the PHP page with necessary parameters and PHP will contact MYSQL database and will fetch the result and return the results to us.
PHP — MYSQL
Creating Database
MYSQL database can be created easily using this simple script. The CREATE DATABASE statement creates the database.
Creating Tables
Once database is created, its time to create some tables in the database. The CREATE TABLE statement creates the database.
Inserting Values in tables
When the database and tables are created. Now its time to insert some data into the tables. The Insert Into statement creates the database.
PHP — GET and POST methods
PHP is also used to fetch the record from the mysql database once it is created. In order to fetch record some information must be passed to PHP page regarding what record to be fetched.
The first method to pass information is through GET method in which $_GET command is used. The variables are passed in the url and the record is fetched. Its syntax is given below −
$username = $_GET['username']; $password = $_GET['password']; $result = mysqli_query($con,"SELECT Role FROM table1 where Username='$username' and Password='$password'"); $row = mysqli_fetch_array($result); $data = $row[0]; if($data) < echo $data; >mysqli_close($con); ?>
The second method is to use POST method. The only change in the above script is to replace $_GET with $_POST. In Post method, the variables are not passed through URL.
Android — Connecting MYSQL
Connecting Via Get Method
There are two ways to connect to MYSQL via PHP page. The first one is called Get method. We will use HttpGet and HttpClient class to connect. Their syntax is given below −
URL url = new URL(link); HttpClient client = new DefaultHttpClient(); HttpGet request = new HttpGet(); request.setURI(new URI(link));
After that you need to call execute method of HttpClient class and receive it in a HttpResponse object. After that you need to open streams to receive the data.
HttpResponse response = client.execute(request); BufferedReader in = new BufferedReader (new InputStreamReader(response.getEntity().getContent()));
Connecting Via Post Method
In the Post method, the URLEncoder,URLConnection class will be used. The urlencoder will encode the information of the passing variables. It’s syntax is given below −
URL url = new URL(link); String data = URLEncoder.encode("username", "UTF-8") + "=" + URLEncoder.encode(username, "UTF-8"); data += "&" + URLEncoder.encode("password", "UTF-8") + "=" + URLEncoder.encode(password, "UTF-8"); URLConnection conn = url.openConnection(); The last thing you need to do is to write this data to the link. After writing, you need to open stream to receive the responded data.
OutputStreamWriter wr = new OutputStreamWriter(conn.getOutputStream()); wr.write( data ); BufferedReader reader = new BufferedReader(new InputStreamReader(conn.getInputStream()));
Example
The below example is a complete example of connecting your android application with MYSQL database via PHP page. It creates a basic application that allows you to login using GET and POST method.
PHP — MYSQL part
In this example a database with the name of temp has been created at 000webhost.com. In that database, a table has been created with the name of table1. This table has three fields. (Username, Password, Role). The table has only one record which is («admin»,»admin»,»administrator»).
The php page has been given below which takes parameters by post method.
$username = $_POST['username']; $password = $_POST['password']; $result = mysqli_query($con,"SELECT Role FROM table1 where Username='$username' and Password='$password'"); $row = mysqli_fetch_array($result); $data = $row[0]; if($data) < echo $data; >mysqli_close($con); ?>
Android Part
To experiment with this example , you need to run this on an actual device on which wifi internet is connected.
| Steps | Description |
|---|---|
| 1 | You will use Android studio IDE to create an Android application and name it as PHPMYSQL under a package com.example.phpmysql. |
| 2 | Modify src/MainActivity.java file to add Activity code. |
| 3 | Create src/SiginActivity.java file to add PHPMYSQL code. |
| 4 | Modify layout XML file res/layout/activity_main.xml add any GUI component if required. |
| 5 | Modify res/values/string.xml file and add necessary string components. |
| 6 | Modify AndroidManifest.xml to add necessary permissions. |
| 7 | Run the application and choose a running android device and install the application on it and verify the results. |
Here is the content of src/com.example.phpmysql/MainActivity.java.
package com.example.phpmysql; import android.app.Activity; import android.os.Bundle; import android.view.View; import android.widget.EditText; import android.widget.TextView; public class MainActivity extends Activity < private EditText usernameField,passwordField; private TextView status,role,method; @Override protected void onCreate(Bundle savedInstanceState) < super.onCreate(savedInstanceState); setContentView(R.layout.activity_main); usernameField = (EditText)findViewById(R.id.editText1); passwordField = (EditText)findViewById(R.id.editText2); status = (TextView)findViewById(R.id.textView6); role = (TextView)findViewById(R.id.textView7); method = (TextView)findViewById(R.id.textView9); >public void login(View view) < String username = usernameField.getText().toString(); String password = passwordField.getText().toString(); method.setText("Get Method"); new SigninActivity(this,status,role,0).execute(username,password); >public void loginPost(View view) < String username = usernameField.getText().toString(); String password = passwordField.getText().toString(); method.setText("Post Method"); new SigninActivity(this,status,role,1).execute(username,password); >> Here is the content of src/com.example.phpmysql/SigninActivity.java.
package com.example.phpmysql; import java.io.BufferedReader; import java.io.InputStreamReader; import java.io.OutputStreamWriter; import java.net.URI; import java.net.URL; import java.net.URLConnection; import java.net.URLEncoder; import org.apache.http.HttpResponse; import org.apache.http.client.HttpClient; import org.apache.http.client.methods.HttpGet; import org.apache.http.impl.client.DefaultHttpClient; import android.content.Context; import android.os.AsyncTask; import android.widget.TextView; public class SigninActivity extends AsyncTask < private TextView statusField,roleField; private Context context; private int byGetOrPost = 0; //flag 0 means get and 1 means post.(By default it is get.) public SigninActivity(Context context,TextView statusField,TextView roleField,int flag) < this.context = context; this.statusField = statusField; this.roleField = roleField; byGetOrPost = flag; >protected void onPreExecute() < >@Override protected String doInBackground(String. arg0) < if(byGetOrPost == 0)< //means by Get Method try< String username = (String)arg0[0]; String password = (String)arg0[1]; String link = "http://myphpmysqlweb.hostei.com/login.php?username="+username+"& password="+password; URL url = new URL(link); HttpClient client = new DefaultHttpClient(); HttpGet request = new HttpGet(); request.setURI(new URI(link)); HttpResponse response = client.execute(request); BufferedReader in = new BufferedReader(new InputStreamReader(response.getEntity().getContent())); StringBuffer sb = new StringBuffer(""); String line=""; while ((line = in.readLine()) != null) < sb.append(line); break; >in.close(); return sb.toString(); > catch(Exception e) < return new String("Exception: " + e.getMessage()); >> else < try< String username = (String)arg0[0]; String password = (String)arg0[1]; String link="http://myphpmysqlweb.hostei.com/loginpost.php"; String data = URLEncoder.encode("username", "UTF-8") + "=" + URLEncoder.encode(username, "UTF-8"); data += "&" + URLEncoder.encode("password", "UTF-8") + "=" + URLEncoder.encode(password, "UTF-8"); URL url = new URL(link); URLConnection conn = url.openConnection(); conn.setDoOutput(true); OutputStreamWriter wr = new OutputStreamWriter(conn.getOutputStream()); wr.write( data ); wr.flush(); BufferedReader reader = new BufferedReader(new InputStreamReader(conn.getInputStream())); StringBuilder sb = new StringBuilder(); String line = null; // Read Server Response while((line = reader.readLine()) != null) < sb.append(line); break; >return sb.toString(); > catch(Exception e) < return new String("Exception: " + e.getMessage()); >> > @Override protected void onPostExecute(String result) < this.statusField.setText("Login Successful"); this.roleField.setText(result); >> Add the following content to build.gradle and rebuild the whole project.
Here is the content of activity_main.xml.
Here is the content of Strings.xml.
PHPMYSQL Settings Hello world! Username Password Login - Get Login - Post Login Application Login Status Login Role Not login Not assigned Login Method Choose Method
Here is the content of AndroidManifest.xml.

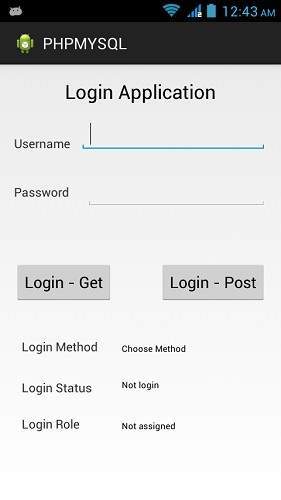
Let’s try to run your PHPMYSQL application. I assume you have connected your actual Android Mobile device with your computer. To run the app from Android studio, open one of your project’s activity files and click Run icon from the tool bar. Before starting your application, Android studio will display following window to select an option where you want to run your Android application.

Select your mobile device as an option and then check your mobile device which will display following screen −
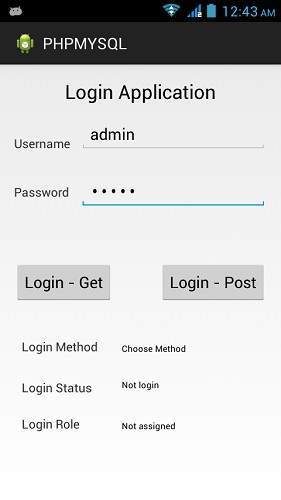
Now just type in your username and password. In my case i am typing admin as username and password. It is shown in the figure −
Now press the Get button and wait a few seconds and response will be downloaded and will be shown to you. In this case, the response is the ROLE that is fetched in case of admin as username and password.It is shown in the figure below −
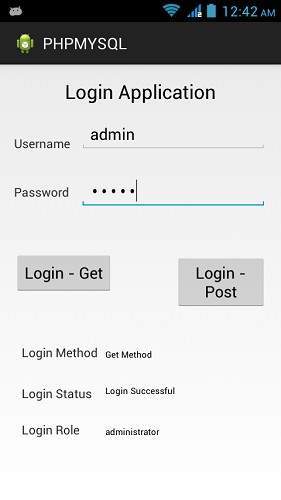
Now again press the POST button and same result would appear. It is shown in the figure below −