PHP: Get Value of Select Option and Radio Button
HTML select tag allows user to choose one or more options from the given drop down list. Below example contains PHP script to get a single or multiple selected values from given HTML select tag. We are covering following operations on select option field using PHP script.
To get value of a selected option from select tag:
?> To get value of multiple select option from select tag, name attribute in HTML tag should be initialize with an array [ ]:
?> PHP script for RADIO BUTTON FIELD:
HTML allows user to choose one option from the given choices. Below codes contains PHP script to get a selected value from given HTML .
To get selected value of a radio button:
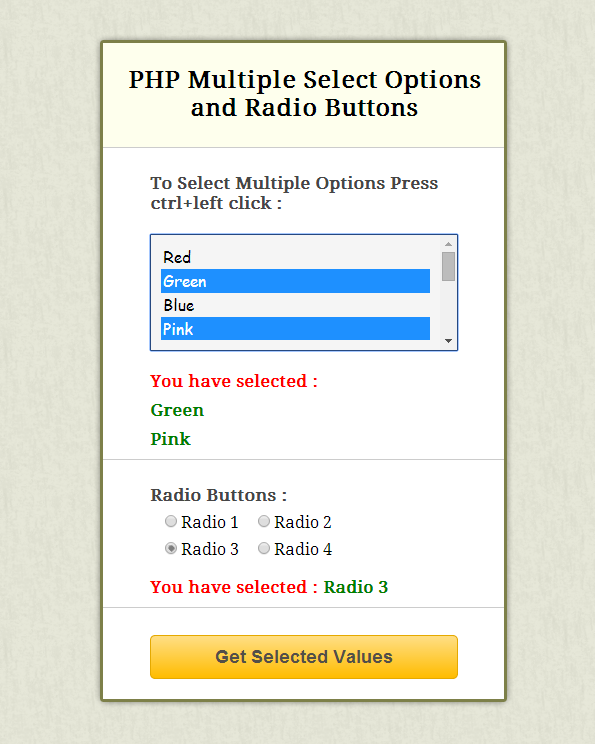
In below example, we have created a form having select tag and some radio buttons, As user submits it, Value of selected options will be displayed.
Watch our live demo or download our codes to use it.
Our complete HTML and PHP codes are given below.
PHP file: form.php
Given below our complete HTML contact form.
PHP Multiple Select Options and Radio Buttons
Radio 1 Radio 2 Radio 3 Radio 4 PHP file: select_value.php
To display multiple values, we used foreach loop here.
You have selected :
"; // As output of $_POST['Color'] is an array we have to use Foreach Loop to display individual value foreach ($_POST['Color'] as $select) < echo "".$select."
"; > > else < echo "Please Select Atleast One Color.
";> > ?>
PHP file: radio_value.php
To display radio buttons value.
You have selected : ".$_POST['radio'].""; > else< echo "Please choose any radio button.";> > ?>
CSS File: style.css
@import "http://fonts.googleapis.com/css?family=Droid+Serif"; /* Above line is used for online google font */ div.container < width:960px; height:610px; margin:50px auto; font-family:'Droid Serif',serif >div.main < width:308px; float:left; border-radius:5px; border:2px solid #990; padding:0 50px 20px >span < color:red; font-weight:700; display:inline-block; margin-bottom:10px >b < color:green; font-weight:700 >h2 < background-color:#FEFFED; padding:25px; margin:0 -50px; text-align:center; border-radius:5px 5px 0 0 >hr < margin:0 -50px; border:0; border-bottom:1px solid #ccc; margin-bottom:25px >label < color:#464646; text-shadow:0 1px 0 #fff; font-size:14px; font-weight:700; font-size:17px >select < width:100%; font-family:cursive; font-size:16px; background:#f5f5f5; padding:10px; border:1px solid >input[type=radio] < margin-left:15px; margin-top:10px >input[type=submit] < padding:10px; text-align:center; font-size:18px; background:linear-gradient(#ffbc00 5%,#ffdd7f 100%); border:2px solid #e5a900; color:#fff; font-weight:700; cursor:pointer; width:100%; border-radius:5px >input[type=submit]:hover
Conclusion:
Using these values you can perform other operations like CRUD (Create, Read, Update & Delete) in database. Hope you like it, keep reading our other blogs.
Radio buttons to php
Формы могут содержать различные элементы — текстовые поля, флажки, переключатели и т.д., обработка которых имеет свои особенности.
Обработка флажков
Флажки или чекбоксы (html-элемент ) могут находиться в двух состояниях: отмеченном (checked) и неотмеченном. Например:

Если флажок находится в неотмеченном состоянии, например:
то при отправке формы значение данного флажка не передается на сервер.
Если флажок отмечен, то при отправке на сервер для поля remember будет передано значение on :
Если нас не устраивает значение on , то с помощью атрибута value мы можем установить нужное нам значение:
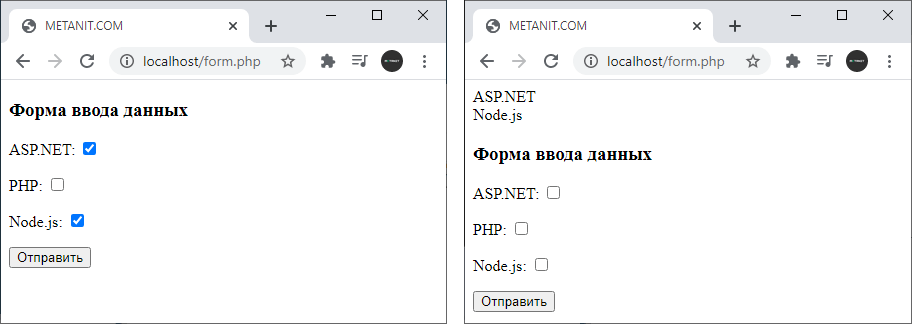
Иногда необходимо создать набор чекбоксов, где можно выбрать несколько значений. Например:
"; > ?> Форма ввода данных
ASP.NET:
PHP:
Node.js:
В этом случае значение атрибута name должно иметь квадратные скобки. И тогда после отправки сервер будет получать массив отмеченных значений:
$technologies = $_POST["technologies"]; foreach($technologies as $item) echo "$item
";
В данном случае переменная $technologies будет представлять массив, который можно перебрать и выполнять все другие операции с массивами.
Переключатели
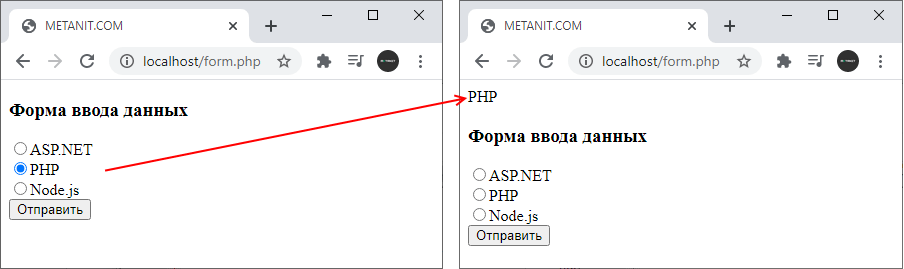
Переключатели или радиокнопки позволяют сделать выбор между несколькими взаимоисключающими вариантами:
?> Форма ввода данных
ASP.NET
PHP
Node.js
На сервер передается значение атрибута value у выбранного переключателя. Получение переданного значения:
Список
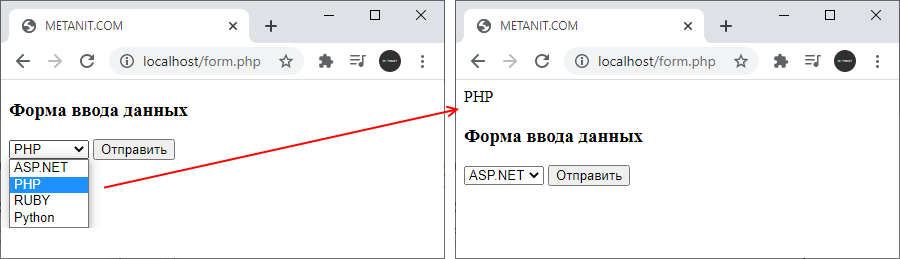
Список представляет элемент select , который предоставляет выбор одного или нескольких элементов:
?> Форма ввода данных
Элемент содержит ряд вариантов выбора в виде элементов :
Получить выбранный элемент в коде PHP как и обычное одиночное значение:
Но элемент также позволяет сделать множественный выбор. И в этом случае обработка выбранных значений изменяется, так как сервер получает массив значений:
"; > ?> Форма ввода данных
Такие списки имеют атрибут multiple=»multiple» . Для передачи массива также указываются в атрибуте name квадратные скобки: name=»courses[]»
PHP Radio Button
Summary: in this tutorial, you’ll learn how to create a form with radio buttons and handle radio groups in PHP.
Introduction to radio buttons
To create a radio button, you use the element with the type radio . For example:
input type="radio" name="contact" id="contact_email" value="email" />Code language: HTML, XML (xml)
A radio button doesn’t have a label. Therefore, you should always use a radio button with a element like this:
input type="radio" name="contact" id="contact_email" value="email"/> label for="contact_email">Email label>Code language: HTML, XML (xml)
To associate a radio button with a element, the value of the for attribute of the label needs to be the same as the value of the id of the radio button.
A radio button has two states: checked and unchecked.
When you link a label with a radio button, you can check the radio button by clicking the label or the radio button itself. Hence, the label increases the usability of the radio button because it expands the selection area.
Alternatively, you can place the radio button within a element like this:
label> input type="radio" name="contact_email" value="email"> Email label>Code language: HTML, XML (xml)
In this case, the radio links to the label without matching the for and id attributes.
To select a radio button automatically when the page loads for the first time, you can use the checked Boolean attribute:
input type="radio" name="contact" id="contact_email" value="email" checked /> label for="contact_email">Email label>Code language: HTML, XML (xml)
Define a radio group
In practice, you often use the radio buttons in a group. A group of radio buttons is called a radio group. A radio group allows you to select only one radio button at a time.
If you select any radio button in a group, the currently-selected radio button in the same group is automatically deselected.
To define a radio group, you assign the same name to all the radio buttons in the same group.
The following example defines a radio group that consists of two radio buttons.
input type="radio" name="contact" id="contact_email" value="email" /> label for="contact_email">Email label> input type="radio" name="contact" id="contact_phone" value="phone" /> label for="contact_phone">Phone label>Code language: HTML, XML (xml)
Handle radio buttons in PHP
When a form has a radio button with a name, you can get the checked radio button by accessing either $_POST or $_GET array, depending on the request method.
If a radio button is not checked, the $_POST or $_GET does not contain the key of the radio button. Therefore, you need to use the isset() function to check whether a radio button is checked or not:
isset($_POST['radio_name'])Code language: PHP (php)
Alternatively, you can use the filter_has_var() function:
filter_has_var(INPUT_POST, 'radio_name')Code language: JavaScript (javascript)
The filer_has_var() returns true if it finds the radio button name in the INPUT_POST .
If a radio button is checked, you get the value of the radio button from the $_POST using the radio button name:
$_POST['radio_name']Code language: PHP (php)
PHP radio button example
We’ll create a simple form with a radio group. If you do not select any option and submit the form, it’ll show an error message. Otherwise, it’ll show the value of the selected radio button.

First, create the following directory and file structure:
. ├── css | └── style.css ├── inc | ├── footer.php | ├── get.php | ├── header.php | └── post.php └── index.phpCode language: plaintext (plaintext)
File Directory Description index.php . Contain the main logic that loads get.php or post.php depending on the HTTP request method header.php inc Contain the HTML header footer.php inc Contain the HTML footer get.php inc Contain the code for showing a form with radio buttons when the HTTP request is GET. post.php inc Contain the code for handling POST request style.css css Contain the CSS code
Second, add the following code to the header.php file:
html> html lang="en"> head> meta charset="UTF-8" /> meta name="viewport" content="width=device-width, initial-scale=1.0" /> title>PHP Radio Button title> link rel="stylesheet" href="css/style.css"> head> body> main>Code language: HTML, XML (xml)
Third, add the following code to the footer.php file:
main> body> html>Code language: HTML, XML (xml)
Fourth, add the following code to the index.php file:
require __DIR__ . '/inc/header.php'; $contacts = [ 'email' => 'Email', 'phone' => 'Phone' ]; $errors = []; $request_method = strtoupper($_SERVER['REQUEST_METHOD']); if ($request_method === 'GET') < require __DIR__ . '/inc/get.php'; > elseif ($request_method === 'POST') < require __DIR__ . '/inc/post.php'; > require __DIR__ . '/inc/footer.php'; Code language: PHP (php)
The $contacts array is used to generate radio buttons dynamically. In a real application, the data may come from a database table or a result of an API call.
The $errors array is used to collect the error messages.
To get the HTTP request method, you access the ‘REQUEST_METHOD’ key of the $_SERVER array. The strtoupper() function converts the request method to uppercase.
$request_method = strtoupper($_SERVER['REQUEST_METHOD']);Code language: PHP (php)
The index.php file loads the get.php from the inc directory if the request is GET. When the form is submitted with the POST request, the index.php loads the post.php from the inc directory:
if ($request_method === 'GET') < require __DIR__ . '/inc/get.php'; > elseif ($request_method === 'POST') < require __DIR__ . '/inc/post.php'; >Code language: PHP (php)
Fifth, create a form in the get.php file:
"" method="post"> Please choose your preferred method of contact: foreach ($contacts as $key => $value) : ?> "radio" name="contact" >"contact_" value="" /> endforeach ?> class hljs-title">error">php echo $errors['contact'] ?? '' ?>small> div> div> button type hljs-title">submit">Submitbutton> div> form>Code language: PHP (php) The following code uses a foreach statement to generate a radio group from the $contacts array:
foreach ($contacts as $key => $value) : ?> "radio" name="contact" >"contact_" value="" /> endforeach ?>Code language: PHP (php)
The following code shows the error message from the $errors array. Note that we use the null coalescing operator (??) which is available in PHP 7+.
The expression $errors[‘contact’] ?? » returns $errors[‘contact’] if it exists and is not null or ” otherwise.
class hljs-title">error">php echo $errors['contact'] ?? '' ?>small>Code language: PHP (php)
Finally, add the code that handles the POST request:
// sanitize the contact $contact = filter_input(INPUT_POST, 'contact', FILTER_SANITIZE_STRING); // check the selected value against the original values if ($contact && array_key_exists($contact, $contacts)) < $contact = htmlspecialchars($contact); >else < $errors['contact'] = 'Please select at least an option.'; > if (count($errors)) < require __DIR__ . '/get.php'; > else < echo $contact. Back to the form html; > Code language: PHP (php)
The filter_input() function sanitizes the value of the checked radio button. To make sure the submitted value is valid, we check it against the keys of the $contact array using the array_key_exists() function.
If the submitted value matches with one of the array keys, we show a message. Otherwise, we add an error message to the $errors array.
In the last if. else statement, we load the form ( get.php ) that shows an error message if the $errors array is not empty. Otherwise, we show a confirmation message.
Summary
- Use the input with type=»radio» to create a radio button.
- Use the same name for multiple radio buttons to define a radio group.
- Get the value of a checked radio via the $_POST (or $_GET ) variable, depending on the request method.