PHP GET and POST Method – Tutorial
While dealing with the forms, information can be submitted and transferred to same or another page. To send submitted data through form, one can use GET & POST method to do that in PHP.
A form data can be submitted using these two methods. Both are used for same purpose but stands apart under some specifications. As in GET method key values are passed in the Url while in POST, the information transfers in a hidden manner.
A form submitted information is appended in to the url in the form of Query String consisting of name=value pairs in URL. This string contains user values/data, which are separated by ampersand and spaces are replaced with + sign.
We have covered lot of examples in which, we set method attribute of form to GET or POST. Let’s discuss about them in detail.
GET Method
As explained above, before sending any information , it converts values/data into a query string in URL known as Url Encoding. Which contains both page link and encoded information separated by the ? character.
Client Side: Below code is an HTML form with method=”get” for user to fill information.
Server Side: Below code has PHP script where, $_GET associative array is used to receive sent information at server end.
 "; echo "Your Email is: ". $_GET["email"]. "
"; echo "Your Mobile No. is: ". $_GET["contact"]; > ?>
Above query string of information, generated by Get method can be readable in address bar therefore, never use Get method for sending sensitive information to server.
One should avoid use of this method to send binary data like, Images or Word Document file to the server.
POST Method
As explained above, before sending information to server, it converts client’s information into a query string in URL.
Client Side: Below code is an HTML form with method=”post” for user to fill information.
Server Side: Below code has PHP script where, $_POST associative array is used to receive sent information at server end.
 "; echo "Your Email is: ". $_POST["email"]. "
"; echo "Your Mobile No. is: ". $_POST["contact"]; > ?>
Query string , generated by Post method never appears in address bar i.e. it is hidden for the user therefore, we can use this method for sending sensitive information to server. Moreover, we can make use of this method to send binary data to the server without any restrictions to data size.
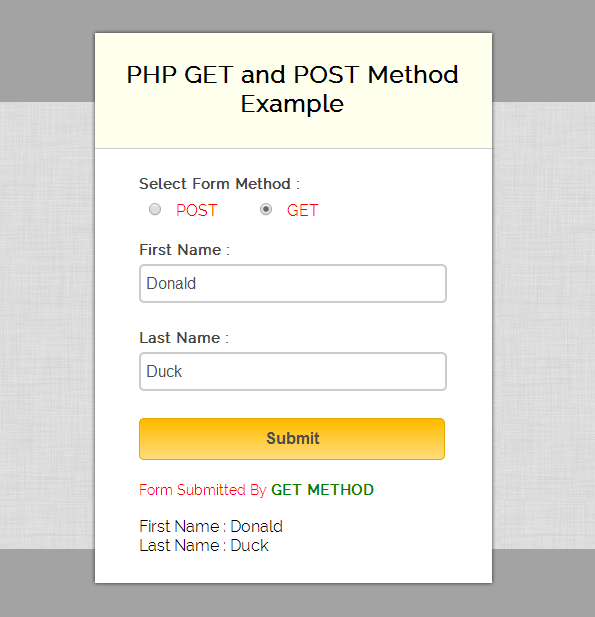
In our example, we allow user to choose a method via radio button and this value is assigned to form’s method attribute.
$("input[type=radio]").change(function()< var method = $(this).val(); $("#form").attr("method", method); // Assigns Method Type From Radio Button >); Watch our live demo or just follow our codes and download it.
Complete HTML and PHP codes are given below.
HTML form: first.php
Given below our complete HTML form.
PHP GET and POST Method Example
POST GET PHP code: second.php
Below PHP code display values on the basis of GET and POST method.
Form Submitted By POST METHOD
"; echo "First Name : ".$fname."
Last Name : ".$lname; > ?> Form Submitted By GET METHOD
"; echo "First Name : ".$fname."
Last Name : ".$lname; > ?>
jQuery code: get_post.js
In the below script, we used on change event to get value of radio button. As this value is assigned to method attribute of form.
$(document).ready(function() < $("input[type=radio]").change(function() < var method = $(this).val(); $("#form").attr("method", method); // Assigns Method Type From Radio Button >); // Function Executes On Submit Button's Click $("#submit").click(function() < var fname = $("#fname").val(); var lname = $("#lname").val(); if (fname != '' || lname != '') < return true; >else < alert("Please fill all fields. "); return false; >>); >);
CSS File: style.css
@import "http://fonts.googleapis.com/css?family=Raleway"; /* Above line is used for online google font */ h2 < background-color:#FEFFED; padding:30px 35px; margin:-10px -50px; text-align:center; border-radius:10px 10px 0 0 >span < display:block; margin-bottom:20px; color:red >.success < display:block; margin-top:20px; margin-bottom:0; font-size:14px >b < color:green >hr < margin:10px -50px; border:0; border-top:1px solid #ccc; margin-bottom:25px >div.container < width:900px; height:610px; margin:35px auto; font-family:'Raleway',sans-serif >div.main < width:306px; padding:10px 50px 30px; border:2px solid gray; border-radius:10px; font-family:raleway; float:left; margin-top:15px >input[type=text] < width:96%; height:25px; padding:5px; margin-bottom:25px; margin-top:5px; border:2px solid #ccc; color:#4f4f4f; font-size:16px; border-radius:5px >input[type=radio] < margin:10px 10px 0 >label < color:#464646; text-shadow:0 1px 0 #fff; font-size:14px; font-weight:700 >input[type=submit] < font-size:16px; background:linear-gradient(#ffbc00 5%,#ffdd7f 100%); border:1px solid #e5a900; color:#4E4D4B; font-weight:700; cursor:pointer; width:100%; border-radius:5px; padding:10px 0; outline:none >input[type=submit]:hover
Conclusion:
For above reasons, POST method is widely used to send the information to server. Hope this tutorial helped you a lot, keep reading our other posts for more coding tricks.
PHP Form Handling
The PHP superglobals $_GET and $_POST are used to collect form-data.
PHP — A Simple HTML Form
The example below displays a simple HTML form with two input fields and a submit button:
Example
When the user fills out the form above and clicks the submit button, the form data is sent for processing to a PHP file named «welcome.php». The form data is sent with the HTTP POST method.
To display the submitted data you could simply echo all the variables. The «welcome.php» looks like this:
The output could be something like this:
The same result could also be achieved using the HTTP GET method:
Example
and «welcome_get.php» looks like this:
The code above is quite simple. However, the most important thing is missing. You need to validate form data to protect your script from malicious code.
Think SECURITY when processing PHP forms!
This page does not contain any form validation, it just shows how you can send and retrieve form data.
However, the next pages will show how to process PHP forms with security in mind! Proper validation of form data is important to protect your form from hackers and spammers!
GET vs. POST
Both GET and POST create an array (e.g. array( key1 => value1, key2 => value2, key3 => value3, . )). This array holds key/value pairs, where keys are the names of the form controls and values are the input data from the user.
Both GET and POST are treated as $_GET and $_POST. These are superglobals, which means that they are always accessible, regardless of scope — and you can access them from any function, class or file without having to do anything special.
$_GET is an array of variables passed to the current script via the URL parameters.
$_POST is an array of variables passed to the current script via the HTTP POST method.
When to use GET?
Information sent from a form with the GET method is visible to everyone (all variable names and values are displayed in the URL). GET also has limits on the amount of information to send. The limitation is about 2000 characters. However, because the variables are displayed in the URL, it is possible to bookmark the page. This can be useful in some cases.
GET may be used for sending non-sensitive data.
Note: GET should NEVER be used for sending passwords or other sensitive information!
When to use POST?
Information sent from a form with the POST method is invisible to others (all names/values are embedded within the body of the HTTP request) and has no limits on the amount of information to send.
Moreover POST supports advanced functionality such as support for multi-part binary input while uploading files to server.
However, because the variables are not displayed in the URL, it is not possible to bookmark the page.
Developers prefer POST for sending form data.
Next, lets see how we can process PHP forms the secure way!
Работа с формами
Одно из главнейших достоинств PHP — то, как он работает с формами HTML. Здесь основным является то, что каждый элемент формы автоматически становится доступным вашим программам на PHP. Для подробной информации об использовании форм в PHP читайте раздел Переменные из внешних источников. Вот пример формы HTML:
Пример #1 Простейшая форма HTML
В этой форме нет ничего особенного. Это обычная форма HTML без каких-либо специальных тегов. Когда пользователь заполнит форму и нажмёт кнопку отправки, будет вызвана страница action.php . В этом файле может быть что-то вроде:
Пример #2 Выводим данные формы
Пример вывода данной программы:
Здравствуйте, Сергей. Вам 30 лет.
Если не принимать во внимание куски кода с htmlspecialchars() и (int) , принцип работы данного кода должен быть прост и понятен. htmlspecialchars() обеспечивает правильную кодировку «особых» HTML-символов так, чтобы вредоносный HTML или Javascript не был вставлен на вашу страницу. Поле age, о котором нам известно, что оно должно быть число, мы можем просто преобразовать в int , что автоматически избавит нас от нежелательных символов. PHP также может сделать это автоматически с помощью модуля filter. Переменные $_POST[‘name’] и $_POST[‘age’] автоматически установлены для вас средствами PHP. Ранее мы использовали суперглобальную переменную $_SERVER , здесь же мы точно так же используем суперглобальную переменную $_POST , которая содержит все POST-данные. Заметим, что метод отправки (method) нашей формы — POST. Если бы мы использовали метод GET, то информация нашей формы была бы в суперглобальной переменной $_GET . Кроме этого, можно использовать переменную $_REQUEST , если источник данных не имеет значения. Эта переменная содержит смесь данных GET, POST, COOKIE.
В PHP можно также работать и с XForms, хотя вы найдёте работу с обычными HTML-формами довольно комфортной уже через некоторое время. Несмотря на то, что работа с XForms не для новичков, они могут показаться вам интересными. В разделе возможностей PHP у нас также есть короткое введение в обработку данных из XForms.
User Contributed Notes 3 notes
According to the HTTP specification, you should use the POST method when you’re using the form to change the state of something on the server end. For example, if a page has a form to allow users to add their own comments, like this page here, the form should use POST. If you click «Reload» or «Refresh» on a page that you reached through a POST, it’s almost always an error — you shouldn’t be posting the same comment twice — which is why these pages aren’t bookmarked or cached.
You should use the GET method when your form is, well, getting something off the server and not actually changing anything. For example, the form for a search engine should use GET, since searching a Web site should not be changing anything that the client might care about, and bookmarking or caching the results of a search-engine query is just as useful as bookmarking or caching a static HTML page.
Also, don’t ever use GET method in a form that capture passwords and other things that are meant to be hidden.