- Create and Modify Word Docx files using Python Docx
- Getting Started
- Working with Text
- Paragraph Alignment
- Working with Fonts
- Basics of python-docx library
- Contents
- Install python-docx
- Check if python-docx installed successfully
- Create new document
- Open and read a document
- Add text content to a document
- Align content
- Apply styles — add_run function
- Bold, Italics, Underline
- Font color, size and family
- Tables
- Tabbed paragraph
- Add Image
- Loop through paragraphs
Create and Modify Word Docx files using Python Docx
Python Docx is a python library for creation and modification of Microsoft Word documents. It offers a variety of operations to create new documents and other word operations like working with text, images, shapes, tables and many other document features. New document can be created and existing documents can also be modified using python docx. For getting started, first install python docx on your system using pip or source.
# using pip pip install python-docx # using easy_install easy_install python-docx # or build from source tar xvzf python-docx-.tar.gz cd python-docx- python setup.py installGetting Started
# import docx document from docx import Document # initialize a document document = Document()Or if there is some existing document, it can also be opened using Document() in python docx by providing path of document.
document = Document(doc_path)Working with Text
Python-Docx offers different options like paragraph, heading and other options for simple text. Headings are paragraphs with different text size and style based on its level defined while creating heading. Heading level ranges from 0-9 based on text size where 0 is biggest font heading. Here are some examples of headings.
# title heading document.add_heading("This is a level 1 heading", 0) # Add other heading levels document.add_heading("This is a level 2 heading", 2) document.add_heading("This is a level 3 heading", 3) document.add_heading("This is a level 5 heading", 5) document.add_heading("This is a level 7 heading", 7) document.add_heading("This is a level 9 heading", 9)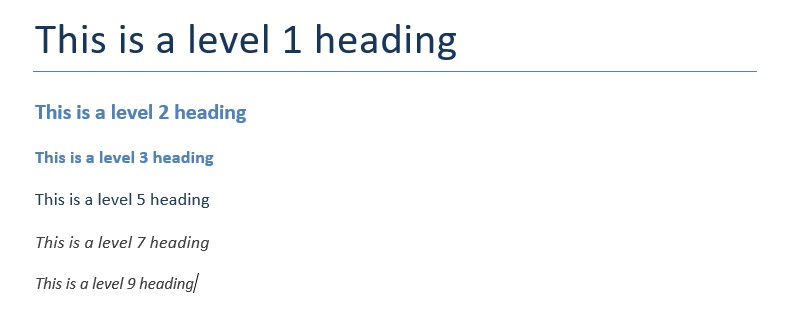
Paragraph has different properties depending on its placement and it divides content accordingly to its lines. Paragraphs has different style and alignment options to create a document with specified text locations and styles.
paragraph = document.add_paragraph("TensorFlow is a free and open-source software library for machine learning and artificial intelligence.")# add more text paragraph.add_run(" It can be used across a range of tasks for ") # add text with styles paragraph.add_run('training model ').bold = True # added text with bold paragraph.add_run('and inference.').italic = True # added italic textdocument.add_paragraph('Intense quote', style='I have no special talent')Paragraph Alignment
Paragraph alignments like horizontal alignment, indentation and other features like line spacing can also be applied to paragraphs. First lets work with horizontal alignment.
from docx.enum.text import WD_ALIGN_PARAGRAPH # Check previous alignment print("Previous alignment", paragraph.paragraph_format.alignment) # Align paragraph center paragraph.paragraph_format.alignment = WD_ALIGN_PARAGRAPH.CENTERIndentation is horizontal space between paragraph and its container edges. In python-docx we can specify details in Inches so we import function and can indent in direction.
from docx.shared import Inches paragraph_r = document.add_paragraph('This is some random paragraph for testing indentation on both (left and right) side of paragraph.') # only first line indent paragraph.paragraph_format.first_line_indent = Inches(0.5) # paragraph indent paragraph_r.paragraph_format.left_indent = Inches(0.5) # apply 0.5 inch left indentation paragraph_r.paragraph_format.right_indent = Inches(1) # apply 1 inch right indentationfrom docx.shared import Pt paragraph.paragraph_format.line_spacing = Pt(18)Working with Fonts
Different font styles like color, font family and other modifications can also be applied. Here we create a paragraph and change its font size and font family.
# font modifications para_font = document.add_paragraph() run = para_font.add_run('This is a paragraph with different font styles.\n') run.font.size = Pt(14) # font size run.font.name = 'Courier New' # font namefrom docx.shared import RGBColor # add underlined text with blue color url = para_font.add_run("http://google.com") url.font.color.rgb = RGBColor(0x00, 0x00, 0xFF) url.font.underline = True # font underline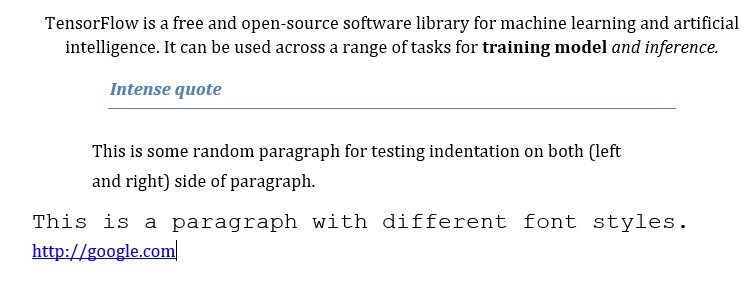
Here is the output for all the code we have written for paragraphs. Now we can export document and write it to directory.
# save document document.save("paragraphs.docx")Basics of python-docx library
python-docx is an open source python library for working with word documents. If there is a requirement to work with word documents using python code, this library is the best option available.
This is also free to use, simple to understand and optimized for best utilization of CPU.
Most of the functionalities that Microsoft Word offers is covered in this library.
Also compatible with the latest version of Python.
Go through this tutorial and you will get to know all the basics you need to work with word documents using python.
Each of the common functionalities are explained with easy to understand code samples.
Contents
Install python-docx
Download and install the latest version of python from Python Website if not already done. Setting up virtual environment is not a must. But this is a best practice when working on python projects. Click virtual environment for more details. Install python-docx using the command: pip install python-docx
Check if python-docx installed successfully
Create new document
Blank word documents can be easily created using python-docx . Import Document module from docx library and also import the os standard library. We need os module functionalities to Open or Save files. Then create a Document object and add the necessary contents and save the file by calling Save() function.
from docx import Document import os newDoc = Document() newDoc.add_paragraph("First Line") filepath = os.path.dirname(__file__) + '\TestFile.docx' newDoc.save(filepath) Open and read a document
To open word files, call Document class and pass the file path as parameter as shown below. Then, we can loop through paragraphs or headings of any other type of contents to access the data.
from docx import Document import os filepath = os.path.dirname(__file__) + '\TestFile.docx' d = Document(filepath) print(len(d.paragraphs)) for p in d.paragraphs: print(p)
Add text content to a document
To add all the text content use add_paragraph built-in function. All content added are by default of normal style. Apply different styles as below. To add a line break, add an empty paragraph.
from docx import Document import os newDoc = Document() newDoc.add_paragraph("Top Heading", style = 'Heading 1')#'Heading 1' newDoc.add_paragraph("First Line")#'Normal' newDoc.add_paragraph("List 1", style = 'List Number')#'Ordered List' newDoc.add_paragraph("List 2", style = 'List Number')#'Ordered List' newDoc.add_paragraph("List 1", style = 'List Bullet')#'Unordered List' newDoc.add_paragraph("List 2", style = 'List Bullet')#'Unordered List' filepath = os.path.dirname(__file__) + '\TestFile.docx' newDoc.save(filepath) Align content
from docx import Document from docx.enum.text import WD_ALIGN_PARAGRAPH import os newDoc = Document() htop = newDoc.add_paragraph("Top Heading", style = 'Heading 1') htop.alignment = WD_ALIGN_PARAGRAPH.CENTER c = newDoc.add_paragraph("This is a justified paragraph.\nThis is a justified paragraph") c.alignment = WD_ALIGN_PARAGRAPH.JUSTIFY filepath = os.path.dirname(__file__) + '\TestFile.docx' newDoc.save(filepath) Apply styles — add_run function
To apply additional styles to a content we have to use add_run function. This function returns an object variable to which we can apply styles.
from docx import Document from docx.enum.text import WD_ALIGN_PARAGRAPH import os newDoc = Document() a1 = newDoc.add_paragraph().add_run('Bold Line') a1.bold = True filepath = os.path.dirname(__file__) + '\TestFile.docx' newDoc.save(filepath) Bold, Italics, Underline
We can change the style of the text content to Bold, Italics or Underlined by using the built-in properties shown below.
from docx import Document from docx.enum.text import WD_ALIGN_PARAGRAPH import os newDoc = Document() p = newDoc.add_paragraph() p.add_run('Bold Content\n') p.bold = True p.add_run('Italic Content\n').italic = True p.add_run('Underline Content\n').underline = True filepath = os.path.dirname(__file__) + '\TestFile.docx' newDoc.save(filepath) Font color, size and family
To modify the font color, size or family, import RGBColor, Pt from docx.shared module of python-docx .
from docx import Document from docx.shared import RGBColor, Pt import os newDoc = Document() p = newDoc.add_paragraph().add_run('Test Content') p.font.color.rgb = RGBColor(115, 52, 100) p.font.name = 'Calibri' p.font.size = Pt(20) filepath = os.path.dirname(__file__) + '\TestFile.docx' newDoc.save(filepath) Tables
from docx import Document import os newDoc = Document() t = newDoc.add_table(rows = 2, cols = 2) t.rows[0].cells[0].text = 'Cell 1' t.rows[0].cells[1].text = 'Cell 2' t.rows[1].cells[0].text = 'Cell 3' t.rows[1].cells[1].text = 'Cell 4' t.add_row() t.rows[2].cells[0].text = 'Cell 5' t.rows[2].cells[1].text = 'Cell 6' filepath = os.path.dirname(__file__) + '\TestFile.docx' newDoc.save(filepath)
Tabbed paragraph
from docx import Document import os newDoc = Document() p = newDoc.add_paragraph() p.add_run().add_tab() p.add_run('After Tab') filepath = os.path.dirname(__file__) + '\TestFile.docx' newDoc.save(filepath) Add Image
from docx import Document from docx.shared import RGBColor, Pt, Inches import os newDoc = Document() img = newDoc.add_picture(imgpath, height=Inches(3), width=Inches(2)) filepath = os.path.dirname(__file__) + '\TestFile.docx' newDoc.save(filepath)
Loop through paragraphs
We can use for loop to navigate through the contents of the document. There are options to access the content based on the type like Paragraphs, Images, Headings, etc. Or we can provide a common property to a group of contents and access those. To see how this works, refer the sample application link provided below.
import docx as doc import os filepath = os.path.dirname(__file__) + '\TestFile.docx' d = doc.Document(filepath) print(len(d.paragraphs)) for p in d.paragraphs: print(p)