- How to insert HTML code to Outlook emails
- How to insert clean HTML code to Outlook
- Outlook HTML limitations
- Как отправить html-письмо в Outlook 2016
- Способ загрузки html-письма №1 (с помощью Microsoft Word)
- Способ загрузки html-письма в Outlook 2016 №2 (напрямую)
- Сохраняем загруженное письмо как шаблон
- Редактирование письма
- Текст письма
- Изображения
- Работа со ссылками
- How to create beautiful HTML emails in MS Outlook
- Inspecting the source code of an email in Outlook
- Developing HTML code for emails
- Outlook HTML rules
- Embedding HTML into Outlook email
How to insert HTML code to Outlook emails
Let’s say you are using Microsoft Outlook and you have to design & send a HTML email (for example, a HTML newsletter with some text & images). First of all, you will quickly learn that – if you design the email using Outlook or Word – the email source code will actually render badly on other email clients. This happens because Outlook is generating the email source code using mostly VML (Vector Markup Language) which is poorly supported by other email clients. So how do you insert HTML code to Outlook emails?
You will have to somehow import a clean HTML source code, to an Outlook email, in order to get it displayed correctly on most email client applications.
Outlook always alters imported HTML code, unless you use an OFT template file, a macro trick or Bells & Whistles for Outlook
To insert your own HTML email code, there are many articles on the web advising you to drag and drop the HTML file over Outlook or insert the HTML file using the “insert as text” feature. Well, they are simply wrong. You will soon discover that Outlook alters / converts your HTML code: there is no way to insert your own, clean HTML code to Outlook by simply doing a copy / paste or drag’n’drop operation.
Basically, to insert clean HTML code to an Outlook email, you have three solutions:
1. save your HTML file as an Outlook OFT email template, then pre-load your email with the OFT template (see this tutorial on how to create an Outlook OFT template from HTML);
2. use a macro script to load the HTML code directly to an Outlook email;
3. use Bells & Whistles for Outlook: it adds an “Insert HTML” button to your Outlook email editor, making it extremely easy for you to select a HTML file and insert its HTML code to your Outlook email.
How to insert clean HTML code to Outlook
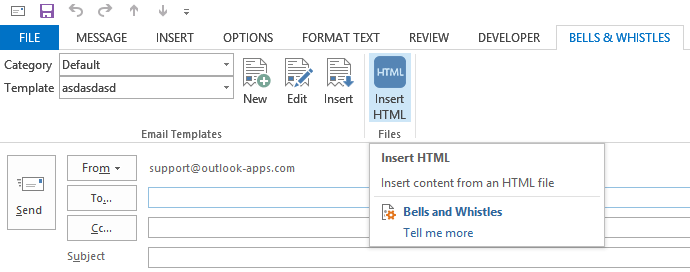
Assuming you’ve downloaded Bells & Whistles (download link), all you have to do is to open a new Outlook email, then go to the Bells menu and click on the big blue “Insert HTML” button and browse to select the HTML file that will be loaded in your email. That’s it!
If you don’t want to use the Bells & Whistles addin to insert HTML code, we will describe below a programmatic way to add your own HTML code to Outlook emails without having it altered by Outlook.
Make sure you are not using a trial-expired version of Office (Developer mode is disabled in expired Office trials). The following procedure was tested on Microsoft Outlook 2010 and 2013.
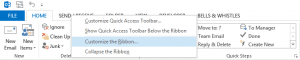
1. Enable the Outlook Developer mode by right clicking on the Outlook ribbon (menus area) -> choose Customize Ribbon -> mark / enable Developer;
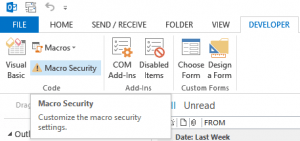
2. In the Developer tab, go to Macro Security -> enable “Notification for all macros”;
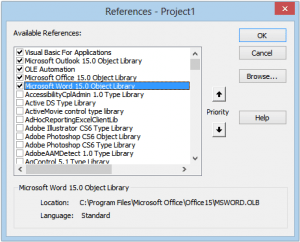
3. In the Developer tab, click on Visual Basic -> Tools -> References -> enable “Microsoft WORD 15.0 Object Library” (don’t confuse it with “Microsoft Office 15.0 Object Library”). If you are using Office 2010, look for Word 14.0 (15.0 means Office 2013);
4. In the Developer Macros-> Macros menu, type a name for the new macro (for example, InsertHTMLFile) then click on Create;
5. In the Macro editor, copy & paste the following source code, between the Sub End Sub lines:
Dim insp As Inspector
Set insp = ActiveInspector
If insp.IsWordMail Then
Dim wordDoc As Word.Document
Set wordDoc = insp.WordEditor
wordDoc.Application.Selection.InsertFile «e:\test.html«, , False, False, False
End If
6. Replace “e:\test.html” with the actual path to the desired HTML file that you want to insert to the Outlook email message body. Make sure you use an absolute path to the HTML file (for example “C:\MyDocs\outlook-file.html” and not “MyDocs\outlook-file.html”);
7. Save the macro. Just in case, restart Outlook to activate the changes;
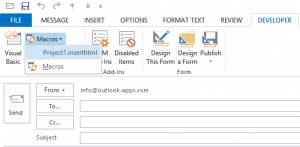
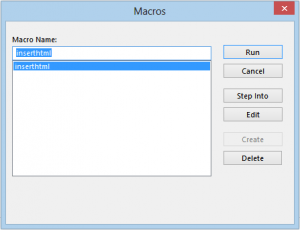
8. Create a new Outlook email, then go to the Developer tab -> Macros and select the newly created macro. It shall insert the non-altered HTML code to your Outlook email 🙂
While the above HTML insertion method is far from being a 2-clicks solution, it actually is the simplest method to insert non-altered, clean HTML code to Outlook emails. Although it surely is counter-productive to use this method on regular daily emails, it can be a helpful solution if you are sending an email newsletter through a mail merge add-in like Easy Mail Merge.
Outlook HTML limitations
Even if you insert your own HTML code to Outlook emails, Outlook will not render it properly unless you follow these simple guidelines:
1. all links and images must be linked as absolute URLs (using something like img src=”images/image1.png” will not work, you have to use an absolute URL like www.domain.com/images/image1.png);
2. do NOT load CSS styles from external CSS files – you have to use inline CSS. Here is a nice tool that can check & clean a HTML email file: http://premailer.dialect.ca/;
3. Make sure you use HTML tags & attributes that are actually supported by Outlook. Outlook is designed to support only a sub-set of HTML 4, so some HTML tags are simply ignored. These tags are not removed from your email code (they will display just fine on other email clients that support them), but Outlook skips them. Here is a list of ignored email HTML tags.
You can always use Bells & Whistles for Outlook to insert HTML files to Outlook emails with just a couple of clicks:
Как отправить html-письмо в Outlook 2016
Добрый день. Сегодня мы расскажем вам как отправлять и редактировать html-письма с помощью Outlook 2016.
Сразу стоит оговорить, что Outlook 2016 не предназначен для отправки html-сообщений, а лишь воспринимает определенные элементы html кода. Это значит, что адаптивность у писем отправленных данными способами «исчезает», а само письмо будет несколько изменено относительно того, что вы увидите открыв его в браузере. Поэтому мы настоятельно рекомендуем проверять отображение письма, отправив его на свои почтовые ящики, перед «чистовой» отправкой предполагаемому получателю.
Способ загрузки html-письма №1 (с помощью Microsoft Word)
1. Открываем нужный нам .html файл с помощью Microsoft Word (Клик правой кнопкой мышки по нужному файлу — Открыть с помощью)
2. Выделяем все содержимое файла (Ctrl+A) и копируем в буфер обмена (Ctrl+С)

3. Создаем сообщение в Outlook 2016

4. Вставляем содержимое буфера обмена в тело письма (Ctrl+V)

Способ загрузки html-письма в Outlook 2016 №2 (напрямую)

2. Добавляем в панель быстрого доступа функцию «Вложить файл»
Примечание: функция с таким же названием во вкладке «Вставка» работает по другому.

3. С помощью появившейся кнопки «Вложить файл» в панели быстрого доступа, выбираем нужный нам html файл письма, и добавляем его в сообщение с помощью опции «Вставить как текст»

4. Готово, письмо вставлено.

Сохраняем загруженное письмо как шаблон
Помимо непосредственно отправки html-писем, мы хотим поделиться с вами еще одним небольшим «лайфхаком» для Outlook 2016 — сохранение писем как шаблонов.
Файлы шаблонов Outlook имеют свое расширение .otf, и открываются сразу в интерфейсе самого почтовика. Это может быть полезно не только для экономии своего времени при отправке письма, но и для дальнейшей передачи письма коллегам, и на другие устройства.
Для того чтобы создать шаблон, после составления письма сохраните его как файл .otf — Файл/Сохранить как/Шаблон Outlook.
Примечание: Outlook автоматически создает директорию для сохранения шаблонов писем формата Диск:\Users\UserName\AppData\Roaming\Microsoft\Templates, для удобства доступа, не забудьте указать другую в момент сохранения.
Но к сожалению, данная функция только сохраняет сам файл шаблона, и он не будет отражен в интерфейсе почтового клиента. Для того чтобы получить быстрый доступ ко всем сохраненным шаблонам, вы можете создать директорию в интерфейсе Outlook:

И уже в нужную директорию добавить сохраненные шаблоны, просто перетащив их из нужной папки:

Теперь все нужные шаблоны будут всегда у вас под рукой!
Редактирование письма
Текст письма
Работа с текстом html-письма по своей сути ничем не отличается от работы с текстом в обычном письме. Вставка, редактирование шрифта, изменение выравнивания и т.д. — все эти опции для вас доступны. Но мы не рекомендуем создавать новые текстовые поля, там где они не предусмотрены структурой письма, и значительно изменять объем текста (за исключением «во всю ширину письма»).
Изображения
Первое что нужно сказать про изображения в письмах Outlook — изображения исходного письма должны храниться не на вашем компьютере, а в сети, и задаваться прямыми ссылками. В противном случае они не отобразятся у получателя.
Также, мы не рекомендуем добавлять новые изображения в письмо, и заменять имеющиеся на изображения другого размера — отображения письма после подобных манипуляций непредсказуемо.
Соответственно единственная безболезненная манипуляции над изображениями в письме — замена на аналогичное по размерам. Для этого кликните правой кнопкой мыши на изображение и выберите опцию «Изменить изображение/Из файла»

Выберите нужное изображение у вас на компьютере, и нажмите кнопку «Вставить»
Работа со ссылками
В работе со ссылками вы не ограничены только выбором объекта — добавить, удалить, заменить ссылку вы можете только для картинки или текста.
Для этого кликните правой кнопкой мышки на нужную картинку или выделенный участок текста и выберите нужную опцию из списка:

- Добавить ссылку — «Ссылка/Вставить ссылку»
- Удалить ссылку — «Удалить ссылку» для картинки, «Удалить гиперссылку» для текста
- Заменить ссылку — «Ссылка для редактирования» для картинки, «Изменить гиперссылку» для текста
После этого у вас откроется окно, где нужно будет указать нужную ссылку и нажать «Ок».
Поздравляем, письмо готово к отправке!
How to create beautiful HTML emails in MS Outlook
Ever wondered how people create those beautiful e-mails that popup in your Outlook mailbox every day? Emails that look like web pages. Emails that can be used for newsletters or marketing campaigns. You can do it too and it’s very easy to do. You would just need to know some HTML and have your beautiful images ready.
Inspecting the source code of an email in Outlook
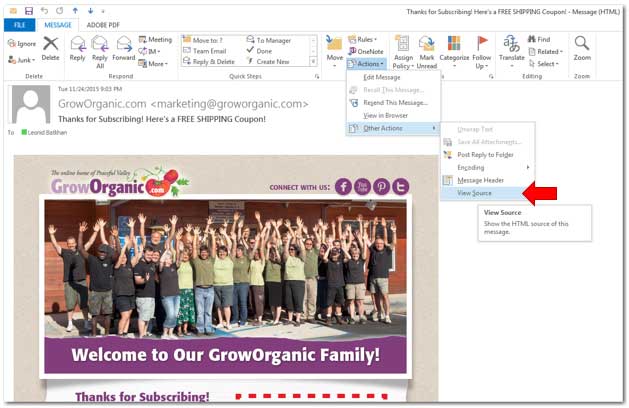
You can start with looking at what and how others do. When you see an email in you Outlook’s Inbox that draw you attention you can easily inspect its «guts» – the source HTML code. In order to do this in Outlook 2013 (Microsoft Office 2013), open the email of your interest and click through Actions → Other Actions → View Source as shown in the following picture:
The HTML source will open in a Notepad window as shown in this picture:

Developing HTML code for emails
You can inspect that HTML code, explore, modify, and save it. You can also develop your own HTML code. Essentially, you develop HTML code for email the same way as you develop a webpage. There are, however, some rules for developing HTML pages for embedding them into Outlook email.
Outlook HTML rules
If you do not follow these rules, the inserted HTML code will not look right in the Outlook. So here are the rules:

- All links and images must use absolute URLs. Using relative URLs, something like will not work, you have to use full URL like .
- Do not use external CSS files for styles; use either embedded CSS that is placed in the section of your HTML, or inline CSS. Avoid using background images in your CSS.
- Do not use Javascript in HTML as it only works in web browsers, not MS Outlook.
- Outlook supports most, but not all HTML tags and attributes, so be warned.
Embedding HTML into Outlook email
When your HTML webpage is ready, you can embed it into Outlook email by clicking New Email → Attach File:
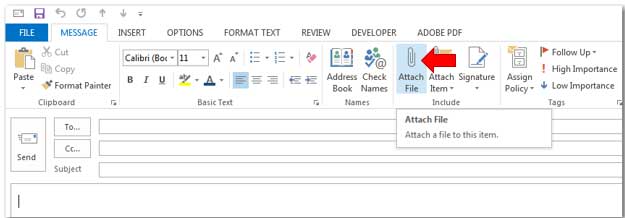
Then navigate to your HTML file, select the file (highlight it), and from the Insert drop-down box select Insert as Text:
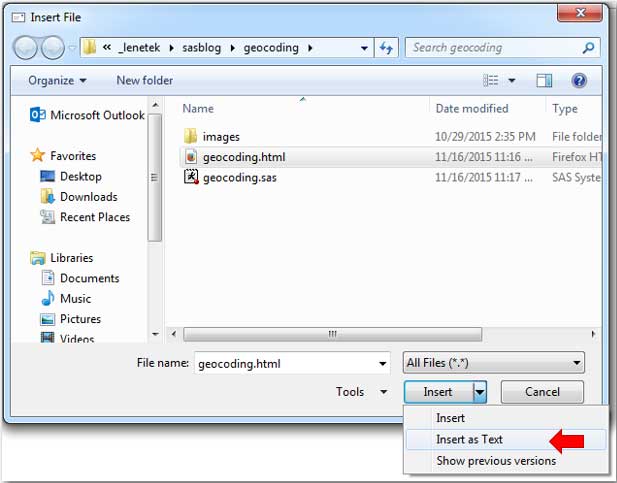
Voila! — Outlook embeds your HTML file into the email body.
If you would like to delegate all or some of these steps — from creating images, compiling content or HTML, or conducting the whole e-mailing campaign — Lenetek will be happy to help.