Install OpenCV 4 with Python 3 on Windows
If you need a short tutorial about how to get started with OpenCV 4 programming in Python 3.8 on Windows, you are in the right place. Most articles I found online, including the OpenCV documentation, seem concerned only with Python 2.7.
We’ll start by installing the latest stable version of Python 3, which at the time of this writing is 3.8. Head over to https://www.python.org/downloads/ and download the installer. The default Python Windows installer is 32 bits and this is what I will use in this article. If you need the 64 bits version of Python, check the Looking for a specific release? section from the above page.
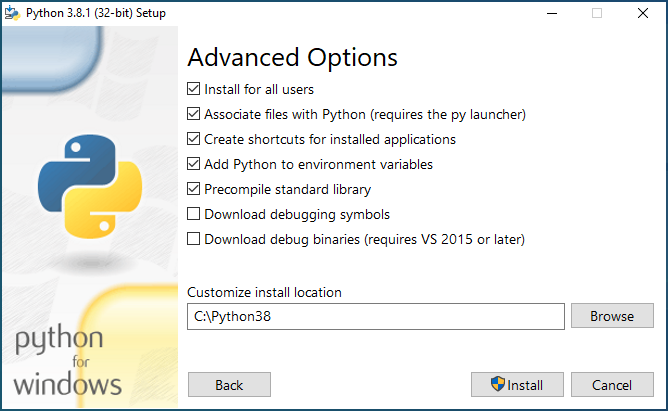
Start the installer and select Customize installation. On the next screen leave all the optional features checked. Finally, on the Advanced Options screen make sure to check Install for all users, Add Python to environment variables and Precompile standard library. Optionally, you can customize the install location. I’ve used C:\Python37. You should see something like this:
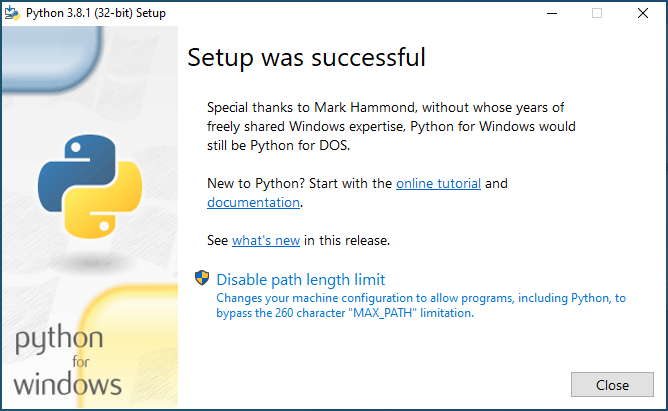
Press the Install button and in a few minutes, depending on the speed of your computer, you should be ready. On the last page of the installer, you should also press the Disable path length limit:
Now, to check if Python was correctly installed, open a Command Prompt (or a PowerShell) window. Press and hold the SHIFT key and right click with your mouse somewhere on your desktop, select Open command window here. Alternatively, on Windows 10, use the bottom left search box to search for cmd.
Write python in the command window and press Enter, you should see something like this:
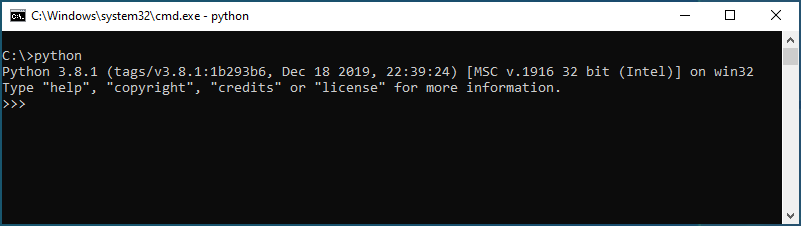
Exit from the Python interpreter by writing quit() and pressing the Enter key.
Open a cmd window like before. Use the next set of commands to install NumPy and OpenCV:

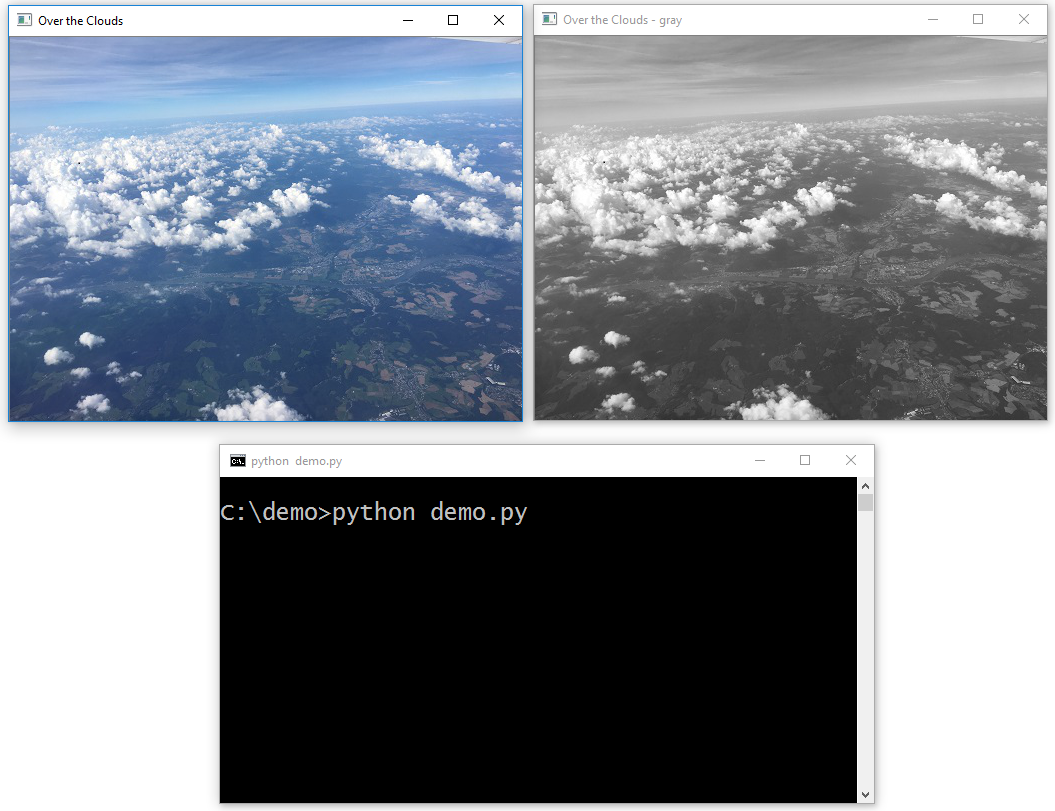
Open a cmd window in this folder and write:
You should see something like this (by default the last image will be over the first one, you need to move the image window in order to see the first image):
If you want to learn more about OpenCV and Python I would recommend reading OpenCV with Python Blueprints by M. Beyeler:
Disclaimer:
All data and information provided on this site is for informational purposes only. solarianprogrammer.com makes no representations as to accuracy, completeness, currentness, suitability, or validity of any information on this site and will not be liable for any errors, omissions, or delays in this information or any losses, injuries, or damages arising from its display or use. All information is provided on an as-is basis. solarianprogrammer.com does not collect any personal information about its visitors except that which they provide voluntarily when leaving comments. This information will never be disclosed to any third party for any purpose. Some of the links contained within this site have my referral id, which provides me with a small commission for each sale. Thank you for understanding.
Copyright © 2023 — Paul Silisteanu
Установка OpenCV + CUDA на Windows
В данной статье речь пойдет о сборке и установке OpenCV 4 для C/C++, Python 2 и Python 3 из исходных файлов с дополнительными модулями CUDA 10 на ОС Windows.
Я постарался включить сюда все тонкости и нюансы, с которыми можно столкнуться в ходе установки, и про которые не написано в официальном мануале.
Сборка тестировалась для:
- Windows 8.1 + Visual Studio 2017 + Python 2/3 + CUDA 10.0 + GeForce 840m
- Windows 10 + Visual Studio 2019 + Python 2/3 + CUDA 10.0 + GeForce GTX 1060
Что потребуется для установки
В моей сборке использовались следующие инструменты:
- CMake 3.15
- MS Visual Studio 2019 64-бит + средства CMake С++ для Windows
- Python 3.7.3 64-бит + NumPy 64-бит
- Python 2.7.16 64-бит + NumPy 64-бит
- CUDA 10.0
- CuDNN 7.6.2
- OpenCV 4.1.1 и OpenCV-contrib-4.1.1
Установка
Так как установка производится через консольные команды, то следует внимательно и аккуратно выполнять все шаги. Также, при необходимости, меняйте установочные пути на свои.
Для начала необходимо установить требуемое ПО, причем Visual Studio должна быть установлена до CUDA:
Далее загружаем архивы исходников opencv-4.1.1 и opencv-contrib-4.1.1 в желаемое место (в моем случае это C:\OpenCV\).
git clone https://github.com/opencv/opencv.git -b "4.1.1" git clone https://github.com/opencv/opencv_contrib.git -b "4.1.1"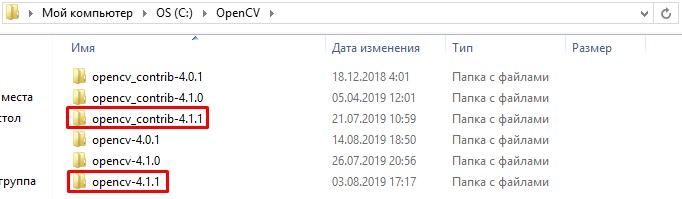
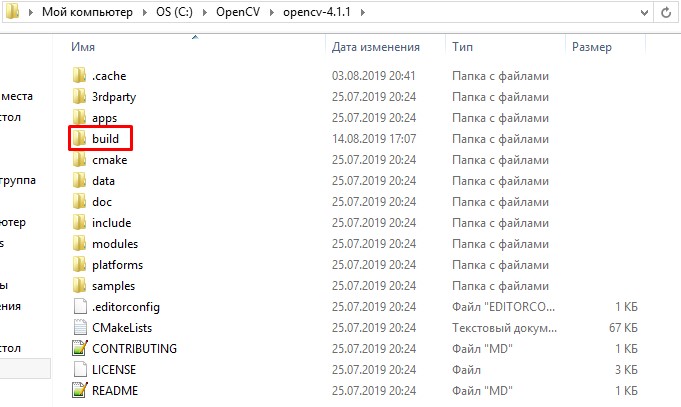
Создаем папку build/ внутри opencv-4.1.1.
Далее сгенерируем файлы сборки с помощью cmake. Мы будем использовать консольный вариант cmake, так как cmake-gui путает типы некоторых переменных (например, OPENCV_PYTHON3_VERSION) и, как следствие, неправильно генерирует файлы.
Открываем консоль по пути C:\OpenCV\ и прописываем переменные.
set "opencvSource=opencv-4.1.1" set "opencvExtraModules=opencv_contrib-4.1.1/modules" set "opencvBuild=%opencvSource%\build" set "compiler=Visual Studio 16 2019" set "buildType=Release"Примечание. Для Visual Studio 2017 генератор пишется как «Visual Studio 15 2017 Win64» и без флага -A.
Также можно явно указать питоновские библиотеки для python 2 и python 3 на случай, если сборщик не сможет найти их автоматически.
set "python2_executable=C:/Python27/python.exe" set "python2_include_dir=C:/Python27/include" set "python2_library=C:/Python27/libs/python27.lib" set "python2_numpy_include_dirs=C:/Python27/Lib/site-packages/numpy/core/include" set "python2_packages_path=C:/Python27/Lib/site-packages" set "python3_executable=C:/Users/root/Anaconda3/python.exe" set "python3_include_dir=C:/Users/root/Anaconda3/include" set "python3_library=C:/Users/root/Anaconda3/libs/python37.lib" set "python3_numpy_include_dirs=C:/Users/root/Anaconda3/lib/site-packages/numpy/core/include" set "python3_packages_path=C:/Users/root/Anaconda3/Lib/site-packages"Примечание. Обратите внимание на то, что библиотека NumPy должна быть той же разрядности, что и OpenCV. Проверить это легко:
import numpy.distutils.system_info as sysinfo print(sysinfo.platform_bits)Выполняем генерацию файлов сборки с помощью длинной команды ниже. При неудачной генерации или наличии ошибок после выполнения команды, повторную генерацию следует производить вычистив все файлы в build/ и .cache/.
cmake ^ -B"%opencvBuild%/" ^ -H"%opencvSource%/" ^ -G"%compiler%" ^ -Ax64 ^ -DCMAKE_BUILD_TYPE=%buildType% ^ -DBUILD_opencv_world=ON ^ -DINSTALL_TESTS=OFF ^ -DINSTALL_C_EXAMPLES=OFF ^ -DBUILD_EXAMPLES=OFF ^ -DOPENCV_EXTRA_MODULES_PATH="%opencvExtraModules%/" ^ -DBUILD_PROTOBUF=ON ^ -DBUILD_opencv_python_bindings_generator=ON ^ -DWITH_CUDA=ON ^ -DCUDA_FAST_MATH=ON ^ -DWITH_CUBLAS=ON ^ -DCUDA_ARCH_PTX=7.5 ^ -DBUILD_opencv_python2=ON ^ -DPYTHON2_EXECUTABLE="%python2_executable%" ^ -DOPENCV_PYTHON2_VERSION=2.7.16 ^ -DPYTHON2_INCLUDE_DIR="%python2_include_dir%" ^ -DPYTHON2_LIBRARY="%python2_library%" ^ -DPYTHON2_NUMPY_INCLUDE_DIRS="%python2_numpy_include_dirs%" ^ -DPYTHON2_PACKAGES_PATH="%python2_packages_path%" ^ -DBUILD_opencv_python3=ON ^ -DPYTHON3_EXECUTABLE="%python3_executable%" ^ -DOPENCV_PYTHON3_VERSION=3.7.3 ^ -DPYTHON3_INCLUDE_DIR="%python3_include_dir%" ^ -DPYTHON3_LIBRARY="%python3_library%" ^ -DPYTHON3_NUMPY_INCLUDE_DIRS="%python3_numpy_include_dirs%" ^ -DPYTHON3_PACKAGES_PATH="%python3_packages_path%"- BUILD_opencv_world – необязательный модуль, содержащий копии всех выбранных в ходе установки библиотек. Удобен при разработке на C++, так как вместо подключения кучи зависимостей opencv можно подключить одну зависимость opencv_world411.lib в проект
- INSTALL_EXAMPLES/INSTALL_TESTS – установка примеров/тестов кода opencv
- CUDA_FAST_MATH, WITH_CUBLAS – дополнительные модули для CUDA, призванные ускорить вычисления
- CUDA_ARCH_PTX – версия PTX инструкций для улучшения производительности вычислений
- OPENCV_EXTRA_MODULES_PATH – путь до дополнительных модулей из opencv-contrib (обязательно для CUDA)
- BUILD_PROTOBUF – для работы некоторых модулей opencv необходим Protobuf (сборщик opencv в любом случае поставит BUILD_PROTOBUF=ON)
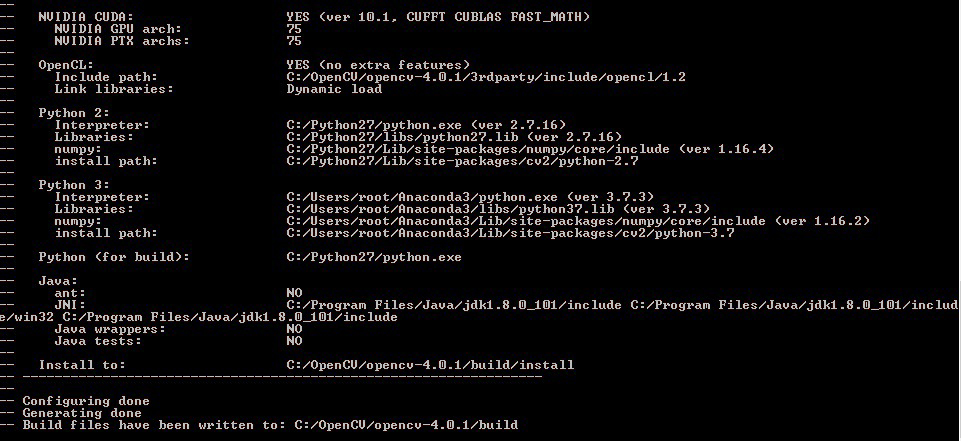
Спустя примерно 10 минут в консоле должна появиться информация о сборке и завершающие строки «Configuring done» и «Generating done». Проверяем всю информацию, особенно разделы NVIDIA CUDA, Python 2, Python 3.
Далее собираем решение. На сборку может уйти несколько часов в зависимости от вашего процессора и версии Visual Studio.
cmake --build %opencvBuild% --target ALL_BUILD --config Releasecmake --build %opencvBuild% --target INSTALL --config ReleaseПосле успешной установки создаем системную переменную OPENCV_DIR со значением C:\OpenCV\opencv-4.1.1\build\install\x64\vc15\bin и также добавляем ее в PATH.
Тест
Проверим работоспособность OpenCV с модулем CUDA на простом примере умножения матриц.
- Установить тип сборки Release/x64 (для Debug следует собрать OpenCV с флагом Debug)
- Project Properties → C/C++ → General → Добавить строку «C:\OpenCV\opencv-4.1.1\build\install\include» в Additional Include Directories
- Project Properties → Linker → General → Добавить строку « C:\OpenCV\opencv-4.1.1\build\install\x64\vc16\lib» в Additional Library Directories
- Project Properties → Linker → General → Добавить «;opencv_world411.lib» («;opencv_world411d.lib» для Debug) в конец Additional Dependencies
Пример на Python 3
import numpy as np import cv2 as cv import time rand = np.random.random((1024, 1024)).astype(np.float32) h_array1 = np.stack([rand, rand],axis=2) h_array2 = h_array1 d_array1 = cv.cuda_GpuMat() d_array2 = cv.cuda_GpuMat() d_array1.upload(h_array1) d_array2.upload(h_array2) start = time.time() cv.cuda.gemm(d_array1, d_array2, 1, None, 0, None, 1) end = time.time() print("Time elapsed:", end - start, "sec")Time elapsed: 0.3130002021789551#include #include #include using namespace std; using namespace cv; using namespace cv::cuda; int main() < Mat h_array1 = Mat::ones(1024, 1024, CV_32FC2); Mat h_array2 = Mat::ones(1024, 1024, CV_32FC2); Mat h_array3 = Mat::zeros(1024, 1024, CV_32FC2); Mat h_result; GpuMat d_array1, d_array2, d_array3, d_result; d_array1.upload(h_array1); d_array2.upload(h_array2); const clock_t begin_time = clock(); cuda::gemm(d_array1, d_array2, 1.0, d_array3, 0.0, d_result); coutУдаление
Чтобы удалить OpenCV, нужно выполнить команду.
cmake --build %opencvBuild% --target uninstall --config Releaseи удалить системную переменную OPENCV_DIR и убрать путь до OpenCV из PATH.
Заключение
В статье мы рассмотрели установку OpenCV 4 для ОС Windows 10. Данный алгоритм тестировался на Windows 8.1 и Windows 10, но, в теории, может собираться и на Windows 7. За дополнительной информацией можно обратиться к списку источников ниже.
P.S. Напоследок сведем все установочные команды в один .bat файл для тех, кто хочет автоматизировать установку.
cd C:\OpenCV git clone https://github.com/opencv/opencv_contrib.git -b "4.1.1" git clone https://github.com/opencv/opencv.git -b "4.1.1" ren opencv opencv-4.1.1 ren opencv_contrib-4.1.1 set "opencvSource=opencv-4.1.1" set "opencvExtraModules=opencv_contrib-4.1.1/modules" set "opencvBuild=%opencvSource%\build" set "compiler=Visual Studio 16 2019" set "buildType=Release" set "python2_executable=C:/Python27/python.exe" set "python2_include_dir=C:/Python27/include" set "python2_library=C:/Python27/libs/python27.lib" set "python2_numpy_include_dirs=C:/Python27/Lib/site-packages/numpy/core/include" set "python2_packages_path=C:/Python27/Lib/site-packages" set "python3_executable=C:/Users/root/Anaconda3/python.exe" set "python3_include_dir=C:/Users/root/Anaconda3/include" set "python3_library=C:/Users/root/Anaconda3/libs/python37.lib" set "python3_numpy_include_dirs=C:/Users/root/Anaconda3/lib/site-packages/numpy/core/include" set "python3_packages_path=C:/Users/root/Anaconda3/Lib/site-packages" cmake ^ -B"%opencvBuild%/" ^ -H"%opencvSource%/" ^ -G"%compiler%" ^ -Ax64 ^ -DCMAKE_BUILD_TYPE=%buildType% ^ -DBUILD_opencv_world=ON ^ -DINSTALL_TESTS=OFF ^ -DINSTALL_C_EXAMPLES=OFF ^ -DBUILD_EXAMPLES=OFF ^ -DOPENCV_EXTRA_MODULES_PATH="%opencvExtraModules%/" ^ -DBUILD_PROTOBUF=ON ^ -DBUILD_opencv_python_bindings_generator=ON ^ -DWITH_CUDA=ON ^ -DCUDA_FAST_MATH=ON ^ -DWITH_CUBLAS=ON ^ -DCUDA_ARCH_PTX=7.5 ^ -DBUILD_opencv_python2=ON ^ -DPYTHON2_EXECUTABLE="%python2_executable%" ^ -DOPENCV_PYTHON2_VERSION=2.7.16 ^ -DPYTHON2_INCLUDE_DIR="%python2_include_dir%" ^ -DPYTHON2_LIBRARY="%python2_library%" ^ -DPYTHON2_NUMPY_INCLUDE_DIRS="%python2_numpy_include_dirs%" ^ -DPYTHON2_PACKAGES_PATH="%python2_packages_path%" ^ -DBUILD_opencv_python3=ON ^ -DPYTHON3_EXECUTABLE="%python3_executable%" ^ -DOPENCV_PYTHON3_VERSION=3.7.3 ^ -DPYTHON3_INCLUDE_DIR="%python3_include_dir%" ^ -DPYTHON3_LIBRARY="%python3_library%" ^ -DPYTHON3_NUMPY_INCLUDE_DIRS="%python3_numpy_include_dirs%" ^ -DPYTHON3_PACKAGES_PATH="%python3_packages_path%" cmake --build %opencvBuild% --target ALL_BUILD --config Release cmake --build %opencvBuild% --target INSTALL --config ReleaseСписок источников
- docs.opencv.org/4.1.1/d3/d52/tutorial_windows_install.html
- www.learnopencv.com/install-opencv-4-on-windows
- jamesbowley.co.uk/build-opencv-4-0-0-with-cuda-10-0-and-intel-mkl-tbb-in-windows
- lightbuzz.com/opencv-cuda
- Глава «Building libraries from Source» книги Hands-on GPU-Accelerated Computer Vision with OpenCV and CUDA