Life2Coding
This post will be helpful in learning OpenCV using Python programming. Here I will show how to implement OpenCV functions and apply it in various aspects using some examples. Then the output will be shown with some comparisons as well.
Requirements:
- OpenCV 3.4
- Python 3.6+
- Numpy
- Image, Webcam or Video input
- Documentation Source: OpenCV Official Documentation
First, you need to setup your Python Environment with OpenCV. You can easily do it by following Life2Coding’s tutorial on YouTube: Linking OpenCV 3 with Python 3
Goals:
In this tutorial, I will show you how to implement mouse callback functions using OpenCV library and Python coding.
Documentation:
Python: cv2.setMouseCallback(windowName, onMouse[, param]) → None
Sets mouse handler for the specified window
- winname – Window name
- onMouse – Name of the callback function. Whenever mouse events related to the above window occur, this callback function will be called. This function should have the signature like the following
- void FunctionName (event, x, y, flags, userdata)
- event – Type of the mouse event. These are the entire list of mouse events
- EVENT_MOUSEMOVE
- EVENT_LBUTTONDOWN
- EVENT_RBUTTONDOWN
- EVENT_MBUTTONDOWN
- EVENT_LBUTTONUP
- EVENT_RBUTTONUP
- EVENT_MBUTTONUP
- EVENT_LBUTTONDBLCLK
- EVENT_RBUTTONDBLCLK
- EVENT_MBUTTONDBLCLK
- EVENT_FLAG_LBUTTON
- EVENT_FLAG_RBUTTON
- EVENT_FLAG_MBUTTON
- EVENT_FLAG_CTRLKEY
- EVENT_FLAG_SHIFTKEY
- EVENT_FLAG_ALTKEY
Steps:
- Create window using cv2.namedWindow()
- Register mouse callback using cv2.setMouseCallback()
- Display Image using cv2.imshow()
- Wait for keyboard button press using cv2.waitKey()
- Exit window and destroy all windows using cv2.destroyAllWindows()
Example Code:
import cv2 import numpy as np # Create a black image and a window windowName = 'MouseCallback' img = np.zeros((512, 512, 3), np.uint8) cv2.namedWindow(windowName) def CallBackFunc(event, x, y, flags, param): if event == cv2.EVENT_LBUTTONDOWN: print("Left button of the mouse is clicked - position (", x, ", ",y, ")") elif event == cv2.EVENT_RBUTTONDOWN: print("Right button of the mouse is clicked - position (", x, ", ", y, ")") elif event == cv2.EVENT_MBUTTONDOWN: print("Middle button of the mouse is clicked - position (", x, ", ", y, ")") elif event == cv2.EVENT_MOUSEMOVE: print("Mouse move over the window - position (", x, ", ", y, ")") if flags == cv2.EVENT_FLAG_CTRLKEY + cv2.EVENT_FLAG_LBUTTON: print("Left mouse button is clicked while pressing CTRL key - position (", x, ", ",y, ")") elif flags == cv2.EVENT_FLAG_RBUTTON + cv2.EVENT_FLAG_SHIFTKEY: print("Right mouse button is clicked while pressing SHIFT key - position (", x, ", ", y, ")") elif event == cv2.EVENT_MOUSEMOVE and flags == cv2.EVENT_FLAG_ALTKEY: print("Mouse is moved over the window while pressing ALT key - position (", x, ", ", y, ")") # bind the callback function to window cv2.setMouseCallback(windowName, CallBackFunc) def main(): while (True): cv2.imshow(windowName, img) if cv2.waitKey(20) == 27: break cv2.destroyAllWindows() if __name__ == "__main__": main()Python OpenCV mouse events
In this tutorial we will learn how to get started handling OpenCV mouse events, in Python.
We will create a very simple application where we will track the position of the mouse in a window by drawing a circle on it. So, we will only make use of one of the event types available, but the full list can be seen on this page.
This tutorial was tested on Windows 8.1, with version 4.1.2 of OpenCV. The Python version used was 3.7.2.
The code
We will start our code by importing the cv2 module, so we have access to all the functions we need for our tutorial.
After that, we will read an image from the file system, to show it in a window. It will be on that window that we will be listening to the mouse moved events. For a detailed tutorial on how to read an image and display it on a window, please check here.
Note that we will call “image” to the window. We will need this name to register the function that will handle the mouse events.
img = cv2.imread('C:/Users/N/Desktop/test.png') cv2.imshow('image', img)Then we will call the setMouseCallback function from the cv2 module to start listening to mouse events. As first input, this function receives the name of the window and as second a callback function that will be invoked every time a mouse event happens. We will check its definition later, but we will call this function drawCircle.
Just as an additional note, this function can receive an additional “user data” parameter that will later be passed to the callback function when it is invoked. Nonetheless, we are not going to make use of it.
cv2.setMouseCallback('image', drawCircle)Then we will wait for a user input in the keyboard to end the program and destroy the window.
cv2.waitKey(0) cv2.destroyAllWindows()
To finalize, we will check the implementation of the drawCircle function. As input, this function should receive 5 parameters (the last 2 we won’t be using), accordingly to what is defined here. The parameters are summarized below:
- event: the OpenCV mouse event that was detected and triggered the execution of the callback. The list of existing events can be seen here;
- x: the x coordinate, in the window, of the mouse event;
- y: the y coordinate, in the window, of the mouse event;
- flags: one of the flags defined here;
- params: optional user defined data that can be passed to the callback. Needs to be defined when registering the callback if we want to use it, like mentioned before.
We start by checking if the event we received is a mouse movement event. To do so, we will compare the received parameter with the constant EVENT_MOUSEMOVE from the cv2 module. This is the only event type we want to handle on this tutorial.
if event == cv2.EVENT_MOUSEMOVE:
If a mouse movement event happened, then we will print the x and y coordinates we also received as parameters.
After that, we will draw a blue circle with center on these coordinates. You can check how to draw circles on images with OpenCV on this previous tutorial.
Note that drawing a circle alters the image we provide. So, if we start drawing the circles on the original image, we will have the circles all over it as we are moving the mouse. To avoid this, we will always create a copy of the original image and draw the circle on the copy. To learn how to copy an image in OpenCV, please consult this tutorial.
Once we have the copy of the image, we then draw the circle and show the image on the same window we created in the previous code (recall the window is called “image“).
imgCopy = img.copy() cv2.circle(imgCopy, (x, y), 10, (255, 0, 0), -1) cv2.imshow('image', imgCopy)The full callback function is shown on the code snippet below.
def drawCircle(event, x, y, flags, param): if event == cv2.EVENT_MOUSEMOVE: print('(<>, <>)'.format(x, y)) imgCopy = img.copy() cv2.circle(imgCopy, (x, y), 10, (255, 0, 0), -1) cv2.imshow('image', imgCopy)The complete code can be seen below.
import cv2 def drawCircle(event, x, y, flags, param): if event == cv2.EVENT_MOUSEMOVE: print('(<>, <>)'.format(x, y)) imgCopy = img.copy() cv2.circle(imgCopy, (x, y), 10, (255, 0, 0), -1) cv2.imshow('image', imgCopy) img = cv2.imread('C:/Users/N/Desktop/test.png') cv2.imshow('image', img) cv2.setMouseCallback('image', drawCircle) cv2.waitKey(0) cv2.destroyAllWindows()Testing the code
To test the code, simply run it in a tool of your choice. In my case, I’m using PyCharm, a Python IDE from JetBrains.
Upon running the code and moving the mouse over the window, you should see a result similar to figure 1. Also, on the console, you should see the coordinates of the mouse getting printed.

Figure 2 is a GIF showing this behavior.
OpenCV Python — Handling Mouse Events
OpenCV is capable of registering various mouse related events with a callback function. This is done to initiate a certain user defined action depending on the type of mouse event.
When the mouse pointer has moved over the window.
Indicates that the left mouse button is pressed.
Event of that the right mouse button is pressed.
Indicates that the middle mouse button is pressed.
When the left mouse button is released.
When the right mouse button is released.
Indicates that the middle mouse button is released.
cv.EVENT_LBUTTONDBLCLK
This event occurs when the left mouse button is double clicked.
cv.EVENT_RBUTTONDBLCLK
Indicates that the right mouse button is double clicked.
cv.EVENT_MBUTTONDBLCLK
Indicates that the middle mouse button is double clicked.
Positive for forward and negative for backward scrolling.
To fire a function on a mouse event, it has to be registered with the help of setMouseCallback() function. The command for the same is as follows −
cv2.setMouseCallback(window, callbak_function)
This function passes the type and location of the event to the callback function for further processing.
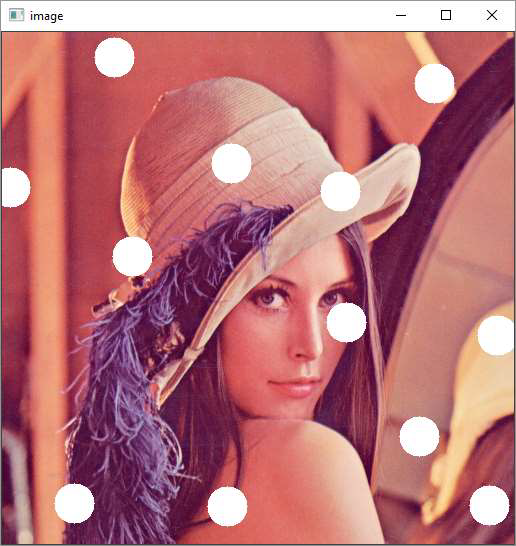
Example 1
Following code draws a circle whenever left button double click event occurs on the window showing an image as background −
import numpy as np import cv2 as cv # mouse callback function def drawfunction(event,x,y,flags,param): if event == cv.EVENT_LBUTTONDBLCLK: cv.circle(img,(x,y),20,(255,255,255),-1) img = cv.imread('lena.jpg') cv.namedWindow('image') cv.setMouseCallback('image',drawfunction) while(1): cv.imshow('image',img) key=cv.waitKey(1) if key == 27: break cv.destroyAllWindows()Output
Run the above program and double click at random locations. The similar output will appear −

Example 2
Following program interactively draws either rectangle, line or circle depending on user input (1,2 or 3) −
import numpy as np import cv2 as cv # mouse callback function drawing=True shape='r' def draw_circle(event,x,y,flags,param): global x1,x2 if event == cv.EVENT_LBUTTONDOWN: drawing = True x1,x2 = x,y elif event == cv.EVENT_LBUTTONUP: drawing = False if shape == 'r': cv.rectangle(img,(x1,x2),(x,y),(0,255,0),-1) if shape == 'l': cv.line(img,(x1,x2),(x,y),(255,255,255),3) if shape=='c': cv.circle(img,(x,y), 10, (255,255,0), -1) img = cv.imread('lena.jpg') cv.namedWindow('image') cv.setMouseCallback('image',draw_circle) while(1): cv.imshow('image',img) key=cv.waitKey(1) if key==ord('1'): shape='r' if key==ord('2'): shape='l' if key==ord('3'): shape='c' #print (shape) if key == 27: break cv.destroyAllWindows()On the window surface, a rectangle is drawn between the coordinates of the mouse left button down and up if ‘1’ is pressed.
If user choice is 2, a line is drawn using coordinates as endpoints.
On choosing 3 for the circle, it is drawn at the coordinates of the mouse up event.
Following image will be the output after the successful execution of the above mentioned program −
- event – Type of the mouse event. These are the entire list of mouse events
- void FunctionName (event, x, y, flags, userdata)