- Java Hello World Desktop Application [closed]
- 2 Answers 2
- Eclipse Window Builder Tutorial for GUI Creation
- Thank you!
- 2.Simple Java Window Application
- 2.1 System requirements
- 2.1.1 Eclipse
- 2.1.2 Java
- 3. Open New Project
- 4. New SWT Application
- 5. Components in the editor
- 6. Editor Features
- 7. Layouts in SWT
- 8. New UI Page
- 9. Source View
- 10. Button Listener
- 11. Conclusion
- 12. Download the Code Project
Java Hello World Desktop Application [closed]
This question is unlikely to help any future visitors; it is only relevant to a small geographic area, a specific moment in time, or an extraordinarily narrow situation that is not generally applicable to the worldwide audience of the internet. For help making this question more broadly applicable, visit the help center.
I would like to see how to create a hello world java desktop application using Eclipse. I know Java very well, but I have never created a Java desktop application. It would be great if someone could provide an example. Thanks!
Stack Overflow is not a tutorial website. A quick google search on Java Eclipse and Tutorial gave me many results. Perhaps you can check one of them out and post more specific questions here?
2 Answers 2
The essential element of a Swing application is a top-level JFrame (window). We’ll add a single component (a JLabel ) so there’s some content in the JFrame , call pack() so the components are laid out, then make the frame visible. All this goes inside the standard main() method for a Java application, though for real applications you’d probably want to organise the code into other methods so that main() doesn’t get too bloated.
import javax.swing.JFrame; import javax.swing.JLabel; public class HelloWorld < public static void main(String[] args) < JFrame hello = new JFrame("Hello World"); hello.add(new JLabel("Hello World")); hello.pack(); hello.setVisible(true); >> you mean with a gui? most people would use swing which there is a plugin for eclipse to help in building swing ui’s. if you dont need a gui then just create a class and in the main method put
Then run your compiled code
It does need a gui. But even with your example how will I get a desktop application ? Is there an exe file or something that gets created when I run the eclipse project ?
Creating an .exe for your Eclipse-RCP app is not only possible, it’s also very easy to do. Take a look here: wiki.eclipse.org/FAQ_How_do_I_create_an_Eclipse_product%3F
owengerig — I see the .java and .class files. But I am trying to get a desktop application. I’d like my program to run when I double click the application.
@stracka — In the tutorial it says go to Plug-in Development, but I dont have that available in my eclipse. I tried installing new software, but I couldn’t find anything related to the Plug-in development. I also looked in the list of available perspectives and I couldn’t find that option there as well.
Eclipse Window Builder Tutorial for GUI Creation
In this example, we will show you how to develop Java GUI Application using Eclipse WindowBuilder plug-in. Eclipse WindowBuilder is a powerful and easy to use bi-directional Java GUI designer that makes it very easy to create Java GUI applications without spending a lot of time writing code to display simple forms. The bi-directional Java GUI designer means the developer can seamlessly move between a Drag n’ Drop designer and the generated code. Using Eclipse WindowBuilder, the developer will enjoy creating Java GUI based applications. One can create complicated windows in minutes using WindowBuilder. WYSIWYG (What You See Is What You Get) layout tools in WindowBuilder are used to generate back-end java code by drag-and-drop of components to the container.
In order to help you master Eclipse, we have compiled a kick-ass guide with all the basic features of the popular IDE! Besides studying them online you may download the eBook in PDF format!
Thank you!
2.Simple Java Window Application
2.1 System requirements
2.1.1 Eclipse
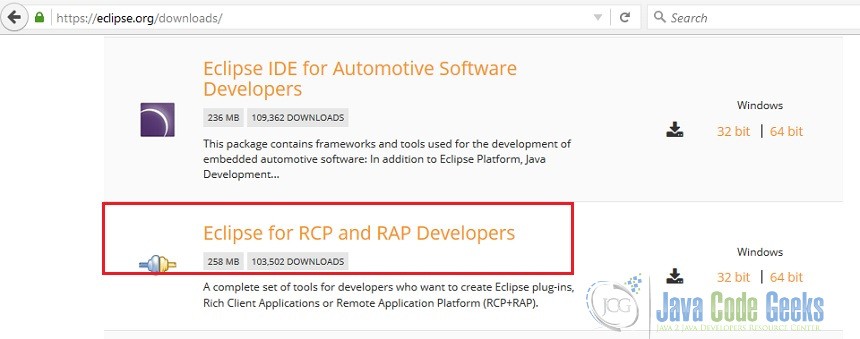
WindowBuilder is built as a plug-in to Eclipse. ‘Eclipse for RCP and RAP Developers’ is the default IDE bundled with ‘Windows Builder’ plug-in. This IDE has a complete set of tools for developers who want to create Eclipse plug-ins, Rich Client Applications (RCA). Download ‘Eclipse for RCP and RAP Developers’ from here. Please refer the picture given below to identify the correct IDE.
2.1.2 Java
3. Open New Project
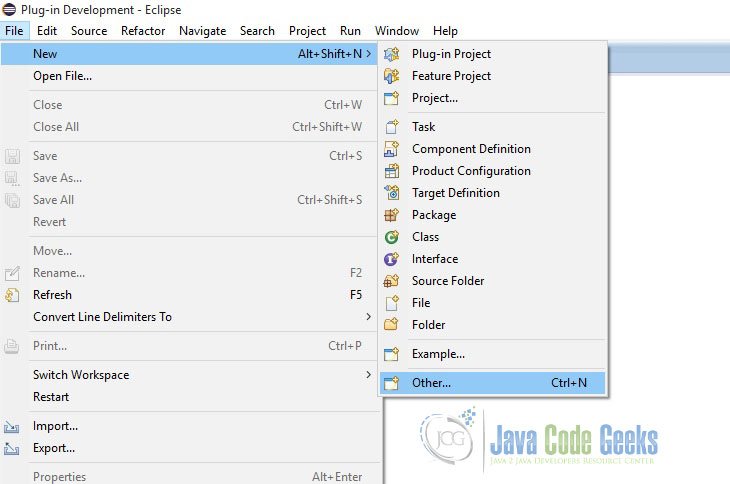
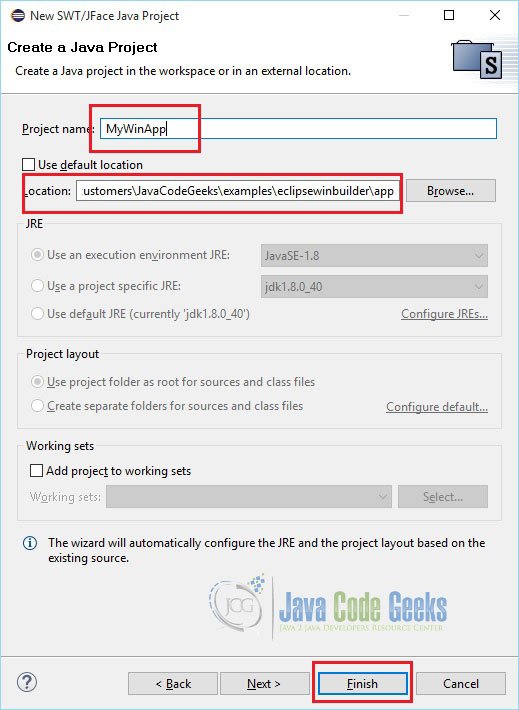
Let us create a new ‘SWT/JFace Java Project’ to see the usage of WindowBuilder for building GUI components. Open ‘File – New – Other’ and then click ‘SWT/JFace Project’ as depicted below

The reason for creating new project as ‘SWT/JFace Java Project’ is to have all the necessary JARs and native libraries included by the IDE itself. Otherwise, you have to add all these dependent JARs and native libraries on your own.
The Standard Widget Toolkit (SWT) is a graphical widget toolkit to be used with the Java platform. It provides a portable graphics API independent of the OS but that relies on the native widgets.
JFace is a UI toolkit with classes for handling many common UI programming tasks. JFace is window-system-independent in both its API and implementation, and is designed to work with SWT without hiding it.
JFace is a higher-level user interface toolkit that uses the raw SWT widgets to provide model-driven widgets, and to some extent some functionality that isn’t available in the Swing libraries, such as advanced editors, dialog boxes, and wizards.
4. New SWT Application
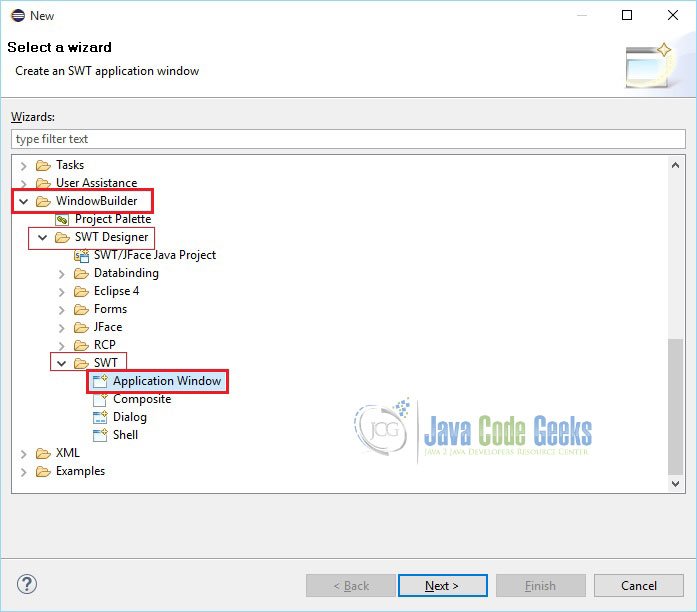
Let us add widget to the project. As a main window, create Application Window as shown below. Right click on the project and select ‘New – Other – Window Builder – SWT Designer – SWT – Application Window’. And then click ‘Next’
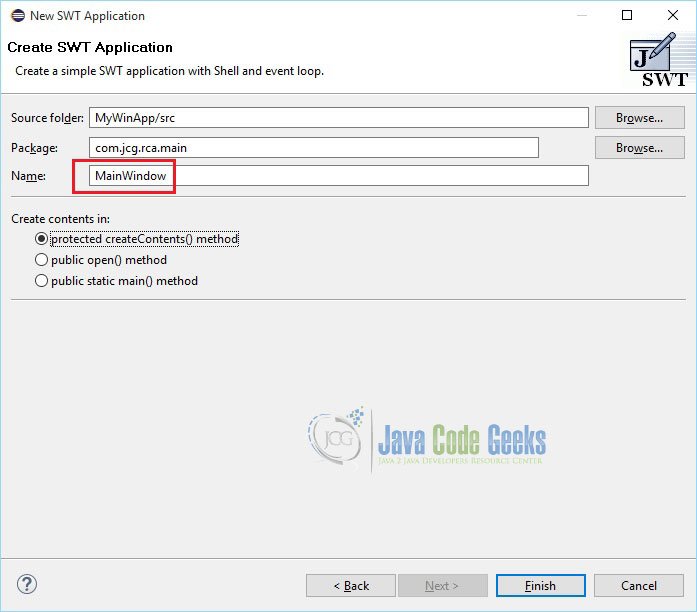
Enter Class Name and click ‘Finish’
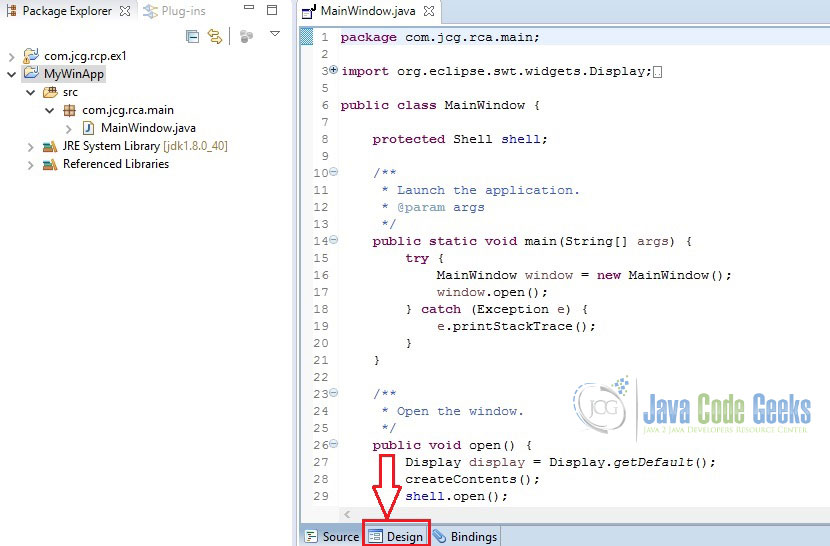
A basic window application has been created. Window Builder can be used to get your UI up and running quickly. Click ‘Design’ tab as shown below.
Now, you will see the graphical representation (Design View) of your code.
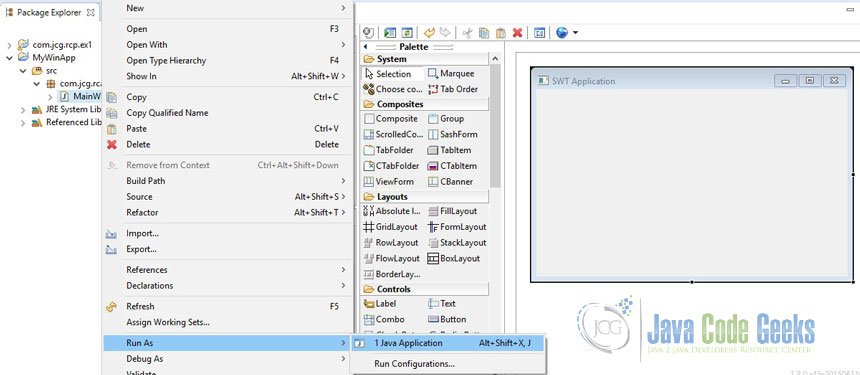
This application can be simply executed like any other java program with main method. Right click on the class name and ‘Run As – Java Application’
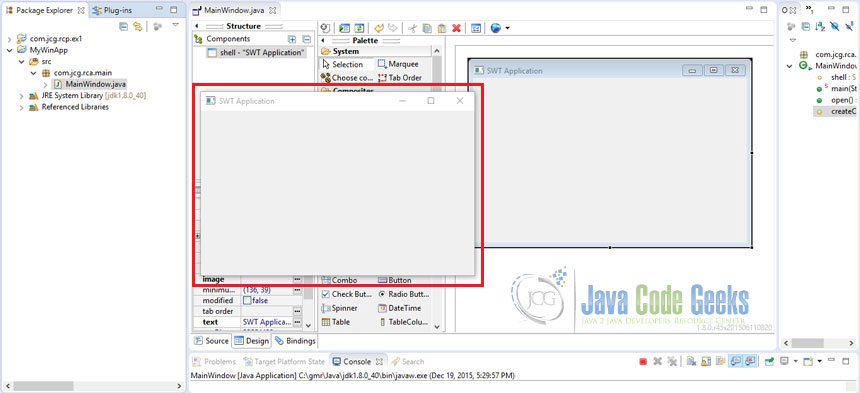
As we have not yet added any other elements, you will see a simple window popping-up as a result of the execution.
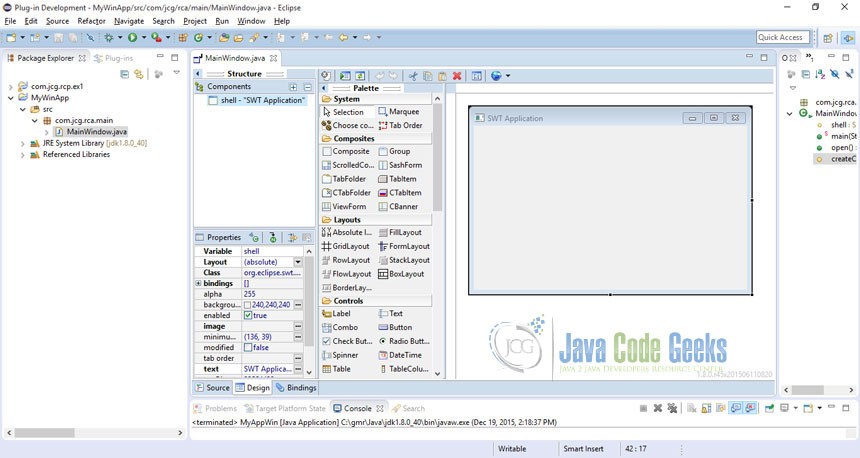
5. Components in the editor
- Design View – the main visual layout area.
- Source View – write code and review the generated code
- Structure View – composed of the Component Tree and the Property Pane.
- Component Tree – shows the hierarchical relationship between all of the components.
- Property Pane – displays properties and events of the selected components.
6. Editor Features
- Bi-directional Code Generation – read and write almost any format and reverse-engineer most hand-written code
- Internationalization (i18n) / Localization – externalize component strings, create and manage resource bundles.
- Custom Composites & Panels – create custom, reusable components.
- Factories – create custom factory classes and methods.
- Visual Inheritance – create visual component hierarchies.
- Event Handling – add event handlers to your components.
- Menu Editing – visually create and edit menubars, menu items and popup menus.
- Morphing – convert one component type into another.
7. Layouts in SWT
Layouts are non-visible widgets used to give GUI windows a specific look and it helps to control the position and size of children in a Composite.
To make sure the GUI application developed in one environment works perfect in another platform, Java provides a system of portable layout managers. We use these layout managers to specify rules and constraints for the layout of the UI in a way that will be portable.
- Correctly positioned components that are independent of fonts, screen resolutions, and platform differences.
- Intelligent component placement for containers that are dynamically resized at runtime.
- Ease of translation. If a string increases in length after translation, the associated components stay properly aligned.
SWT Designer supports the following layout managers.
Layout Manager Description AbsoluteLayout AbsoluteLayout or Null Layout helps to specify the exact position, the width and the height of components. In a generic environment where the size of the screens may vary, this layout manager should be avoided. FillLayout FillLayout is the simplest layout class. It lays out controls in a single row or column, forcing them to be the same size. RowLayout Puts the widgets in rows or columns and allows you to control the layout with options, e.g., wrap, spacing, fill and so on. GridLayout Arranges widgets in a grid. FormLayout Arranges the widgets with the help of the associated attachments. StackLayout A StackLayout object is a layout manager for a container. It treats each component in the container as a card. Only one card is visible at a time, and the container acts as a stack of cards. BorderLayout BorderLayout lays out a container, arranging and resizing its components to fit in five regions: north, south, east, west, and center. Each region may contain no more than one component, and is identified by a corresponding constant: NORTH, SOUTH, EAST, WEST, and CENTER. BoxLayout BoxLayout allows multiple components to be laid out either vertically or horizontally. The components will not wrap so, for example, a vertical arrangement of components will stay vertically arranged when the frame is resized. Nesting multiple panels with different combinations of horizontal and vertical gives an effect similar to GridBagLayout, without the complexity. FlowLayout A flow layout arranges components in a left-to-right flow, much like lines of text in a paragraph. Flow layouts are typically used to arrange buttons in a panel. It will arrange buttons left to right until no more buttons fit on the same line. 8. New UI Page
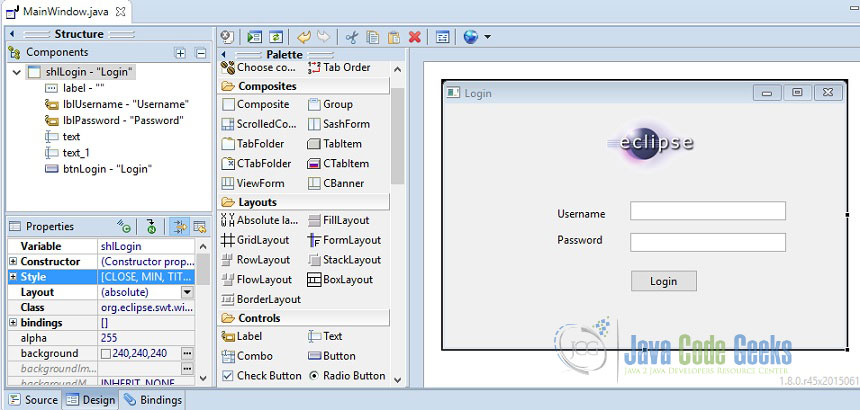
We will now design a new Login UI page using Window Builder. For this normal size screen, we will continue with the default (absolute) layout. We are going to have an image, two labels, one text field, one password field and a button on the screen.
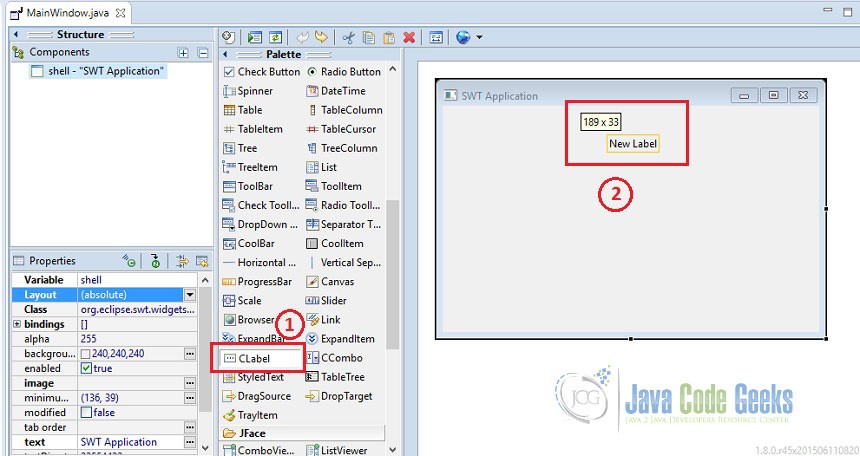
To display image use CLabel widget. CLabel supports aligned text and/or an image and different border styles.

As shown below, click ‘CLabel’ once and keep your cursor on the screen and click. Now, the ‘CLabel’ is placed on the screen.
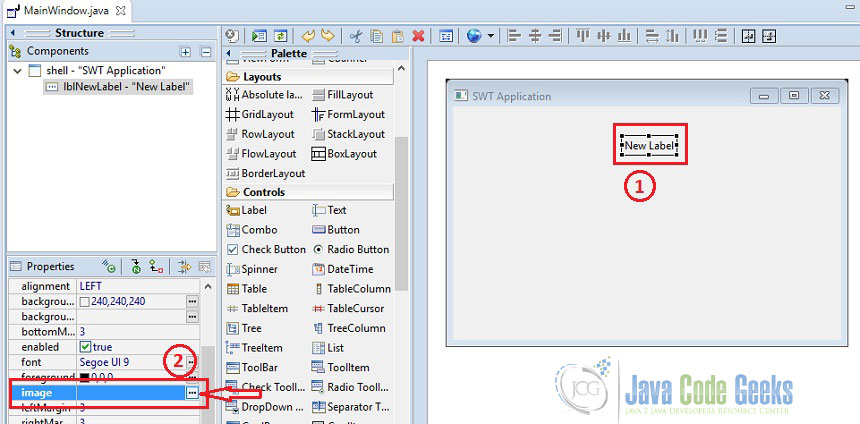
Let us attach an image with ‘CLabel’. For this, you need to have an image in the folder where your ‘MainWindow’ source file is placed. For this example, I have used eclipse logo.

Click on the ‘CLabel’ and then, in the ‘Properties’ window select ‘image’.

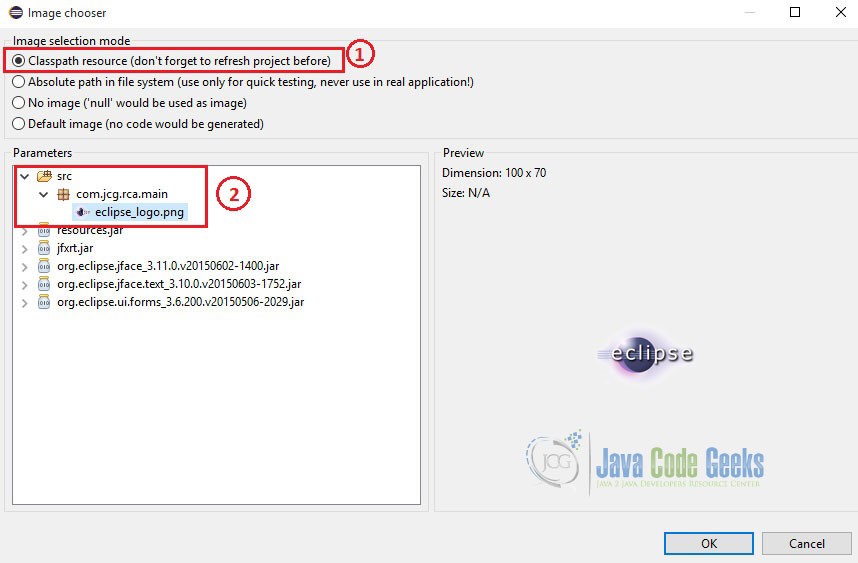
You will now see the Image chooser window pops up. Select ‘Classpath resource’ option and navigate to the image file, select it and then click ‘OK’.

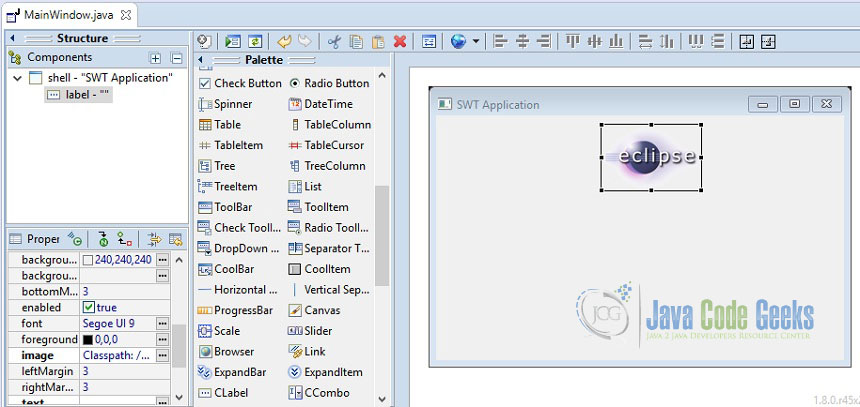
Adjust the field bounds according to the size of the logo so that the image is visible on the screen.

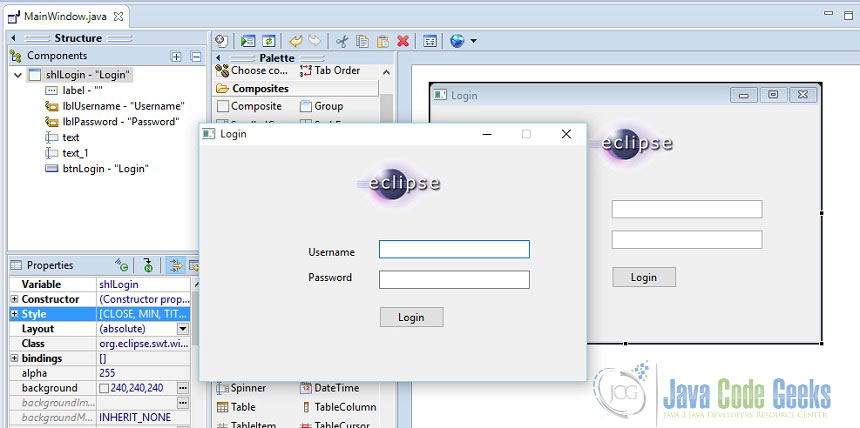
Similarly, add Labels, Text Fields and a Button. Finally the screen will be looking like the one shown below.
To test this design, right click on the window and select ‘Test/Preview’ from the popup menu.


9. Source View

Click ‘Source’ tab to see the code generated by the IDE. Single line of code in this was not written manually.
10. Button Listener
Attach listener with the button to validate field entries. Refer the source code of the main file given below.
package com.jcg.rca.main; import org.eclipse.swt.SWT; import org.eclipse.swt.custom.CLabel; import org.eclipse.swt.widgets.Button; import org.eclipse.swt.widgets.Display; import org.eclipse.swt.widgets.Event; import org.eclipse.swt.widgets.Label; import org.eclipse.swt.widgets.Listener; import org.eclipse.swt.widgets.MessageBox; import org.eclipse.swt.widgets.Shell; import org.eclipse.swt.widgets.Text; import org.eclipse.wb.swt.SWTResourceManager; public class MainWindow < protected Shell shlLogin; private Text userNameTxt; private Text passwordTxt; private String userName = null; private String password = null; /** * Launch the application. * * @param args */ public static void main(String[] args) < try < MainWindow window = new MainWindow(); window.open(); >catch (Exception e) < e.printStackTrace(); >> /** * Open the window. */ public void open() < Display display = Display.getDefault(); createContents(); shlLogin.open(); shlLogin.layout(); while (!shlLogin.isDisposed()) < if (!display.readAndDispatch()) < display.sleep(); >> > /** * Create contents of the window. */ protected void createContents() < shlLogin = new Shell(SWT.CLOSE | SWT.TITLE | SWT.MIN); shlLogin.setSize(450, 300); shlLogin.setText("Login"); CLabel label = new CLabel(shlLogin, SWT.NONE); label.setImage(SWTResourceManager.getImage(MainWindow.class, "/com/jcg/rca/main/eclipse_logo.png")); label.setBounds(176, 10, 106, 70); label.setText(""); Label lblUsername = new Label(shlLogin, SWT.NONE); lblUsername.setBounds(125, 115, 55, 15); lblUsername.setText("Username"); Label lblPassword = new Label(shlLogin, SWT.NONE); lblPassword.setBounds(125, 144, 55, 15); lblPassword.setText("Password"); userNameTxt = new Text(shlLogin, SWT.BORDER); userNameTxt.setBounds(206, 109, 173, 21); passwordTxt = new Text(shlLogin, SWT.BORDER | SWT.PASSWORD); passwordTxt.setBounds(206, 144, 173, 21); Button btnLogin = new Button(shlLogin, SWT.NONE); btnLogin.setBounds(206, 185, 75, 25); btnLogin.setText("Login"); btnLogin.addListener(SWT.Selection, new Listener() < public void handleEvent(Event event) < userName = userNameTxt.getText(); password = passwordTxt.getText(); if (userName == null || userName.isEmpty() || password == null || password.isEmpty()) < String errorMsg = null; MessageBox messageBox = new MessageBox(shlLogin, SWT.OK | SWT.ICON_ERROR); messageBox.setText("Alert"); if (userName == null || userName.isEmpty()) < errorMsg = "Please enter username"; >else if (password == null || password.isEmpty()) < errorMsg = "Please enter password"; >if (errorMsg != null) < messageBox.setMessage(errorMsg); messageBox.open(); >> else < MessageBox messageBox = new MessageBox(shlLogin, SWT.OK | SWT.ICON_WORKING); messageBox.setText("Info"); messageBox.setMessage("Valid"); messageBox.open(); >> >); > >11. Conclusion
From this example, we learned how quickly a Java GUI application can be developed using Eclipse Window Builder. WindowBuilder Engine provides a rich API for creating UI designers. It supports Java-based UI frameworks such as Swing, SWT/RCP, eRCP, GWT etc. It also supports XML-based UI frameworks like XWT, GWT UiBinder, Android etc.
12. Download the Code Project
This was a Tutorial about Eclipse Window Builder for GUI Creation.