- How to Solve Python ModuleNotFoundError: no module named ‘pil’
- What is the Difference Between PIL and Pillow?
- How to Install Pillow on Windows Operating System
- Pillow installation on Windows Using pip
- How to Install Pillow on Mac Operating System using pip
- How to Install Pillow on Linux Operating Systems
- Installing pip for Ubuntu, Debian, and Linux Mint
- Installing pip for CentOS 8 (and newer), Fedora, and Red Hat
- Installing pip for CentOS 6 and 7, and older versions of Red Hat
- Installing pip for Arch Linux and Manjaro
- Installing pip for OpenSUSE
- Pilow installation on Linux with Pip
- Installing Pillow Using Anaconda
- Check Pillow Version
- Summary
- Share this:
- [SOLVED] Python No Module Named Pil
- Causes & Solutions For No Module Named Pil
- Package Not Installed Properly
- Multiple Python Versions Installed
- Incorrect Package Name
- Importing Files
- Python No Module Named Pil Visual Studio Code
- No Module Named pil.imagetk
- For Versions Below Python 3
- For Versions Above Python 3
- No Module Named PIL (macOS)
- No Module Named PIL (Ubuntu)
- No Module Named PIL (Raspberry Pi)
- Pil.exiftags file missing from the Module
- FAQs
- Conclusion
How to Solve Python ModuleNotFoundError: no module named ‘pil’
PIL stands for Python Imaging Library and is a library for image processing. We often use PIL together with other image processing libraries like OpenCV.
What is the Difference Between PIL and Pillow?
Pillow is a fork of the PIL library; in other words, it is built on top of PIL. PIL support ended in 2011; therefore, it is no longer up-to-date nor secure to use. If you want to use the image processing capabilities that PIL provided, you should use the Pillow library.
The simplest way to install Pillow is to use the package manager for Python called pip. The following installation instructions are for the major Python version 3.
How to Install Pillow on Windows Operating System
First, you need to download and install Python on your PC. Ensure you select the install launcher for all users and Add Python to PATH checkboxes. The latter ensures the interpreter is in the execution path. Pip is automatically on Windows for Python versions 2.7.9+ and 3.4+.
You can check your Python version with the following command:
You can install pip on Windows by downloading the installation package, opening the command line and launching the installer. You can install pip via the CMD prompt by running the following command.
You may need to run the command prompt as administrator. Check whether the installation has been successful by typing.
Pillow installation on Windows Using pip
To install Pillow, run the following command from the command prompt.
How to Install Pillow on Mac Operating System using pip
Open a terminal by pressing command (⌘) + Space Bar to open the Spotlight search. Type in terminal and press enter. To get pip, first ensure you have installed Python3:
Download pip by running the following curl command:
curl https://bootstrap.pypa.io/get-pip.py -o get-pip.pyThe curl command allows you to specify a direct download link. Using the -o option sets the name of the downloaded file.
From the terminal, use pip3 to install Pillow:
How to Install Pillow on Linux Operating Systems
All major Linux distributions have Python installed by default. However, you will need to install pip. You can install pip from the terminal, but the installation instructions depend on the Linux distribution you are using. You will need root privileges to install pip. Open a terminal and use the commands relevant to your Linux distribution to install pip.
Installing pip for Ubuntu, Debian, and Linux Mint
sudo apt install python-pip3Installing pip for CentOS 8 (and newer), Fedora, and Red Hat
sudo dnf install python-pip3Installing pip for CentOS 6 and 7, and older versions of Red Hat
sudo yum install epel-release sudo yum install python-pip3Installing pip for Arch Linux and Manjaro
Installing pip for OpenSUSE
Pilow installation on Linux with Pip
Once you have installed pip, you can install Pillow using:
Installing Pillow Using Anaconda
First, to create a conda environment to install PIL.
conda create -n pillow python=3.6 Then activate the pillow container. You will see “pillow” in parentheses next to the command line prompt.
Now you’re ready to install Pillow using conda.
Anaconda is a distribution of Python and R for scientific computing and data science. You can install Anaconda by going to the installation instructions. Once you have installed Anaconda and created your conda environment, you can install Pillow using one of the following commands:
conda install -c intel pillow conda install -c intel/label/oneapibeta pillowCheck Pillow Version
Once you have successfully installed Pillow, you can use two methods to check the version of Pillow. First, you can use pip show from your terminal. Remember that the name of the Pillow package is pillow , not PIL.
Name: Pillow Version: 8.2.0 Summary: Python Imaging Library (Fork)Second, within your python program, you can import pillow and then reference the __version__ attribute:
import PIL print(PIL.__version__)Note that you need to import PIL, though you installed pillow. Pillow is simply a repackaged, updated version of PIL.
If you used conda to install Pillow, you could check the version using the following command:
# Name Version Build Channel pillow 8.3.1 py36ha4cf6ea_0 Summary
Congratulations on reading to the end of this tutorial. The modulenotfounderror occurs if you misspell the module name, incorrectly point to the module path or do not have the module installed in your Python environment. If you do not have the module installed in your Python environment, you can use pip to install the package. However, you must ensure you have pip installed on your system. You can also install Anaconda on your system and use the conda install command to install Pillow. Remember to use Pillow, and you have to use the import statement: import PIL
For further reading on installing modules in Python, go to the article: How to Solve Python is ModuleNotFoundError: no module named ‘selenium’.
Go to the online courses page on Python to learn more about Python for data science and machine learning.
Have fun and happy researching!
Share this:
[SOLVED] Python No Module Named Pil

Python Image Library or PIL is an image processing module developed for Python. It provides image processing tools that help in creating, editing, and exporting image files. However, the PIL project was abandoned in 2011. To continue providing support for the latest Python versions, the Pillow module forked the PIL module. The Pillow module eventually replaced PIL and became the go-to image processing library for Python.
The Python interpreter may not detect specific modules when imported. Therefore, upon execution, Python will return the ModuleNotFoundError: No module named ‘pil’ exception and exits the program.
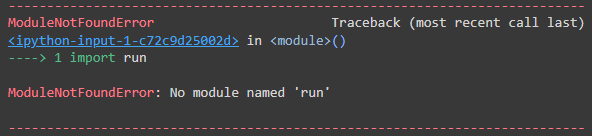
For example, let’s say we’re importing a package called “run”. We would do so by using the import statement followed by the package name ; run. Since there is no module called “run”, this error is shown.
Causes & Solutions For No Module Named Pil
There are multiple reasons why this exception may be raised. Let’s look at the following instances.
Package Not Installed Properly
This is probably the most typical reason for this exception. Some libraries may not be part of the Python Standard Library. Therefore they require additional installation steps before we can use them.
In specific IDEs (e.g., spyder), make sure your module are all installed in a single folder. PIP installer may install your package in one place, whereas the IDE expects the module in another directory. Make sure to save all external dependencies in one place.
It is vital to ensure that the correct installation commands for provided to install Pillow.
Windows Installationpython3 -m pip install --upgrade pip python3 -m pip install --upgrade PillowmacOS Installationpython3 -m pip install --upgrade pip python3 -m pip install --upgrade PillowLinux Installationpython3 -m pip install --upgrade pip python3 -m pip install --upgrade Pillow
Multiple Python Versions Installed
Installing multiple versions of Python can result in multiple library folders for each version. Therefore, ensure the library is present in the correct version of Python.
Here’s how we can find the installation location for your version of Python
Open up the Python command terminal
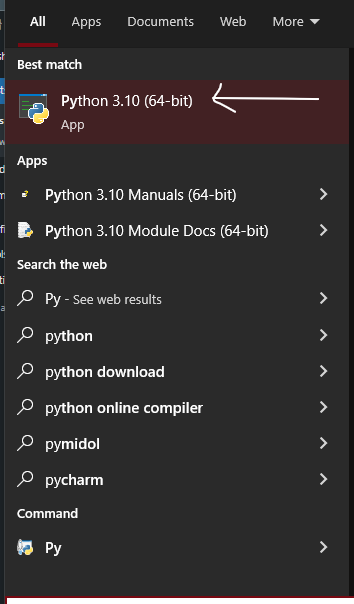
Type the following lines of commands
import os import sys os.path.dirname(sys.executable)
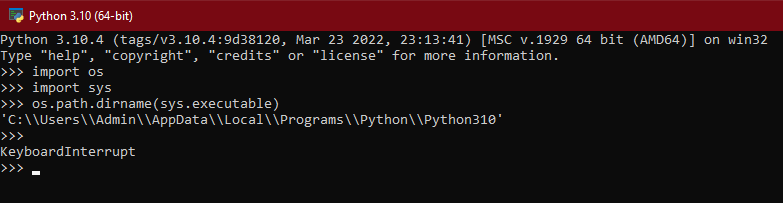
So the location would be: ‘C:\Users\Admin\AppData\Local\Programs\Python\Python310’
Incorrect Package Name
Certain packages have import statements that are different from their actual names. One notable example is a web scraping library called BeautifulSoup . The common user may attempt to import the module by calling import BeautifulSoup .
However, this is incorrect. You must go through the documents of each module and figure out the correct import command to avoid confusion. Furthermore, the correct implementation for the said example would be: import bs4
Importing Files
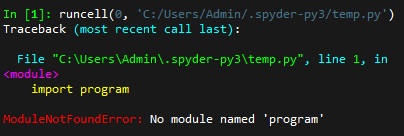
Another reason for the error to arise is importing Python files incorrectly. For example, let’s assume we’re importing the file “program.py”. To import this, we run “ import program ” excluding the .py extension. It is also essential to ensure that the file is present in the working directory. If failed to do so, the following error will appear:
Another rule to remember is that do not use names of pre-existing packages as your Python file name i.e pil.py . If done otherwise, the Python interpreter will consider pandas as your Python file rather than the pil package itself. This will cause problems when working with your file and the package.
Python No Module Named Pil Visual Studio Code
Users tend to face an issue with the module in VSCode. Upon importing, the program may run perfectly, but under the problems tab, this may appear:
import PIL could not be resolved from source. Pylance(reportmissingmodulesource) This error is caused due to the fact that VS Code isn’t running the same Python interpreter between the two or more versions. Modules are installed on one of the Python versions you have. Therefore, we must determine the path to the Python executable. Refer to the following command
import sys print(sys.executable)
This will show us the location in which Python is installed. If you run the same command on VS Code, it will show a different location. In order to have the versions in the same location, we must install the Python interpreter that is being used by VS Code. Type this in your terminal
/path/to/python/used/by/vs/code/python -m pip install pillow
No Module Named pil.imagetk
For Versions Below Python 3
This is due to the fact that Python is installed in a different location than the standard one. This can be fixed by re-installing Python to the standard location or by appending the location to sys.path .
For Versions Above Python 3
Python 3 and above imagetk comes under the Pillow module. Therefore, in order to import, run the following command.
No Module Named PIL (macOS)
PIL is a deprecated project, and no further support is provided. However, the Pillow project forked PIL to provide support for the latest Python versions. For macOS machines, the following command needs to be entered.
In some instances, the following error may appear.
ImportError: No module named PILAn easy solution to this problem is to make sure PIP is upgraded to the latest versions. PIP makes sure all your packages are unzipped and loaded into Python, ready to use. Therefore, it is vital to upgrade PIP in order to install the latest versions of modules. You can upgrade PIP using the following command in macOS
sudo pip install --upgrade pipNo Module Named PIL (Ubuntu)
In some versions of PIL in Ubuntu, it may come under the name imaging. Therefore in order to install Pillow in Ubuntu, run the following command.
sudo apt-get install python-imagingNo Module Named PIL (Raspberry Pi)
Upon installing the module on your Pi 0, you may be presented with the following error
sudo apt-get install python-pillow python-pil Reading package lists. Done Building dependency tree Reading state information. Done Note, selecting 'python-pil' instead of 'python-pillow' python-pil is already the newest version (5.4.1-2+deb10u2). 0 upgraded, 0 newly installed, 0 to remove and 0 not upgraded.
Despite the successful installation, you may be presented with No Module Named Pil error upon running your Python file.
This may be due to the fact that the version of PIL and Python do not match. Make sure your Pi has the correct version of Python installed, and it makes sure the PIL installation matches your Python version.
Pil.exiftags file missing from the Module
Upon installation, the . exiftags function may not work. This may be due to the fact that other versions of the same module may cause the file to be deleted or overwritten.
Deleting all module versions and only saving the latest one can fix this issue.
FAQs
Support for Python Image Library has been discontinued. Therefore, for the module to work on newer Python versions, the Pillow project forked the existing PIL project. All functionalities from PIL are present in Pillow as well.
Add RUN apk add zlib-dev jpeg-dev gcc musl-dev within your docker file and add Pillow within the requirements.txt file
Pillow provides image processing capabilities for Python. It has multiple file format support and powerful image processing abilities.
Conclusion
We’ve gone through various causes for Python No Module Named Pil exception. Make sure to keep these reasons in mind, as most “No Module Named” errors have similar reasons.