- Sidebar Menu Using HTML and CSS
- Step 2: Design the background using css code
- Step 3: Add profile images and titles
- Step 4: Add menu items in the sidebar
- Step 5: Design menu items with css code
- Step 6: Create navigation bar
- Step 7: Add JavaScript code to activate the menu button
- Разрабатываем нижнее меню на HTML5
- Шаг 1. HTML
- Шаг 2. CSS
- Шаг 3. JS
- Заключение
- 16 CSS Sidebar Menus
- Related Articles
- Author
- Links
- Made with
- About a code
- App Admin Menus
- Author
- Links
- Made with
- About a code
- Menu Hover Slide Fill
- Author
- Links
- Made with
- About a code
- Pure CSS Single Page Application
- Author
- Links
- Made with
- About the code
- Menu Effect
- Author
- Links
- Made with
- About the code
- CSS Only Navigation for Sidebar
- Author
- Links
- Made with
- About the code
- CSS Sidebar Menu
- Author
- Links
- Made with
- About the code
- Purple Sidebar Menu
- Author
- Links
- Made with
- About the code
- Pure CSS Fly in Sidebar Navigation
- Author
- Links
- Made with
- About the code
- Sidebar Navigation Animation
- Author
- Links
- Made with
- About the code
- Fixed Hover Navigation
- Author
- Links
- Made with
- About the code
- Fully Responsive CSS3 Sidebar Menu
- Author
- Links
- Made with
- About the code
- Sidebar Sliding Menu CSS
- Author
- Links
- Made with
- About the code
- 3D Rotating Sidebar Navigation
- Author
- Links
- Made with
- About the code
- Pure CSS3 Sidebar Menu
- Author
- Links
- Made with
- About the code
- Sidebar Menu CSS
- Author
- Links
- Made with
- About the code
- CSS Sidebar Menu
- Author
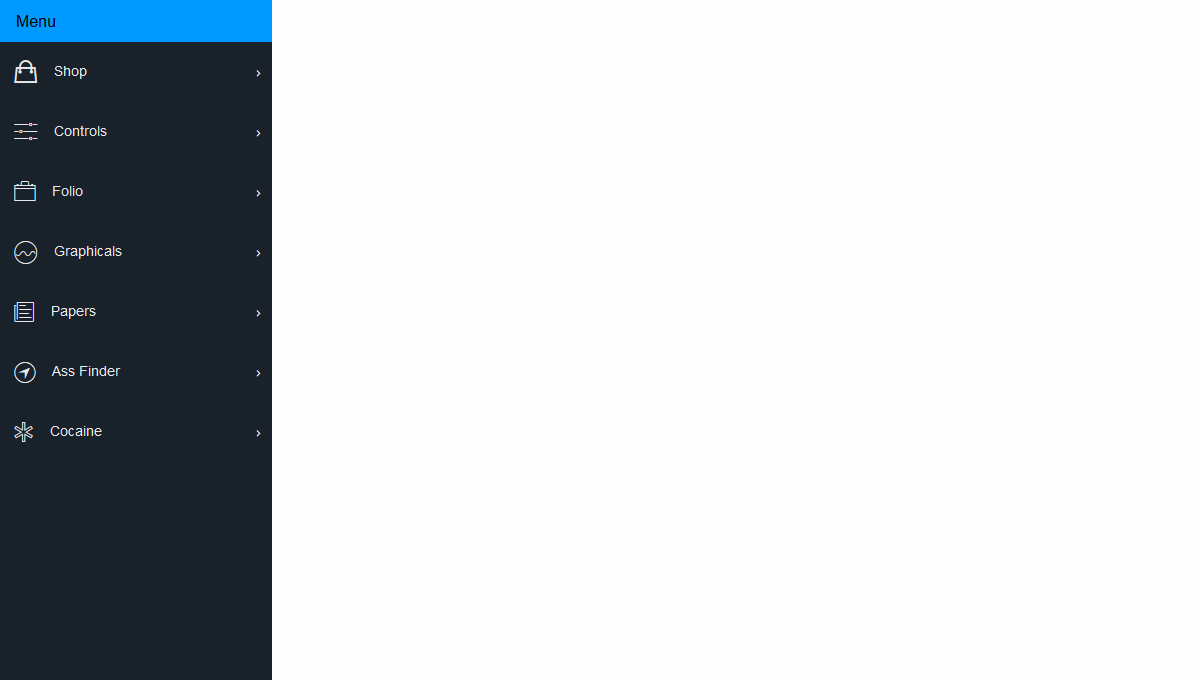
Sidebar Menu Using HTML and CSS
To create this you need to create an HTML and CSS file. Then copy the structure below and paste it into the HTML file. In the HTML structure below I have put all the information where you will add the required code. Follow this tutorial and add the code according to the information below.
lang="en"> rel="stylesheet" href="https://use.fontawesome.com/releases/v5.8.1/css/all.css"> charset="UTF-8"> http-equiv="X-UA-Compatible" content="IE=edge"> name="viewport" content="width=device-width, initial-scale=1.0"> Document class="wrapper"> class="sidebar"> Step 2: Design the background using css code
With that I added some basic CSS code that basically designed the background and gave the sidebar a shape. In this case I have used blue color in the background. You can change this color if you want.
@import url('https://fonts.googleapis.com/css2?family=Open+Sans&display=swap'); * list-style: none; text-decoration: none; margin: 0; padding: 0; box-sizing: border-box; font-family: 'Open Sans', sans-serif; > body background: #f5f6fa; > .wrapper .sidebar background: rgb(5, 68, 104); position: fixed; top: 0; left: 0; width: 225px; height: 100%; padding: 20px 0; transition: all 0.5s ease; > 
Step 3: Add profile images and titles
As you can see in the demo above, first of all here I used a profile image, a title and some description. I have used the following HTML and CSS programming code to make it. In this case, you can change the profile image to your liking and increase or decrease the size of this image if you want. In this case I used height 100px and width 100px . Here I have used border-radius 50% in the profile image which makes this image look completely round. You can change this percentage if you want to keep it square or other size.
class="profile"> src="https://1.bp.blogspot.com/-vhmWFWO2r8U/YLjr2A57toI/AAAAAAAACO4/0GBonlEZPmAiQW4uvkCTm5LvlJVd_-l_wCNcBGAsYHQ/s16000/team-1-2.jpg" alt="profile_picture"> Anamika Roy Designer .wrapper .sidebar .profile margin-bottom: 30px; text-align: center; > .wrapper .sidebar .profile img display: block; width: 100px; height: 100px; border-radius: 50%; margin: 0 auto; > .wrapper .sidebar .profile h3 color: #ffffff; margin: 10px 0 5px; > .wrapper .sidebar .profile p color: rgb(206, 240, 253); font-size: 14px; > 
Step 4: Add menu items in the sidebar
In this case I have used eight menu items . I have used an icon with each menu to make the menu items more beautiful and attractive. You can change those icons and menu items as you wish.
href="#" class="active"> class="icon"> class="fas fa-home"> class="item">Home href="#"> class="icon"> class="fas fa-desktop"> class="item">My Dashboard href="#"> class="icon"> class="fas fa-user-friends"> class="item">People href="#"> class="icon"> class="fas fa-tachometer-alt"> class="item">Perfomance href="#"> class="icon"> class="fas fa-database"> class="item">Development href="#"> class="icon"> class="fas fa-chart-line"> class="item">Reports href="#"> class="icon"> class="fas fa-user-shield"> class="item">Admin href="#"> class="icon"> class="fas fa-cog"> class="item">Settings Step 5: Design menu items with css code
The following codes are the CSS programming codes that were originally used to design and add colors to the menu items added above. In this case I have used white color between the icons and the text which looks much more interesting on a blue background. You can see below that I have added the effect of hover. When you hover your mouse over or click on that menu, the background will change as you saw in the demo above.
.wrapper .sidebar ul li a display: block; padding: 13px 30px; border-bottom: 1px solid #10558d; color: rgb(241, 237, 237); font-size: 16px; position: relative; > .wrapper .sidebar ul li a .icon color: #dee4ec; width: 30px; display: inline-block; > .wrapper .sidebar ul li a:hover, .wrapper .sidebar ul li a.active color: #0c7db1; background:white; border-right: 2px solid rgb(5, 68, 104); > .wrapper .sidebar ul li a:hover .icon, .wrapper .sidebar ul li a.active .icon color: #0c7db1; > .wrapper .sidebar ul li a:hover:before, .wrapper .sidebar ul li a.active:before display: block; > 
Step 6: Create navigation bar
In this case I used a navigation bar but I did not use any link in the navigation bar. In this case I have added a menu button which when clicked will hide the whole menu and when clicked again the menu will appear. The following HTML and CSS programming codes have been used to create and design this menu bar.
class="section"> class="top_navbar"> class="hamburger"> href="#"> class="fas fa-bars"> .wrapper .section width: calc(100% - 225px); margin-left: 225px; transition: all 0.5s ease; > .wrapper .section .top_navbar background: rgb(7, 105, 185); height: 50px; display: flex; align-items: center; padding: 0 30px; > .wrapper .section .top_navbar .hamburger a font-size: 28px; color: #f4fbff; > .wrapper .section .top_navbar .hamburger a:hover color: #a2ecff; > The following CSS codes basically indicate the exact position of the sidebar when this menu button is activated. This means that when you click on the menu button, the entire side will be hidden. Below I have indicated that when that menu button is clicked, the side will move 225 to the left , that is, it will be completely hidden.
body.active .wrapper .sidebar left: -225px; > body.active .wrapper .section margin-left: 0; width: 100%; > Step 7: Add JavaScript code to activate the menu button
In this case I have used a very small amount of JavaScript code which was originally used to activate the menu button on the navigation menu bar. If you see the demo above, you will understand that I have created a menu button here and if you click on that button, the entire menu bar will be hidden. Now we will activate that button which means when you click on this button the css code added above will be valid. I used the following JavaScript programming code to make it. The JavaScript programming code below is very simple and simple I hope you understand.
var hamburger = document.querySelector(".hamburger"); hamburger.addEventListener("click", function() document.querySelector("body").classList.toggle("active"); >) Разрабатываем нижнее меню на HTML5
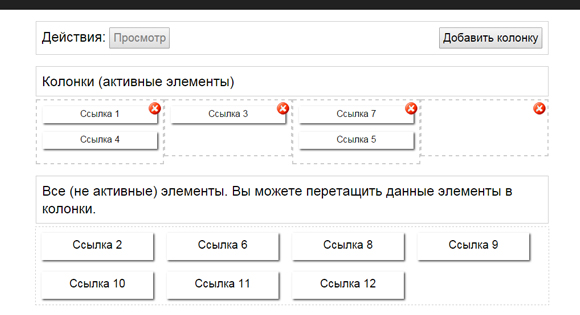
Поговорим про нижнюю навигацию сайтов. Я уверен, что вы видели её много раз (на различных сайтах). Как правило, это три-четыре колонны меню с различными ссылками. Сегодня я хотел бы показать вам, разработку, которую можно использовать для создания, нижнего меню. Главная цель этой разработки – приготовить статический код HTML (как кэш-файл) для встраивания в нижнюю часть сайта. Если вы заинтересованы в такой теме, то я расскажу вам о создании хорошего, удобного меню. Это руководство разделено на 2 части, сегодня я расскажу вам о первой части: пользовательский интерфейс с возможностью перетаскивания блоков.
Для начала, советую вам загрузить исходные файлы и запустить демо в новой вкладке для лучшего понимания.
Итак, давайте приступим к разработке
Шаг 1. HTML
Actions: Columns (with active elements) ![]()
![]()
![]() All (inactive) elements. You can drag these elements into columns. Link 1 Link 2 Link 3 Link 4 Link 5 Link 6 Link 7 Link 8 Link 9 Link 10 Link 11 Link 12
All (inactive) elements. You can drag these elements into columns. Link 1 Link 2 Link 3 Link 4 Link 5 Link 6 Link 7 Link 8 Link 9 Link 10 Link 11 Link 12 Имеются три основные части: блок с действиями, блок с активными колонками и блок с неактивными элементами. Все элементы можно перетаскивать между колонками. Также мы можем добавлять и удалять наши колонны.
Шаг 2. CSS
Теперь пришло время добавить стиль к нашему меню
/* menu builder styles */ .actions < border: 1px solid #CCCCCC; font-size: 24px; margin: 20px auto 5px; overflow: hidden; padding: 10px; width: 900px; /* CSS3 Box sizing property */ -moz-box-sizing: border-box; -webkit-box-sizing: border-box; -o-box-sizing: border-box; box-sizing: border-box; >.actions button < cursor: pointer; font-size: 20px; padding: 5px; >.actions #add_col < float: right; >.inactive < border: 1px dashed #ccc; margin: 0 auto; width: 900px; >.inactive a < border-color: #FFFFFF; border-style: solid; border-width: 8px 8px 20px; cursor: pointer; display: inline-block; font-size: 20px; height: 20px; margin: 10px; opacity: 1; position: relative; text-align: center; width: 180px; -khtml-user-drag: element; /* CSS3 Prevent selections */ -moz-user-select: none; -webkit-user-select: none; -khtml-user-select: none; user-select: none; /* CSS3 Box Shadow */ -webkit-box-shadow: 2px 2px 4px #444; -o-box-shadow: 2px 2px 4px #444; box-shadow: 2px 2px 4px #444; >.inactive a.hidden < height: 0; margin: 0; opacity: 0; width: 0; >.columns < margin: 0 auto; overflow: hidden; width: 900px; >.column < border: 2px dashed #ccc; float: left; min-height: 100px; padding: 10px; position: relative; width: 33.3%; /* CSS3 Box sizing property */ -moz-box-sizing: border-box; -webkit-box-sizing: border-box; -o-box-sizing: border-box; box-sizing: border-box; >.column a < border-color: #FFFFFF; border-style: solid; border-width: 4px 4px 10px; cursor: pointer; display: block; font-size: 16px; height: 30px; margin-bottom: 15px; opacity: 1; position: relative; text-align: center; -khtml-user-drag: element; -webkit-user-drag: element; /* CSS3 Prevent selections */ -moz-user-select: none; -webkit-user-select: none; -khtml-user-select: none; user-select: none; /* CSS3 Box Shadow */ -webkit-box-shadow: 2px 2px 4px #444; -o-box-shadow: 2px 2px 4px #444; box-shadow: 2px 2px 4px #444; /* CSS3 Box sizing property */ -moz-box-sizing: border-box; -webkit-box-sizing: border-box; -o-box-sizing: border-box; box-sizing: border-box; >.column img
Шаг 3. JS
// add event handler realization var addEvent = (function () < if (document.addEventListener) < return function (el, type, fn) < if (el && el.nodeName || el === window) < el.addEventListener(type, fn, false); >else if (el && el.length) < for (var i = 0; i < el.length; i++) < addEvent(el[i], type, fn); >> >; > else < return function (el, type, fn) < if (el && el.nodeName || el === window) < el.attachEvent('on' + type, function () < return fn.call(el, window.event); >); > else if (el && el.length) < for (var i = 0; i < el.length; i++) < addEvent(el[i], type, fn); >> >; > >)(); // update handlers for draggable objects function updateHandlerDrag() < var dragItems = document.querySelectorAll('[draggable=true]'); for (var i = 0; i < dragItems.length; i++) < // dragstart event handler addEvent(dragItems[i], 'dragstart', function (event) < event.dataTransfer.setData('obj_id', this.id); return false; >); > > // update handlers for droppable objects function updateHandlerDrop() < var dropAreas = document.querySelectorAll('[droppable=true]'); // dragover event handler addEvent(dropAreas, 'dragover', function (event) < if (event.preventDefault) event.preventDefault(); this.style.borderColor = "#000"; return false; >); // dragleave event handler addEvent(dropAreas, 'dragleave', function (event) < if (event.preventDefault) event.preventDefault(); this.style.borderColor = "#ccc"; return false; >); // dragenter event handler addEvent(dropAreas, 'dragenter', function (event) < if (event.preventDefault) event.preventDefault(); return false; >); // drop event handler addEvent(dropAreas, 'drop', function (event) < if (event.preventDefault) event.preventDefault(); // get dropped object var iObj = event.dataTransfer.getData('obj_id'); var oldObj = document.getElementById(iObj); // get inner text var linkText = oldObj.innerHTML; oldObj.className += 'hidden'; // remove object from DOM oldObj.parentNode.removeChild(oldObj); // add similar object in another place this.innerHTML += ''+linkText+''; // and update event handlers updateHandlerDrag(); this.style.borderColor = "#ccc"; return false; >); > // add column button var addColBtn = document.querySelectorAll('#add_col'); addEvent(addColBtn, 'click', function (event) < if (event.preventDefault) event.preventDefault(); // recalculate widths for columns var oCols = document.querySelector('div.columns'); var iChilds = oCols.childElementCount + 1; var dWidth = 100 / iChilds; // add single column oCols.innerHTML += '![]() '; // set new widths for (var i = 0; i < iChilds; i++) < oCols.children[i].style.width = dWidth + '%'; >// update handlers updateHandlerDrop(); return false; >); // remove columns function removeColumn(obj) < var oParent = obj.parentNode; // move object to inactive area var oInactive = document.querySelector('div.inactive'); for (var i = 0; i < oParent.childNodes.length; i++) < if (oParent.childNodes[i].nodeType == document.ELEMENT_NODE && oParent.childNodes[i].tagName == 'A') < oInactive.innerHTML += ''+oParent.childNodes[i].innerHTML+''; > > // remove column oParent.parentElement.removeChild(oParent); // recalculate widths for columns var oCols = document.querySelector('div.columns'); var iChilds = oCols.childElementCount; var dWidth = 100 / iChilds; // set new widths for (var i = 0; i < iChilds; i++) < oCols.children[i].id = 'drop_' + (i + 1); oCols.children[i].style.width = dWidth + '%'; >// update handlers updateHandlerDrop(); updateHandlerDrag(); > // update handlers updateHandlerDrag(); updateHandlerDrop();
'; // set new widths for (var i = 0; i < iChilds; i++) < oCols.children[i].style.width = dWidth + '%'; >// update handlers updateHandlerDrop(); return false; >); // remove columns function removeColumn(obj) < var oParent = obj.parentNode; // move object to inactive area var oInactive = document.querySelector('div.inactive'); for (var i = 0; i < oParent.childNodes.length; i++) < if (oParent.childNodes[i].nodeType == document.ELEMENT_NODE && oParent.childNodes[i].tagName == 'A') < oInactive.innerHTML += ''+oParent.childNodes[i].innerHTML+''; > > // remove column oParent.parentElement.removeChild(oParent); // recalculate widths for columns var oCols = document.querySelector('div.columns'); var iChilds = oCols.childElementCount; var dWidth = 100 / iChilds; // set new widths for (var i = 0; i < iChilds; i++) < oCols.children[i].id = 'drop_' + (i + 1); oCols.children[i].style.width = dWidth + '%'; >// update handlers updateHandlerDrop(); updateHandlerDrag(); > // update handlers updateHandlerDrag(); updateHandlerDrop(); Здесь мы использовали много обработчиков событий. В начале, скрипта обновляем различные обработчики для всех перетаскивании и dropable объектов. При перемещении между блоками (с нижней области), мы должны воссоздать объекты в верхней области и обновить обработчики событий. В случае, когда нам нужно удалить колонку, мы должны передвинуть объект назад в нижнюю неактивную область, в которой содержится список всех возможных элементов.
Заключение
Вот и все, сегодня мы реализовали первую половину нашей постройки меню с функциями перетаскивания. Надеюсь, что наше руководство помогло вам. Не стесняйтесь поделиться своими знаниями с друзьями. Удачи!
UPD: Так как эта статья получила много негативных мнений, продолжение публиковаться на хабре не будет, но если кому то интересно то можете прочитать его здесь
16 CSS Sidebar Menus
Collection of hand-picked free HTML and CSS sidebar menu code examples from codepen and other resources. Update of July 2018 collection. 3 new items.
Related Articles
Author
Links
Made with
About a code
App Admin Menus
App admin menus. light/dark modes.
Compatible browsers: Chrome, Edge, Firefox, Opera, Safari
Author
Links
Made with
About a code
Menu Hover Slide Fill
Compatible browsers: Chrome, Edge, Firefox, Opera, Safari
Author
Links
Made with
About a code
Pure CSS Single Page Application
Compatible browsers: Chrome, Edge, Firefox, Opera, Safari
Author
Links
Made with
About the code
Menu Effect
Reverse text color menu effects.
Compatible browsers: Chrome, Firefox, Opera, Safari

Author
Links
Made with
About the code
CSS Only Navigation for Sidebar
CSS only mirror like navigation for sidebar.
Compatible browsers: Chrome, Edge, Firefox, Opera, Safari

Author
Links
Made with
About the code
CSS Sidebar Menu
HTML and CSS navbar and sidebar mega menu.
Compatible browsers: Chrome, Edge, Firefox, Opera, Safari
Dependencies: bootstrap.css, font-awesome.css

Author
Links
Made with
About the code
Purple Sidebar Menu
This is a reverse engineering of the «Hyperspace» design from HTML5 Up! https://html5up.net/hyperspace
Compatible browsers: Chrome, Edge, Firefox, Opera, Safari
Author
Links
Made with
About the code
Pure CSS Fly in Sidebar Navigation
A simple, multi-level sidebar navigation. Features pure css «fly in» subnav, that leaves icons of parent nav visible. Nav items will scroll ( overflow-y ) if needed. Uses transform s and transition s.
Compatible browsers: Chrome, Edge, Firefox, Opera, Safari

Author
Links
Made with
About the code
Sidebar Navigation Animation
Nothing like a little trendy body pushin.
Compatible browsers: Chrome, Edge, Firefox, Opera, Safari

Author
Links
Made with
About the code
Fixed Hover Navigation
Fixed sidebar drawer navigation, that expands on hover.
Compatible browsers: Chrome, Edge, Firefox, Opera, Safari

Author
Links
Made with
About the code
Fully Responsive CSS3 Sidebar Menu
A fully responsive sidebar menu without any need of JavaScript and using less than 200 lines of functional CSS code.
Compatible browsers: Chrome, Edge, Firefox, Opera, Safari

Author
Links
Made with
About the code
Sidebar Sliding Menu CSS
CSS sliding sidebar menu with scroll, no JS were used
Compatible browsers: Chrome, Edge, Firefox, Opera, Safari

Author
Links
Made with
About the code
3D Rotating Sidebar Navigation
A vertical navigation bar that switches from an icon to text with a cool animation.
Compatible browsers: Chrome, Edge, Firefox, Opera, Safari

Author
Links
Made with
About the code
Pure CSS3 Sidebar Menu
Pure CSS3 mega dropdown sidebar menu with animation..
Compatible browsers: Chrome, Edge, Firefox, Opera, Safari

Author
Links
Made with
About the code
Sidebar Menu CSS
CSS sidebar menu with hover show/hide.
Compatible browsers: Chrome, Edge, Firefox, Opera, Safari

Author
Links
Made with
About the code
CSS Sidebar Menu
Easy to use sidebar menu with HTML and CSS.
Compatible browsers: Chrome, Edge, Firefox, Opera, Safari
