- MySQL Database Connection in Java with Example
- Establish MySQL Database Connection
- MySQL JDBC Driver Details
- MySQL Database JDBC Connection Code in Java Example
- Standard Steps to Develop JDBC Application
- JDBC Program Example
- Java Program
- Connect to MySQL with JDBC driver
- 1. Download MySQL JDBC Driver
- 2. JDBC Connection
- 3. Maven Project
- Download Source Code
- References
- Comments
MySQL Database Connection in Java with Example
In this post, we will discuss how to establish the JDBC connection in Java with MySQL database. After establishing the connection we will develop a sample JDBC application to check whether the connection is done properly or not with the MySQL database. We will develop a simple JDBC program to fetch the record from one table of the MySQL database and display it on the console.
Before establishing a MySQL database connection in Java, make sure you have the following software setup ready on your computer system,
1) MySQL Database
2) JDK1.8 or later version
3) Any text editor to write the code or IDE
Establish MySQL Database Connection
Now let us begin the establishing MySQL JDBC connection.
Step1) Collect JDBC driver of MySQL database.
The JDBC driver of MySQL database doesn’t come along with MySQL database installation, We need to collect it separately. Download the JDBC driver/connector of the MySQL database.
Open the zip file, and extract it. The mysql-connector-java-.jar is the main jar file that will be used to develop the JDBC applications through the MySQL database.
Step2) Add jar file to the CLASSPATH.
Note:- In the CLASSPATH don’t add the location/folder where the jar file is available. We have to add the location of the jar file, not the folder where the jar file is available.
Don’t try to write the location name manually because we can do a spelling mistake, so it is recommended to copy the jar file location. In order to copy the jar files correctly in the Windows operating system, Go to the folder where the jar file is locating, now select jar file, right-click and select properties, in the security section you will find “Object name”. We can copy the actual path of the jar file from here.
The folder where the Jar file is located:- C:\Users\user\Downloads\
The location which will be added to Classpath:- C:\Users\user\Downloads\mysql-connector-java-8.0.21.jar
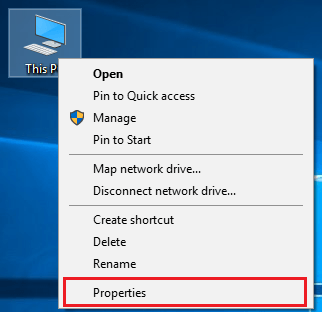
How to add the jar file to the classpath?
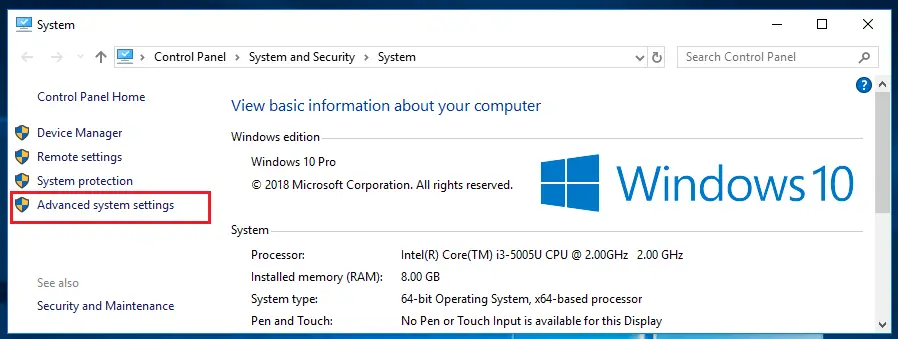
For this, we have to go to “Advance System Settings”. There are many ways to go to “Advance System Settings”,
1) This PC -> Properties -> Advance System Settings
2) Control panel -> System and Security -> System -> Advance system settings
Now go to Advance system settings -> Environment Variables -> System Variables.
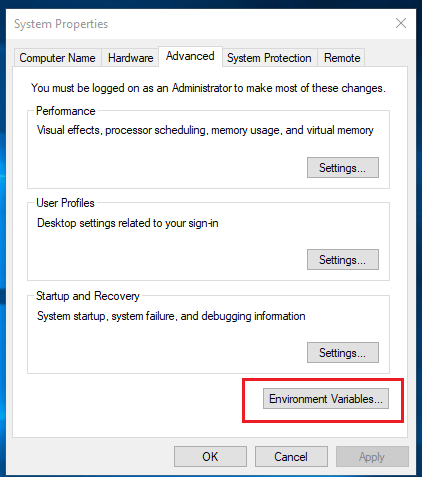
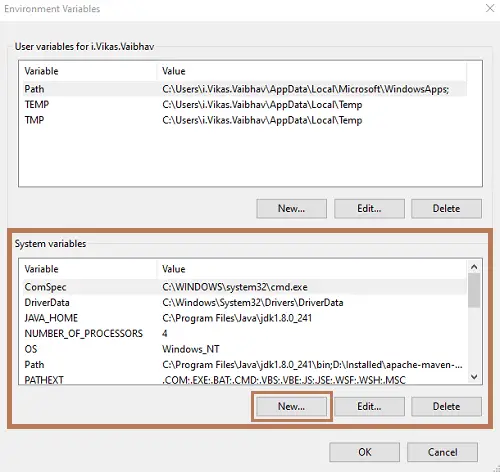
If the CLASSPATH variable already exists then “Edit it”, otherwise create “New”.
Variable Name: CLASSPATH Value: ;.Variable Name: CLASSPATH Value: ;;.It is recommended to place dot (.) after the variable values, and ; is a separator that separates two variable values. Learn more:- Different Ways to Set Java Classpath Environment Variables in Windows
In case of “Edit”, if new window came then each line must have separate variable value, and using “Move UP” button place it on the first position.
Step3) Develop the application.
We have established the connection successfully. Now, we have to develop a sample JDBC application to check the establishing the connection is done properly or not.
MySQL JDBC Driver Details
We need some basic details of MySQL JDBC driver to develop the JDBC program.
JDBC Driver Class Name:: com.mysql.cj.jdbc.Driver
- For local MySQL:: jdbc:mysql:///
- For remote MySQL:: jdbc:mysql://:/
Username:
Password:
Note:- If you developing JDBC application for first time in local computer/laptop then use URL for local MySQL.
How to find the database name in MySQL?
Type below query to get all databases available in the MySQL server.
If you are new to MySQL then create a new database,
CREATE SCHEMA `knowprogram` ;Here “knowprogram” will be the name of the database. Hence the URL for local MySQL will be => jdbc:mysql:///knowprogram
MySQL Database JDBC Connection Code in Java Example
Now, let us develop a small Java program to check JDBC connection with MySQL Database is established properly or not?
import java.sql.*; public class ConnectionTest < public static void main(String[] args ) throws Exception < // register Oracle thin driver with DriverManager service // it is optional for JDBC4.x version Class.forName("com.mysql.cj.jdbc.Driver"); // declare variables // place your own values final String url = "jdbc:mysql:///knowprogram"; final String user = "root"; final String password = "[email protected]"; // establish the connection Connection con = DriverManager.getConnection(url, user, password); // display status message if(con == null) < System.out.println("JDBC connection is not established"); return; >else System.out.println("Congratulations,"+ " JDBC connection is established successfully.\n"); // close JDBC connection con.close(); > //main > //classCompile the Java Program,
> javac ConnectionTest.java
Execute the program,
> java ConnectionTest
Congratulations, JDBC connection is established successfully.
Standard Steps to Develop JDBC Application
There are some standard steps to develop JDBC program. Every JDBC program will have these common points.
1. Register JDBC driver with DriverManager service
This step is only required for the JDBC3.0 The JDBC4.x version supports the auto-loading of the driver class, so registering JDBC driver with DriverManager is optional. Here auto-loading means when we call the method of the class then due to logic of its static block it loads the driver class.
// register MySQL connector with // DriverManager service // optional for JDBC4.x version drivers Class.forName("com.mysql.cj.jdbc.Driver");2. Establish the connection with database software
// establishing the connection with database software Connection con = DriverManager.getConnection(url, username, password);Here place your own URL, username, and password which are assigned to the MySQL database.
3. Create JDBC Statement object
// create JDBC Statement object Statement st = con.createStatement();4. Gather SQL query result back to Java application from database software.
// close JDBC objects rs.close(); st.close(); con.close();JDBC Program Example
Previously, we have developed a simple Java program to check that the JDBC connection is established properly with the MySQL database or not. Now, let us develop a simple Java to fetch records from a table and display it on the console.
But for this, we need a table. You can use an existing table. But here we are developing for the first time so we will create a new table in the MySQL database.
CREATE TABLE `knowprogram`.`student`( `sno` INT NOT NULL, `sname` VARCHAR(45) NULL, `sadd` VARCHAR(45) NULL, `avg` FLOAT NULL, PRIMARY KEY (`sno`) );Table created. Now, insert some record into the table,
INSERT INTO `knowprogram`.`student` (`sno`, `sname`, `sadd`, `avg`) VALUES ('10', Sophia', 'Manchester', '70'); INSERT INTO `knowprogram`.`student` (`sno`, `sname`, `sadd`, `avg`) VALUES ('11', 'William', 'Washington', '80'); INSERT INTO `knowprogram`.`student` (`sno`, `sname`, `sadd`, `avg`) VALUES ('12', 'Alex', 'Boise', '85'); INSERT INTO `knowprogram`.`student` (`sno`, `sname`, `sadd`, `avg`) VALUES ('13', 'Amelia', 'London', '90');Java Program
We will develop a simple JDBC program which will fetch the record of “student” table and display it to the console.
import java.sql.*; public class SelectTest < public static void main(String[] args ) throws Exception < // variables final String url = "jdbc:mysql:///knowprogram"; final String user = "root"; final String password = "[email protected]"; // establish the connection Connection con = DriverManager.getConnection(url, user, password); // create JDBC statement object Statement st = con.createStatement(); // prepare SQL query String query = "SELECT SNO, SNAME, SADD, AVG FROM STUDENT"; // send and execute SQL query in Database software ResultSet rs = st.executeQuery(query); // process the ResultSet object boolean flag = false; while(rs.next()) < flag = true; System.out.println( rs.getInt(1) + " " + rs.getString(2) + " " + rs.getString(3) + " " + rs.getFloat(4) ); >if(flag == true) < System.out.println("\nRecords retrieved and displayed"); >else < System.out.println("Record not found"); >// close JDBC objects rs.close(); st.close(); con.close(); > //main > //classCompile and Execute the JDBC program,
> javac SelectTest.java
> java SelectTest
10 Sophia Manchester 72.0
11 William Washington 80.0
12 Alex boise 95.0
13 Amelia London 85.0
Records retrieved and displayed
Note:- While developing this application we didn’t follow any coding standards. We should follow some coding standards while developing JDBC applications. Learn more:- Coding Standards and Guidelines for JDBC Application, Best Way to Close JDBC Connection Object
If you enjoyed this post, share it with your friends. Do you want to share more information about the topic discussed above or do you find anything incorrect? Let us know in the comments. Thank you!
Connect to MySQL with JDBC driver
A JDBC example to show you how to connect to a MySQL database with a JDBC driver.
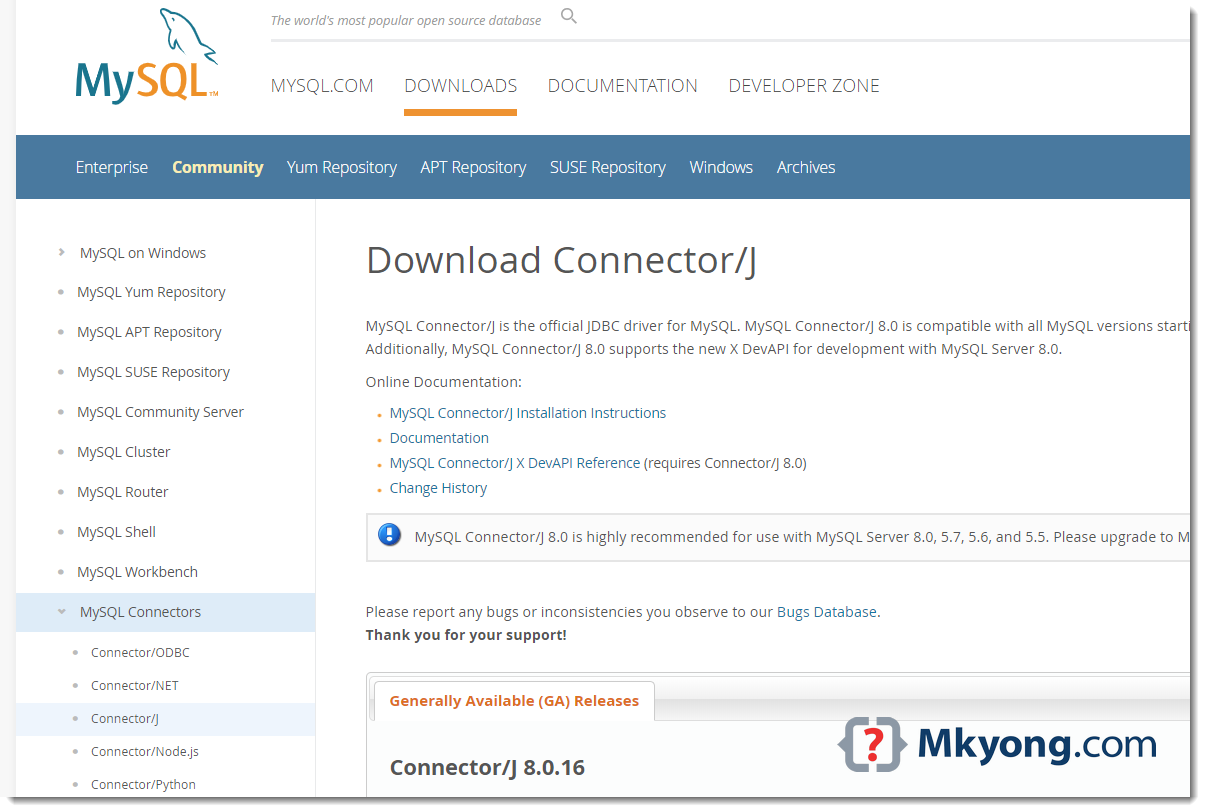
1. Download MySQL JDBC Driver
Visit https://dev.mysql.com/downloads/connector/j/ to download the latest MySQL JDBC Driver.
2. JDBC Connection
2.1 Make a connection to the MySQL database.
import java.sql.Connection; import java.sql.DriverManager; import java.sql.SQLException; public class JDBCExample < public static void main(String[] args) < // https://docs.oracle.com/javase/8/docs/api/java/sql/package-summary.html#package.description // auto java.sql.Driver discovery -- no longer need to load a java.sql.Driver class via Class.forName // register JDBC driver, optional since java 1.6 /*try < Class.forName("com.mysql.jdbc.Driver"); >catch (ClassNotFoundException e) < e.printStackTrace(); >*/ // auto close connection try (Connection conn = DriverManager.getConnection( "jdbc:mysql://127.0.0.1:3306/test", "root", "password")) < if (conn != null) < System.out.println("Connected to the database!"); >else < System.out.println("Failed to make connection!"); >> catch (SQLException e) < System.err.format("SQL State: %s\n%s", e.getSQLState(), e.getMessage()); >catch (Exception e) < e.printStackTrace(); >> > # compile > javac JDBCExample.java # run > java JDBCExample SQL State: 08001 No suitable driver found for jdbc:mysql://127.0.0.1:3306/test To run it with java command, we need to load the MySQL JDBC driver manually. Assume everything is stored in the c:\test folder, run it again with this -cp option.
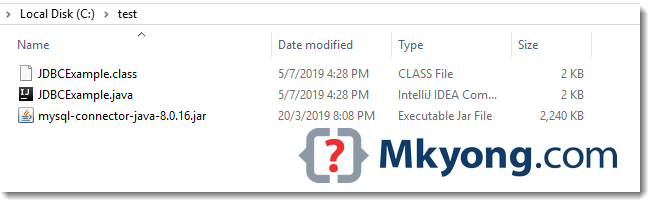
> java -cp "c:\test\mysql-connector-java-8.0.16.jar;c:\test" JDBCExample Connected to the database! 3. Maven Project
3.1 The MySQL JDBC driver is available in the Maven central repository.
mysql mysql-connector-java 8.0.16 3.2 A simple JDBC select example.
import com.mkyong.jdbc.model.Employee; import java.math.BigDecimal; import java.sql.*; import java.util.ArrayList; import java.util.List; public class JDBCExample2 < public static void main(String[] args) < System.out.println("MySQL JDBC Connection Testing ~"); Listresult = new ArrayList<>(); String SQL_SELECT = "Select * from EMPLOYEE"; try (Connection conn = DriverManager.getConnection( "jdbc:mysql://127.0.0.1:3306/test", "root", "password"); PreparedStatement preparedStatement = conn.prepareStatement(SQL_SELECT)) < ResultSet resultSet = preparedStatement.executeQuery(); while (resultSet.next()) < long String name = resultSet.getString("NAME"); BigDecimal salary = resultSet.getBigDecimal("SALARY"); Timestamp createdDate = resultSet.getTimestamp("CREATED_DATE"); Employee obj = new Employee(); obj.setId(id); obj.setName(name); obj.setSalary(salary); // Timestamp ->LocalDateTime obj.setCreatedDate(createdDate.toLocalDateTime()); result.add(obj); > result.forEach(x -> System.out.println(x)); > catch (SQLException e) < System.err.format("SQL State: %s\n%s", e.getSQLState(), e.getMessage()); >catch (Exception e) < e.printStackTrace(); >> > import java.math.BigDecimal; import java.time.LocalDateTime; public class Employee < private Long id; private String name; private BigDecimal salary; private LocalDateTime createdDate; //. > CREATE TABLE EMPLOYEE ( ID INT NOT NULL AUTO_INCREMENT, NAME VARCHAR(100) NOT NULL, SALARY DECIMAL(15, 2) NOT NULL, CREATED_DATE DATETIME NOT NULL DEFAULT CURRENT_TIMESTAMP, PRIMARY KEY (ID) ); Download Source Code
References

mkyong
Founder of Mkyong.com, love Java and open source stuff. Follow him on Twitter. If you like my tutorials, consider make a donation to these charities.
Comments
[…] Connect to MySQL with JDBC driver Here’s an example to show you how to connect to MySQL database via JDBC driver. […]Thanks for your help. It’s really helpful !
Truly a live saver, thanks a lot!
Hi. Thank you for the excellent explanation. I wanted to ask what I am writing exactly in the url when I use localhost in mysql using jdbc in android studio. I tried all kinds of Syntax and did not work me the connection to the database. Do I need to specify the port in the url or the IP address of my computer?
3/14/19 4:36:20:213 GMT] 4f6f5df5 SystemOut U ——– MySQL JDBC Connection Testing ————
[3/14/19 4:36:20:218 GMT] 4f6f5df5 SystemOut U MySQL JDBC Driver Registered!
java.lang.NoClassDefFoundError: java/util/LinkedHashMap
at java.lang.ClassLoader.defineClass0(Native Method)
at java.lang.ClassLoader.defineClass(ClassLoader.java(Compiled Code))
at java.security.SecureClassLoader.defineClass(SecureClassLoader.java(Compiled Code))
at com.ibm.ws.classloader.CompoundClassLoader._defineClass(CompoundClassLoader.java(Compiled Code))
at com.ibm.ws.classloader.CompoundClassLoader.findClass(CompoundClassLoader.java(Compiled Code))
at com.ibm.ws.classloader.CompoundClassLoader.loadClass(CompoundClassLoader.java(Compiled Code))
at java.lang.ClassLoader.loadClass(ClassLoader.java(Compiled Code))
at com.mysql.jdbc.NonRegisteringDriver.connect(NonRegisteringDriver.java:283)
at java.sql.DriverManager.getConnection(DriverManager.java:543)
at java.sql.DriverManager.getConnection(DriverManager.java:194)
at com.portrade.ipms.icms.schedulers.TafmsInterfaceJob.execute(TafmsInterfaceJob.java:49)
at org.quartz.core.JobRunShell.run(JobRunShell.java:195)
at org.quartz.simpl.SimpleThreadPool$WorkerThread.run(SimpleThreadPool.java:520)
i try used this method. however i face this error.
i have no idea with this error.
now how do i use it in struts 2 to insert