JDBC Using Model Object and Singleton Class
This article explains how to perform JDBC operation using a Model object and a Singleton connection class from a MySQL database.
JDBC is an Application Programming Interface for Java which connects a Java application with a database to perform CRUD operations.
Pre requisite:
- JDK 7+ (Click here to download)
- MySQL Database (Click here to download)
- MySQL J Connector (Click here to download)
- JDBC basic (Click here to learn JDBC)
- Eclipse or any other IDE
Model Class: The model class is highly used in the MVC pattern where it works as an intermediate medium between business logic and the view. Usually, a model contains some variables and methods of a specific entity.
Singleton Class: Singleton class is a software design pattern that ensures there will be one single instance of that class. There are multiple ways to achieve a singleton class.
Approach: We are going to create an Organization database that contains an Employee table. We will also create a java application that will connect with the Organization database. The connection will be established by a singleton class which will contain all the necessary driver information. From the java application, we will perform some data manipulation tasks like insert, delete, update and retrieve using a model object of Employee.
- Creating a MySQL database and a table:
create database org; use org; create table employee( emp_id int auto_increment, emp_name varchar(400), emp_address varchar(400), primary key (emp_id) );
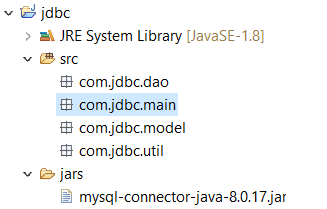
- Create a project in eclipse named ‘jdbc’
- Create a folder on that project named ‘jars’ and paste MySQL J Connector on that folder
- Add jars to java build path
- Create 4 package: com.jdbc.util, com.jdbc.dao, com.jdbc.model and com.jdbc.main
Database connection: Create a singleton connection class DatabaseConnection in com.jdbc.util package. Use your MySQL username and password on the variable user and pass. Look carefully at the last part of the “url” variable. It is mandatory to keep the name the same as the database name. The name of my database is “org” that’s why I put “org” in the URL variable.
14.2. Create a Model
In the next several pages, we will be making updates to coding-events to demonstrate model creation, how models relate to data, and the practice of model binding. The first of these steps is to move data handling out of our controller classes and into a model class. As we discussed on the previous page, the controller class is not responsible for holding data.
In coding-events , we’ll remove the ArrayList data from EventController and create a proper Java class to deal with event items. We’ll then update our controller methods to take advantage of the new model and its properties, rather than the strings stored in the list. Lastly, because the controller is updating, the template variables it relies upon will also need to change to reflect the model properties.
14.2.1. Create a Model Class — Video
The starter code for this video is found at the add-bootstrap branch of coding-events-demo . The final code presented in this video is found on the create-model branch . As always, code along with the videos on your own coding-events project.
14.2.2. Create a Model Class — Text
Like controllers, model classes are conventionally located in a models package. Structurally, model classes most closely resemble the kinds of classes we practiced making at the start of this course, before introducing Spring Boot. In other words, models are plain old Java objects, or POJOs.
To create a model to shape event data, we include a field for name . Of course, we’ll also like at least one constructor and some getters and setters.
6 7 8 9 10 11 12 13 14 15 16 17 18 19 20 21 22 23 24 25 26
public class Event private String name; public Event(String name) this.name = name; > public String getName() return name; > public void setName(String name) this.name = name; > @Override public String toString() return name; > >
Now that we’re working to move the data handling out from the controller classes and into a class of its own, we’ll need to update the POST handler that creates new events. Update the .add() method inside of processCreateEventForm to add a new Event instance:
@PostMapping("create") public String processCreateEventForm(@RequestParam String eventName) events.add(new Event(eventName)); return "redirect:"; >
And you’ll notice, we’re adding a different type of data to the ArrayList , so we’ll have to update that too:
private static ListEvent> events = new ArrayList<>();
Back in the events/index.html template, update the HTML to use the Event object’s fields, rather than simply strings.
The syntax event.fieldName runs a getter method behind the scenes in order to access a field.
14.2.3. Add a Model Property — Video
The starter code for this video is found at the create-model branch of the coding-events-demo repo. The final code presented in this video is found on the add-property branch . As always, code along to the videos on your own coding-events project.
14.2.4. Add a Model Property — Text
To round out the Event class, we’ll add a description field to showcase what our events are all about.
Updates to models/Event.java :
6 7 8 9 10 11 12 13 14 15 16 17 18 19 20 21 22 23 24 25 26 27 28 29 30 31 32 33 34 35 36
public class Event private String name; private String description; public Event(String name, String description) this.name = name; this.description = description; > public String getName() return name; > public void setName(String name) this.name = name; > public String getDescription() return description; > public void setDescription(String description) this.description = description; > @Override public String toString() return name; > >
Now that our data is object-oriented, it’s quick and easy to add a new property affiliated with an event. If after this, we decide to add a date or location field, we would simply follow the pattern established. Before, with events stored as name strings, we would have had more changes to make in order to add other information fields to the shape of the data.
Update both the events/create.html and events/index.html templates to create an event object with a description field and to display that description along with the event’s name.
label> Description input type="text" name="eventDescription" class="form-control"> label>