- How to Rotate / Mirror Photos with Python
- Rotating an Image
- Mirroring an Image
- Wrapping Up
- Related Reading
- 3 thoughts on “How to Rotate / Mirror Photos with Python”
- Image Flipping and Mirroring with NumPy and OpenCV
- Package requirements
- Let’s get started
- Mirroring the Image
- Flipping the Image
- The Complete Code
- Basic Image Operations Package
- What I have gained from this?
- How do I Create Mirror Image Using Python?
- How to Rotate and Mirror Images with Python and Pillow (Video)
- The Python Show Podcast
- The Python Quiz Book
- Automating Excel with Python
- Python 101
- Pillow: Image Processing with Python
- Pick a Category
- Archives
- Links
How to Rotate / Mirror Photos with Python
In our last article, we learned how to crop images with the Pillow package. For this article, we will learn how to rotate and mirror our images.
Rotating an Image
Rotating an image with Python and Pillow is quite simple. Let’s take a look at some code:
from PIL import Image def rotate(image_path, degrees_to_rotate, saved_location): """ Rotate the given photo the amount of given degreesk, show it and save it @param image_path: The path to the image to edit @param degrees_to_rotate: The number of degrees to rotate the image @param saved_location: Path to save the cropped image """ image_obj = Image.open(image_path) rotated_image = image_obj.rotate(degrees_to_rotate) rotated_image.save(saved_location) rotated_image.show() if __name__ == '__main__': image = 'mantis.png' rotate(image, 90, 'rotated_mantis.jpg')
Here we just import the Image module from PIL and create a rotate() function. Our custom rotate function takes the following parameters: the image path that we will be rotating, the degrees we want to rotate and where we want to save the result. The actual code is quite straight-forward. All we do is open the image and then call the image object’s rotate() method while passing it the number of degrees to rotate it counter-clockwise. Then we save the result and call the image object’s show() method to see the result:
In the example above, we rotated the praying mantis 90 degrees counter-clockwise.
Mirroring an Image
Now let’s try to flip or mirror our mantis image. Here’s an example that mirrors the image from left to right:
from PIL import Image def flip_image(image_path, saved_location): """ Flip or mirror the image @param image_path: The path to the image to edit @param saved_location: Path to save the cropped image """ image_obj = Image.open(image_path) rotated_image = image_obj.transpose(Image.FLIP_LEFT_RIGHT) rotated_image.save(saved_location) rotated_image.show() if __name__ == '__main__': image = 'mantis.png' flip_image(image, 'flipped_mantis.jpg')
This code is very similar to the previous example. The meat of this code is that we are using the image object’s transpose() method which takes one of the following constants:
You can also use one of Pillow’s ROTATE constants here too, but we’re focusing just on the mirroring aspect of the transpose() method. Try swapping in one of these other constants into the code above to see what happens.
Wrapping Up
Now you know how to use the Pillow package to rotate and flip / mirror your images. Python makes this sort of thing quite trivial to do. You should give it a try and be sure to check out Pillow’s documentation to find out what else you can do!
Related Reading
3 thoughts on “How to Rotate / Mirror Photos with Python”
Image Flipping and Mirroring with NumPy and OpenCV
In this blog article, I will explain how we can mirror or flip an image in Python. All it is required is understanding the basic mathematics behind various matrix operations and matrix manipulations.
Credits of Cover Image — Photo by Michael Busch on Unsplash
Package requirements
- NumPy — For matrix operations and manipulating the same.
- OpenCV — For reading the image and converting it into a 2D array (matrix).
- Matplotlib — For plotting the matrix as an image.

For this mini-project, I am using a famous Lena image which is mainly used for testing the computer vision models. Make sure to download this image and save it in the current working directory.
import cv2 import numpy as np from matplotlib import pyplot as plt Let’s get started
First, we read the image file using the imread() method from the module cv2 . To do that, we simply need to import the package and use so. Hence by doing this, we get the image in the form of a matrix.
By default, imread() method reads the image in BGR ( Blue , Green , Red ) format. To convert the read image into regular format i.e., RGB ( Red , Green , Blue ) we use cvtColor() method from the same module cv2 .
def read_this(image_file, gray_scale=False): image_src = cv2.imread(image_file) if gray_scale: image_rgb = cv2.cvtColor(image_src, cv2.COLOR_BGR2GRAY) else: image_rgb = cv2.cvtColor(image_src, cv2.COLOR_BGR2RGB) return image_rgb The above function returns an image matrix from the image file that is passed. It consists of regular if and else condition if we want to get the image matrix either in gray_scale or RGB format.
Mirroring the Image
To mirror the image basically, we need to reverse the matrix row-wise from left to right. For example, let’s consider a matrix A .
If we want to mirror this matrix (row-wise), then it would be —
>>> import numpy as np >>> mirror_ = np.fliplr(A) >>> mirror_ [[1, 1, 4], [0, 8, 2], [1, 8, 3]] We can also do this without using the NumPy module. If so, we get to use loops and reverse each row. This would take a while if performed the same on image matrices as they are very large matrices and we don’t want our code to perform very slow.
def mirror_this(image_file, gray_scale=False, with_plot=False): image_rgb = read_this(image_file=image_file, gray_scale=gray_scale) image_mirror = np.fliplr(image_rgb) if with_plot: fig = plt.figure(figsize=(10, 20)) ax1 = fig.add_subplot(2, 2, 1) ax1.axis("off") ax1.title.set_text('Original') ax2 = fig.add_subplot(2, 2, 2) ax2.axis("off") ax2.title.set_text("Mirrored") if not gray_scale: ax1.imshow(image_rgb) ax2.imshow(image_mirror) else: ax1.imshow(image_rgb, cmap='gray') ax2.imshow(image_mirror, cmap='gray') return True return image_mirror The above function returns an image matrix that is reversed or flipped row-wise from left to right.
mirror_this(image_file="lena_original.png", with_plot=True) 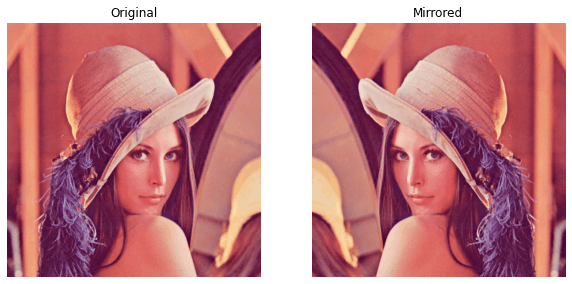
mirror_this(image_file="lena_original.png", gray_scale=True, with_plot=True) 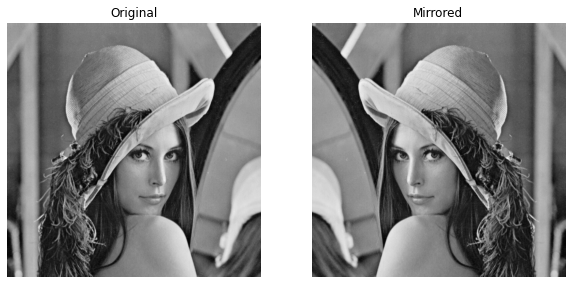
Flipping the Image
To flip the image basically, we need to reverse the matrix column-wise from up to down. For example, let’s consider a matrix B .
If we want to flip this matrix (column-wise), then it would be —
>>> import numpy as np >>> flip_= np.flipud(B) >>> flip_ [[3, 8, 1], [2, 8, 0], [4, 1, 1]] We use NumPy for flipping the matrix in order to maintain the fastness of the code.
def flip_this(image_file, gray_scale=False, with_plot=False): image_rgb = read_this(image_file=image_file, gray_scale=gray_scale) image_flip = np.flipud(image_rgb) if with_plot: fig = plt.figure(figsize=(10, 20)) ax1 = fig.add_subplot(2, 2, 1) ax1.axis("off") ax1.title.set_text('Original') ax2 = fig.add_subplot(2, 2, 2) ax2.axis("off") ax2.title.set_text("Flipped") if not gray_scale: ax1.imshow(image_rgb) ax2.imshow(image_flip) else: ax1.imshow(image_rgb, cmap='gray') ax2.imshow(image_flip, cmap='gray') return True return image_flip The above function returns an image matrix that is reversed or flipped column-wise from up to down.
flip_this(image_file='lena_original.png', with_plot=True) 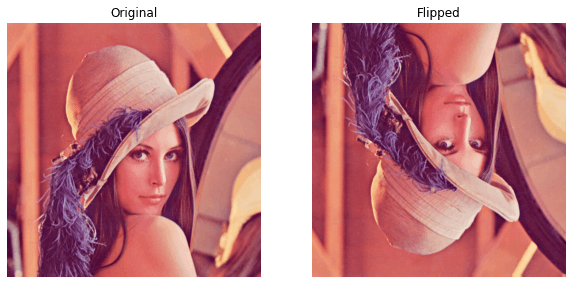
flip_this(image_file='lena_original.png', gray_scale=True, with_plot=True) 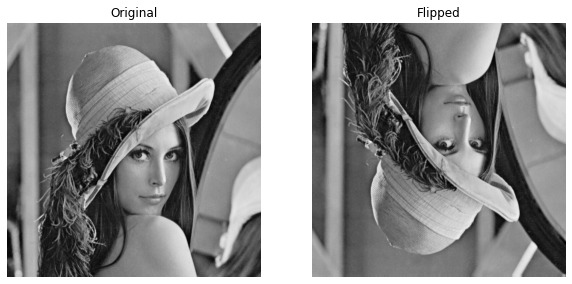
The Complete Code
class ImageOpsFromScratch(object): def __init__(self, image_file): self.image_file = image_file def read_this(self, gray_scale=False): image_src = cv2.imread(self.image_file) if gray_scale: image_rgb = cv2.cvtColor(image_src, cv2.COLOR_BGR2GRAY) else: image_rgb = cv2.cvtColor(image_src, cv2.COLOR_BGR2RGB) return image_rgb def mirror_this(self, with_plot=True, gray_scale=False): image_rgb = self.read_this(gray_scale=gray_scale) image_mirror = np.fliplr(image_rgb) if with_plot: self.plot_it(orig_matrix=image_rgb, trans_matrix=image_mirror, head_text='Mirrored', gray_scale=gray_scale) return None return image_mirror def flip_this(self, with_plot=True, gray_scale=False): image_rgb = self.read_this(gray_scale=gray_scale) image_flip = np.flipud(image_rgb) if with_plot: self.plot_it(orig_matrix=image_rgb, trans_matrix=image_flip, head_text='Flipped', gray_scale=gray_scale) return None return image_flip def plot_it(self, orig_matrix, trans_matrix, head_text, gray_scale=False): fig = plt.figure(figsize=(10, 20)) ax1 = fig.add_subplot(2, 2, 1) ax1.axis("off") ax1.title.set_text('Original') ax2 = fig.add_subplot(2, 2, 2) ax2.axis("off") ax2.title.set_text(head_text) if not gray_scale: ax1.imshow(orig_matrix) ax2.imshow(trans_matrix) else: ax1.imshow(orig_matrix, cmap='gray') ax2.imshow(trans_matrix, cmap='gray') return True Basic Image Operations Package
imo = ImageOpsFromScratch(image_file='lena_original.png') ### Mirroring ### imo.mirror_this() imo.mirror_this(gray_scale=True) ### Flipping ### imo.flip_this() imo.flip_this(gray_scale=True) The above image results will be displayed. Now that everything is sorted we can create other image operations like equalize() , solarize() etc. I have not covered that in this article but definitely in the next one.
What I have gained from this?
- By implementing this, I have learned and understood the logic behind various image operations and how to put that in the form of code.
We can also do the same using a well-known image library Pillow . But, as a developer, we need to know things work from start to end. This is something where everyone should be curious about.
Please do read my another article related to image processing and computer vision where I explain image convolution from scratch.
How do I Create Mirror Image Using Python?


I will show you how to mirror an image horizontally using Python in this post. We will create an application that mirrors the image horizontally using the PIL and transpose () function modules.
The steps below describe how to create a horizontal Mirror image application.
Step 1: Import the required modules
Step 2: Select the image to be mirrored. To do this,we are going to use the Image.open() to select the image to be mirrored.
| upright_image = Image.open(«C:/Users/Kevoh/Pictures/ilovepython.png») |
Step 3: Transform the selected image using the method Image.FLIP_TOP_BOTTOM.
| mirrored_img = upright_image.transpose(method=Image.FLIP_TOP_BOTTOM) |
Step 4: Now Save the mirrored image in the application directory.
| mirrored_img.save(«python.png») |
Step 5: Run your application
 |
 |
Complete code for Create Mirror Image in Python
How to Rotate and Mirror Images with Python and Pillow (Video)
In this video tutorial, you will learn how to rotate and mirror images with Python and the Pillow package. This is also known as transposing an image.
Want to learn more about working with images with Python?
- Leanpub – eBooks (epub, mobi and PDF)
- Gumroad – eBooks (epub, mobi and PDF)
- Amazon – Kindle and paperback
The Python Show Podcast

The Python Quiz Book
Automating Excel with Python
Python 101

Pillow: Image Processing with Python