- CSS Grid понятно для всех
- Поддержка браузерами
- Grid контейнер
- Создаем шаблон сайта с CSS Grid:
- Изменяем шаблон
- Гриды с медиа запросами
- Заключение
- Concise Media Queries with CSS Grid
- How do we flex it?
- Enter grid-template-areas
- Keep accessibility in mind when reordering elements
- If you enjoyed this post, you might also like:
- Elevate your customer experience with an Interface Design Audit
CSS Grid понятно для всех
Grid представляет собой пересекающийся набор горизонтальных и вертикальных линий — один набор определяет столбцы, а другой строки. Элементы могут быть помещены в сетку, соответственно строкам и столбцам.
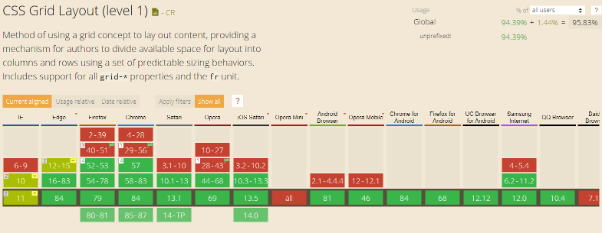
Поддержка браузерами
В 2020 году поддержка браузерами достигает 94 %
Grid контейнер
Мы создаем grid контейнер, объявляя display: grid или display: inline-grid на элементе. Как только мы это сделаем, все прямые дети этого элемента станут элементами сетки.
Header
Navbar
Article
Ads
grid-template-rows — это CSS свойство, которое определяет названия линий и путь размера функции grid rows.
CSS свойство grid-row определяет с какой строки в макете сетки будет начинаться элемент, сколько строк будет занимать элемент, или на какой строке завершится элемент в макете сетки. Является сокращенным свойством для свойств grid-row-start и grid-row-end.
Свойство CSS grid-gap является сокращенным свойством для grid-row-gap и grid-column-gap , определяющего желоба между строками и столбцами сетки.
Свойство grid-template-areas определяет шаблон сетки ссылаясь на имена областей, которые заданы с помощью свойства grid-area.
Повторение названия области приводит к тому, что содержимое охватывает эти ячейки. Точка означает пустую ячейку. Сам синтаксис предоставляет визуализацию структуры сетки.
С помощью свойства grid-area мы можем назначить каждой из этих областей свое собственное имя. Именование областей еще не создает никакого макета, однако теперь у нас есть именованные области, которые мы можем в нем использовать.
Создаем шаблон сайта с CSS Grid:

Изменяем шаблон
Вы можете изменить шаблон просто перераспределив грид-области в grid-template-areas .
Таким образом, если мы сменим на это:
grid-template-areas: "nav header header" "nav article ads"; > То в результате получим такой шаблон:

Гриды с медиа запросами
Одной из сильных сторон гридов является то, что вы можете создать уже совершенно другой шаблон за секунды.
Это делает CSS Grid идеальным для медиа запросов. Мы можем просто переназначить значения в ASCII-графике и обернуть результат в конечный медиа запрос.
@media all and (max-width: 575px) < .row < grid-template-areas: "header" "article" "ads" "nav"; grid-template-rows: 80px 1fr 70px 1fr ; grid-template-columns: 1fr; >> 
Таким образом, все дело состоит в переназначении значений в свойстве grid-template-areas .
Заключение
В данной статье мы рассмотрели всего лишь верхушку CSS Grid Layout айсберга. Иногда сложно поверить своим глазам какие штуки удается сделать при помощи CSS Grid. Это разрыв всех шаблонов. И мне это нравится.
Я вам советую обратить внимание на данную спецификацию и потратить немного своего времени на ее изучение. Поверьте, в будущем вам это точно пригодится и не важно, пишете вы на React, Angular, Vue (вставьте свое). Grid’ы пришли надолго.
Concise Media Queries with CSS Grid
Media queries are commonly used to control responsive layouts on websites. Organizing layouts this way is intuitive: On a wide desktop display, we want to present information in columns, and as screen width diminishes below a threshold, we stack elements vertically. With modern CSS, solutions to this problem have become easier than in the past. No longer must we use kludgey rules like display: table; to achieve the layout of our dreams. CSS modules like flexbox and several clever frameworks have made grids easy to achieve with minimal code, but with CSS grid we can write our grid rules once, and achieve the desired layout at any screen size with a single rule, and without any framework.
As an example, let’s take a common layout for a user profile. In a profile we have a user name, avatar, and short biography. Our markup might look something like this:
class="user-profile"> class="user-profile__username"> Rob Ott src="avatar.jpg" class="user-profile__avatar"/> class="user-profile__bio"> made of metal likes animals hates water skiing How do we flex it?
I’ve seen media queries of all varieties trying to solve the same problem. A common method is to describe a media query which sets the rule display: flex; on a container above a certain width:
@media (min-width: 700px) .user-profile display: flex; . > > This relies on the initial flex-direction of a flexbox being row and the initial value of flex-wrap being nowrap . When the children are block elements, they will naturally stack vertically when the display: flex; rule no longer applies. Alternatively, we could write a query to swap the value of flex-direction for row or column .
The drawback to the flexbox solution is that in order to achieve complex layout rules with blocks arranged along 2 axes, such as an element spanning 2 rows, we must:
- nest elements
- write queries to ensure margins and gutters (white space between rows and columns) remain equal,
- trip over the order rules of child elements to correctly organize them.
What a headache! Media queries will quickly get out of hand if we take this approach for any complex layout.
Enter grid-template-areas
CSS grid definitely has the advantage when it comes to quickly organizing layouts. Even simple layouts require minimal effort with CSS grid compared to flexbox. With the grid-template-areas property, we can write responsive layouts with a single rule inside a media query. That’s because grid-template-areas defines a visual grid system on both axes at the once. Take a look:
.grid grid-template-areas: 'avatar name' 'bio bio'; > This rule tells the container that there are three areas: “name”, “avatar”, and “bio”, arranged in a pattern with the avatar and username side by side in the first row, and the bio section in a second row spanning both columns. The magic of this rule is that the number of columns is inferred by the property values. Each name separated by one or more spaces defines a column (and each row must define the same number of columns). For clarity, I broke up the rows onto separate lines to visualize the result of the grid. Our child elements simply need to tell the grid which area they appear in, and the container does the rest:
.user-profile__username grid-area: name; > .user-profile__avatar grid-area: avatar; > .user-profile__bio grid-area: bio; > 
Now a simple media query to rearrange the grid template will handle our responsive layout:
@media (max-width: 700px) .grid grid-template-areas: 'name' 'avatar' 'bio'; > > 
And now our children will stack vertically in a viewport up to 700px!
Keep accessibility in mind when reordering elements
When reordering elements visually, it’s important to ensure that the document structure is ordered logically for accessibility. Here are some thoughts on maintaining accessibility when working with grid.
Now, what if we want to show the user’s avatar first, with their name underneath? we can simply reorder the areas with the same property:
@media (max-width: 700px) .grid grid-template-areas: 'avatar' 'name' 'bio'; > > 
Furthermore, we can rearrange the grid areas in any arbitrary layout with that single rule, and because the CSS grid system handles gutters with a flick of the grid-gap rule, we don’t have to worry about any conditional margins on our child elements. So the next time you tackle a layout with complex responsive behavior, choose CSS grid and spend less time in front of your computer.
If you enjoyed this post, you might also like:

Elevate your customer experience with an Interface Design Audit
thoughtbot has the experience to ensure your designs are accessible, your development and design processes are scalable, and your design system working as intended.
© 2023 thoughtbot, inc. The design of a robot and thoughtbot are registered trademarks of thoughtbot, inc. Privacy Policy