- How to Create and Save text file in JavaScript?
- Create a text file using custom text and save it to a local computer
- Syntax
- Algorithm
- Example
- Use the FileSaver JavaScript library to create and save the text file
- Syntax
- Parameters
- Example
- Save the content of the image in a text file using the FileSaver JavaScript library
- Syntax
- Example
- Как создать Javascript (js) файл.
- How to create a .js file for Javascript functions
How to Create and Save text file in JavaScript?
In this tutorial, we will learn to create and save the text file in JavaScript. Sometimes, developers need to get texts or content from the user and allow users to store content in a text file and allow the file to download to the local computer.
Many JavaScript libraries are available to achieve our goal, but we have used the best two libraries in this tutorial to create and save the text file.
Create a text file using custom text and save it to a local computer
We will use normal JavaScript operations to create and save the text file on the user’s computer. Users can use the HTML tag to create a text file from the custom content and save it.
Developers should follow the below syntax to create a text file from the text input and save it.
Syntax
In the above syntax, we have taken the content from the users, converted it to blog object, and then saved it to the text file.
Algorithm
Users should follow the below steps to understand the above syntax.
Example
We have written the code in the example below by following the syntax and algorithm. We have created the HTML . Users can enter the content they want to add to the file and click on the ‘save file’ button to save the text file on the computer.
When a user clicks on the ‘save file’ button, it will call the ‘downloadFile()’ function, in which we have added the code to create and save the text files.
html> body> h2> Create a text file and save it to a local computer using JavaScript. /h2> p> Enter the file content:- /p> textarea> /textarea> br/> button onclick = "downloadFile()"> save File /button> script> const downloadFile = () => const link = document.createElement("a"); const content = document.querySelector("textarea").value; const file = new Blob([content], type: 'text/plain' >); link.href = URL.createObjectURL(file); link.download = "sample.txt"; link.click(); URL.revokeObjectURL(link.href); >; /script> /body> /html>
Use the FileSaver JavaScript library to create and save the text file
The ‘FileSaver’ is the JavaScript library that we can use to create a text file in vanilla JavaScript. Users can use the CDN of the library to use it with HTML and JavaScript.
Users should use the below syntax to use the FileSaver library.
Syntax
// Create blob object with file content var blob = new Blob(["This is a sample file content."], < type: "text/plain;charset=utf-8", >); // Create and save the file using the FileWriter library saveAs(Content, fileName);
In the above syntax, we have used some text to create the blob object of the ‘text’ type. Also, we have used the ‘saveAs()’ function of the FileWriter library to create and save the text file.
Parameters
The ‘saveAs’ function takes two parameters.
- Content − It is the content that needs to be stored in the file.
- filename − It is a default file name when a user downloads it.
Example
We have added the CDN of the ‘FileWriter’ library in the section of the below code. When a user clicks on the ‘create text file’ button, it will invoke the ‘CreateTextFile()’ function in JavaScript, which creates the blob object of the sentence ‘This is a simple file content’ and executes the ‘saveAs()’’function to save the text file.
html> head> script src = "https://cdnjs.cloudflare.com/ajax/libs/FileSaver.js/2.0.0/FileSaver.min.js" integrity="sha512-csNcFYJniKjJxRWRV1R7fvnXrycHP6qDR21mgz1ZP55xY5d+aHLfo9/FcGDQLfn2IfngbAHd8LdfsagcCqgTcQ= token operator">= "anonymous" referrerpolicy = "no-referrer"> /script> /head> body> h2>Create text file and save it to local computer using i> FileSaver /i> JavaScript Library./h2> button type = "button" onclick = "CreateTextFile();">Create Text File/button> script> function CreateTextFile() var blob = new Blob(["This is a sample file content."], type: "text/plain;charset=utf-8", >); saveAs(blob, "download.txt"); > /script> /body> /html>
Save the content of the image in a text file using the FileSaver JavaScript library
In this section, we have used the same library, ‘FileSaver’, but rather than storing the normal texts to the file, we string the image after converting the image to a blob object.
Users can follow the syntax below to store the image in the text file format and save it.
Syntax
// Access the file input by Id var element = document.getElementById("uploadedImage"); // Add onchange event to file input element.onchange = function (event) < // Convert image content to text var blob = new Blob[event.target.files[0]], < type: "text/plain;charset=utf-8", >); // Create text file using image’s content and save it saveAs(blob, "download.txt"); >; In the above syntax, we take the file the user uploads into the HTML and convert its content to a blob object. After that, we create the text file using the blob object and save the file to the local computer.
Example
We have used the ‘FileSaver’ JavaScript library in the example below, as shown in the above syntax. We have created the file input field, allowing users only to upload the image file.
In JavaScript, we have added the event listener to the file input, and as the user uploads a file, it will create a text file using the uploaded image file and save it to the user’s computer.
html> head> script src = "https://cdnjs.cloudflare.com/ajax/libs/FileSaver.js/2.0.0/FileSaver.min.js" integrity = "sha512-csNcFYJniKjJxRWRV1R7fvnXrycHP6qDR21mgz1ZP55xY5d+aHLfo9/FcGDQLfn2IfngbAHd8LdfsagcCqgTcQ= token operator">= "anonymous" referrerpolicy = "no-referrer"> /script> /head> body> h2>Upload image and add its content to text file and save it to computerusing i> FileSaver /i> JavaScript Library./h2> input type = "file" id = "uploadedImage" accept = "image/png, image/gif, image/jpeg"/> script> var element = document.getElementById("uploadedImage"); element.onchange = function (event) var blob = new Blob[event.target.files[0]], type: "text/plain;charset=utf-8", >); saveAs(blob, "download.txt"); >; /script> /body> /html>
Как создать Javascript (js) файл.

Многие начинающие веб-программисты, когда они начинают изучать Javascript, сталкиваются с проблемой:
Как создать файл с расширением js, в котором будет размещаться javascript код?
Помню, как я тоже на первых порах столкнулся с этой проблемой. Такой вопрос может возникать из-за непонимания того, что собой представляет Javascript код.
В первую очередь, нужно понимать, что javascript – это обычный текст, который написан по определенным правилам. Соответственно, храниться этот текст тоже должен в текстовом документе.
Единственное отличие этого текстового документа от простого текстового файла – это его расширение. Javascript файлы имеют расширение *.js.
Таким образом, вся задача состоит в том, чтобы создать текстовый документ и изменить его расширение.
Хочу рассказать о тех способах создания файла с расширением js, которыми я сам лично пользуюсь.
Все мои уроки по Javascript здесь.
Способ 1. Создание файла js из обычного текстового документа.
Открываем программу «Блокнот», которая входит в стандартный пакет операционной системы Windows.
Если у вас этой программы нет, то можете воспользоваться другим текстовым редактором.
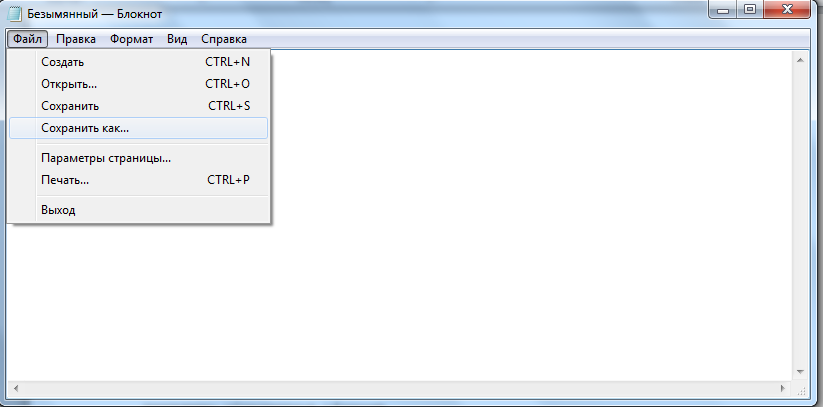
Создаем новый документ и сохраняем его, выбрав в главном меню команду «Файл-сохранить как…»
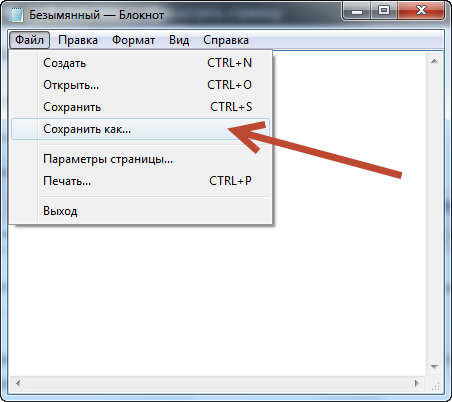
После того, как файл будет сохранен, нужно открыть папку, где вы его сохранили и переименовать файл, изменив его расширение на js.
Если расширение файлов у вас не отображается, то здесь можно почитать, как его можно включить.
После этой операции, файл для работы с Javascript готов.
Способ 2. Создание файла js в редакторе кода Dreamweaver.
Этим способом я пользуюсь намного чаще, по причине того, что это просто быстрее и удобнее. Создать файл js можно с помощью универсального редактора кода Dreamweaver.
Имейте в виду, что Dreamweaver – это далеко не единственная программа, которая на это способна. Очень многие редакторы кода тоже позволяют также создавать файлы с расширением js.
При первом запуске программы, появляется следующее окно, в котором можно выбрать, что мы хотим создать документ js.

Выбираем его и сохраняем документ.
Если такое окно приветствия у вас не открылось, то можно воспользоваться главным меню «Файл – Создать новый документ» и выбираем «Javascript».
Если у вас возникнут какие-то вопросы или проблемы с созданием, файлов js таким способом, прошу написать об этом в комментариях.
Все мои уроки по Javascript здесь.
How to create a .js file for Javascript functions

When we want to use Javascript we have two options to include it in our web page, the first one is to put directly the code between the
and tags and the second one is to use an external file with extension .js. In this post we will talk about how to create this .js file.The external file has the advantage of making your page lighter because it is saved in the browser cache and does not have to be loaded on each visit. The creation of this .js file can be done in several different ways:
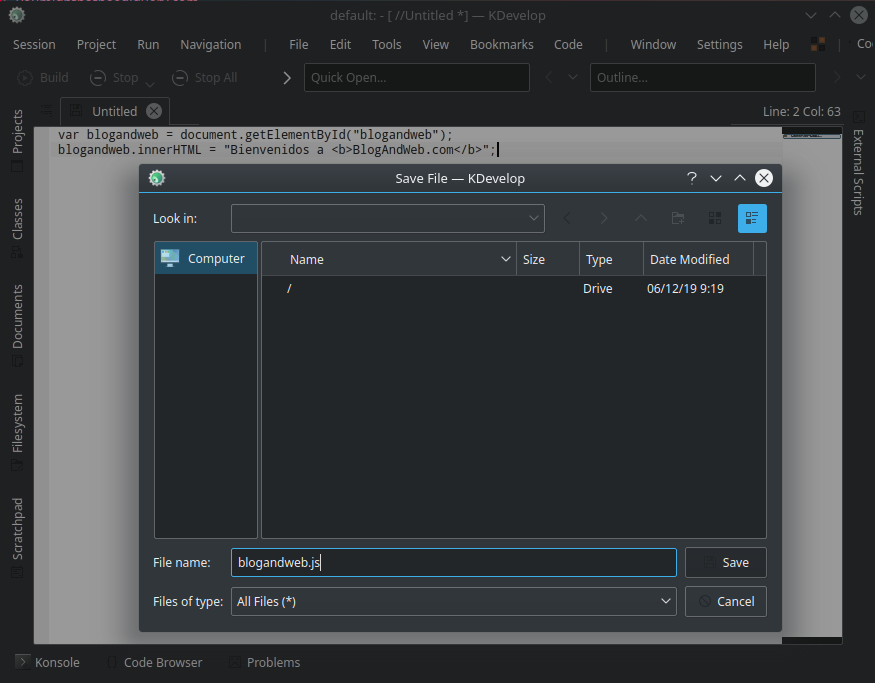
1. With a program for creating and editing code, also known as IDE (Integrated development environment) it is very easy to create it. I recommend using a free program, but also libre, like KDevelop, available for Windows, GNU/Linux and macOS. In KDevelop you just need to create a file (File / New), write your code and save it with .js extension (File / Save as).
2. With notepad. If for any reason you don’t have a web design software, you can create it with any note application.
- Open notepad.
- Paste your functions in the new document. In this file you should not include the tags as when you include them directly in the HTML code, if they do appear in your function, just remove them.
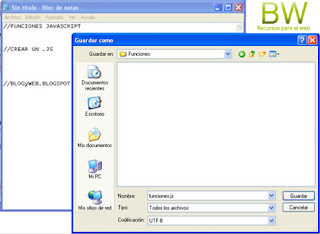
- Go to the “file” menu and “save as”. In the file name, delete the default name and write the name of your file but with ending “.js”, for example: functions.js. A little below, in the “Type” tab select “All files” and below this, in the “encoding” tab select “UTF-8” and that’s it, you have your .js file, upload it to your host or to a free host like neocities.
To link it, we go to the HTML code of our page and we place ourselves between the tags
and . It is here where we will make the call to the file and we will do it in the following way:Where we only need to change the location of our script, i.e. replacing functions.js with the full URL to the location of our JS file.
I hope you find it useful, it is very basic, but it is always difficult when you don’t know it.