- Chart.js
- How to Use Chart.js?
- Typical Bar Chart Syntax:
- Typical Line Chart Syntax:
- Bar Charts
- Source Code
- Horizontal Bars
- Pie Charts
- Example
- Doughnut Charts
- Scatter Plots
- Source Code
- Line Graphs
- Source Code
- Multiple Lines
- Source Code
- Linear Graphs
- Source Code
- Function Graphs
- Creating line graphs with Javascript using an HTML canvas
- Drawing an outline for the graph using Javascript
- Transforming data into lines in your graph using Javascript
- Adding reference values and putting it all together
Chart.js
Chart.js is an free JavaScript library for making HTML-based charts. It is one of the simplest visualization libraries for JavaScript, and comes with the many built-in chart types:
- Scatter Plot
- Line Chart
- Bar Chart
- Pie Chart
- Donut Chart
- Bubble Chart
- Area Chart
- Radar Chart
- Mixed Chart
How to Use Chart.js?
1. Add a link to the providing CDN (Content Delivery Network):
2. Add a to where in the HTML you want to draw the chart:
The canvas element must have a unique id.
Typical Bar Chart Syntax:
Typical Line Chart Syntax:
Bar Charts
Source Code
const xValues = [«Italy», «France», «Spain», «USA», «Argentina»];
const yValues = [55, 49, 44, 24, 15];
const barColors = [«red», «green»,»blue»,»orange»,»brown»];
new Chart(«myChart», type: «bar»,
data: labels: xValues,
datasets: [ backgroundColor: barColors,
data: yValues
>]
>,
options: <. >
>);
Horizontal Bars
Just change type from «bar» to «horizontalBar»:
Pie Charts
Example
new Chart(«myChart», <
type: «pie»,
data: <
labels: xValues,
datasets: [ <
backgroundColor: barColors,
data: yValues
>]
>,
options: <
title: <
display: true,
text: «World Wide Wine Production»
>
>
>);
Doughnut Charts
Just change type from «pie» to «doughnut»:
Scatter Plots
Source Code
new Chart(«myChart», type: «scatter»,
data: datasets: [ pointRadius: 4,
pointBackgroundColor: «rgba(0,0,255,1)»,
data: xyValues
>]
>,
options:<. >
>);
Line Graphs
Source Code
const xValues = [50,60,70,80,90,100,110,120,130,140,150];
const yValues = [7,8,8,9,9,9,10,11,14,14,15];
new Chart(«myChart», type: «line»,
data: labels: xValues,
datasets: [ backgroundColor:»rgba(0,0,255,1.0)»,
borderColor: «rgba(0,0,255,0.1)»,
data: yValues
>]
>,
options:<. >
>);
If you set the borderColor to zero, you can scatter plot the line graph:
Multiple Lines
Source Code
const xValues = [100,200,300,400,500,600,700,800,900,1000];
new Chart(«myChart», type: «line»,
data: labels: xValues,
datasets: [ data: [860,1140,1060,1060,1070,1110,1330,2210,7830,2478],
borderColor: «red»,
fill: false
>, data: [1600,1700,1700,1900,2000,2700,4000,5000,6000,7000],
borderColor: «green»,
fill: false
>, data: [300,700,2000,5000,6000,4000,2000,1000,200,100],
borderColor: «blue»,
fill: false
>]
>,
options: legend:
>
>);
Linear Graphs
Source Code
const xValues = [];
const yValues = [];
generateData(«x * 2 + 7», 0, 10, 0.5);
new Chart(«myChart», type: «line»,
data: labels: xValues,
datasets: [ fill: false,
pointRadius: 1,
borderColor: «rgba(255,0,0,0.5)»,
data: yValues
>]
>,
options: <. >
>);
function generateData(value, i1, i2, step = 1) for (let x = i1; x
Function Graphs
Same as Linear Graph. Just change the generateData parameter(s):
Creating line graphs with Javascript using an HTML canvas
One of the uses of the canvas is element is the visualization of data. By making use of the graphics functions provided in Javascript, you can create graphing functions that visualize a given set of data.
In this tutorial you will learn how to create a line graph function that takes a dynamically sized array that contains each piece of data, and transforms that data into graph form.
You will need to have a basic understanding of
in order to properly understand this tutorial.
Drawing an outline for the graph using Javascript
When creating a graph, the first thing you will need to do is create the initial outline. In this tutorial we will be drawing the X and Y axis, as well as horizontal reference lines to help see the values of particular points on the graph.
Firstly, you will need to add a new canvas element into your HTML document, here we will make one with a width of 550, and a height of 450.
canvas>canvas id="testCanvas" width="550" height="450">
Next we’ll create the X and Y axis lines as well as the horizontal reference lines using Javascript. We’ll also be leaving a margin of 25 pixels on the top and left sides of the graph for padding and a 75 pixel margin on the bottom and right sides of the graph for any extra information such as titles and reference values.
Taking these margins into account, our graph will start from 25:25 and end at 475:375, we’ll declare these coordinates as well as the height and width of the graph as variables for reference throughout the tutorial .
var canvas = document.getElementById( "testCanvas" ); var context = canvas.getContext( "2d" ); // declare graph start and end var GRAPH_TOP = 25; var GRAPH_BOTTOM = 375; var GRAPH_LEFT = 25; var GRAPH_RIGHT = 475; var GRAPH_HEIGHT = 350; var GRAPH_WIDTH = 450; // clear canvas (if another graph was previously drawn) context.clearRect( 0, 0, 500, 400 ); // draw X and Y axis context.beginPath(); context.moveTo( GRAPH_LEFT, GRAPH_BOTTOM ); context.lineTo( GRAPH_RIGHT, GRAPH_BOTTOM ); context.lineTo( GRAPH_RIGHT, GRAPH_TOP ); context.stroke(); // draw reference line at the top of the graph context.beginPath(); // set light grey color for reference lines context.strokeStyle = "#BBB"; context.moveTo( GRAPH_LEFT, GRAPH_TOP ); context.lineTo( GRAPH_RIGHT, GRAPH_TOP ); context.stroke(); // draw reference line 3/4 up from the bottom of the graph context.beginPath(); context.moveTo( GRAPH_LEFT, ( GRAPH_HEIGHT ) / 4 * 3 + GRAPH_TOP ); context.lineTo( GRAPH_RIGHT, ( GRAPH_HEIGHT ) / 4 * 3 + GRAPH_TOP ); context.stroke(); // draw reference line 1/2 way up the graph context.beginPath(); context.moveTo( GRAPH_LEFT, ( GRAPH_HEIGHT ) / 2 + GRAPH_TOP ); context.lineTo( GRAPH_RIGHT, ( GRAPH_HEIGHT ) / 2 + GRAPH_TOP ); context.stroke(); // draw reference line 1/4 up from the bottom of the graph context.beginPath(); context.moveTo( GRAPH_LEFT, ( GRAPH_HEIGHT ) / 4 + GRAPH_TOP ); context.lineTo( GRAPH_RIGHT, ( GRAPH_HEIGHT ) / 4 + GRAPH_TOP ); context.stroke();
This will result in a graph outline that looks like this:

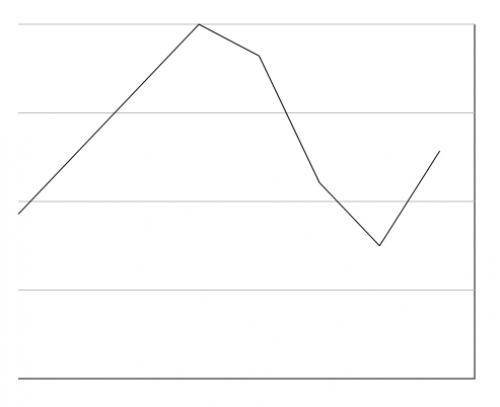
Transforming data into lines in your graph using Javascript
Now that you’ve created a graph outline, you can start adding points in your graph and adding lines in-between them to create a line graph, for this we will use a single path.
The X position for each point on the line graph will be calculated by the graph width divided by the number of pieces of data, multiplied by the point’s position in the array. The Y position for each point will be calculated by the graph height minus the point’s actual value, divided by the largest piece of data in the set, multiplied by the graph height.
We will use the following Javascript to create the lines on our graph:
// declare test data set and get length var dataArr = [ 6, 8, 10, 12, 11, 7, 5, 8 ]; var arrayLen = dataArr.length; // calculate largest piece of data var largest = 0; for( var i = 0; i < arrayLen; i++ )< if( dataArr[ i ] > largest ) < largest = dataArr[ i ]; >> context.beginPath(); // make your graph look less jagged context.lineJoin = "round"; context.strokeStyle = "black"; // add first point in the graph context.moveTo( GRAPH_LEFT, ( GRAPH_HEIGHT - dataArr[ 0 ] / largest * GRAPH_HEIGHT ) + GRAPH_TOP ); // loop over data and add points starting from the 2nd index in the array as the first has been added already for( var i = 1; i < arrayLen; i++ )< context.lineTo( GRAPH_RIGHT / arrayLen * i + GRAPH_LEFT, ( GRAPH_HEIGHT - dataArr[ i ] / largest * GRAPH_HEIGHT ) + GRAPH_TOP ); >// actually draw the graph context.stroke();
This will result in a line graph that looks like this:
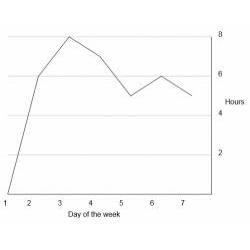
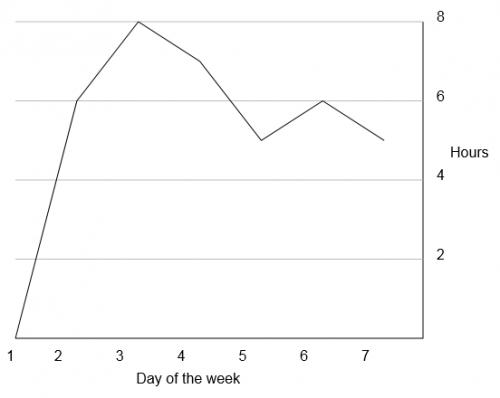
Adding reference values and putting it all together
Now that you’ve drawn your line graph, you will need to add reference values along the X and Y axis, as with the current graph it is difficult to tell what data is being shown and the value of each point. To fix this, we’ll make use of the
function to draw text displaying the reference values along the X and Y axis.
For this example we’ll assume the X axis displays the days of the week (from 1-7) and the Y axis displays the number of hours worked by a certain employee.
We’ll put all our Javascript for creating the graph inside a function to give it some re-usability.
function drawGraph( dataArr ) var canvas = document.getElementById( "testCanvas" ); var context = canvas.getContext( "2d" ); var GRAPH_TOP = 25; var GRAPH_BOTTOM = 375; var GRAPH_LEFT = 25; var GRAPH_RIGHT = 475; var GRAPH_HEIGHT = 350; var GRAPH_WIDTH = 450; var arrayLen = dataArr.length; var largest = 0; for( var i = 0; i arrayLen; i++ ) if( dataArr[ i ] > largest ) largest = dataArr[ i ]; > > context.clearRect( 0, 0, 500, 400 ); // set font for fillText() context.font = "16px Arial"; // draw X and Y axis context.beginPath(); context.moveTo( GRAPH_LEFT, GRAPH_BOTTOM ); context.lineTo( GRAPH_RIGHT, GRAPH_BOTTOM ); context.lineTo( GRAPH_RIGHT, GRAPH_TOP ); context.stroke(); // draw reference line context.beginPath(); context.strokeStyle = "#BBB"; context.moveTo( GRAPH_LEFT, GRAPH_TOP ); context.lineTo( GRAPH_RIGHT, GRAPH_TOP ); // draw reference value for hours context.fillText( largest, GRAPH_RIGHT + 15, GRAPH_TOP); context.stroke(); // draw reference line context.beginPath(); context.moveTo( GRAPH_LEFT, ( GRAPH_HEIGHT ) / 4 * 3 + GRAPH_TOP ); context.lineTo( GRAPH_RIGHT, ( GRAPH_HEIGHT ) / 4 * 3 + GRAPH_TOP ); // draw reference value for hours context.fillText( largest / 4, GRAPH_RIGHT + 15, ( GRAPH_HEIGHT ) / 4 * 3 + GRAPH_TOP); context.stroke(); // draw reference line context.beginPath(); context.moveTo( GRAPH_LEFT, ( GRAPH_HEIGHT ) / 2 + GRAPH_TOP ); context.lineTo( GRAPH_RIGHT, ( GRAPH_HEIGHT ) / 2 + GRAPH_TOP ); // draw reference value for hours context.fillText( largest / 2, GRAPH_RIGHT + 15, ( GRAPH_HEIGHT ) / 2 + GRAPH_TOP); context.stroke(); // draw reference line context.beginPath(); context.moveTo( GRAPH_LEFT, ( GRAPH_HEIGHT ) / 4 + GRAPH_TOP ); context.lineTo( GRAPH_RIGHT, ( GRAPH_HEIGHT ) / 4 + GRAPH_TOP ); // draw reference value for hours context.fillText( largest / 4 * 3, GRAPH_RIGHT + 15, ( GRAPH_HEIGHT ) / 4 + GRAPH_TOP); context.stroke(); // draw titles context.fillText( "Day of the week", GRAPH_RIGHT / 3, GRAPH_BOTTOM + 50); context.fillText( "Hours", GRAPH_RIGHT + 30, GRAPH_HEIGHT / 2); context.beginPath(); context.lineJoin = "round"; context.strokeStyle = "black"; context.moveTo( GRAPH_LEFT, ( GRAPH_HEIGHT - dataArr[ 0 ] / largest * GRAPH_HEIGHT ) + GRAPH_TOP ); // draw reference value for day of the week context.fillText( "1", 15, GRAPH_BOTTOM + 25); for( var i = 1; i arrayLen; i++ ) context.lineTo( GRAPH_RIGHT / arrayLen * i + GRAPH_LEFT, ( GRAPH_HEIGHT - dataArr[ i ] / largest * GRAPH_HEIGHT ) + GRAPH_TOP ); // draw reference value for day of the week context.fillText( ( i + 1 ), GRAPH_RIGHT / arrayLen * i, GRAPH_BOTTOM + 25); > context.stroke(); > // test graph var testValues = [ 0, 6, 8, 7, 5, 6, 5 ]; drawGraph( testValues );
The line graph created for this example looks like this:
Now you should be able to create your own line graphs using Javascript to visually display your data. You can also modify the width and height of your canvas as well as the style of your graph to suit your needs.
Other data visualization tutorials: