- License Plate Recognition using OpenCV in Python
- Install required libraries for License Plate Recognition
- Use of pytesseract
- Pre-processing of image
- Finding and displaying Contours
- Extracting text using Pytesseract
- One response to “License Plate Recognition using OpenCV in Python”
- Saved searches
- Use saved searches to filter your results more quickly
- mrzaizai2k/License-Plate-Recognition-YOLOv7-and-CNN
- Name already in use
- Sign In Required
- Launching GitHub Desktop
- Launching GitHub Desktop
- Launching Xcode
- Launching Visual Studio Code
- Latest commit
- Git stats
- Files
- README.md
- About
License Plate Recognition using OpenCV in Python
This tutorial will tell you the way to implement License Plate Recognition from car image in Python program using OpenCV and Pytesseract.
Let’s begin and implement it now step by step.
Follow the step with me to do this task.
Install required libraries for License Plate Recognition
Open cmd and install OpenCV and imutils using the following commands-
pip install opencv-contrib-python
OpenCV will be used here for various pre-processing techniques and for displaying the image.
imutils library contains a series of basic pre-processing functions and here it will be used for resizing the image.
Now for installing pytesseract, head over to https://github.com/UB-Mannheim/tesseract/wiki and download and install it.
Use of pytesseract
The tesseract library is an optical character recognition (OCR) tool for Python. That is, it can recognize and read the text embedded from any image. So we’ll use it for identifying the characters inside the number plate.
For this tutorial, we will use the image you can see below:

Pre-processing of image
Now, look at our code given below:
import cv2 import imutils import numpy as np import pytesseract from PIL import Image pytesseract.pytesseract.tesseract_cmd = 'C:\\Program Files\\Tesseract-OCR\\tesseract.exe' img = cv2.imread('4.jpg',cv2.IMREAD_COLOR) img = imutils.resize(img, width=500 ) gray = cv2.cvtColor(img, cv2.COLOR_BGR2GRAY) #convert to grey scale gray = cv2.bilateralFilter(gray, 11, 17, 17) #Blur to reduce noise edged = cv2.Canny(gray, 30, 200) #Perform Edge detection - Here, we first imported all the three libraries required by using the Python import keyword.
- Then the image is read and converted into gray-scale as less information will be stored for each pixel.
- After that, using OpenCV’s bilateralFilter fuunction, we reduce the noise in the image for a better edge detection.
- Finally, we use the Canny edge detection algorithm. It takes first argument as our input image, second and third arguments are our minVal and maxVal respectively which specify the threshold values.
This program will give the following output:

Finding and displaying Contours
Let us write our code first:
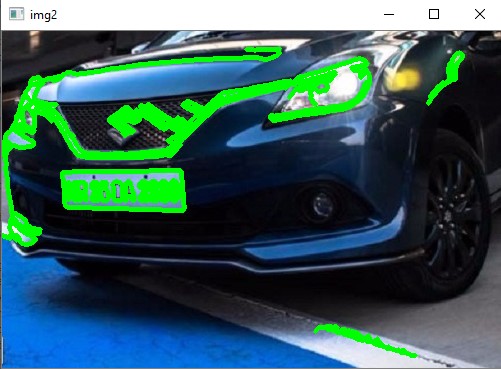
# find contours from the edged image and keep only the largest # ones, and initialize our screen contour cnts,new = cv2.findContours(edged.copy(), cv2.RETR_LIST, cv2.CHAIN_APPROX_SIMPLE) img1=img.copy() cv2.drawContours(img1,cnts,-1,(0,255,0),3) cv2.imshow("img1",img1) cv2.waitKey(0) Now, let’s understand what are contours?
Contours are curves that help in identifying the regions in an image with the same intensity. Here, contours will help us in identifying the license plate of the car from the image. We are using two contours functions, cv2.findContours and cv2.drawContours.
cv.findContours() function takes three arguments-
- The first argument is the source image. Here we make a copy of the edged image as this function repeatedly finds contours in the image, meaning it makes the image unusable for future use. Also, the edged image makes identifying similar intensity curves easier.
- The second argument is the contour retrieval mode. Here the RETR_LIST type is used to retrieve all the detected contours in the image.
- The third parameter is the contour approximation method. CHAIN_APPROX_SIMPLE stores the end-points of the detected contours.
cv2.drawContours() function takes five arguments-
- The first argument is the image in which the detected contours will be drawn.
- The second argument is the variable that stores all the detected contours.
- Then, the third argument is contour indexes. Here we use the value -1 which will use the indexes of all the contours detected in our image. Hence all of the contours will be drawn on the image.
- After that, the fourth argument is the color in which contours will be drawn.
- The fifth argument is the thickness of the contour curve to be drawn.
This gives the following output-

#sorts contours based on minimum area 30 and ignores the ones below that cnts = sorted(cnts, key = cv2.contourArea, reverse = True)[:30] screenCnt = None #will store the number plate contour img2 = img.copy() cv2.drawContours(img2,cnts,-1,(0,255,0),3) cv2.imshow("img2",img2) #top 30 contours cv2.waitKey(0) count=0 Here, we select the top 30 contours according to the area in decreasing order as we don’t need the various small contours. This reduces the redundant and small contours that are not needed.
This gives the following output-
After that, see the code below:
idx=7 # loop over contours for c in cnts: # approximate the contour peri = cv2.arcLength(c, True) approx = cv2.approxPolyDP(c, 0.018 * peri, True) if len(approx) == 4: #chooses contours with 4 corners screenCnt = approx x,y,w,h = cv2.boundingRect(c) #finds co-ordinates of the plate new_img=img[y:y+h,x:x+w] cv2.imwrite('./'+str(idx)+'.png',new_img) #stores the new image idx+=1 break - We loop over the selected 30 contours and then check one by one if the contour contains four corners as that would most likely be the number plate. Using peri function, we calculate perimeter of each contour.
- Then after finding coordinates of the plate using OpenCVs boundingRect function, we store the image with new dimensions in the variable new_img.
- Then using OpenCV’s function imwrite, we store the image in the directory.
Extracting text using Pytesseract
It’s time to extract the number or text from the plate:
#draws the selected contour on original image cv2.drawContours(img, [screenCnt], -1, (0, 255, 0), 3) cv2.imshow("Final image with plate detected",img) cv2.waitKey(0) Cropped_loc='./7.png' #the filename of cropped image cv2.imshow("cropped",cv2.imread(Cropped_loc)) text=pytesseract.image_to_string(Cropped_loc,lang='eng') #converts image characters to string print("Number is:" ,text) cv2.waitKey(0) cv2.destroyAllWindows() Here, we draw the selected contour on the original image which will be on the license plate as shown-
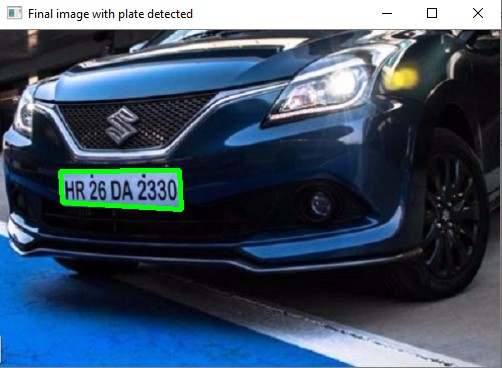
Then using pytesseract, we extract the characters from the image and print the text on the screen as you can see below:

Yea, we did it… License Plate Recognition in Python has been done successfully.
I hope you all liked the article!
One response to “License Plate Recognition using OpenCV in Python”
A very good post.
you write: we did it’ but there is right unnecessary right bracket.
it because the pallet isn’t aligned. I subtract 1 pixel from the right and the bracket disappeared.
but I think that we must aligned the pallet in the program
Saved searches
Use saved searches to filter your results more quickly
You signed in with another tab or window. Reload to refresh your session. You signed out in another tab or window. Reload to refresh your session. You switched accounts on another tab or window. Reload to refresh your session.
This project is for the ultimate manner of identifying the License Plate. Combining YOLOv7 object detection, Hough transform alignment, and CNN character recognition
mrzaizai2k/License-Plate-Recognition-YOLOv7-and-CNN
This commit does not belong to any branch on this repository, and may belong to a fork outside of the repository.
Name already in use
A tag already exists with the provided branch name. Many Git commands accept both tag and branch names, so creating this branch may cause unexpected behavior. Are you sure you want to create this branch?
Sign In Required
Please sign in to use Codespaces.
Launching GitHub Desktop
If nothing happens, download GitHub Desktop and try again.
Launching GitHub Desktop
If nothing happens, download GitHub Desktop and try again.
Launching Xcode
If nothing happens, download Xcode and try again.
Launching Visual Studio Code
Your codespace will open once ready.
There was a problem preparing your codespace, please try again.
Latest commit
Git stats
Files
Failed to load latest commit information.
README.md
Check out my 2 YOUTUBE channels for more:
This project is for the ultimate manner of identifying the License Plate. Combining YOLOv7 object detection, Hough transform alignment, and CNN character recognition

Figure. Input license plate

- Remember to set up neccesary libraries in requirements.txt
- Download the model used for YOLOv7 model LP_detect_yolov7_500img.pt and CNN model weight.h5 in Git RELEASES and put them in the right path like in the code
- To test on image/video, run main_image.py / main_video.py . Remember to change the path of image/video. I don’t provide videos for testing, but you can record it yourself. 1920×1080 pixels, 24 fps recommend
- In data folder you can find data.yaml needed for YOLOv7 training and folder test including test images. Feel free to use it
- doc images for documents
- src folder are codes for CNN model. put the CNN model here
- utils and models are for YOLOv7. They’re a part of original YOLO. However, don’t care about them, you can use YOLOv7 to derectly detect License Plates with detect.py . I have changed the code a lot compared to the original one. It’s now much easier to use
- Preprocess.py , utils_LP.py and vid2img.py are util files. Spend time to explore them.
- yolo-v7-license-plate-detection.ipynb is the training of YOLOv7
As you know: There are 3 main stages in the license plate recoginition algorithm

Figure. The main stages in the license plate recoginition algorithm
3. License Plate Detection
Difference form my previous repo. I detected LP with just image preprocessing. It was quite complicated and low accuracy. But now with YOLOv7, all we have to do is collecting the data and train the model
- Instead of taking a lot of pictures for training, I recoreded the video and use vid2img.py to split frames into images
- I used labelImg to label each images. We will have the .txt file in the same folder with the image. .txt file include label, x, y, w, h
- Split the dataset into 70/20/10
- Train YOLOv7 on Kaggle
You can find the whole dataset and the code on my kaggle: YOLO V7 License Plate Detection
Dataset include 1000 images of both 1 and 2 lines Vietnamese License Plates

Figure. Detected License Plate
4. Hough Transform Alignment
With previous repo, I tried to find the biggest contour, and from 4 coordinates of that contour, I can rotate the License Plate; however, it has 2 problems with contour
- Not sure that the biggest contour is the LP. Somtimes the view is not good which is hard to find the right contour
- Not sure that we can approx that contour to 4 points. If not, we can’t calculate the rotate angle
Now I come up with different approach.
- I used Hough transform to find the horizontal lines
- Using some criterias (length, angle. ) to find the right ones
- Calculate angles and angles.mean()
- Rotate the LP with angles.mean()


Figure. Rotated License Plate
5. Character Segmentation and Recognition
Here I used the same technique as before. I won’t talk much about this part, because so many people have done that

Figure. Find and extract characters
Figure. Character segmentation result
About
This project is for the ultimate manner of identifying the License Plate. Combining YOLOv7 object detection, Hough transform alignment, and CNN character recognition