- A PHP MySQL Tutorial for Bloggers
- A Complete PHP MySQL tutorial
- The idea behind modern web development
- PHP and database development for Bloggers
- PHP With MySQL: Ultimate Step-By-Step Guide
- Basics to Advanced — Learn It All!
- Prerequisites for PHP With MySQL
- Software Requirements for the Tutorial
- How to Create a Database?
- Basics to Advanced — Learn It All!
- How to Create a Registration Page?
- Registration Form
- How to Connect Webpage to the Database Using PHP?
- Learn From The Best Mentors in the Industry!
- How to Edit and Delete Data From the Database?
- Conclusion
- Find our Full Stack Java Developer Online Bootcamp in top cities:
- About the Author
A PHP MySQL Tutorial for Bloggers
In our SEO blog we often talked about so called “onpage” criteria – things you need to take care of on your website. Within that scope, technical requirements are often addressed by a Content Management System like WordPress. However, while talking about web auditing, we also noted that there are times when you need to take things into your own hands. Code responsibility is always yours, no matter which technology you choose to use.
In short, you need to be able to fix things when they went out of order. This tutorial will give you a definite how to in order for you to understand, construct, develop and/or fix your website by teaching you how to build a standalone database supported web application using PHP and MySQL. This is meant as a complete tutorial and will take you by the hand step by step through all you need for a minimal PHP and MySQL based web application.
We will go into infrastructure basics as well as database concept foundations and step-by-step HTML notation and PHP programming exercises. However, please read this first page carefully before proceeding any further.
A Complete PHP MySQL tutorial
This is your starting point. Feel free to get back to this post every time you like.
Let’s get started right away. In order for you to grasp everything you need to know about PHP and database development, we recommend going through this tutorial step by step. The following lessons are designed to be worked through in chronological order.
- Lesson 1: Client and Server Infrastructure: File, Web, Database tools vs. WordPress
- Lesson 2: Relational Database Management System Basics
- Lesson 3: Database Modelling and Structurization
- Lesson 4: VI Editor in Unix
- Lesson 5: HTML Coding Basics
- Lesson 6: HTML form elements
- Lesson 7: Learning PHP: programming basics for output, calculation and variables
- Lesson 8: PHP for loops and conditions
- Lesson 9: How to use PHP functions
- Lesson 10: PHP GET and POST parameters
- Lesson 11: How to build a website — PHP navigational skeleton step by step
- Lesson 12: How to connect to MySQL using PHP
- Lesson 13: PHP Login Script Tutorial
- Lesson 14: Dynamic PHP based MySQL data management with HTML output
If you have doubts wether you need to understand all that, feel free to read ahead.
The idea behind modern web development
But worry aber PHP or MySQL at all? Well, ever since the concept “web 2.0” came up, the user was meant to participate in the content delivery of a modern web page. For example, a user can take part in content creation by:
- creating a blog post or a page in WordPress
- posting a comment underneith a blog post
- posting a guest book entry on someones personal website
- posting a statement to a community forum
- posting texts to a Wiki
- uploading media (images or videos) to a social network
- sharing documents with team mates in a web collaboration system
- changing attribute values of data sets in a global music library
- adding or deleting items within a geo caching record system
All of the above require data handling capabilities of the web site in question. A web site is no longer a static item delivering simple hard coded structured data via HTML. Web 2.0 web pages require dynamic data display. To achieve that, communication between the web server and a database server which delivers the ever changing data is required.

Between the ideas of delivering structured display data via HTML and managing data coming from a database system such as MySQL, PHP is used to introduce various algorithms such as loops and data sorting functions. Using databases like MySQL to hold data and HTML as a way to formulate visual markup, PHP is the binding element for both sides to understand each other.
A HTML form may present a way to input guest book data such as your name and your entry text. PHP then reads that data and passes it to the database. The database system then inserts the data received from PHP to the pre-defined database tables. Another web page can then use PHP to read the content of a specific database table, or even different tables combined, and present that data, e.g. the guest book content, including the newly created entry. PHP then not only handles the data readout, but it also generates the HTML output you desire.
Now that must all sound pretty horrible. Actually it’s not. All the concepts above will be explained in more detail using this tutorial.
PHP and database development for Bloggers
This guide is scructured in a way that it can serve as a reference sheet regarding certain source code or concept ideas even when you already know how to code. Still, this guide does not require you to have any skills to start using it. Every blogger will have the benefit in understanding all that is tought here. In fact the material in front of you was used for basic first semester University programming and database classes — with great success and feedback.
Understanding how modern web technologies like PHP and MySQL work together is essential to grasp the basics on how a Content Management System like WordPress functions – and how to fix themes or plugins when things are broken.
Whenever you need an overview, feel free to get back to this post. Have fun! 🙂
PHP With MySQL: Ultimate Step-By-Step Guide
PHP is a language that gives you the flexibility to connect and work with different databases while developing your webpage. There are different databases, both commercial and free to use. Amongst them, MySQL is the most commonly used database alongside PHP.
MySQL is an open-source, free-to-use relational database management system (RDBMS). It is a fast, simple, and highly scalable program and hence can be used for small as well as huge businesses.
Basics to Advanced — Learn It All!
Prerequisites for PHP With MySQL
This PHP with MySQL tutorial will mainly focus on linking and managing a database with your webpage. Hence, the following prerequisites should be met before beginning the tutorial:
Software Requirements for the Tutorial
To set up the PHP development environment, you mainly need two software, a code editor and a web server package.
Now that you know the prerequisites for this tutorial as well and the software requirements, it’s time to move on to creating a database.
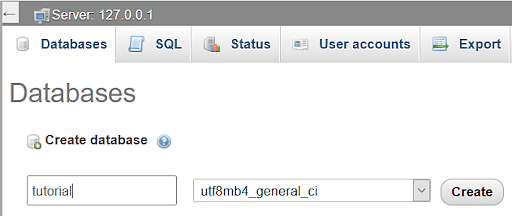
How to Create a Database?
A database is defined as an organized collection of data that makes the data easy to access, manage and modify. Generally, databases use SQL (Structured Query Language) for data manipulation.
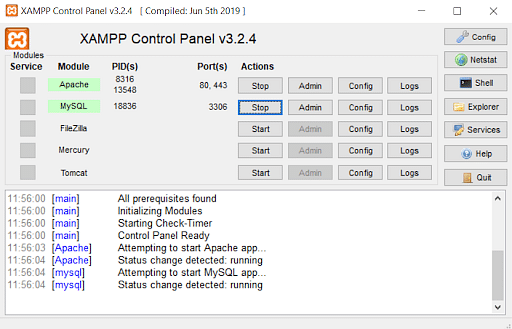
1. Open XAMPP Control Panel and start the Apache server and MySQL service.
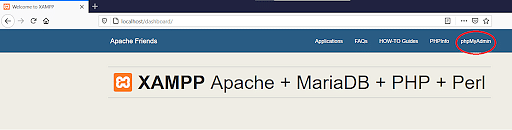
2. Now, go to your browser and type localhost in the address bar, and then on the XAMPP dashboard, click on the phpmyadmin tab.

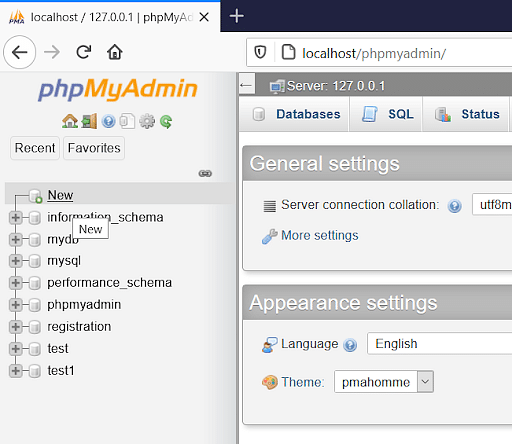
3. Into the phpmyadmin section, click on new to create a new database. Here, name your database “tutorial”.
4. Now, create a table named “users” and create 6 columns as shown below, which you will use on the registration page.
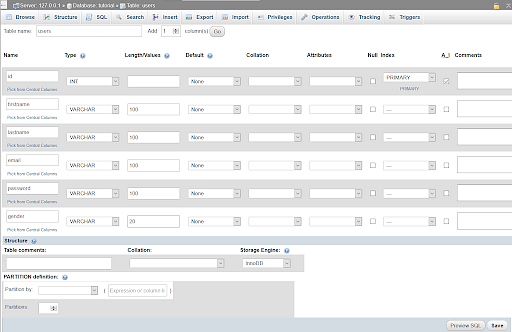
Keep the “id” column as Auto Incremented by clicking the check box next to ‘AI’ since it will be the primary key.
Basics to Advanced — Learn It All!
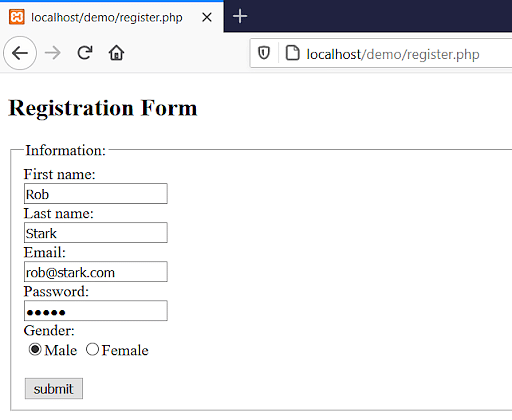
How to Create a Registration Page?
To create a registration, first, create a folder named “demo” inside htdocs and then open it inside the code editor i.e, Visual Studio Code.
Now, create a file named “register.php” and write the following code.
$sql = «INSERT INTO `users`(`firstname`, `lastname`, `email`, `password`, `gender`)
echo «New record created successfully.»;
echo «Error:». $sql . «
«. $conn->error;
Registration Form
That’s it. Now you just need to connect this webpage with the database.
How to Connect Webpage to the Database Using PHP?
To connect the webpage to the database, create another file in the code editor named “config.php” and write the following code.
$conn = new mysqli($servername, $username, $password, $dbname);
die(«Connection Failed» . $conn->connect_error);
Now that you have the registration page ready and connected to the database, open the browser for the output.
- Open the browser and type “localhost/demo/register.php”. Fill in the required fields and click on “submit”.
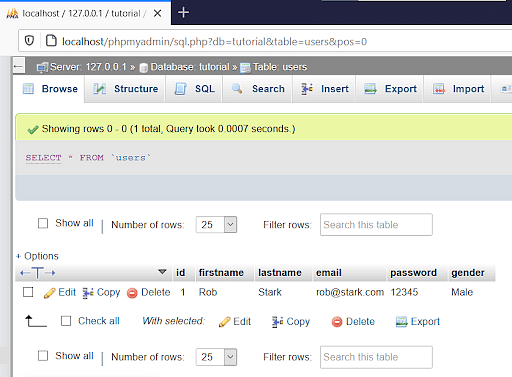
As you can see, the records are visible in the table “users”.
Now you know how to create a database and link it to a webpage. You will now see how to edit or delete the fields from the phpmyadmin control panel.
Learn From The Best Mentors in the Industry!
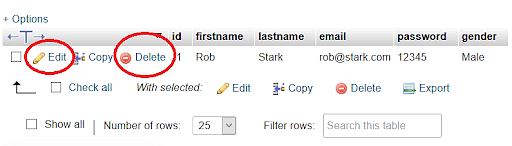
How to Edit and Delete Data From the Database?
Once data has been entered into the database, you can open the phpmyadmin panel from the XAMPP dashboard and locate to the table “users” where every information entered into the table is visible.
Here, with every data, there exists an edit and delete option which can be used to update or delete any desired data from the table.
Conclusion
This brings us to the end of the “PHP with MySQL” tutorial. In this, you have learned how to create a database using XAMPP and MySQL and also create a registration page with the help of PHP. In the later sections, you learned how to connect the webpage to the database and then finally how to edit and delete the entries in the table using the phpmyadmin panel.
You can refer here for a video tutorial on the same. If you wish to learn more about PHP and Web Development check out the PostGraduate Program in Web Development offered by Simplilearn in collaboration with Caltech where you’ll learn modern coding techniques with boot camp-level intensity and gain all you need to be a full-stack technologist.
If you have any queries regarding the PHP with MySQL tutorial, do mention them in the comment section of this tutorial, and we’ll have our experts answer them for you.
Find our Full Stack Java Developer Online Bootcamp in top cities:
| Name | Date | Place | |
|---|---|---|---|
| Full Stack Java Developer | Cohort starts on 4th Aug 2023, Weekend batch | Your City | View Details |
| Full Stack Java Developer | Cohort starts on 25th Aug 2023, Weekend batch | Your City | View Details |
About the Author
Kartik Menon
Kartik is an experienced content strategist and an accomplished technology marketing specialist passionate about designing engaging user experiences with integrated marketing and communication solutions.