- ‘Install Dlib in Anaconda Python
- Solution 1: [1]
- Solution 2: [2]
- Solution 3: [3]
- Sources
- nguyenhoan1988 / install_dlib_conda.md
- Install Dlib on Windows
- Step 1: Install Visual Studio 2015
- Step 2: Install CMake v3.8.2
- Step 3: Install Anaconda 3
- Step 4: Download Dlib
- Step 5: Build Dlib library
- Master Generative AI for CV
- Step 6: Update user environment variable – dlib_DIR
- Step 7: Build Dlib examples
- Step 8: Test Dlib’s C++ example
- Step 9: Install Dlib’s Python module (Only Anaconda 3)
- Step 10: Test Dlib’s Python example
- Subscribe & Download Code
‘Install Dlib in Anaconda Python
I’m trying to install the dlib package in Anaconda by running the following:
conda install -c menpo dlib I’m getting the following error:
UnsatisfiableError: The following specifications were found to be in conflict: - dlib - zict Use "conda info " to see the dependencies for each package. How can I solve this problem?
Solution 1: [1]
Installers Info: This package contains files in non-standard labels.
To install this package with conda run one of the following:
conda install -c conda-forge dlib conda install -c conda-forge/label/cf201901 dlib conda install -c conda-forge/label/cf202003 dlib Solution 2: [2]
You should go to the Python Index Page to download the specific whl for your python, then put it into site-packages folder.
cd into this folder and use the command pip install XXX.whl
Attention you should notice:
1 make sure boost,boost-python,opencv-python have already been installed.
2 use the command print(pip.pep425tags.get_supported()) to learn which specific wheel your python support.
3 The dlib version should match your python version.
Solution 3: [3]
Use below command in your script for the first time.
import subprocess subprocess.check_call(["python", '-m', 'pip', 'install', 'dlib']) # install pkg Sources
This article follows the attribution requirements of Stack Overflow and is licensed under CC BY-SA 3.0.
nguyenhoan1988 / install_dlib_conda.md
Cleanest installation guide of dlib (with CUDA) on the internet. Thanks a ton.
Is there specific cuda toolkit version that works with dlib? I can’t manage to get it to run:
cnn_face_detector = dlib.cnn_face_detection_model_v1('dlib_models/mmod_human_face_detector.dat') RuntimeError: Error while calling cudaMallocHost(&data, new_size*sizeof(float)) in ./dlib/dlib/cuda/gpu_data.cpp:211. code: 222, reason: the provided PTX was compiled with an unsupported toolchain. Surprisingly, this the only way it worked.
Although it froze still while building a sample cuda project and didn’t continue till I pressed «space», no idea why or how but it worked.
Many thanks! Now I’m off to the next glitch:
dlib ‘19.24.99’, face_recognition_models ‘0.1.0’
Ubuntu 20.04, python 3.10
import face_recognition_models import dlib cnn_face_detection_model = face_recognition_models.cnn_face_detector_model_location() cnn_face_detector = dlib.cnn_face_detection_model_v1(cnn_face_detection_model)
--------------------------------------------------------------------------- RuntimeError Traceback (most recent call last) Cell In [1], line 4 2 import dlib 3 cnn_face_detection_model = face_recognition_models.cnn_face_detector_model_location() ----> 4 cnn_face_detector = dlib.cnn_face_detection_model_v1(cnn_face_detection_model) RuntimeError: Error while calling cudaMallocHost(&data, new_size*sizeof(float)) in file /home/brian/dlib/dlib/cuda/gpu_data.cpp:211. code: 222, reason: the provided PTX was compiled with an unsupported toolchain. Many thanks! Now I’m off to the next glitch:
Same problem, I think, as @sashavor :
dlib ‘19.24.99’, face_recognition_models ‘0.1.0’ Ubuntu 20.04, python 3.10
import face_recognition_models import dlib cnn_face_detection_model = face_recognition_models.cnn_face_detector_model_location() cnn_face_detector = dlib.cnn_face_detection_model_v1(cnn_face_detection_model)
--------------------------------------------------------------------------- RuntimeError Traceback (most recent call last) Cell In [1], line 4 2 import dlib 3 cnn_face_detection_model = face_recognition_models.cnn_face_detector_model_location() ----> 4 cnn_face_detector = dlib.cnn_face_detection_model_v1(cnn_face_detection_model) RuntimeError: Error while calling cudaMallocHost(&data, new_size*sizeof(float)) in file /home/brian/dlib/dlib/cuda/gpu_data.cpp:211. code: 222, reason: the provided PTX was compiled with an unsupported toolchain. Any suggestion for this issue please?
Thanks for your explanation, I used it, mixing it with some other I found around internet to make a new one that worked for me
I used my device CUDA,=11.5 and Cudnn=8.3 and runs in Anaconda with python=3.8 as well
The biggest differences is that, I guess due to the time you uploaded this, with VS 2022 is not possible to compile DLIB, so we need to specify the version and not use the GIF_SUPPORT library
Thanks again for your clear explanation
for windows user who met the
import dlib Traceback (most recent call last): File «», line 1, in File «C:\Users\oceanx\AppData\Local\Programs\Python\Python310\lib\site-packages\dlib-19.24.99-py3.10-win-amd64.egg\dlib\__init__.py», line 19, in from _dlib_pybind11 import * ImportError: DLL load failed while importing _dlib_pybind11: The specified module could not be found.
check your __init__.py , make sure its «on»==»on».
Could not load library libcudnn_cnn_train.so.8. Error: /home/ankit/anaconda3/envs/dlib/bin/../lib/libcudnn_ops_train.so.8: undefined symbol: _Z22cudnnGenericOpTensorNdILi3EE13cudnnStatus_tP12cudnnContext16cudnnGenericOp_t21cudnnNanPropagation_tPKdPKvPK17cudnnTensorStructS8_S8_SB_S8_S8_SB_Pv, version libcudnn_ops_infer.so.8
I go this message after installing.
Installed c:\users\asdf\anaconda3\envs\dlib\lib\site-packages\dlib-19.24.99-py3.8-win-amd64.egg Processing dependencies for dlib==19.24.99 Finished processing dependencies for dlib==19.24.99 But when try to test dlib it gives this error:
Traceback (most recent call last): File "", line 1, in File "C:\Users\ASDF\anaconda3\envs\dlib\lib\site-packages\dlib-19.24.99-py3.8-win-amd64.egg\dlib\__init__.py", line 19, in from _dlib_pybind11 import * ImportError: DLL load failed while importing _dlib_pybind11: The specified module could not be found. >>> import dlib Traceback (most recent call last): File "", line 1, in File "C:\Users\ASDF\anaconda3\envs\dlib\lib\site-packages\dlib-19.24.99-py3.8-win-amd64.egg\dlib\__init__.py", line 19, in from _dlib_pybind11 import * ImportError: DLL load failed while importing _dlib_pybind11: The specified module could not be found. >>> import dlib Traceback (most recent call last): File "", line 1, in File "C:\Users\ASDF\anaconda3\envs\dlib\lib\site-packages\dlib-19.24.99-py3.8-win-amd64.egg\dlib\__init__.py", line 19, in from _dlib_pybind11 import * ImportError: DLL load failed while importing _dlib_pybind11: The specified module could not be found. Install Dlib on Windows

In this post, we will provide step by step instructions on how to install Dlib on Windows.
Please use the official instructions to use Dlib in your project. This post is no longer updated or maintained.
Compiling Python modules such as NumPy, SciPy etc. is a tedious task. Anaconda is a great Python distribution which comes with a lot of pre-compiled Python packages. So we will use Anaconda as our Python distribution.
An alternative to Anaconda is that you install official Python library and use Christoph Gohlke’s awesome repository to install pre-compiled Python modules.
This tutorial is based on using Anaconda so we may not be able to help if you choose to use Gohlke’s precompiled binaries or if you compile Python libraries from source.
If you intend to use Dlib only in C++ projects, you can skip Python installation part.
Now let’s go through the steps to install Dlib. Follow our previous post Install OpenCV3 on Windows to complete Step 1, 2 and 3.
Step 1: Install Visual Studio 2015
Step 2: Install CMake v3.8.2
Step 3: Install Anaconda 3
Step 4: Download Dlib
Step 5: Build Dlib library
Extract this compressed file. Open Windows PowerShell or Command Prompt and move to the directory where you have extracted this file.
If you are running these commands on Command Prompt replace ` (backtick) with ^ (caret).
cd dlib-19.6\ mkdir build cd build # This is a single command. Backticks are used for line continuation cmake -G "Visual Studio 14 2015 Win64" ` -DJPEG_INCLUDE_DIR=..\dlib\external\libjpeg ` -DJPEG_LIBRARY=..\dlib\external\libjpeg ` -DPNG_PNG_INCLUDE_DIR=..\dlib\external\libpng ` -DPNG_LIBRARY_RELEASE=..\dlib\external\libpng ` -DZLIB_INCLUDE_DIR=..\dlib\external\zlib ` -DZLIB_LIBRARY_RELEASE=..\dlib\external\zlib ` -DCMAKE_INSTALL_PREFIX=install .. cmake --build . --config Release --target INSTALL cd ..
Dlib will be installed within dlib-19.6\build\install directory. We will use CMake to build Dlib examples but you can use Visual Studio too. This directory (dlib-19.6\build\install) contains include and library folders which you can specify in Visual Studio to build projects using Dlib.
Master Generative AI for CV
Get expert guidance, insider tips & tricks. Create stunning images, learn to fine tune diffusion models, advanced Image editing techniques like In-Painting, Instruct Pix2Pix and many more
Step 6: Update user environment variable – dlib_DIR
This environment variable is needed for CMake to find out where Dlib is installed. CMake looks for a file named dlibConfig.cmake within directory dlib_DIR to find Dlib’s include and library directories.
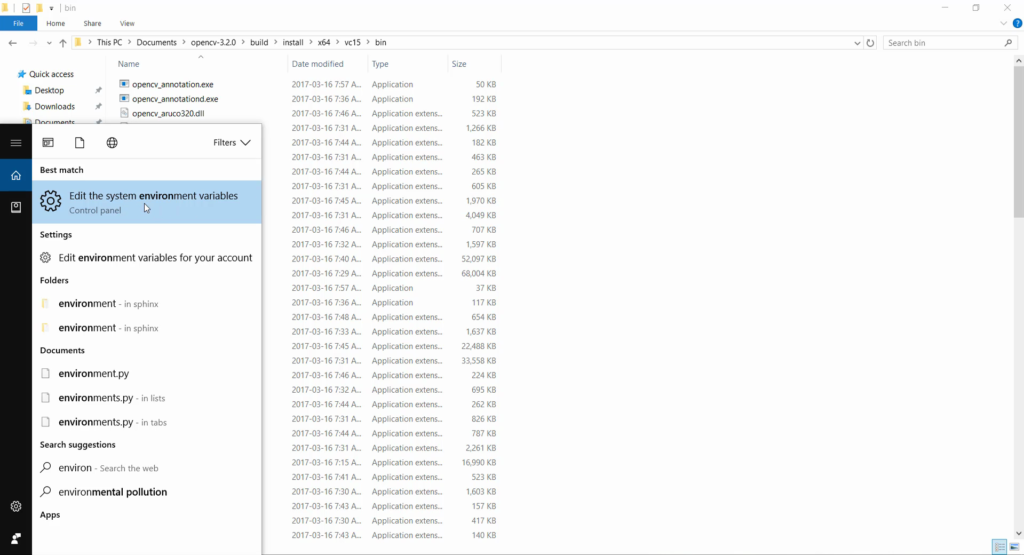
- Press Windows Super key, search for “environment variables”.

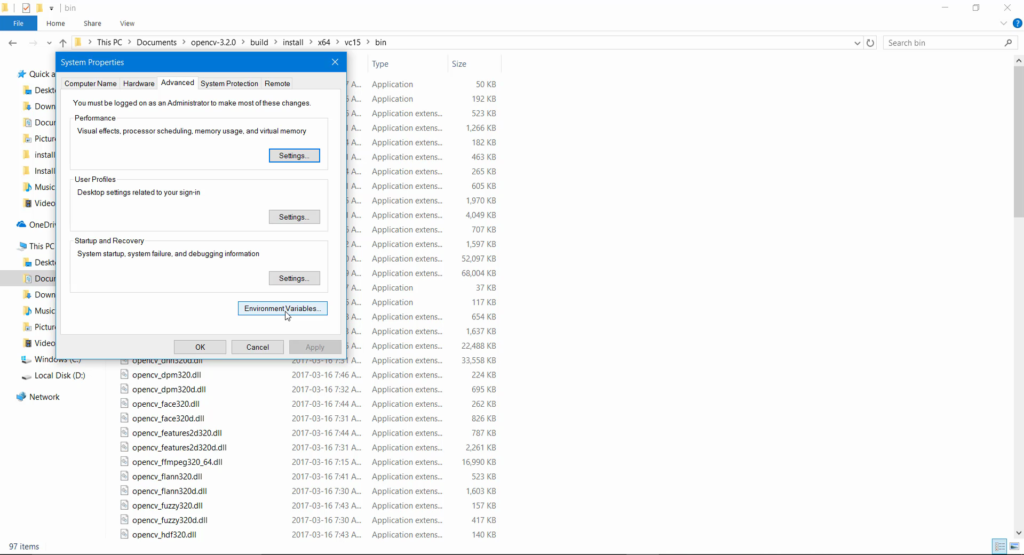
- Click Environment Variables in System Properties window.
- Click New in “User Variables” (in upper half of window).
- Under variable name write dlib_DIR and under variable value write full path to directory dlib-19.6\build\install\lib\cmake\dlib
On my machine path is: D:\programming\dlib-19.6\build\install\lib\cmake\dlib
This directory contains file “dlibConfig.cmake”. This is used by CMake to configure dlib_LIBS and dlib_INCLUDE_DIRS variables to generate project files. Before assigning the value to variable dlib_DIR make sure that this path has file dlibConfig.cmake. - Now click ok to save and close environment variables window.
Note: If you have an open Command Prompt/Power Shell window before these values were updated, you have to close and open a new Command Prompt/Power Shell window again.
Step 7: Build Dlib examples
We will use our CMakeLists.txt file instead of one which is shipped with Dlib.
Download modified CMakeLists.txt file and put it in dlib-19.6\examples directory and replace the default one with this one. Then follow the steps given below:
cd dlib-19.6/examples mkdir build cd build cmake -G "Visual Studio 14 2015 Win64" .. cmake --build . --config Release cd ../..
Once build is complete, it will generate executables for all examples in examples\build\Release folder.
Step 8: Test Dlib’s C++ example
We will test Face Landmark Detection demo to check whether we have installed Dlib correctly.
Download trained model of facial landmarks from Dlib’s website. Extract this file (shape_predictor_68_face_landmarks.dat.bz2) to Dlib’s root directory (dlib-19.6).
cd examples\build .\Release\face_landmark_detection_ex.exe ..\..\shape_predictor_68_face_landmarks.dat ..\faces\2008_001009.jpg
Step 9: Install Dlib’s Python module (Only Anaconda 3)
Compiling Python bindings for Dlib from source is non-trivial. You have to compile Boost.Python from scratch and configure some environment variables (such as BOOST_ROOT and BOOST_LIBRARYDIR) before you can compile Python module of Dlib. We are skipping that part for now. A complete tutorial on how to build Dlib Python bindings from source will be released in future.
To save time and efforts it is suggested to use Anaconda 3. You can install a compiled binary of dlib v19.4 from Anaconda. At the time this article was updated Dlib’s latest available version on Anaconda’s conda-forge repository is 19.4. So we will install v19.4 instead of 19.6
conda install -c conda-forge dlib=19.4
Step 10: Test Dlib’s Python example
cd dlib-19.6\python_examples python face_landmark_detection.py ..\shape_predictor_68_face_landmarks.dat ..\examples\faces\
Subscribe & Download Code
If you liked this article and would like to download code (C++ and Python) and example images used in this post, please click here. Alternately, sign up to receive a free Computer Vision Resource Guide. In our newsletter, we share OpenCV tutorials and examples written in C++/Python, and Computer Vision and Machine Learning algorithms and news.