- Installing Packages in a Jupyter Notebook
- Install Python package using Jupyter Notebook
- Installing Python Library in Jupyter
- Using ! pip install
- Using sys library
- Install Python package using Jupyter Notebook
- How to Install Python Library/Package using Jupyter Notebook?
- 1. How to Install Python package in Jupyter Notebook using «! pip install.»
- 2. Install Python package in Jupyter Notebook using «Python sys library.»
- Conclusion
- How to make Jupyter Notebook import packages in Python3.5
- 2 Answers 2
Installing Packages in a Jupyter Notebook

Here’s a really quick recipe that I use when I’m writing scratch code. If you have a Jupyter notebook running and you want to install or upgrade a package for that environment, you can run the following in a cell:
import sys !$sys.executable -m pip install
For example, the following would upgrade seaborn to the latest version in the current environment:
import sys !$sys.executable -m pip install --upgrade seabornWhy does it work? Well, you can call pip with the python executable by using the -m flag:
And in a Python session, the sys.executable attribute is a string with the full path to the executable for the current environment, e.g.:
sys.executable # Exected result like. # /Users/myname/anaconda3/envs/myenv/bin/pythonAdditionally, we use ! to escape shell commands in a notebook and $ to insert Python variables from the current session into that shell command.
After you run the command, you might need to restart the notebook for the new package to be available.
Finally, a quick word of warning: you should usually avoid this pattern! Whenever possible, you want your Python code to be in a reproducible environment. Use something like Poetry for that, or at least save dependencies in requirements.txt .
Still, notebooks can be useful for scratch code and sometimes reproducibility is not a major concern. In those scenarios, you want to get your environment working as quickly as possible. For this kind of use case, try this trick!
Install Python package using Jupyter Notebook
Jupyter Notebook is an open-source web application that is used to create and share documents that contain data in different formats which includes live code, equations, visualizations, and text. Uses include data cleaning and transformation, numerical simulation, statistical modeling, data visualization, machine learning, and much more.
Jupyter has support for over 40 different programming languages and Python is one of them. Python is a requirement (Python 3.3 or greater, or Python 2.7) for installing the Jupyter Notebook itself.
In Jupyter everything runs in cells. It gives options to change the cell type to markup, text, Python console, etc. Within the Python IPython console cell, jupyter allows Python code to be executed.
Installing Python Library in Jupyter
Using ! pip install
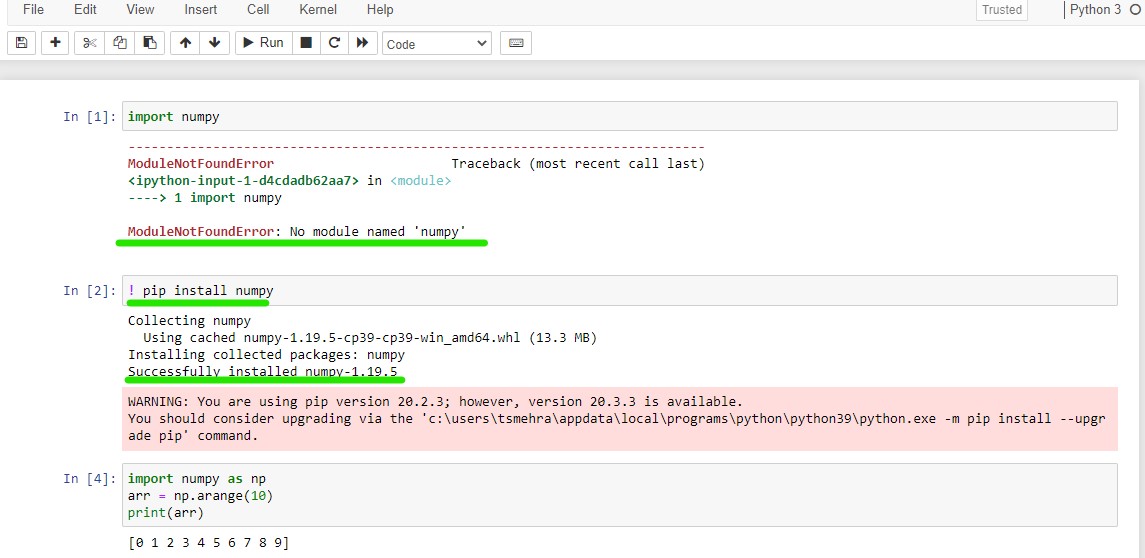
To install Python libraries, we use pip command on the command line console of the Operating System. The OS has a set of paths to executable programs in its so-called environment variables through which it identifies directly what exactly the pip means. This is the reason that whenever pip command can directly be run on the console. In Jupyter, the console commands can be executed by the ‘!’ sign before the command within the cell. For example, If the following code is written in the Jupyter cell, it will execute as a command in CMD.

Similarly we can install any package via jupyter in the same way, and it will run it directly in the OS shell. Syntax:

Example: Let’s install NumPy using Jupyter. But using this method is not recommended because of the OS behavior. This command executed on the current version in the $PATH variable of the OS. So in the case of multiple Python versions, this might not install the same package in the jupyter’s Python version. In the simplest case it may work.
Using sys library
To solve the above-mentioned problem, it is recommended to use sys library in Python which will return the path of the current version’s pip on which the jupyter is running. sys.executable will return the path of the Python.exe of the version on which the current Jupyter instance is Syntax:
import sys ! -m pip install [package_name]

Example: By the above code, the package will be installed in the same Python version on which the jupyter notebook is running.
Install Python package using Jupyter Notebook

Jupyter Notebook is an open-source web-application that can be used to write, execute, store, and share code in a single document file. Although using Jupyter notebook we can write and execute code for 40 different programming languages, but Pythoninsta highly uses it for Python Data Science and ML projects. There are two ways of Installing Jupyter notebook for Python, we recommend you to read this article if you want to know how to install Jupyter notebook with coda and pip command.
In the Jupyter Notebook, we have the terminology called «cell» where we can write code, markup language, raw code, and Heading for our notebook document. The type of the cell can be changed according to the requirement. By default, when we create a Jupyter Notebook, it uses the installed Python as a kernel to execute the Python code, this means it can only use the packages that we have installed for our Python environment.
Now let’s say you wish to use a new Python package that is not installed for your Python, so what will you do?. You simply go to your terminal or command prompt and install it using the Python pip command, which is one of the obvious options you have. Sometimes, even after installing the package using the terminal and pip command, it does not guarantee that you can import it instantly.
You might have to close your Jupyter Notebook and restart it, which can be a tedious task. So now the question is- can we install Python packages using Jupyter Notebook. Yes, there are two techniques to install Python Package Using Jupyter Notebook.
How to Install Python Library/Package using Jupyter Notebook?
- Install Python package in Jupyter Notebook using «! pip install.»
- Install Python package in Jupyter Notebook using » Python sys library. «
1. How to Install Python package in Jupyter Notebook using «! pip install.»
We can use the Jupyter Notebook cells as a command line or terminal shell by using the ! symbol as a prefix. Similar to the pip install command we use in our terminal or command prompt we can use the same command in our Jupyter Notebook cell to install the Python package from the Notebook itself. To execute a shell command in the Jupyter Notebook we use the ! sing before the command. Now let’s install the Python numpy library by using Jupyter Notebook.
For some operating systems where there are multiple users exist on the system, the above command will not work and ask you for the user permission in that case you can use the following command.
Many Pythoneer also uses conda distribution for installing Jupyter Notebook and Python packages, in that case, the above command won’t be of any help. If you are using Jupyter Notebook with anaconda and want to install python packages using Jupyter Notebook then you need to write the following command on your Notebook cell
Similar to the pip install command we use the conda install command to install Python packages for the conda environment. The —yes command will make all the permission to yes even if the operating system has multiple users.
2. Install Python package in Jupyter Notebook using «Python sys library.»
The approach of installing Python Package using sys library in Jupyter Notebook is similar to the above ! pip install command . Many Pythonista use multiple Python versions on the same system, for instance, you might have Python3.8 and 3.9 running side by side on the same system. And using Python3.9 for your latest Jupyter Notebook protect and 3.8 for an old project. So in that case, you do not install one dependency package of a project into another using PIP command in Jupyter notebook, it would be a great practice to use Python sys library, which will return the current versions of pip on which your Jupyter Notebook is running.
import sys ! -m pip install
How to Install numpy with sys library in Jupyter Notebook
import sys ! -m pip install numpy 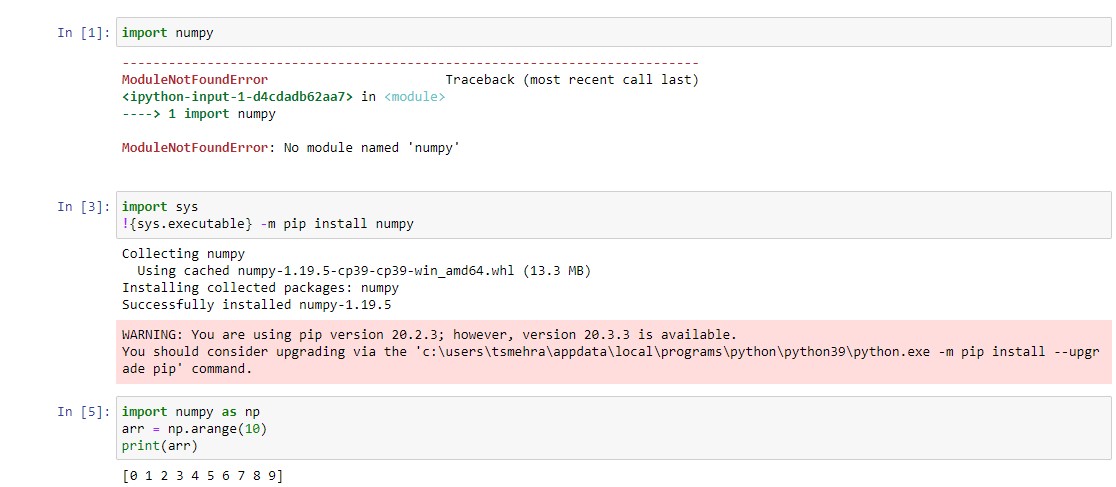
If you are using Conda distribution to run jupyter notebook ten use the following command
import sys !conda install --yes --prefix numpyConclusion
In this tutorial, you learned how to install Python Packages directly from the Jupyter Notebook cells. By putting the ! sign in the cell we can use the Jupyter Notebook cell as a terminal shell. Like the command shell, you can also use the different terminal commands with ! sign, for instance, you can check the current directly from the Jupyter Notebook using ! cd command.
People are also reading:
How to make Jupyter Notebook import packages in Python3.5
I have several packages being imported perfectly in my Python 3.5. But not in my Jupyter Notebook. When i try to Import those packages in Jupyter i get and error of module not found. Is there a way to make Jupyter load my Python 3.5 as a kernel. or something similar. I’m working in a virtual environment. Already tried to reinstall the packages again in my virtual env But no success.
2 Answers 2
Try to install the packages inside a jupyter notebook cell like this:
So you are sure that the packages are installed in jupyter’s environment
Tks for the suggestion ! But did not work . It seems there’s something very wrong with my Jupyter Notebook . I could not install any packages using this approach. Tried to use with a package cv2 for example . and got an error («Could not find a version thta satisfies the requirement cv2 . » . In fact even numpy will give me problems . If i run !pip install numpy . for example . i get «Requirement already satisfied. numpy in . (path to my site-packages. )». but if i try to import numpy i get «import error» (no module named numpy. ).
I think you should reinstall anaconda or reinstall Jupiter notebook. check this: stackoverflow.com/questions/33052232/how-to-uninstall-jupyter
Yes Billy. i think this is the best way to. but i also found another thing: my Jupyter Notebook Kernel is looking for the packages from: home/