- Full JavaScript Animation Templates
- 10+ Top JavaScript Animation Templates 2020
- Bonobomb — Full Animated Zoo Website Template (NEW)
- Kelissa Smith — Photographer Portfolio Website Template
- Using templates and slots
- Using templates with web components
- Adding flexibility with slots
- A more involved example
- Creating a template with some slots
- Creating a new element from the
- Using the custom element with named slots
- Adding a final bit of style
- Result
- Found a content problem with this page?
Full JavaScript Animation Templates
Do you wonder why animation has been in demand in web design from year to year? It attracts, avoids static pages, highlights the core content, looks modern, and. Better hurry up to enhance your website with animation! How? Using best JavaScript animation templates. Let’s find out more about them today!
You may ask, why JavaScript animated templates? Is there anything special about them? Well, the main perk of such templates is their ability to give a power of real a Flash website. That means using them you can get a robust site with flawless Flash-like animation. Yet, to build it, you do not need special skills, if you rely on ready-to-use JavaScript animation templates, of course. Being based on JavaScript technologies, this animation boasts of high visual characteristics and simple structure. Even if you are not tech-savvy, you’ll easily manage the included elements to get what you like.
Moreover, JavaScript adds dynamics to a template letting it be extremely light. That is absolutely good for a site loading speed and others. In a word JavaScript animated templates is a hybrid of Java and HTML technologies. So, they don’t require extra software for edits. You can tweak up up them with the help of any HTML editor.
10+ Top JavaScript Animation Templates 2020
We give you 10+ Full JavaScript Animated Templates 2020 to find the best design for you. The templates are also customizable and can highlight any of your ides. Hopefully, one of them will fully meet your expectations and reflect your site’s goals for maximum.
JavaScript animated templates are ready-made designs based on HTML and various JavaScript elements. They are must-haves for everyone who want to make websites that reflect dynamics and perform lightning-fast. If you are a freelance developer or run a web agency, check our collection. It’s full of various templates with perfect JavaScript animation. Plus, these products can be quickly changed for different topics you or your clients may be interested in. For example, you can switch colors and add new images. After, you’ll get an absolutely new template powered with trendy 2020 animation.
Like any HTML template, these JavaScript animated templates can be adjusted with any HTML editor. In such a way you’ll easily work on visuals, text, color scheme, as well as add new pages. Also, you’ll be able to modify the menu. So, just replace the default content with your own and enjoy your animated website!
Bonobomb — Full Animated Zoo Website Template (NEW)

Bonobomb — Full Animated Zoo Website Template comes under the notion of dynamics and vivid colors. Modern and catchy, it’s designed up to the latest trends and customer impact studies. If you look for a cool smooth JavaScript animation, this offer is right for you!
Despite Bonobomb is presented as a template for zoos, you can adjust it to other topics, as well. Due to user-friendly Bootstrap technologies, the mentioned process doesn’t require deep knowledge of web development. Just replace the default content on your own images, text, etc and get a full-fledged HTML site. Without doubts, you’ll find it very easy also because of the well-commented documentation.
Moreover, this JavaScript animated template is fully optimized for search engines and boasts of high speed. We’ve also provided Bonobomb with handy working contact forms and pre-built extra page layouts. Using this HTML template be sure that your future website will perform the same flawless on screens of all possible gadgets. So, chose Bonobomb to see all the perks of premium products on your own!
Main features:
- ready-to-use;
- SEO-friendly;
- clean coding;
- responsive;
- Bootstrap;
- 24/7 support;
- detailed documentation.
Kelissa Smith — Photographer Portfolio Website Template
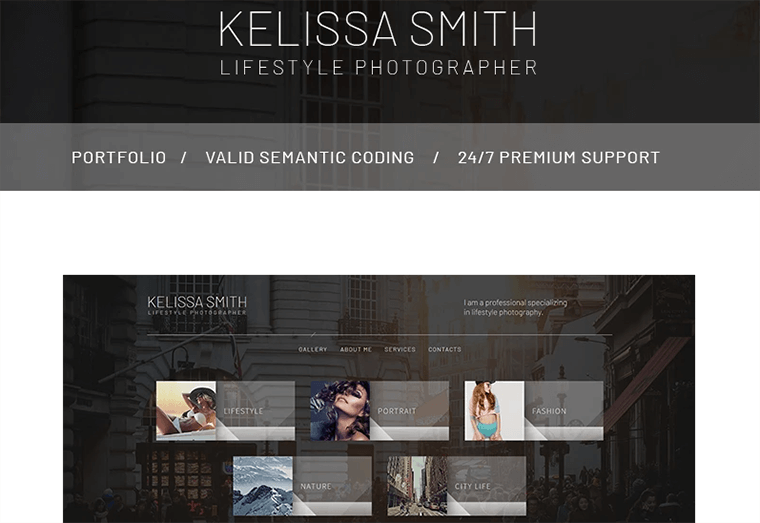
Kelissa Smith — Photographer Portfolio Website Template is a perfect way to show lots of visual content. Rely on it if you have to create a portfolio or blog. With this product, any idea is quite possible. Just replace the examples with your data and advanced Bootstrap 4 technologies will do the rest!
As for functionality, Kelissa Smith — Photographer Portfolio Website Template is well-documented and provided with pre-built forms and pages. You can use it for multiple projects where dynamic JavaScript animation is in priority. Moreover, the template is backed with our professional 24/7 support.
Main features:
- SEO-friendly;
- mobile-ready;
- gallery script;
- Bootstrap;
- 24/7 support.
Using templates and slots
When you have to reuse the same markup structures repeatedly on a web page, it makes sense to use some kind of a template rather than repeating the same structure over and over again. This was possible before, but it is made a lot easier by the HTML element. This element and its contents are not rendered in the DOM, but it can still be referenced using JavaScript.
Let’s look at a trivial quick example:
template id="my-paragraph"> p>My paragraphp> template>
This won’t appear in your page until you grab a reference to it with JavaScript and then append it to the DOM, using something like the following:
let template = document.getElementById("my-paragraph"); let templateContent = template.content; document.body.appendChild(templateContent);
Although trivial, you can already start to see how this could be useful.
Using templates with web components
Templates are useful on their own, but they work even better with web components. Let’s define a web component that uses our template as the content of its shadow DOM. We’ll call it as well:
.define( "my-paragraph", class extends HTMLElement constructor() super(); let template = document.getElementById("my-paragraph"); let templateContent = template.content; const shadowRoot = this.attachShadow( mode: "open" >); shadowRoot.appendChild(templateContent.cloneNode(true)); > >, );
The key point to note here is that we append a clone of the template content to the shadow root, created using the Node.cloneNode() method.
And because we are appending its contents to a shadow DOM, we can include some styling information inside the template in a element, which is then encapsulated inside the custom element. This wouldn’t work if we just appended it to the standard DOM.
template id="my-paragraph"> style> p color: white; background-color: #666; padding: 5px; > style> p>My paragraphp> template>
Now we can use it by just adding it to our HTML document:
Adding flexibility with slots
So far so good, but the element isn’t very flexible. We can only display one bit of text inside it, meaning that at the moment it is even less useful than a regular paragraph! We can make it possible to display different text in each element instance in a nice declarative way using the element.
Slots are identified by their name attribute, and allow you to define placeholders in your template that can be filled with any markup fragment you want when the element is used in the markup.
So, if we want to add a slot into our trivial example, we could update our template’s paragraph element like this:
p>slot name="my-text">My default textslot>p>
If the slot’s content isn’t defined when the element is included in the markup, or if the browser doesn’t support slots, just contains the fallback content «My default text».
To define the slot’s content, we include an HTML structure inside the element with a slot attribute whose value is equal to the name of the slot we want it to fill. As before, this can be anything you like, for example:
my-paragraph> span slot="my-text">Let's have some different text!span> my-paragraph>
my-paragraph> ul slot="my-text"> li>Let's have some different text!li> li>In a list!li> ul> my-paragraph>
Note: Nodes that can be inserted into slots are known as Slottable nodes; when a node has been inserted in a slot, it is said to be slotted.
And that’s it for our trivial example. If you want to play with it some more, you can find it on GitHub (see it running live also).
A more involved example
To finish off the article, let’s look at something a little less trivial.
The following set of code snippets show how to use together with and some JavaScript to:
- create a element with named slots in its shadow root
- design the element in such a way that, when used in documents, it is rendered from composing the element’s content together with content from its shadow root—that is, pieces of the element’s content are used to fill in named slots in its shadow root
In addition, even if it is not already rendered, the purpose of the container as a template should be more semantically clear when using the . In addition, can have items directly added to it, like , which would disappear when added to a .
Note: You can find this complete example at element-details (see it running live also).
Creating a template with some slots
template id="element-details-template"> style> details font-family: "Open Sans Light", Helvetica, Arial; > .name font-weight: bold; color: #217ac0; font-size: 120%; > h4 margin: 10px 0 -8px 0; > h4 span background: #217ac0; padding: 2px 6px 2px 6px; > h4 span border: 1px solid #cee9f9; border-radius: 4px; > h4 span color: white; > .attributes margin-left: 22px; font-size: 90%; > .attributes p margin-left: 16px; font-style: italic; > style> details> summary> span> code class="name" ><slot name="element-name">NEED NAMEslot>>code > span class="desc" >slot name="description">NEED DESCRIPTIONslot>span > span> summary> div class="attributes"> h4>span>Attributesspan>h4> slot name="attributes">p>Nonep>slot> div> details> hr /> template>
Creating a new element from the
Next, let’s create a new custom element named and use Element.attachShadow to attach to it, as its shadow root, that document fragment we created with our element above. This uses exactly the same pattern as we saw in our earlier trivial example.
.define( "element-details", class extends HTMLElement constructor() super(); const template = document.getElementById( "element-details-template", ).content; const shadowRoot = this.attachShadow( mode: "open" >); shadowRoot.appendChild(template.cloneNode(true)); > >, );
Using the custom element with named slots
Now let’s take that element and actually use it in our document:
element-details> span slot="element-name">slotspan> span slot="description" >A placeholder inside a web component that users can fill with their own markup, with the effect of composing different DOM trees together.span > dl slot="attributes"> dt>namedt> dd>The name of the slot.dd> dl> element-details> element-details> span slot="element-name">templatespan> span slot="description" >A mechanism for holding client- side content that is not to be rendered when a page is loaded but may subsequently be instantiated during runtime using JavaScript.span > element-details>
About that snippet, notice these points:
- The snippet has two instances of elements which both use the slot attribute to reference the named slots «element-name» and «description» we put in the shadow root .
- Only the first of those two elements references the «attributes» named slot. The second element lacks any reference to the «attributes» named slot.
- The first element references the «attributes» named slot using a element with and children.
Adding a final bit of style
As a finishing touch, we’ll add a tiny bit more CSS for the , , and elements in our doc:
dl margin-left: 6px; > dt color: #217ac0; font-family: Consolas, "Liberation Mono", Courier; font-size: 110%; font-weight: bold; > dd margin-left: 16px; > Result
Finally let’s put all the snippets together and see what the rendered result looks like.
Notice the following points about this rendered result:
- Even though the instances of the element in the document do not directly use the element, they get rendered using because the shadow root causes them to get populated with that.
- Within the rendered output, the content in the elements fills the named slots from the shadow root. In other words, the DOM tree from the elements get composed together with the content of the shadow root.
- For both elements, an Attributes heading gets automatically added from the shadow root before the position of the «attributes» named slot.
- Because the first has a element which explicitly references the «attributes» named slot from its shadow root, the contents of that replace the «attributes» named slot from the shadow root.
- Because the second doesn’t explicitly reference the «attributes» named slot from its shadow root, its content for that named slot gets filled with the default content for it from the shadow root.
Found a content problem with this page?
This page was last modified on Jul 7, 2023 by MDN contributors.
Your blueprint for a better internet.