Minimal REST API tests in Node.js
Ahoy, mate! This topic may be useful for beginners in Test Automation or those testers who works with other languages (like Java or Python) and new to JavaScript (Node.js). Source code of project from this article on GitHub: https://github.com/bormando/mochapi/tree/main
Tools
- Test runner. This tool allows us to define test scenarios and combine them into test suites. It also allows us to run these scenarios and suites. One of the most popular test runners for Node.js is Mocha — we’ll use this one.
- Assertion library. Assertion library is a set of assertions (or expectations) for our test scenarios. Test runners usually contains some basic assertions set, but we’re going to include this one too so we could accustom beginners to these libraries, especially Chai (this is our choice for current article).
- HTTP client. And this one makes REST API test automation possible. This is a tool that sends requests to HTTP (API) server. One of the most popular solutions in this area is Axios — this is our guy.
We’ll also need Postman or similar tool (f.e. SoapUI, TestMace, Insomnia) to send few requests manually.
As an example of REST API server, we’ll use public endpoint of crypto market Bitfinex:
Setup
First of all, we’ll need to create a project directory. After that, we must open it in console (terminal in MacOS/Linux or CMD/PowerShell in Windows) and execute command:
After this command execution you’ll find package.json file in your project’s root directory. This file contains your package info, we’ll get back to it later.
Next, we need to install dependencies (chosen tools from previous section):
Now, when we have our package initialized and dependencies installed — we need to create files and folders structure.
In project’s root directory we’ll create src directory, and then specs as a subdirectory of src.
- src is a primary place for our project’s code,
- specs contains test suites.
In specs directory we create markets.test.js file. Here we’ll define our test scenarios.
At current state our project structure should look like this:
Test cases
Let’s make a GET request to the API endpoint that we’re testing: https://api-pub.bitfinex.com/v2/ticker/tBTCUSD
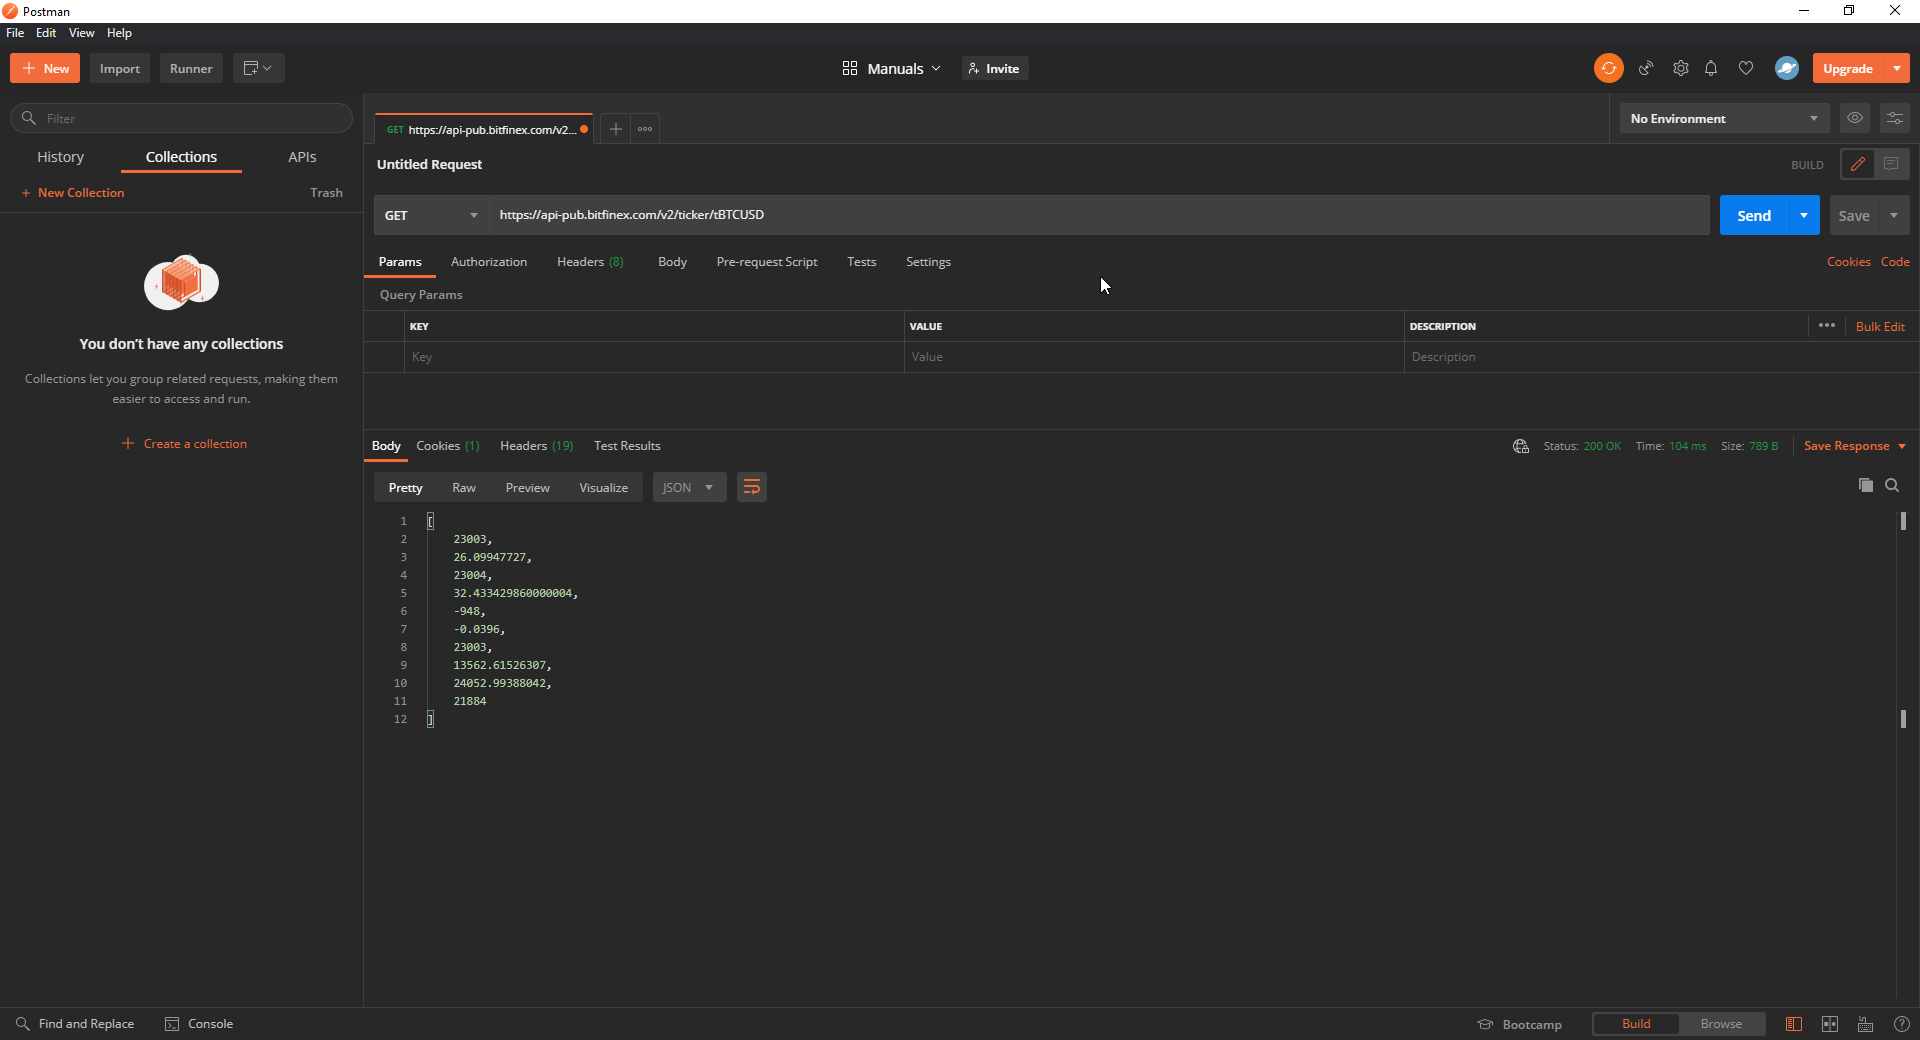
As we can see, the response body looks like this:
[ 23003, 26.09947727, 23004, 32.433429860000004, -948, -0.0396, 23003, 13562.61526307, 24052.99388042, 21884 ] Response body contains list of numbers and this structure won’t change if you’ll execute this request few more times, only values will (since this pair is being traded without stop).
So, we can define at least 3 test scenarios here:
- Status-code of response must be 200 (OK).
- Response body must contain list with length of 10 values (nor more nor less).
- Response body must contain list with number values only.
Coding
Finally, we can start writing code to automate our test scenarios. First of all, we have to define our test suite — let’s name it ‘price data’, since we’re checking on BTC/USD pair on crypto market:
Previously, we have defined test scenarios for automation, so let’s hold on for a second and think for something that they have in common. Of course, it’s the data that they check on. So what can we do to not to duplicate our code (and not to execute a request in each test)? We’ll use hooks (or actually, a hook)!
const axios = require('axios'); describe('price data', () => < let data; before(async () => < await axios.get('https://api-pub.bitfinex.com/v2/ticker/tBTCUSD') .then((response) =>< data = response; >); >); >); As you can see, we’ve added Axios import into our test suite, so we could execute requests to our API.
Hook ‘before’ is being executed before all the tests in our test suite, so we gather data using Axios and store it into data variable, that is defined just above the ‘before’ hook.
Also, pay attention that await is used so we could wait for request to finish execution so we could continue. If you won’t use await — you’ll have data variable undefined in your tests.
Next, we’re going to add our three test scenarios and import Chai to check on assertions:
const axios = require('axios'); const assert = require('chai').assert; describe('price data', () => < let data; before(async () => < await axios.get('https://api-pub.bitfinex.com/v2/ticker/tBTCUSD') .then((response) =>< data = response; >); >); it('has 200 response code', () => < assert.equal(data.status, 200, 'the response code is not 200'); >); it('contains 10 values', () => < assert.equal(data.data.length, 10, 'number of values is not 10'); >); it('values should be numbers', () => < for (const value of data.data) < assert.isNumber(value, `value '$' is not a number`); > >); >); First one simply checks if status field from our test data is 200.
Second scenario gets length of response body’s list and collates it with 10.
Third and final case is using for loop to cycle through response body list’s values and checks if every value is a number.
Seems pretty easy to understand and code, huh?
Running tests
Let’s get back to package.json file that is being stored in our project’s root directory.
Find test key and replace it’s value (not key) with npx mocha src/specs .
You can add description and author values if you like, but that’s not not necessary.
Your package.json file should look like this:
< "name": "mochapi", "version": "1.0.0", "description": "API test automation with Mocha and Axios", "scripts": < "test": "npx mocha src/specs" >, "keywords": [], "author": "Dmitrii Bormotov", "license": "ISC", "devDependencies": < "axios": "^0.21.0", "chai": "^4.2.0", "mocha": "^8.2.1" >> Now, you can run your tests by simply executing command in console while in your project’s root directory:
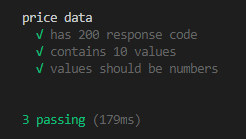
After run completion, you’ll see report like this:
Now you may consider yourself REST API test automator. 🙂
Thanks for reading, hope you’ve learned something new.
API Testing Tools in JavaScript
API testing is a type of software testing that focuses on determining if APIs meet expectations. It is critical for automating testing because APIs now serve as the primary interface to application logic.
Tools
Find other options at the end.
Chakram
dareid / chakram
REST API test framework. BDD and exploits promises
Chakram
Chakram is no longer actively maintained, PRs are welcomed
Chakram is an API testing framework designed to perform end to end tests on JSON REST endpoints.
The library offers a BDD testing style and fully exploits javascript promises — the resulting tests are simple, clear and expressive. Chakram is built on node.js, mocha, chai and request.
This readme offers an introduction to the library. For more information, visit Chakram’s documentation and tests which demonstrate all of Chakram’s capabilities. In addition, example tests of publicly accessible APIs are available in the examples directory. If required, assistance can be found in the project’s gitter chat room.
Features
- HTTP specific assertions. Allows testing of
- Status codes
- Cookie presence and value
- Header presence and value
- JSON values
- JSON structure (using the JSON schema specification)
- Compression
- Response times
Chakram is a REST API testing framework offering a BDD testing style and fully exploiting promises.
Chakram extends Chai.js, adding HTTP specific assertions. It allows simple verification of returned status codes, the compression used, cookies, headers, returned JSON objects and the schema of the JSON response.
describe("HTTP assertions", function () it("should make HTTP assertions easy", function () var response = chakram.get("http://httpbin.org/get"); expect(response).to.have.status(200); expect(response).to.have.header("content-type", "application/json"); expect(response).not.to.be.encoded.with.gzip; return chakram.wait(); >); >);Pros
Cons