Открываем файлы формата Open XML Excel в JavaScript
Для загрузки информации о торговых точках в наш логистический SaaS-сервис «Муравьиная логистика» из Excel я решил использовать web-браузер. Обычно проще загрузить файл на сервер и с помощью любой библиотеки залить в БД. Но мне было интересно загрузить его построчно для контроля целостности каждой строки на клиенте, ну и, конечно, опробовать так всеми рекламируемое HTML5 FileAPI и Drag and Drop.
Книга Exсel – это ZIP архив с каталогами и файлами XML в формате Open XML. Парсить XML отлично умеет jQuery, а вот зиппить нет. Для этого на просторах сети была найдена библиотека zip.js, которая прекрасно справилась с поставленной задачей.
Итак, попробуем посмотреть, что же находится внутри архива:
var c = document.getElementById("comps"), FileDragHover = function (e) < e.stopPropagation(); e.preventDefault(); if(e.target.id==='comps') e.target.className = (e.type == "dragover" ? "filedrag hover" : "filedrag"); else c.className = (e.type == "dragover" ? "filedrag hover" : "filedrag"); >c.addEventListener("drop", function(e) < e.preventDefault(); c.className = "filedrag"; var files = e.target.files || e.dataTransfer.files; for (var i = 0, f; f = files[i]; i++) < if(f.name.toLowerCase().indexOf('xlsx')<=0) < alert('Это не файл Excel'); >else < zip.createReader(new zip.BlobReader(f), function(reader) < // Получаем все файлы архива reader.getEntries(function(entries) < // В консоли появятся все внутренности архива Excel console.info(entries) return false; >); >, function(error) < alert("Ошибка: " + error) >); > > return false; >, false); c.addEventListener("dragover", FileDragHover, false); c.addEventListener("dragleave", FileDragHover, false); Результат можно посмотреть тут. Скачайте пример файла и перетащите его на форму.
В консоли появится список всех файлов архива книги Excel. Среди свойств объектов, появившихся в консоли, есть filename, по нему-то мы и будем искать необходимые нам файлы XML.
Отфильтруем только нужные для нас файлы:
// Получаем все файлы архива reader.getEntries(function(entries) < var a=[],st; for(var i in entries)< var e=entries[i]; var fn=e.filename.toLowerCase(); if(fn.indexOf("sheet")>0) < a.push(e); >else if(fn.indexOf("sharedstring")>0) < st=e; >> // Массив всех листов книги Excel console.info(a) // Ассоциативный массив строк console.info(st) return false; >); Результат можно посмотреть тут, закинув файл и посмотрев в консоль.
Далее нам необходимо извлечь данные простыми селекторами, для словаря строк это — st t, для записей таблицы с данными на листе это — sheetdata row.
Добавим функцию для вывода данных из листа Excel:
printExcelData = function(sheets, strings) < var unzipProgress = document.getElementById("progress"); unzipProgress.style.display='block'; strings.getData(new zip.TextWriter(), function(text) < // Получаем все строки листа для ассоциации с их кодами var i,st=$($.parseXML(decodeURIComponent(escape(text)))).find('si t'); for(i=0;i; for(i=0;i if(h) < d.push(o) >else h=o; >); var id_name=""; for(i in h) if(h[i]=='Comp_Id') < id_name=h[i]; break; >// Если поле Comp_Id есть в записи, значит лист наш if(id_name=='Comp_Id') < unzipProgress.style.display='none'; // Это заголовок таблицы данных s=""; for(i=0;i'; $('.result thead tr').append(s) // Это данные s=""; for(j=0; j'; for(i=0; i'+d[j][h[i]].toString()+''; > s+=''; > $('.result tbody').append(s) sheets=[]; return; > if(sheets.length>0) parseSheet(sheets.pop()); >, function(current, total) < unzipProgress.value = current; unzipProgress.max = total; >); > parseSheet(sheets.pop()); >, function(current, total) < unzipProgress.value = current; unzipProgress.max = total; >); > Так как Chrome считает преступлением использование HTML File API в кросс-домене (Uncaught SecurityError: An attempt was made to break through the security policy of the user agent.), последний пример выложил на Web-сервер.
Перетаскиваем файл и получаем стандартную таблицу HTML.
P.S.
Да, сейчас, как оказалось, есть Open XML SDK for JavaScript, но это тема для отдельной статьи…
How to Import and Export Excel XLSX Using JavaScript
JavaScript is a versatile platform that allows easy customization of client-side scripting tools. In some applications, it’s helpful to have some sort of spreadsheet interface that is easy to code and maintain. The SpreadJS client-side JavaScript spreadsheet component is perfect for this.
Add complete JavaScript spreadsheets into your enterprise web apps. Download SpreadJS Now!
In this blog, we will cover how to import/export to Excel in JavaScript following these steps:
Set Up the JavaScript Spreadsheet Project
To start, we can use the SpreadJS files hosted on NPM. To do this, we can install using a command line argument. Open a command prompt and navigate to the location of your application. There, you can install the required files with one command.
In this case, we need the base Spread-Sheets library, Spread-ExcelIO, and jQuery:
npm i @grapecity/spread-sheets @grapecity/spread-excelio jquery
SpreadJS isn’t dependent on jQuery, but in this case, we use it for the easy cross-origin-request support, which we will review later.
Once those are installed, we can add references to those script and CSS files in our code:
We will also need the FileSaver library, which we have imported in addition to the SpreadJS and jQuery files.
Then we can add a script to the page that initializes the Spread.Sheets component and a div element to contain it (since the SpreadJS spreadsheet component utilizes a canvas, this is necessary to initialize the component):
Add Excel Import Code
We need to create an instance of the client-side ExcelIO component that we can use to open the file:
var excelIO = new GC.Spread.Excel.IO(); Then we need to add a function to import a file. In this example, we import a local file, but you can do the same thing with a file on a server. You need to reference the location if importing a file from a server. The following is an example of an input element where the user can enter the location of the file:
Once you have that, you can directly access that value in script code:
var excelUrl = $("#importUrl").val(); The following code for the import function uses a local file for the «excelUrl» variable:
function ImportFile() < var excelUrl = "./test.xlsx"; var oReq = new XMLHttpRequest(); oReq.open('get', excelUrl, true); oReq.responseType = 'blob'; oReq.onload = function () < var blob = oReq.response; excelIO.open(blob, LoadSpread, function (message) < console.log(message); >); >; oReq.send(null); > function LoadSpread(json) Whether you’re referencing a file on a server or locally, you’ll need to add the following to your script inside the $(document).ready function:
In this case, we need to enable Cross-Origin-Request-Support because we are potentially loading a file from a URL. Hence the $.support.cors = true; line, or else attempting to load it will result in a CORS error.
Add Data to the Imported Excel File
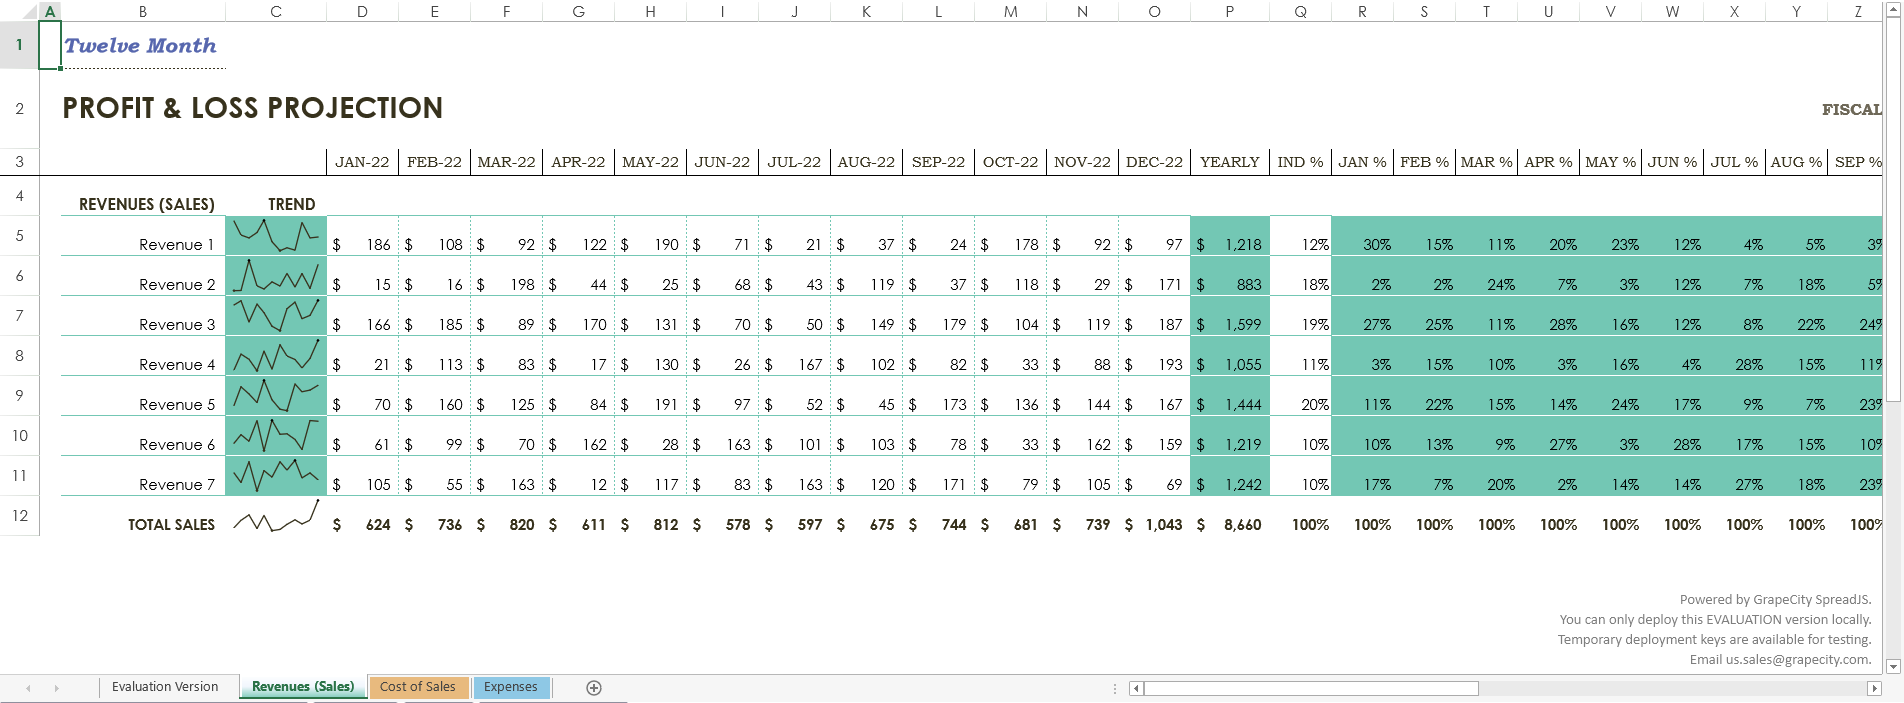
We import a local file using the “Profit loss statement” Excel template for this tutorial.

Now we can use Spread.Sheets script to add another revenue line into this file. Let’s add a button to the page that will do just that:
We can write a function for the click event handler for that button to add a row and copy the style from the previous row in preparation for adding some data. To copy the style, we will need to use the copyTo function and pass in:
- the origin and destination row and column indices
- row and column count
- the CopyToOptions value for style
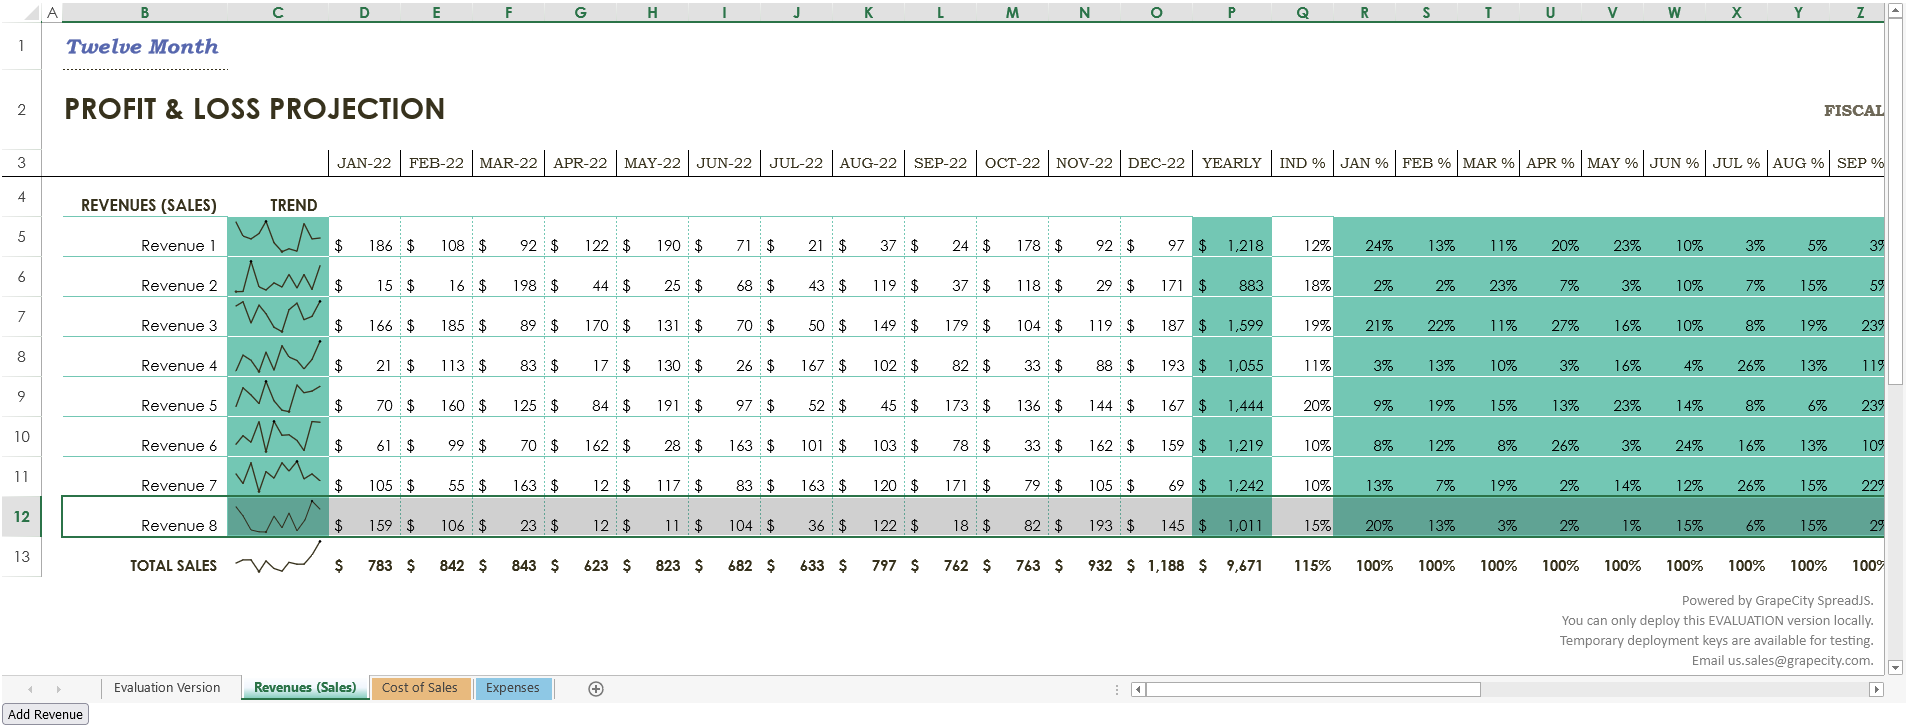
document.getElementById("addRevenue").onclick = function () The following script code for adding data and a Sparkline will be contained within this button click event handler. For most of the data, we can use the setValue function. This allows us to set a value in a sheet in Spread by passing in a row index, column index, and value:
sheet.setValue(newRowIndex, 1, "Revenue 8"); for (var c = 3; c
Set a SUM formula in column P to match the other rows and set a percentage for column Q:
sheet.setFormula(newRowIndex, 15, "=SUM([@[Jan]:[Dec]])") sheet.setValue(newRowIndex, 16, 0.15); Lastly, we can copy the formulas from the previous rows to the new row for columns R through AD using the copyTo function again, this time using CopyToOptions.formula:
sheet.copyTo(10, 17, newRowIndex, 17, 1, 13, GC.Spread.Sheets.CopyToOptions.formula); Add a Sparkline
Now we can add a sparkline to match the other rows of data. To do this, we need to provide a range of cells to get the data from and some settings for the sparkline. In this case, we can specify:
- the range of cells, we just added data to
- settings to make the sparkline look like the other sparklines in the same column
var data = new GC.Spread.Sheets.Range(11, 3, 1, 12); var setting = new GC.Spread.Sheets.Sparklines.SparklineSetting(); setting.options.seriesColor = "Text 2"; setting.options.lineWeight = 1; setting.options.showLow = true; setting.options.showHigh = true; setting.options.lowMarkerColor = "Text 2"; setting.options.highMarkerColor = "Text 1"; After that, we call the setSparkline method and specify:
- a location for the sparkline
- the location of the data
- the orientation of the sparkline
- the type of sparkline
- the settings we created
sheet.setSparkline(11, 2, data, GC.Spread.Sheets.Sparklines.DataOrientation.horizontal, GC.Spread.Sheets.Sparklines.SparklineType.line, setting); If you were to try running the code now, it might seem a little slow because the workbook is repainting every time data is changed and styles are added. To drastically speed it up and increase performance, Spread.Sheets provide the ability to suspend painting and the calculation service. Let’s add the code to suspend both before adding a row and its data and then resume both after:
workbook.suspendPaint(); workbook.suspendCalcService(); //. workbook.resumeCalcService(); workbook.resumePaint(); Once we add that code, we can open the page in a web browser and see the Excel file load into Spread.Sheets with an added revenue row. Important: Keep in mind that Chrome doesn’t allow you to open local files for security purposes, so you need to use a web browser like Firefox to run this code successfully. Alternatively, loading a file from a website URL should open fine in any browser.
Add Excel Export Code
Finally, we can add a button to export the file with the added row. To do this, we can use the client-side ExcelIO code built into Spread.Sheets:
function ExportFile() < var fileName = $("#exportFileName").val(); if (fileName.substr(-5, 5) !== '.xlsx') < fileName += '.xlsx'; >var json = JSON.stringify(workbook.toJSON()); excelIO.save(json, function (blob) < saveAs(blob, fileName); >, function (e) < if (e.errorCode === 1) < alert(e.errorMessage); >>); > That code gets the export file name from an exportFileName input element. We can define it and let users name the file like so:
Then we can add a button that calls this function:
document.getElementById("export").onclick = function () 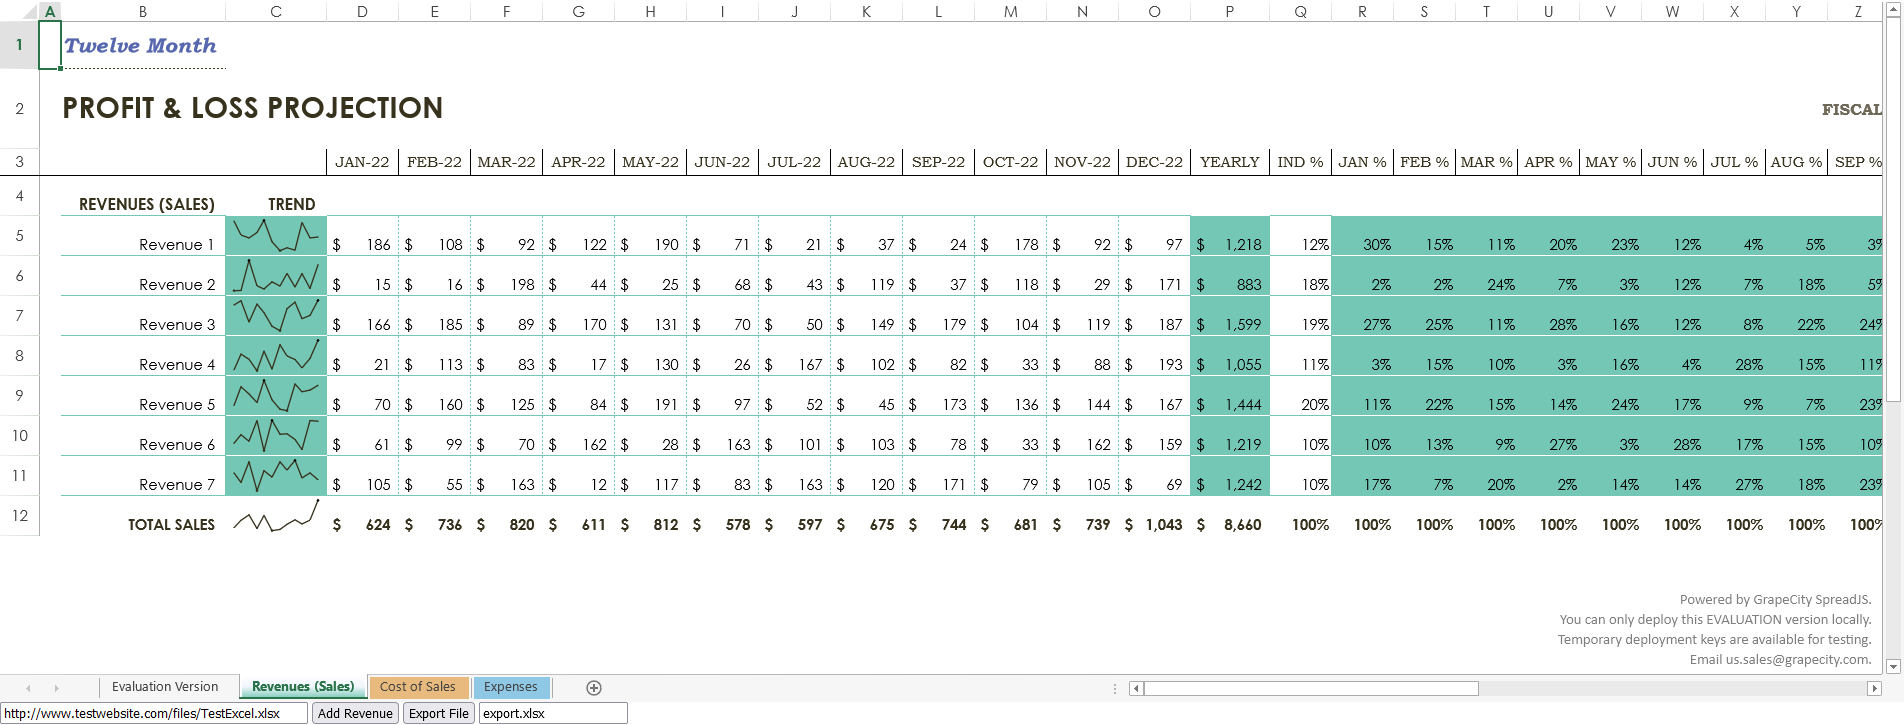
Once you add a revenue row, you can export the file using the Export File button. Make sure to add the FileSaver external library to allow users to save the file where they want:
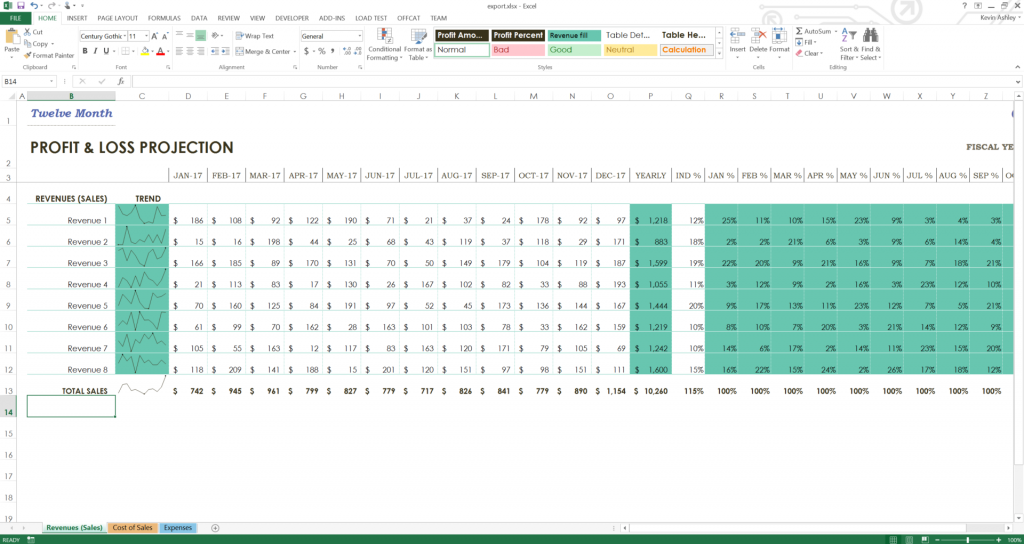
When the file is successfully exported, you can open it in Excel and see that the file looks like it did when it was imported, except there is now an extra revenue line that we added.
This is just one example of how you can use SpreadJS JavaScript spreadsheets to add data to your Excel files and then export them back to Excel with simple JavaScript code.
In another article series, we demonstrate how to import/export Excel spreadsheets in other Javascript frameworks:
Add complete JavaScript spreadsheets into your enterprise web apps. Download SpreadJS Now!