- Login Form in Java Swing With Source Code Tutorial
- Login Form in Java Swing With Source Code | Login Page
- Importing Packages
- Creating a Class LoginFrame.java
- Creating Object of LoginFrame class
- Setting Layout Manager of JFrame
- Adding Components to our JFrame
- Adding Event Handling to JButtons(LOGIN,RESET) and JCheckBox(showPassword)
- actionPerformed() method
- Login Form in Java Swing With Source Code Download
- 13 thoughts on “Login Form in Java Swing With Source Code Tutorial”
- Как начать пользоваться Swing GUI-визардом IntelliJ IDEA. Подробная инструкция
- Создание Swing GUI форм средствами JetBrains IntelliJ IDEA 2016.1
Login Form in Java Swing With Source Code Tutorial
Hello Friends, Today we will learn how to make a simple Login Form in Java Swing With Source Code. A login form or login page is the core functionality of any application. It is usually used to check the authenticity of the user. If the user gives the valid username and password then he/she can log into the system otherwise the system will deny accepting the user’s login request. To create our Gui Login Form or Login Page in Java Swing, we must have good concepts about fundamental components of Java Swing. Below I am providing you all the topics that are required to build our GUI Login Form in Java or we can say as Java code for Login page with Username and Password.
If you are done with the above topics, then we can start our tutorial login form in Java swing with Source Code .
Watch Video Tutorial
Login Form in Java Swing With Source Code | Login Page
Importing Packages
- To create our Login Page using Java, In the very first step, we need to import all the necessary packages for our program so that we will be able to use all the interfaces and classes that we will use in our program.
Creating a Class LoginFrame.java
- In this step, we will create a class (LoginFrame.java) in this example that will both extend the JFrame class and implements the ActionListener interface.
- We are going to implement the ActionListener interface because we will do some click events in our program. ActionListener interface resides in java.awt.event.ActionListener package so, first of all, we have to import this package into our class which we have already done.
- ActionListener contains only one method actionPerformed(ActionEvent e), so if we are implementing the ActionListener interface in any class, then we have to override its method actionPerformed(ActionEvent e) into that class.
- Next, we will create the constructor of the LoginFrame class.
Creating Object of LoginFrame class
- Now we will create another class(Login.java in this example) where our main method will reside.
- Now inside our main method, we will create the object of LoginFrame class and set some of its properties like its title, size and location, default close operation, and its visibility.

- Now save your program compile it and run it.
- You can see that we have created our JFrame. Now we can add components to it.
Setting Layout Manager of JFrame
- Now inside our LoginFrame class, we will get the content pane of the frame using the getContenPane() method.
- getContentPane() returns a Container reference so we will create a reference to the container.
- Now we are going to set the layout manager of the Container.For this, we are going to create a user-defined method setLayoutManager.
- By default, a content pane uses BorderLayout If we do not like the default layout manager that a content pane uses then we are free to change it to a different one.
- To set the layout manager to null, we have to call the setLayout() method using the object of Container and we will pass null as its argument.By doing this, we are setting the Layout manager of Container to null.
Adding Components to our JFrame
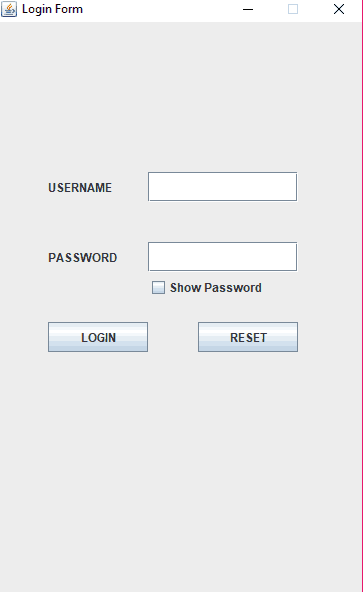
- Since we have already created our JFrame, now, we will design our login page in Java by adding components to it.
- To add components to it, first of all, we have to create the objects of all components.
- We are going to create,
- Two JLabel USERNAME and PASSWORD.
- One JTextField to enter username one JPasswordField to enter the password
- Two JButon LOGIN and RESET.
- One JCheckBox showPassword.

- Now save your program, compile it and run it.
- Now we can see that we have successfully added components to JFrame.
- Now the next thing we have to do is to add functionalities to our JButtons and JCheckBox so that when we click on them, they should perform some actions.
Adding Event Handling to JButtons(LOGIN,RESET) and JCheckBox(showPassword)
- To add event handling to our JButtons and JCheckBox first thing we have to do is to register(add) actionListener to them.
- For this, we will call the addActionListener() method using the object of the desired component.The parameter of the addActionListener() method is the object of that class in which ActionListener interface is implemented and since we are in the same class so we will pass this as the argument of the addActionListener() method.
- By registering the component, the actionPerformed() method will be called whenever we click on any of the registered components.
- Now we will sum up all the things inside a user-defined method addActionEvent().
- The next thing we have to do is to code the desired actions that we want in response whenever we click on the Jbutton or JcheckBox inside actionPerformed() method.
actionPerformed() method
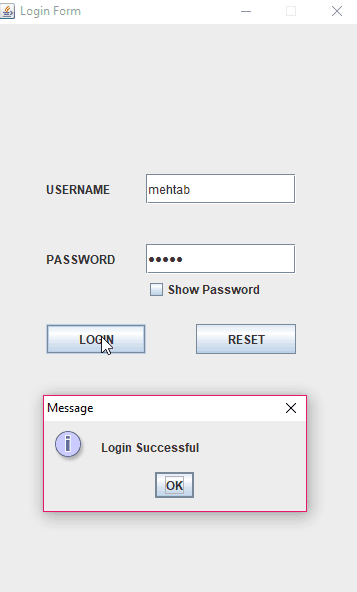
- If we enter username as “mehtab” and password as “12345” and click on the LOGIN button then a message dialog box should appear and display the message “Login Successful” and if we enter different username or password then message dialog box should display the message “Invalid Username or Password”.For message dialog box we will use showMessageDialog() method of JOptionPane class.
- If we click on the RESET button, then all the texts of JTextField and JPasswordField should be cleared.
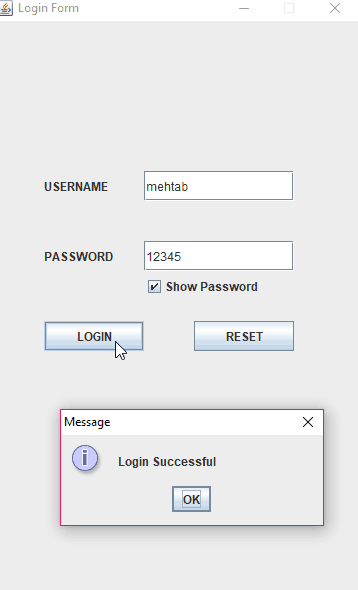
- If we click on the showPassword JCheckBox, then the secret password should be revealed, and if we uncheck the showPassword JCheckBox, then all the texts of the JPasswordField should be masked with “*” characters.
- Now you can save your program, compile it and run it.
- Now let’s provide username as “mehtab” and password as “12345” and see what happens.
- As we can see the message dialog box has displayed the message “Login Successful”.
- Now let’s enter other username or password.
- As we can see message dialog box has displayed the message “Invalid Username or Password”.
- Now let’s check the JCheckBox showPassword and see what happens.
- As we can see the secret password has been revealed.
- You can also check the RESET button and also uncheck the JCheckBox and it will work fine.
Login Form in Java Swing With Source Code Download
- You can also download the source code of this login system in Java.
- The Download Link of the login page code in Java file is given below..
So this was all for Login Form in Java swing with Source Code tutorial. Feel free to ask if you have any queries regarding this tutorial By commenting on this post. Thank You.
- How to Create Multi User Login Form in Java using MySQL Database
- How to Play Mp3 File in Java Tutorial | Simple Steps
- Number Guessing Game in Java Swing with Source Code
- Menu Driven Program in Java Using Switch Case
- Calculator Program in Java Swing/JFrame with Source Code
- Registration Form in Java With Database Connectivity
- How to Create Login Form in Java Swing
- Text to Speech in Java
- How to Create Splash Screen in Java
- Java Button Click Event
- Best Laptops for Java Programming
13 thoughts on “Login Form in Java Swing With Source Code Tutorial”
how about using the username and password from ms access data base from your last tutorial about user registration. how does the coding of such?thanks a lot..
Как начать пользоваться Swing GUI-визардом IntelliJ IDEA. Подробная инструкция
Давно не писал настольных приложений на Java вообще и с использовании Swing в частности. Однако, возникла необходимость немного по GUIть. В качестве инструмента выбрал IntelliJ IDEA Community edition, 2016.1 версии.
Взялся ваять и, естественно, первое, на что налетел — хотя со времён Borland Java Builder 2006 воды утекло немало, экранные интерфейсы создавать проще не стало, скорее наоборот. А одной из причин выбора IDEA было как раз наличие Swing дизайнера «из коробки», однако как им пользоваться с ходу решительно непонятно — форма генерится, класс создаётся, создаются переменные контролов из дизайнера… но и только: при создании нашего класса форма на экране не появляется
Пошарил интернет, информации приблизительно ноль. Народ говорит, мол, «создавай и — вперёд!». Хм…
По результатам небольших мытарств на эту тему решил опубликовать инструкцию, так как мне с учётом былого опыта было искать намного легче, чем новичку, который вообще в первый раз ваяет форму на Swing.
Создание Swing GUI форм средствами JetBrains IntelliJ IDEA 2016.1
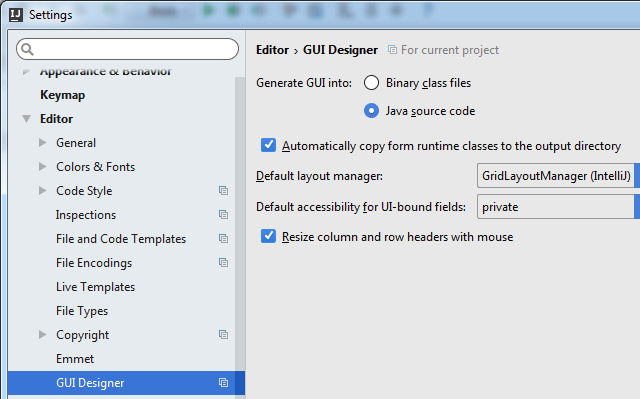
Во-первых, для понимания процесса лучше начать с того. что зайти в меню IDEA «File -> Settings» — там «Editor -> GUI Designer» и установить флажок Generate GUI Into: в Java source code. (это немного поможет пониманию процесса на первом этапе — потом можно будет убрать обратно).
Далее открываем дерево исходного кода своего проекта и кликаем правой кнопкой мыши на любую папку или файл исходного кода java и выбираем «New -> Dialog» — вводим имя класса для формы.
В итоге нам действительно сгенерили класс-наследник JDialog (который можно создать и использовать) и форма к нему.
Запускаем наш проект на выполнение и… оужасчудо! при компиляции IDEA добавляет в конец нашего файла некоторый дополнительный код.< // GUI initializer generated by IntelliJ IDEA GUI Designer // >>> IMPORTANT!! /** * Method generated by IntelliJ IDEA GUI Designer * >>> IMPORTANT!! /** * @noinspection ALL */ public JComponent $$$getRootComponent$$$()
Несложно догадаться, что вся наша Swing-овая форма конфигурируется в автогенерируемом методе $$$setupUI$$$.
Вспомните настройку, которую мы установили в самом начале — «GUI Into: -> Java source code». Если её не ставить, то этот метод просто будет появляться напрямую в _class_ файле, минуя java-файл (декомпилируйте его, если сомневаетесь — я это сделал). Соответственно, можете вернуть настройку «GUI Into:» к первоначальному виду, чтобы этот код (который всё равно редактировать настоятельно не рекомендуют) не мозолил глаза.
Теперь, когда мы поняли, как оно работает, перейдём к созданию прочих форм — необязательно диалогов.
Опять правой кнопкой мыши кликаем на папку или файл исходного кода, выбираем «New -> GUI Form» — вводим имя класса для формы.
Генерится класс и форма к нему. Накидываем на форму несколько контролов. В GUI дизайнере смотрим имя корневого элемента (обычно panel1, если IDEA не задала имя, а такое бывает, задайте принудительно — я для наглядности назвал rootPanel).
Переходим к исходному коду нашего класса.
Итак:
1. Добавляем для нашего класса наследование «extends JFrame»;
2. Добавляем конструктор класса со строками:setContentPane(panel1); setVisible(true);public class GUIFrame extends JFrame < private JButton button1; private JPanel rootPanel; public GUIFrame() < setContentPane(rootPanel); setVisible(true); setDefaultCloseOperation(WindowConstants.EXIT_ON_CLOSE); >public static void main(String[] args) < new GUIFrame(); >>Всё. Форма готова к употреблению. Остальное смотрите в многочисленных инструкциях по Swing.
P.S. Как вариант, можно не наследовать наш класс от JFrame, а создать конструктор вида:
JFrame frame = new JFrame(); frame.setContentPane(panel1); frame.setVisible(true);