- Lesson: Laying Out Components Within a Container
- A Visual Guide to Layout Managers
- Using Layout Managers
- How Layout Management Works
- How to Use .
- Creating a Custom Layout Manager
- Doing Without a Layout Manager (Absolute Positioning)
- Solving Common Layout Problems
- Questions and Exercises
- Creating a Custom Layout Manager
- Example of a Custom Layout
- A Visual Guide to Layout Managers
- BorderLayout
- BoxLayout
- CardLayout
- FlowLayout
- GridBagLayout
- GridLayout
- GroupLayout
- SpringLayout
Lesson: Laying Out Components Within a Container
This lesson tells you how to use the layout managers provided by the Java platform. It also tells you how to use absolute positioning (no layout manager) and gives an example of writing a custom layout manager. For each layout manager (or lack thereof), this lesson points to an example that you can run using Java™ Web Start. By resizing an example’s window, you can see how size changes affect the layout.
Note: This lesson covers writing layout code by hand, which can be challenging. If you are not interested in learning all the details of layout management, you might prefer to use the GroupLayout layout manager combined with a builder tool to lay out your GUI. One such builder tool is the NetBeans IDE. Otherwise, if you want to code by hand and do not want to use GroupLayout , then GridBagLayout is recommended as the next most flexible and powerful layout manager.
If you are interested in using JavaFX to create your GUI, see Working With Layouts in JavaFX.
A Visual Guide to Layout Managers
This section shows examples of the standard layout managers and points to the how-to section for each one.
Using Layout Managers
This section gives general rules on using the standard layout managers. It includes how to set the layout manager, add components to a container, provide size and alignment hints, put space between components, and set the orientation of the container’s layout so that it is appropriate for the locale in which the program is running. It also has some tips for choosing the right layout manager.
How Layout Management Works
This section goes through a typical layout sequence and then describes what happens when a component’s size changes.
How to Use .
This series of sections tells you how to use each of the general-purpose layout managers that the Java platform provides.
Creating a Custom Layout Manager
Layout managers must implement the LayoutManager interface, which specifies the five methods every layout manager must define. Optionally, layout managers can implement LayoutManager2 , which is a subinterface of LayoutManager .
Doing Without a Layout Manager (Absolute Positioning)
If necessary, you can position components without using a layout manager. Generally, this solution is used to specify absolute sizes and positions for components.
Solving Common Layout Problems
Some of the most common layout problems involve components that are displayed too small or not at all. This section tells you how to fix these and other common layout problems.
Questions and Exercises
Try these questions and exercises to test what you have learned in this lesson.
If you are interested in using JavaFX to create your GUI, see Working With Layouts in JavaFX.
Creating a Custom Layout Manager
Before you start creating a custom layout manager, make sure that no existing layout manager meets your requirements. In particular, layout managers such as GridBagLayout , SpringLayout , and BoxLayout are flexible enough to work in many cases. You can also find layout managers from other sources, such as from the Internet. Finally, you can simplify layout by grouping components into containers such as panels.
Note: This lesson covers writing layout code by hand, which can be challenging. If you are not interested in learning all the details of layout management, you might prefer to use the GroupLayout layout manager combined with a builder tool to lay out your GUI. One such builder tool is the NetBeans IDE. Otherwise, if you want to code by hand and do not want to use GroupLayout , then GridBagLayout is recommended as the next most flexible and powerful layout manager.
If you are interested in using JavaFX to create your GUI, see Working With Layouts in JavaFX.
To create a custom layout manager, you must create a class that implements the LayoutManager interface. You can either implement it directly, or implement its subinterface, LayoutManager2 .
Every layout manager must implement at least the following five methods, which are required by the LayoutManager interface:
void addLayoutComponent(String, Component) Called by the Container class’s add methods. Layout managers that do not associate strings with their components generally do nothing in this method. void removeLayoutComponent(Component) Called by the Container methods remove and removeAll . Layout managers override this method to clear an internal state they may have associated with the Component . Dimension preferredLayoutSize(Container) Called by the Container class’s getPreferredSize method, which is itself called under a variety of circumstances. This method should calculate and return the ideal size of the container, assuming that the components it contains will be at or above their preferred sizes. This method must take into account the container’s internal borders, which are returned by the getInsets method. Dimension minimumLayoutSize(Container) Called by the Container getMinimumSize method, which is itself called under a variety of circumstances. This method should calculate and return the minimum size of the container, assuming that the components it contains will be at or above their minimum sizes. This method must take into account the container’s internal borders, which are returned by the getInsets method. void layoutContainer(Container) Called to position and size each of the components in the container. A layout manager’s layoutContainer method does not actually draw components. It simply invokes one or more of each component’s setSize , setLocation , and setBounds methods to set the component’s size and position.
This method must take into account the container’s internal borders, which are returned by the getInsets method. If appropriate, it should also take the container’s orientation (returned by the getComponentOrientation method) into account. You cannot assume that the preferredLayoutSize or minimumLayoutSize methods will be called before layoutContainer is called.
Besides implementing the preceding five methods, layout managers generally implement at least one public constructor and the toString method.
If you wish to support component constraints, maximum sizes, or alignment, then your layout manager should implement the LayoutManager2 interface. In fact, for these reasons among many others, nearly all modern layout managers will need to implement LayoutManager2 . That interface adds five methods to those required by LayoutManager :
- addLayoutComponent(Component, Object)
- getLayoutAlignmentX(Container)
- getLayoutAlignmentY(Container)
- invalidateLayout(Container)
- maximumLayoutSize(Container)
Of these methods, the most important are addLayoutComponent(Component, Object) and invalidateLayout(Container) . The addLayoutComponent method is used to add components to the layout, using the specified constraint object. The invalidateLayout method is used to invalidate the layout, so that if the layout manager has cached information, this should be discarded. For more information about LayoutManager2 , see the LayoutManager2 API documentation.
Finally, whenever you create custom layout managers, you should be careful of keeping references to Component instances that are no longer children of the Container . Namely, layout managers should override removeLayoutComponent to clear any cached state related to the Component .
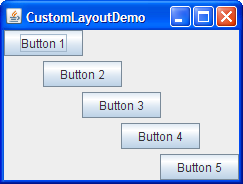
Example of a Custom Layout
The example CustomLayoutDemo uses a custom layout manager called DiagonalLayout . You can find the layout manager’s source code in DiagonalLayout.java . DialogLayout lays out components diagonally, from left to right, with one component per row. Here is a picture of CustomLayoutDemo using DialogLayout to lay out five buttons.
Click the Launch button to run CustomLayoutDemo using Java™ Web Start (download JDK 7 or later). Alternatively, to compile and run the example yourself, consult the example index.
A Visual Guide to Layout Managers
Several AWT and Swing classes provide layout managers for general use:
This section shows example GUIs that use these layout managers, and tells you where to find the how-to page for each layout manager. You can find links for running the examples in the how-to pages and in the example index.
Note: This lesson covers writing layout code by hand, which can be challenging. If you are not interested in learning all the details of layout management, you might prefer to use the GroupLayout layout manager combined with a builder tool to lay out your GUI. One such builder tool is the NetBeans IDE. Otherwise, if you want to code by hand and do not want to use GroupLayout , then GridBagLayout is recommended as the next most flexible and powerful layout manager.
If you are interested in using JavaFX to create your GUI, see Working With Layouts in JavaFX.
BorderLayout
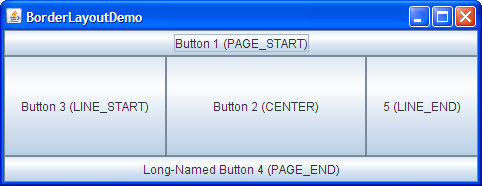
Every content pane is initialized to use a BorderLayout . (As Using Top-Level Containers explains, the content pane is the main container in all frames, applets, and dialogs.) A BorderLayout places components in up to five areas: top, bottom, left, right, and center. All extra space is placed in the center area. Tool bars that are created using JToolBar must be created within a BorderLayout container, if you want to be able to drag and drop the bars away from their starting positions. For further details, see How to Use BorderLayout.
BoxLayout
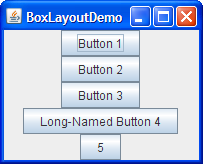
The BoxLayout class puts components in a single row or column. It respects the components’ requested maximum sizes and also lets you align components. For further details, see How to Use BoxLayout.
CardLayout
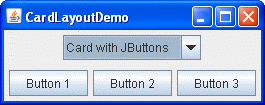
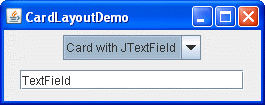
The CardLayout class lets you implement an area that contains different components at different times. A CardLayout is often controlled by a combo box, with the state of the combo box determining which panel (group of components) the CardLayout displays. An alternative to using CardLayout is using a tabbed pane, which provides similar functionality but with a pre-defined GUI. For further details, see How to Use CardLayout.
FlowLayout

FlowLayout is the default layout manager for every JPanel . It simply lays out components in a single row, starting a new row if its container is not sufficiently wide. Both panels in CardLayoutDemo, shown previously, use FlowLayout . For further details, see How to Use FlowLayout.
GridBagLayout
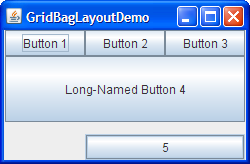
GridBagLayout is a sophisticated, flexible layout manager. It aligns components by placing them within a grid of cells, allowing components to span more than one cell. The rows in the grid can have different heights, and grid columns can have different widths. For further details, see How to Use GridBagLayout.
GridLayout
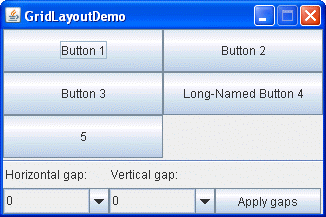
GridLayout simply makes a bunch of components equal in size and displays them in the requested number of rows and columns. For further details, see How to Use GridLayout.
GroupLayout
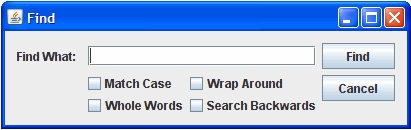
GroupLayout is a layout manager that was developed for use by GUI builder tools, but it can also be used manually. GroupLayout works with the horizontal and vertical layouts separately. The layout is defined for each dimension independently. Consequently, however, each component needs to be defined twice in the layout. The Find window shown above is an example of a GroupLayout . For further details, see How to Use GroupLayout.
SpringLayout

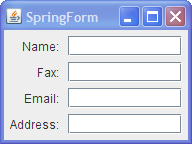
SpringLayout is a flexible layout manager designed for use by GUI builders. It lets you specify precise relationships between the edges of components under its control. For example, you might define that the left edge of one component is a certain distance (which can be dynamically calculated) from the right edge of a second component. SpringLayout lays out the children of its associated container according to a set of constraints, as shall be seen in How to Use SpringLayout.