Setting an Application’s Entry Point
If you have an application bundled in a JAR file, you need some way to indicate which class within the JAR file is your application’s entry point. You provide this information with the Main-Class header in the manifest, which has the general form:
The value classname is the name of the class that is your application’s entry point.
Recall that the entry point is a class having a method with signature public static void main(String[] args) .
After you have set the Main-Class header in the manifest, you then run the JAR file using the following form of the java command:
The main method of the class specified in the Main-Class header is executed.
An Example
We want to execute the main method in the class MyClass in the package MyPackage when we run the JAR file.
We first create a text file named Manifest.txt with the following contents:
Main-Class: MyPackage.MyClass
Warning: The text file must end with a new line or carriage return. The last line will not be parsed properly if it does not end with a new line or carriage return.
We then create a JAR file named MyJar.jar by entering the following command:
jar cfm MyJar.jar Manifest.txt MyPackage/*.class
This creates the JAR file with a manifest with the following contents:
Manifest-Version: 1.0 Created-By: 1.7.0_06 (Oracle Corporation) Main-Class: MyPackage.MyClass
When you run the JAR file with the following command, the main method of MyClass executes:
Setting an Entry Point with the JAR Tool
The ‘e’ flag (for ‘entrypoint’) creates or overrides the manifest’s Main-Class attribute. It can be used while creating or updating a JAR file. Use it to specify the application entry point without editing or creating the manifest file.
For example, this command creates app.jar where the Main-Class attribute value in the manifest is set to MyApp :
jar cfe app.jar MyApp MyApp.class
You can directly invoke this application by running the following command:
If the entrypoint class name is in a package it may use a ‘.’ (dot) character as the delimiter. For example, if Main.class is in a package called foo the entry point can be specified in the following ways:
jar cfe Main.jar foo.Main foo/Main.class
How to run java class file which is in different directory?
In this article, we will learn about how to use other project’s utilities, classes, and members. Before proceeding let’s learn about some keywords.
Classpath is the location from where JVM starts execution of a program. Similar to the classic dynamic loading behavior, when executing Java programs, the Java Virtual Machine finds and loads classes lazily (it loads the bytecode of a class only when the class is first used). The classpath tells Java where to look in the filesystem for files defining these classes. Variables and methods which are accessible and available at classpath are known as classpath variables. By default JVM always access the classpath classes while executing a program. JVM always go into the deep of classpath to search for a class or resource.
The JVM searches for and loads classes in this order:
- bootstrap classes: the classes that are fundamental to the Java Platform (comprising the public classes of the Java Class Library, and the private classes that are necessary for this library to be functional).
- extension classes: packages that are in the extension directory of the JRE or JDK, jre/lib/ext/ user-defined packages and libraries
Using import keyword
import keyword is used in Java to import classes from current project’s classpath. You can import classes from different packages but from same classpath. It is to be remembered that packaging of a class starts from classpath. Suppose you have directory structure as follows:
and your classpath starts from c, then your class should be in package d not in a.b.c.d.
Using classpath -cp option
import keyword can import classes from the current classpath, outside the classpath import can’t be used. Now suppose you already have a project in which you have used some utility classes, which you need in your second project also. Then in this situation import keyword doesn’t work because your first project is at another classpath. In that case, you can use -cp command while compiling and executing your program.
Let’s proceed with the following example. Create a directory structure as shown in the figure below.
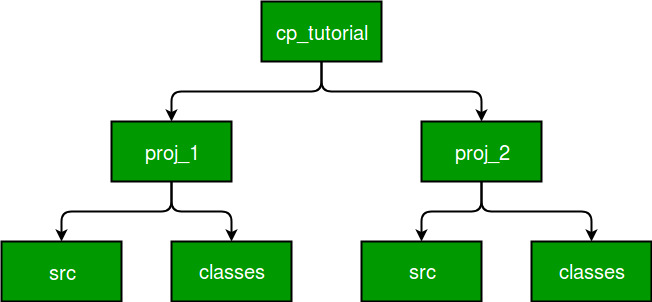
Here you have 2 projects proj1 and proj2. proj1 contains src and classes. In the src directory, we will keep .java files that are source files and in classes directory, we will keep .classes files that are files generated after compiling the project.
Following are the steps to run java class file which is in different directory:
- Step 1 (Create utility class): Create A.java in src directory containing following code.
cp_tutorial/proj1>cd src cp_tutorial/proj1/src>javac -d ../classes A.java
cp_tutorial/proj2>cd src cp_tutorial/proj2/src>javac -d ../classes MainClass.java MainClass.java:4: error: cannot find symbol A a1 = new A(); ^ symbol: class A location: class MainClass MainClass.java:4: error: cannot find symbol A a1 = new A(); ^ symbol: class A location: class MainClass 2 errors
cp_tutorial/proj2>cd src cp_tutorial/proj2/src>javac -d ../classes -cp ../../proj1/classes MainClass.java
cp_tutorial/proj2/src>cd ../classes cp_tutorial/proj2/classes>java MainClass Exception in thread "main" java.lang.NoClassDefFoundError: A at MainClass.main(MainClass.java:4) Caused by: java.lang.ClassNotFoundException: A at java.net.URLClassLoader$1.run(Unknown Source) at java.net.URLClassLoader$1.run(Unknown Source) at java.security.AccessController.doPrivileged(Native Method) at java.net.URLClassLoader.findClass(Unknown Source) at java.lang.ClassLoader.loadClass(Unknown Source) at sun.misc.Launcher$AppClassLoader.loadClass(Unknown Source) at java.lang.ClassLoader.loadClass(Unknown Source) . 1 more
cp_tutorial/proj2/classes>java -cp ../../proj1/classes; MainClass In main class Test() method of class A
How to run a java class with a jar in the classpath?
You can also use jar file instead of class files from different classpath. The process will be same, you just have to replace classes folder with jar folder and class name with jar name.
Suppose you have jar file in the lib directory, then to compile you can use
cp_tutorial/proj2/src>javac -d ../classes -cp ../../proj1/lib MainClass.java
cp_tutorial/proj2/classes>java -cp ../../proj1/lib; MainClass
This article is contributed by Vishal Garg. If you like GeeksforGeeks and would like to contribute, you can also write an article using contribute.geeksforgeeks.org or mail your article to contribute@geeksforgeeks.org. See your article appearing on the GeeksforGeeks main page and help other Geeks.
Please write comments if you find anything incorrect, or you want to share more information about the topic discussed above.
Как скомпилировать исходники java вручную
В современной разработке многие рутинные процессы автоматизированы достаточно хорошо, поэтому вам не приходится каждый раз компилировать ваши исходники вручную. Я не сомневаюсь, что вы прекрасно знаете, как это делается. А для тех, кто забыл или решил освежить свои знания, рассмотрим небольшой пример.
Наш проект будет состоять всего из двух классов, причём один будет вызывать метод другого.
Класс Other, единственный метод которого выводит строку текста на экран:
public class Other public String getMessage() return «Привет, мир!» ;
>
>
Сохраним этот текст как есть в файл, имя которого обязательно должно совпадать с именем класса, т.е. Other.java.
Класс Main:
class Main public static void main(String. args) Other other = new Other();
System.out.println(other.getMessage());
>
>
Поскольку здесь есть статичный метод main(), то этот класс может использовать как точка начала работы нашего приложения (так называемый «Main-Class»). Внутри мы создаём экземпляр класса Other, вызываем его единственный метод и выводим результат на экран.
Сохраним исходники этого класса в файле Main.java.
Теперь мы готовы к тому, чтобы скомпилировать написанный нами код. Для этого используется утилита javac, которая поставляется вместе с jdk. Выполним эту команду в той папке, где лежат оба наших файла:
Опция -d указывает, какие именно файлы мы хотим скомпилировать. В результате в нашей папке помимо исходников появится иерархическая структура папок и файлов:
class-файлы – это бинарные файлы с байт-кодом, которые может обрабатывать виртуальная машина Java. Обратите внимание, что каждый класс компилируется в свой собственный файл. Таким образом достигается модульность нашего приложения. Более того, скомпилированный класс будет работать в любой операционной системе на любой java-машине.
Но когда мы говорим о приложении, то ожидаем увидеть один файл, а не кучу папок. Давайте упакуем наши class-файлы в jar-архив. В этом нам поможет одноимённая утилита.
Опция c говорит, что нужно создать новый архив, f задаёт имя будущего архива, а e указывает полное имя main-класса. В конце указываем папку, в которой лежает все class-файлы.
В результате вы получите файл lesson1.jar, который готов к запуску:
В результате на экране вы увидите приветствие, которые генерирует наш класс Other.
Примечательно, что jar-архив – это обычный zip-архив определённой структуры. Открыв его любым архиватором вы увидите наши class-файлы в иерархии пакетов, а также папку META-INF с файлом MANIFEST.MF. Этот файл содержит вспомогательную информацию об архиве.
У меня этот файл манифеста выглядит так, но у вас может отличаться:
Здесь указано, в какой версии java был создан архив, а также указан Main-Class. Как видите, ничего сложного.
Только что мы рассмотрели процесс компиляции простого проекта. Надеюсь, теперь вы понимаете, сколько рутинных действий за вас выполняет ваша среда разработки.