- Главный класс приложения Java и работа с ним
- Lesson: A Closer Look at the «Hello World!» Application
- Source Code Comments
- The HelloWorldApp Class Definition
- The main Method
- Java main class это
- Reasons to Create a Separate Class for the Main Method in Java
- What Does the Main Method Do?
- Separate Class or Not?
- Elements of the Main Method
Главный класс приложения Java и работа с ним
Программирование на Java тесно связано с понятием, так называемого, главного класса. В чём его особенность, и какую роль этот класс играет в создании и работе приложения.
Главный класс приложения – это класс, метод main которого используется в качестве точки входа в программу.
В приложении на языке Java любой класс может содержать в себе метод main. Но при его сборке и последующем запуске используется только метод main главного класса. Методы main остальных классов игнорируются.
При отсутствии главного класса сборка и, тем более, работа приложения не возможны.
Современные среды программирования (IDE) для Java, как правило, создают главный класс автоматически. Если такой возможности нет или автоматически созданный класс по каким-либо причинам не устраивает разработчика в качестве главного, необходимо самостоятельно создать другой класс, реализовать в нём метод main и задать этот класс в качестве главного.
Последнее можно сделать либо в манифесте приложения (файл manifest.mf) добавив в него следующую строку.
Главный класс задаётся обязательно с указанием полного имени пакета.
Либо в графическом интерфейсе IDE. Ниже показан пример для NetBeans.
Однажды созданный главный класс вовсе не обязательно должен оставаться таковым. В случае необходимости вполне можно создать новый. Процесс его создания и указания в качестве главного ничем не отличается от описанного выше.
Приведём простейший пример. Приложение имеет графический интерфейс на основе библиотеки swing. IDE создают в качестве главного обычный не визуальный класс. Поэтому при наличии в программе графического интерфейса в методе main необходимо прописывать код его инициализации и вывода на экран.
Если же использовать в качестве главного класс myJFrameForm, то вся инициализация сводится фактически к следующему:
Это всего лишь частный случай того, как можно оптимизировать приложение просто с помощью умелого манипулирования с главными классами. Однако, чтобы вместо улучшения не получить худшее чем было изначально при работе с ними стоит придерживаться некоторых простых рекомендаций.
1.Не перегружайте главный класс
Если приложение достаточно сложное, используйте декомпозицию. Выделяйте сложные алгоритмы в отдельные классы.
В идеале, если речь не идёт о простейших программах (неважно консольных или с графическим интерфейсом), это должен быть всё-таки отдельный не визуальный класс, который содержит только один единственный метод main с инициализацией только основных компонентов программы.
2.Давайте главному классу понятное имя
Лучше всего назвать главный класс на основе названия самого приложения или MainClass.
3.Старайтесь проектировать приложение таким образом, чтобы свести к минимуму все возможные манипуляции с главным классом, а ещё лучше полностью их избежать
Главный класс по своей сути это фундамент Вашего приложения. Старайтесь делать так, чтобы все детальные алгоритмы его работы можно было изменять независимо от него.
Важно отметить, что серьёзная работа над главным классом приложения в реальных проектах явление достаточно редкое, так как это традиционно относят, скорее, к «тонкостям» языка и архитектуры. Но, зачастую именно вследствие игнорирования таких «тонкостей» и возникают многие «непонятные» и трудно локализуемые проблемы.
Lesson: A Closer Look at the «Hello World!» Application
Now that you’ve seen the «Hello World!» application (and perhaps even compiled and run it), you might be wondering how it works. Here again is its code:
The «Hello World!» application consists of three primary components: source code comments, the HelloWorldApp class definition, and the main method. The following explanation will provide you with a basic understanding of the code, but the deeper implications will only become apparent after you’ve finished reading the rest of the tutorial.
Source Code Comments
/** * The HelloWorldApp class implements an application that * simply prints "Hello World!" to standard output. */ class HelloWorldApp < public static void main(String[] args) < System.out.println("Hello World!"); // Display the string. > > Comments are ignored by the compiler but are useful to other programmers. The Java programming language supports three kinds of comments:
/* text */ The compiler ignores everything from /* to */ . /** documentation */ This indicates a documentation comment (doc comment, for short). The compiler ignores this kind of comment, just like it ignores comments that use /* and */ . The javadoc tool uses doc comments when preparing automatically generated documentation. For more information on javadoc , see the Javadoc™ tool documentation . // text The compiler ignores everything from // to the end of the line.
The HelloWorldApp Class Definition
/** * The HelloWorldApp class implements an application that * simply displays "Hello World!" to the standard output. */ class HelloWorldApp public static void main(String[] args) < System.out.println("Hello World!"); // Display the string. >> As shown above, the most basic form of a class definition is:
The keyword class begins the class definition for a class named name , and the code for each class appears between the opening and closing curly braces marked in bold above. Chapter 2 provides an overview of classes in general, and Chapter 4 discusses classes in detail. For now it is enough to know that every application begins with a class definition.
The main Method
/** * The HelloWorldApp class implements an application that * simply displays "Hello World!" to the standard output. */ class HelloWorldApp < public static void main(String[] args) System.out.println("Hello World!"); //Display the string. > > In the Java programming language, every application must contain a main method whose signature is:
public static void main(String[] args)
The modifiers public and static can be written in either order ( public static or static public ), but the convention is to use public static as shown above. You can name the argument anything you want, but most programmers choose «args» or «argv».
The main method is similar to the main function in C and C++; it’s the entry point for your application and will subsequently invoke all the other methods required by your program.
The main method accepts a single argument: an array of elements of type String .
public static void main(String[] args)
This array is the mechanism through which the runtime system passes information to your application. For example:
Each string in the array is called a command-line argument. Command-line arguments let users affect the operation of the application without recompiling it. For example, a sorting program might allow the user to specify that the data be sorted in descending order with this command-line argument:
The «Hello World!» application ignores its command-line arguments, but you should be aware of the fact that such arguments do exist.
System.out.println("Hello World!"); uses the System class from the core library to print the «Hello World!» message to standard output. Portions of this library (also known as the «Application Programming Interface», or «API») will be discussed throughout the remainder of the tutorial.
Java main class это
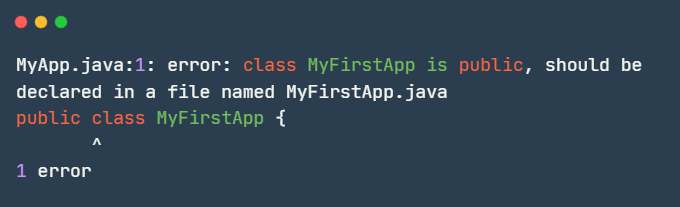
Она означает, что в строке 1 файла MyApp.java объявляется публичный класс с именем MyFirstApp, а значит и находиться он должен в файле с таким же именем.
2) Теперь нарушим еще одно правило, написав имя класса и файла с маленькой буквы, назвав их myFirstApp. Запустив программу, видим, что отобразилось сообщение Write once, run anywhere.
Можно сделать вывод, что писать имя файла и класса с большой буквы является лишь договоренностью всех программистов друг с другом. Это сделано для того, чтобы в коде не путать имена переменных (начинаются с маленькой буквы. О них мы поговорим в другой статье) с именами классов.
3) Попробуем изменить имя метода main, например, на Main. Запустив программу, увидим следующую ошибку:
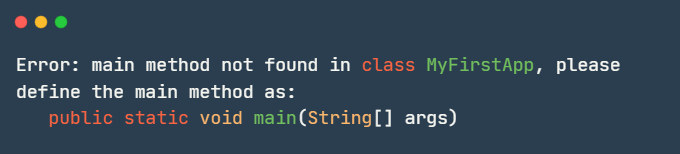
JVM не смогла запустить программу т. к. не нашла метод main (с маленькой буквы). О чем и свидетельствует ошибка Error: main method not found.
4) Вернем методу его первоначальное имя, но удалим слова public static и снова запустим. Возникнет та же самая ошибка, что и в предыдущем пункте, связанная с тем, что при запуске программы не был найден метод main, записанный по всем правилам.
Самостоятельно попробуйте удалять разные части программы и смотреть, какие при этом будут возникать ошибки.
Reasons to Create a Separate Class for the Main Method in Java
:max_bytes(150000):strip_icc()/close-up-of-javascript-on-computer-monitor-660582997-59976780519de2001168fb5e.jpg)
Paul Leahy is a computer programmer with over a decade of experience working in the IT industry, as both an in-house and vendor-based developer.
All Java programs must have an entry point, which is always the main() method. Whenever the program is called, it automatically executes the main() method first.
The main() method can appear in any class that is part of an application, but if the application is a complex containing multiple files, it is common to create a separate class just for main(). The main class can have any name, although typically it will just be called «Main».
What Does the Main Method Do?
The main() method is the key to making a Java program executable. Here is the basic syntax for a main() method:
public class MyMainClass public static void main(String[] args) // do something here.
>
>
Note that the main() method is defined within curly braces and is declared with three keywords: public, static and void :
- public: This method is public and therefore available to anyone.
- static: This method can be run without having to create an instance of the class MyClass.
- void: This method does not return anything.
- (String[] args): This method takes a String argument. Note that the argument args can be anything — it’s common to use «args» but we could instead call it «stringArray».
Now let’s add some code to the main() method so that it does something:
public class MyMainClass public static void main(String[] args) System.out.println("Hello World!");
>
>
This is the traditional «Hello World!» program, as simple as it gets. This main() method simply prints the words «Hello World!» In a real program, however, the main() method just starts the action and does not actually perform it.
Generally, the main() method parses any command line arguments, does some setup or checking, and then initializes one or more objects that continue the work of the program.
Separate Class or Not?
As the entry point into a program, the main() method has an important place, but programmers do not all agree on what it should contain and to what degree it should be integrated with other functionality.
Some argue that the main() method should appear where it intuitively belongs — somewhere at the top of your program. For example, this design incorporates main() directly into the class that creates a server:
However, some programmers point out that putting the main() method into its own class can help make the Java components you are creating reusable. For example, the design below creates a separate class for the main() method, thus allowing the class ServerFoo to be called by other programs or methods:
Elements of the Main Method
Wherever you place the main() method, it should contain certain elements since it is the entry point to your program. These might include a check for any preconditions for running your program.
For example, if your program interacts with a database, the main() method might be the logical place to test basic database connectivity before moving on to other functionality.
Or if authentication is required, you would probably put the login information in main().
Ultimately, the design and location of main() are completely subjective. Practice and experience will help you determine where best to put main(), depending on the requirements of your program.