- 3 ways to install Java on macOS [2023]
- Download from java.com
- Download java distribution
- Verify the file’s sha256 hash
- Extract the JDK to your system folder
- Run java
- Install java with brew
- Install brew
- Install java with brew
- Symbolic link java install to system folder
- Install java with SDKMAN!
- Install SDKMAN!
- Install java with SDKMAN!
- MacOS JAVA_HOME location (for Java JDK/SDK)
- macOS JDK location
- JRE location
- Older Mac OS X systems
- Find the JDK location with XCode
3 ways to install Java on macOS [2023]
Java is no longer preinstalled on macOS and even if it is, there are likely security patches or new capabilities you need for software to work properly. And if you are a developer, you will most likely need to install and manage multiple versions of Java (as well as other development runtimes).
This article will show you 3 different ways you can install Java on a macOS computer. A future article will walk through techniques to manage which Java JDK you are using. You can skip to the specific technique your interested in:
Download from java.com
The first approach is probably the most common path and the one suggested by default from macOS. When you first try to run java -version from the command line, you’ll get the following:
The operation couldn’t be completed. Unable to locate a Java Runtime. Please visit http://www.java.com for information on installing Java. Download java distribution
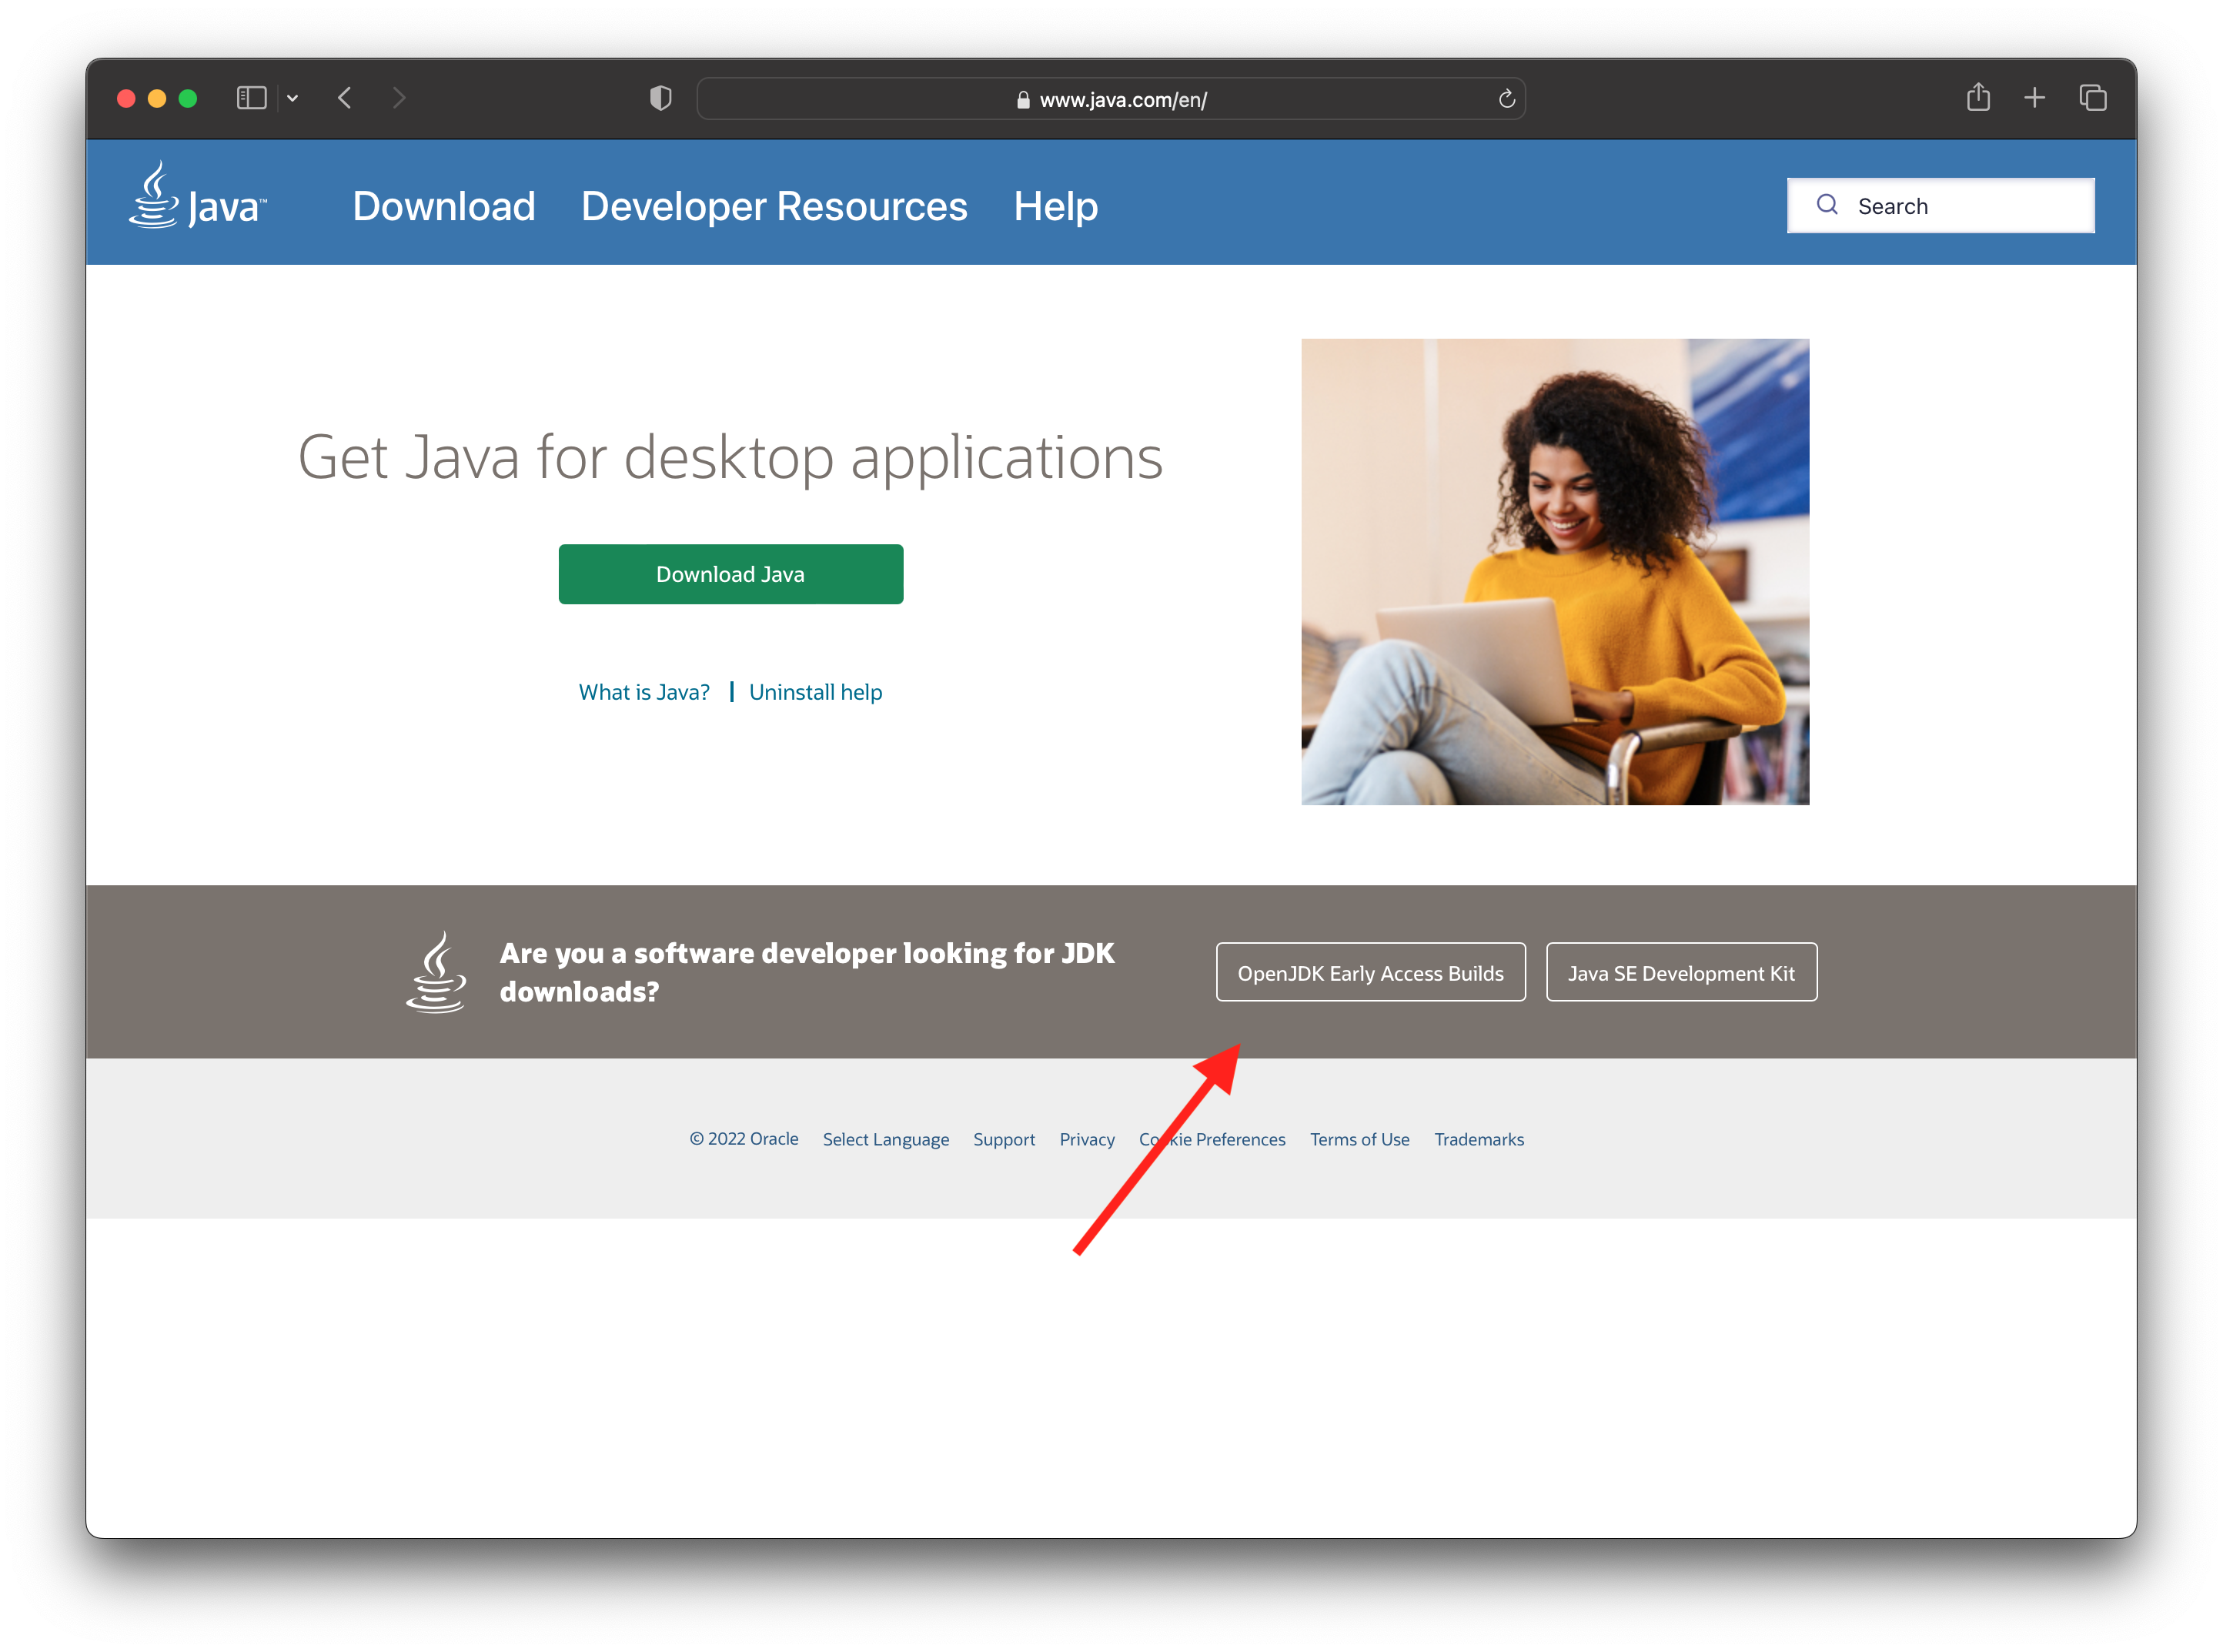
So generally folks will go to java.com and be presented with the following website which by default is focused on installing a Java runtime for users, not the Java Development Kit developers need: So don’t click the green Download Java button! 🙂 Instead, click on the OpenJDK Early Access Builds which will then let you select which JDK you want to install. For the demo, we’ll just go with the latest version (OpenJDK 19 as of Nov 2022) and you’ll be taken to a page with links to platform specific downloads.
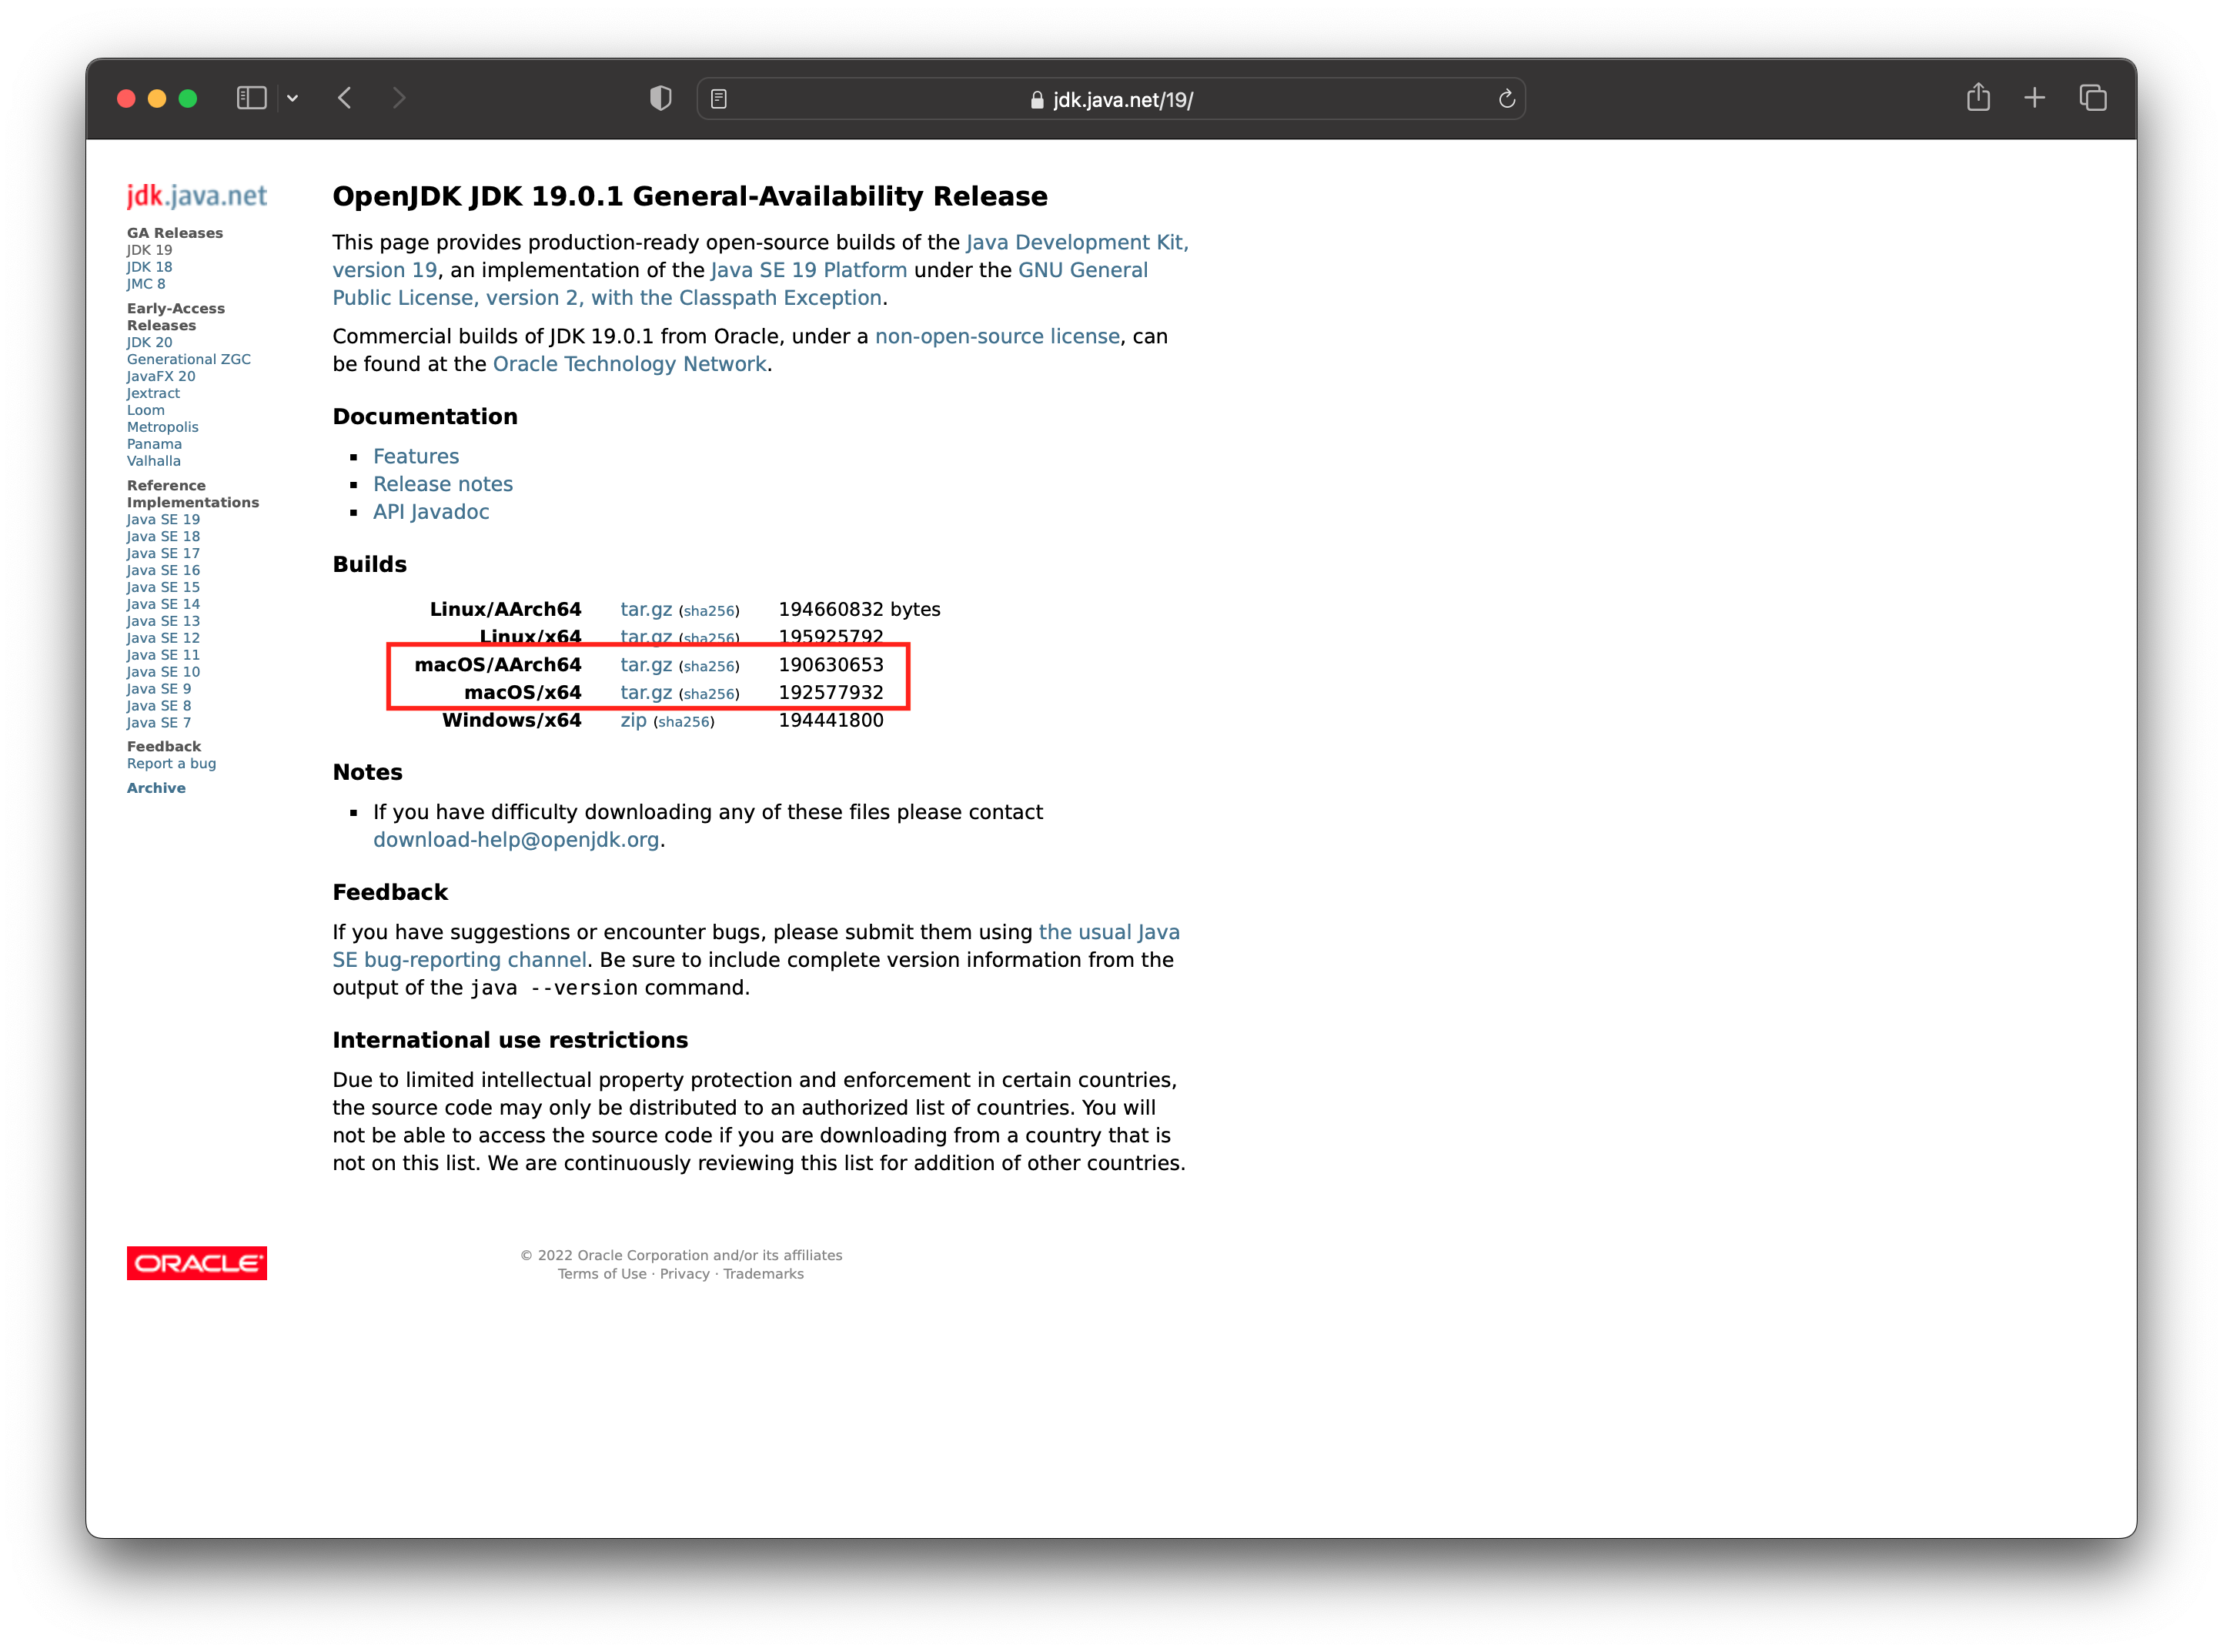
Since Apple moved using their own ARM chips (“Apple Silicon”) starting with the M1 series, you’ll have to choose between “macOS / AArch64” (Apple M1 and above) and “macOS / x64” (older Intel chips).
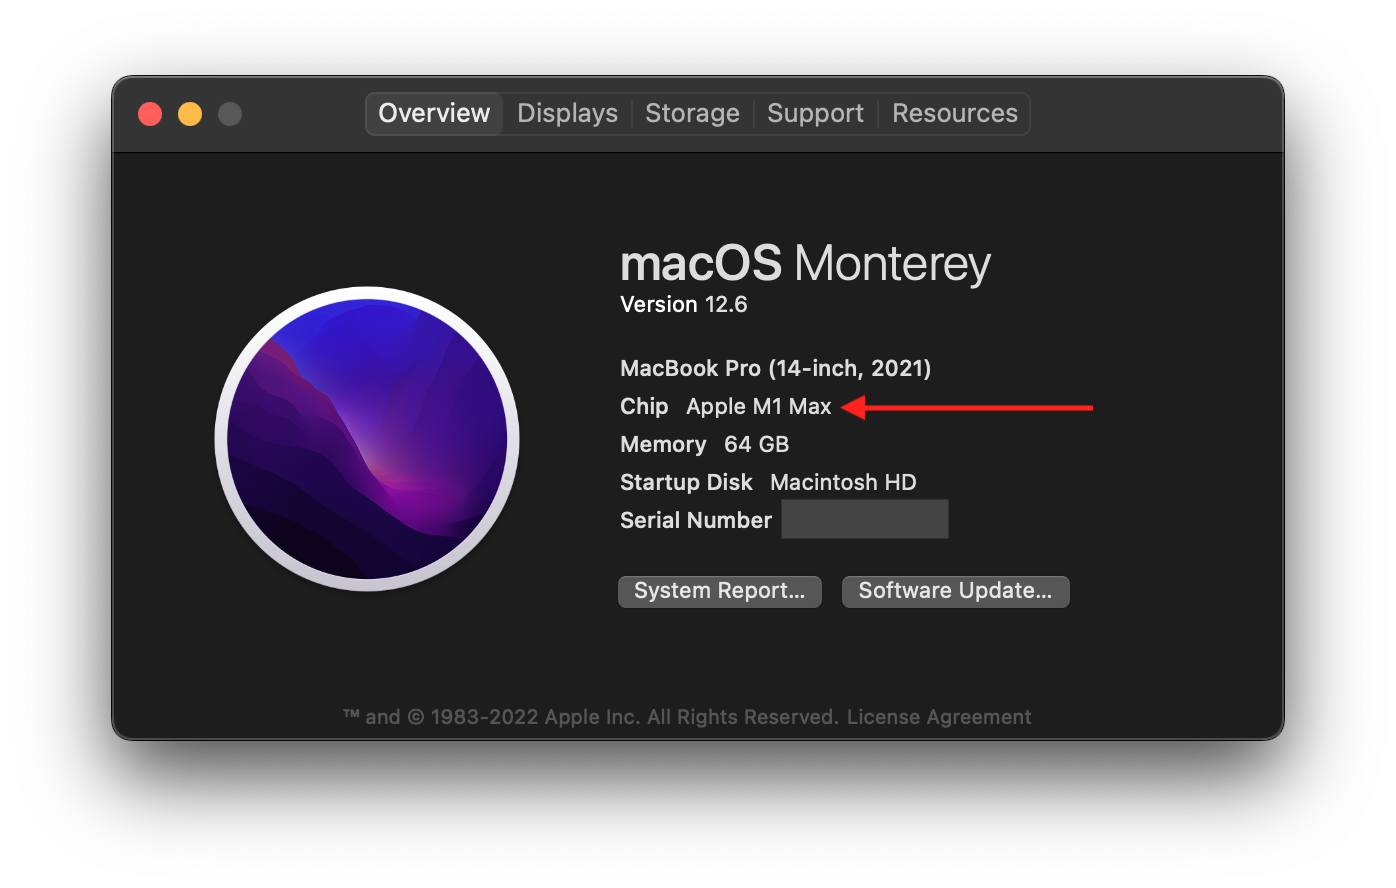
To determine this, choose the Apple menu -> About this Mac and then look at the Chip section: You can also check out the Apple Support article “Mac computers with Apple silicon” for additional details. Since I’m on an Apple M1, I’ll go ahead and download the macOS/AArch64 file.
Most folks will just click the link and this works however by default Safari will uncompress the file after download which will make it difficult to verify the sha256 hash . So you can either disable this Safari feature but going into Settings -> General and unselect the “Open “safe” files after downloading” or just copy the download link (right click on the tar.gz link and click “Copy Link”) and then use curl at the command line (my preference!):
$ cd ~/Downloads $ curl -OL https://download.java.net/java/GA/jdk19.0.1/afdd2e245b014143b62ccb916125e3ce/10/GPL/openjdk-19.0.1_macos-x64_bin.tar.gz Verify the file’s sha256 hash
Since this is a security blog, we we have to check the sha256 hash to make sure we downloaded an official, unchanged JDK. To do this, we use a hash function (sha256) which will generate a deterministic (or consistent) signature for a given input. So if the file was changed in any way, the sha256 hash signatures will not match. If that happens, do not use the downloaded file!
You can easily calculate the hash of a file from the command line:
$ shasum -a 256 openjdk-19.0.1_macos-x64_bin.tar.gz which should provide the following:
915054b18fc17216410cea7aba2321c55b82bd414e1ef3c7e1bafc7beb6856c8 Then compare that to the sha256 link next to your specific file download (e.g. this is the sha256 for my AArch64 download) on the OpenJDK website. Provided those match, we can proceed.
Extract the JDK to your system folder
Next we’ll extract the JDK to the default folder on macOS for storing Java Virtual Machines, /Library/Java/JavaVirtualMachines . Because this is a system folder, we’ll need to elevate to system privileges with sudo :
$ sudo tar xzf openjdk-19.0.1_macos-x64_bin.tar.gz -C /Library/Java/JavaVirtualMachines The above command will extract ( x ) a gzip compressed ( z ) file ( f ) and change directory the command executes the extract in ( -C ). After you type in your password, the extraction will take a moment and then you’ll be back at the command prompt.
Run java
Since we extracted the JDK to the system folder, we’re ready to test it out. You can run this command to make sure everything is working and return the version of Java installed:
and now you’ll see the following version details:
openjdk version "19.0.1" 2022-10-18 OpenJDK Runtime Environment (build 19.0.1+10-21) OpenJDK 64-Bit Server VM (build 19.0.1+10-21, mixed mode, sharing) Install java with brew
The second and frankly my recommended approach is installing java via Homebrew (more commonly just referred to as brew ) which positions itself as:
The Missing Package Manager for macOS (or Linux)
This is my recommendation because brew is so versatile at installing nearly any software you would need on a macOS computer. So once you have it setup, you can take care of far more than just development dependencies.
Install brew
Installing brew is quite simple:
$ /bin/bash -c "$(curl -fsSL https://raw.githubusercontent.com/Homebrew/install/HEAD/install.sh)" which will require system privileges ( sudo ) and will also install XCode Command Line Tools (super helpful down the road anyway):
==> Checking for `sudo` access (which may request your password). Password: ==> This script will install: /opt/homebrew/bin/brew /opt/homebrew/share/doc/homebrew /opt/homebrew/share/man/man1/brew.1 /opt/homebrew/share/zsh/site-functions/_brew /opt/homebrew/etc/bash_completion.d/brew /opt/homebrew ==>The Xcode Command Line Tools will be installed. 
You might get a dialogue box like the following: After the install is complete, brew will let you know any additional steps you need to take. For example:
==> Next steps: - Run these three commands in your terminal to add Homebrew to your PATH: echo '# Set PATH, MANPATH, etc., for Homebrew.' >> /Users/hiro/.zprofile echo 'eval "$(/opt/homebrew/bin/brew shellenv)"' >> /Users/hiro/.zprofile eval "$(/opt/homebrew/bin/brew shellenv)" - Run brew help to get started - Further documentation: https://docs.brew.sh The first commands initialize your shell environment and then you do a one-time setup of your current shell (you could also restart your terminal to execute .zprofile ).
Install java with brew
From there, you can install java with this one command:
By default, brew will check to see if it needs any updates and auto-update. After that, it will identify the current version of java (OpenJDK) and install it. Like before, it will pass along any necessary info post install:
==> openjdk For the system Java wrappers to find this JDK, symlink it with sudo ln -sfn /opt/homebrew/opt/openjdk/libexec/openjdk.jdk /Library/Java/JavaVirtualMachines/openjdk.jdk openjdk is keg-only, which means it was not symlinked into /opt/homebrew, because macOS provides similar software and installing this software in parallel can cause all kinds of trouble. If you need to have openjdk first in your PATH, run: echo 'export PATH="/opt/homebrew/opt/openjdk/bin:$PATH"' >> ~/.zshrc For compilers to find openjdk you may need to set: export CPPFLAGS="-I/opt/homebrew/opt/openjdk/include" In this case, we can take what we learned from the manual install directions above and understand that brew installed java in a non-system folder ( /opt/homebrew/opt/openjdk/libexec/openjdk.jdk ) and as such, macOS won’t automatically know of its existence. By creating a symbolic link from the install directory to the system directory for JVMs, macOS will automatically find java without the need to add it explicitly to your path.
Symbolic link java install to system folder
Here’s the results after the symbolic link and then running java:
$ sudo ln -sfn /opt/homebrew/opt/openjdk/libexec/openjdk.jdk /Library/Java/JavaVirtualMachines/openjdk.jdk $ java -version openjdk version "19.0.1" 2022-10-18 OpenJDK Runtime Environment Homebrew (build 19.0.1) OpenJDK 64-Bit Server VM Homebrew (build 19.0.1, mixed mode, sharing) Install java with SDKMAN!
For the last option, we’ll try SDKMAN! which is a tool I’ve not used to date (side note: I hate having to capitalized and use an exclamation point every time I reference to tool!). Unlike brew’s broad approach, SDKMAN! is tightly focused on installing and managing SDKs:
SDKMAN! is a tool for managing parallel versions of multiple Software Development Kits on most Unix based systems. It provides a convenient Command Line Interface (CLI) and API for installing, switching, removing and listing Candidates. Formerly known as GVM the Groovy enVironment Manager, it was inspired by the very useful RVM and rbenv tools, used at large by the Ruby community.
Install SDKMAN!
Installing SDKMAN! is actually quite simple:
$ curl -s "https://get.sdkman.io" | bash It will automatically update your login scripts so that future sessions will have SDKMAN! in your path. So you can either start a new terminal session or source the init script directly and then we’ll make sure the tool in installed by checking its version:
$ source "$HOME/.sdkman/bin/sdkman-init.sh" $ sdk version which should give you the current version:
From there, you can list the available Java SDK versions with the following:
which will return a large list inside less :
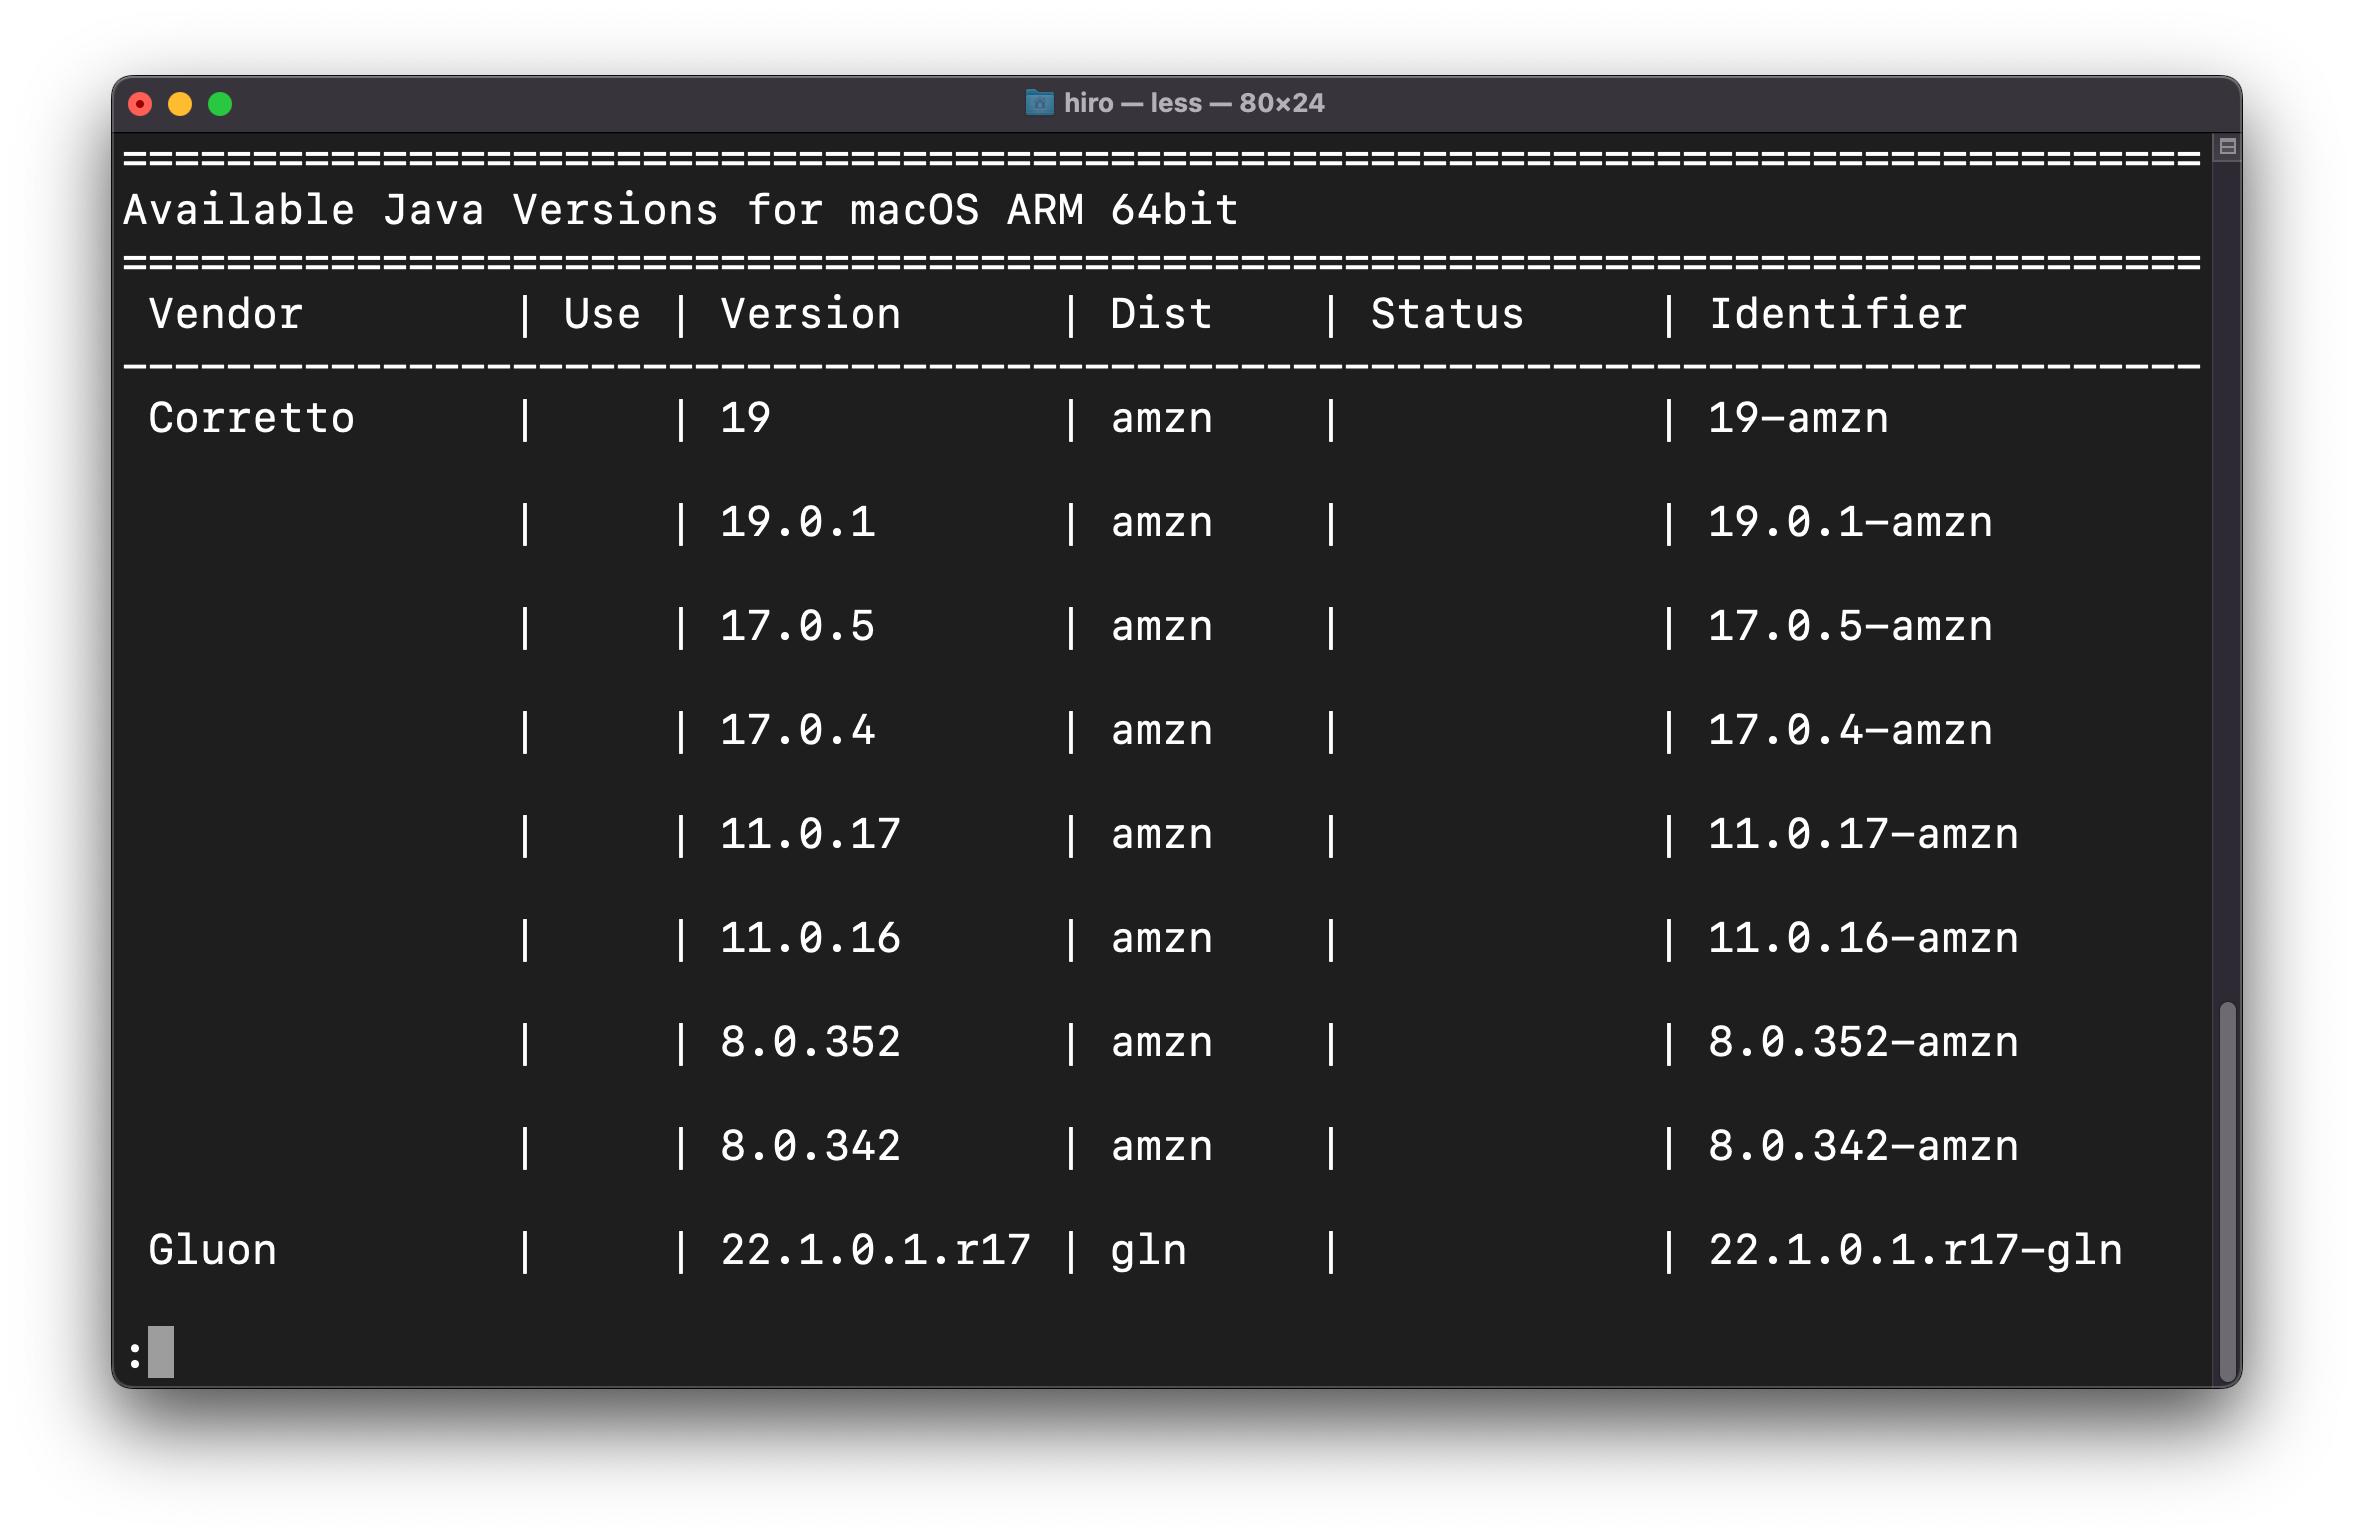
You can scroll through the list with all the standard less commands like spacebar for page down or q for quit. At the end of the list, there are several hints on how to install:
================================================================================ Omit Identifier to install default version 17.0.5-tem: $ sdk install java Use TAB completion to discover available versions $ sdk install java [TAB] Or install a specific version by Identifier: $ sdk install java 17.0.5-tem ================================================================================ Install java with SDKMAN!
So let’s just try out the default java installed with:
which will provide status as the install progresses:
Downloading: java 17.0.5-tem In progress. ######################################################################### 100.0% Repackaging Java 17.0.5-tem. Done repackaging. Cleaning up residual files. Installing: java 17.0.5-tem Done installing! Setting java 17.0.5-tem as default. Note: if you wanted to install OpenJDK 19 like the other tools, you would have simply used: sdk install java 19-open .
And for completeness, let’s check to see what version of java is installed:
openjdk version "17.0.5" 2022-10-18 OpenJDK Runtime Environment Temurin-17.0.5+8 (build 17.0.5+8) OpenJDK 64-Bit Server VM Temurin-17.0.5+8 (build 17.0.5+8, mixed mode) and you can see where the java executable is located with this command:
which will return something along the lines of:
/Users/hiro/.sdkman/candidates/java/current/bin/java You can also use which to see where SDKMAN! man installs various SDKs it manages.
I like to tinker in mobile forensics, security, privacy, tools development and nodejs. I’m an author, inventor, expert witness and co-founder of NowSecure.
MacOS JAVA_HOME location (for Java JDK/SDK)
Java/Mac FAQ: Where is JAVA_HOME located on Mac OS X (macOS) systems?
macOS JDK location
This has changed over time, but if you’re using Mac OS X 10.9 or newer (now macOS), your JDK/SDK JAVA_HOME location for Java 8 will be something like this:
/Library/Java/JavaVirtualMachines/jdk1.8.0_181.jdk/Contents/Home
For Java 7 it was also in the same area:
/Library/Java/JavaVirtualMachines/jdk1.7.0_51.jdk/Contents/Home/
Of course that will vary by the JDK version you have installed.
JRE location
If you’ve installed the Oracle JRE (as opposed to the JDK), JAVA_HOME for it appears to be located here instead:
/Library/Internet Plug-Ins/JavaAppletPlugin.plugin/Contents/Home
This is confirmed by this Oracle Java/JRE documentation page, which shows that you can demonstrate this by running this command in the Mac Terminal:
/Library/Internet\ Plug-Ins/JavaAppletPlugin.plugin/Contents/Home/bin/java -version
Older Mac OS X systems
I have no way of verifying this any more, but on Mac OS X 10.5, 10.6, and 10.7, I’m pretty sure this is where the JDK JAVA_HOME was located:
Find the JDK location with XCode
If you have XCode installed you can now find the JAVA_HOME directory with this command:
$ /usr/libexec/java_home /Library/Java/JavaVirtualMachines/jdk1.7.0_51.jdk/Contents/Home/
You might also be able to find some of these settings in the Mac OS X Control Panel, but I looked just now, and did not see them (though you can see Java’s «temporary internet files» from that console).
In summary, if you are trying to figure out where JAVA_HOME is on your Mac OS X system, I hope this has been helpful.