- 64-bit java not working
- Unable To Install Java – How To Resolve ?
- Why Am I Unable To Install Java?
- Fix Java Update Failed Issue
- Solution 1: Restart PC
- Solution 2: Disable Firewall
- Solution 3: Uninstall The Old Java Version And Install The New Java Package
- Solution 4: Update Windows
- Solution 5: Disable Java Content For Browser
- Wrapping Up
- About Sanmay Chakrabarti
- Leave a Reply Cancel reply
- Recent Posts
- FIX: Java Installation Not Completed – Unable to install Java error in Java .JAR files. (Solved)
- How to FIX: Unable to Open Java JAR Files – There are errors in the following switches: ‘file.jar’.
- Method 1. Uninstall and re-Install JAVA on your system.
- Method 2. Set «Java Platform SE Binary» as the Default program to Open .JAR files.
- Method 3. Repair Invalid Java files Association with Jarfix.
- Related Posts
- FIX: Source Path Too Long – Cannot Delete Folder/File (Solved)
- How to Login to a Local User Account on a Active Directory Joined PC.
- FIX: Sign in with a local account instead is missing. (Solved)
- 13 Comments
- Leave a Reply Cancel reply
- Recent Posts
64-bit java not working
I feel like this should just naturally work, but for some reason it isn’t. I’ve gone through the following guide How can I install Sun/Oracle’s proprietary Java JDK 6/7/8 or JRE? And it seems that all the help isn’t working. I’m trying to get oracle’s 64-bit java to work. I already installed java using the ppa:
sudo add-apt-repository ppa:webupd8team/java sudo apt-get update sudo apt-get install oracle-java8-installer java version "1.8.0_45" Java(TM) SE Runtime Environment (build 1.8.0_45-b14) Java HotSpot(TM) Server VM (build 25.45-b02, mixed mode) $ java -d64 Error: This Java instance does not support a 64-bit JVM. Please install the desired version. ~/jdk1.7.0_79/bin$ ./java -bash: ./java: No such file or directory ~/jdk1.7.0_79/bin$ file java java: ELF 64-bit LSB executable, x86-64, version 1 (SYSV), dynamically linked (uses shared libs), for GNU/Linux 2.6.9, BuildID[sha1]=0x68582ab83ddaf6429310a6f841f0adda165ce880, not stripped So as you see, the file is there, but also not there at the same time. Which is hyper confusing. I next thought that maybe I didn’t actually have a 64-bit version of Ubuntu, but I checked and (if I’m reading everything correctly) it looks like I do have 64-bit ubuntu:
$ uname -a Linux random 4.0.4-x86_64-linode57 #1 SMP Thu May 21 11:01:47 EDT 2015 x86_64 x86_64 x86_64 GNU/Linux Also, I tried the same thing with version 7, and openjdk uses version 7 as well. Both of them did the 32-bit version. You can see all my versions of java here:
$ update-alternatives --config java There are 4 choices for the alternative java (providing /usr/bin/java). Selection Path Priority Status ------------------------------------------------------------ * 0 /usr/lib/jvm/java-8-oracle/jre/bin/java 1053 auto mode 1 /usr/lib/jvm/java-7-openjdk-i386/jre/bin/java 1051 manual mode 2 /usr/lib/jvm/java-7-oracle/jre/bin/java 1052 manual mode 3 /usr/lib/jvm/java-8-oracle/jre/bin/java 1053 manual mode 4 /usr/lib/jvm/jdk1.8.0_05/bin/java 1 manual mode Any help would be beneficial in order to get 64 bit working on ubuntu. Thanks in advance. EDIT Turns out uname is not as accurate as I thought. Turns out I am on a 32-bit machine:
$dpkg --print-architecture i386 $ file /sbin/init /sbin/init: ELF 32-bit LSB shared object, Intel 80386, version 1 (SYSV), dynamically linked (uses shared libs), for GNU/Linux 2.6.24, BuildID[sha1]=0x07075fcb55b05aeb6286efabba63534fa6ecd213, stripped Unable To Install Java – How To Resolve ?
Multiple users have recently reported on facing issues while trying to install or update Java in their Windows. Installation errors are quite common for windows, and there can be many causes of this issue. In this article, I have discussed why you are unable to install Java and what you can do to fix it.
Why Am I Unable To Install Java?
Generally, it is hard to pinpoint one specific cause of this issue, but there are some commonly known causes that can trigger it. The first place to check is whether your system meets the basic requirement for installing that Java version.
Other than system specifications, the Windows Firewall can also affect the installation of Java. Insufficient disk space and using unsupported browsers can also be the issue. Whatever the case may be, below I have discussed some troubleshooting methods that you can follow for fixing this issue.
Fix Java Update Failed Issue
Java update failure is nothing to be afraid of. By simply following the troubleshooting procedure mentioned below, you should be able to fix it.
Solution 1: Restart PC
The first thing you can try is to restart your PC. Restarting is known for fixing various minor bugs and errors, including the bug that is preventing Java from installing. Restart the PC before downloading the Java installer and then try installing it.
Solution 2: Disable Firewall
Try disabling the Windows Firewall and see whether you are able to install Java. Windows Firewall is important for protecting your PC. However, it can sometimes become overprotective and stop essentials programs that are not a threat. This may be one of those cases.
- Type Control Panel in the Start menu and select the top result.
- Change the View by option to small icons.
- Locate and click on the Windows Defender Firewall option. This will open the Windows 10 Firewall settings.
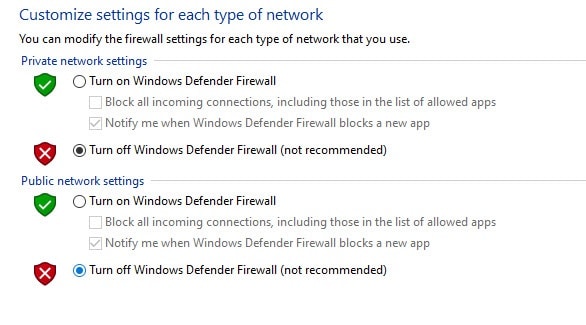
- In the Windows Defender Firewall settings click on the Turn Windows Defender Firewall on or off option.
- Check the Turn off Windows Defender Firewall (not recommended) option for private if you are facing issues connecting with home or office network. Check it in Public if you are facing trouble connecting to public hotspots.
- Click on OK to save the changes.
Check whether now you can install or update Java. If no, then enable the Windows Firewall by following the above steps and checking the Turn on Windows Defender Firewall option for private and public networks.
Solution 3: Uninstall The Old Java Version And Install The New Java Package
If you are trying to update Java by installing a newer package, you should first uninstall the old one, to do it, follow the steps given below:
- Press the Windows + R keys to open the Run utility.
- Type appwiz.cpl and press Enter to open the Programs and Features panel.
- Locate the Java package among the other listed apps and right-click on it.
- Select the Uninstall option.
- Follow the on-screen instructions to complete the process.
Now, download the latest Java package from the official website and try installing it.
Solution 4: Update Windows
Outdated operating systems are known to conflict with newer apps and games. If you are using outdated Windows, you should update it to the latest version. Windows update fixes bugs, adds security patches, and provides newer features. To update your Windows 10, follow the steps given below:
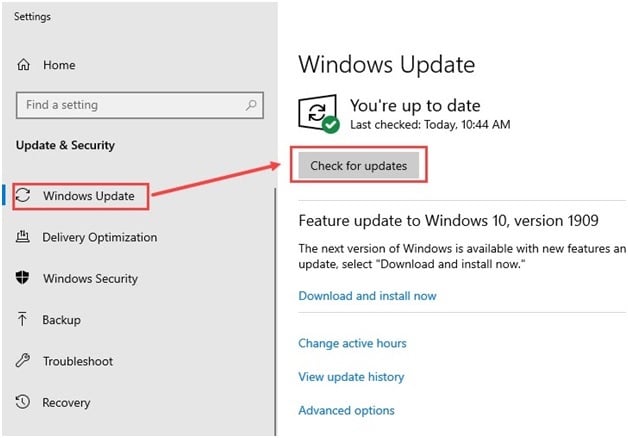
- Type Check for updates in the Start menu and select the top result.
- Click on the Check for updates option and wait for Windows 10 to finish checking.
- If any update is available, Windows should start downloading it automatically. After the download is complete, install it and restart your PC.
Solution 5: Disable Java Content For Browser
If the above solutions don’t work, you can try disabling the Java content for the browser feature and try re-installing it. To disable the Java content for the browser, follow the steps given below:
- Type control panel in the Windows search menu and select the top result.
- Change the View By settings to Small icons.
- Click on the Java option. This will open the Java control panel.
- Select the Security tab.
- Uncheck the Enable Java content in the browser box and click on Apply and OK to save the changes.
Now, reinstall the Java package and check whether this fixes the issue.
Wrapping Up
So, there you have it. Now you know how to fix the unable to install Java issue. Follow the steps given above and you should be able to fix this issue. If you have any questions regarding this article, ask them in the comment section below.
About Sanmay Chakrabarti
Sanmay is a Tech enthusiast. He has been troubleshooting PC issues for 6 years and writing about them for 4. Reading books, traveling to new places and listening to music are some of his favorite hobbies.
Leave a Reply Cancel reply
Recent Posts
FIX: Java Installation Not Completed – Unable to install Java error in Java .JAR files. (Solved)
If you cannot open .JAR JAVA files on a Windows 10, 8 or 7 based computer, with error «Unable to install Java. There are errors in the following switches: filename.jar. Check that the commands are valid and try again«, continue reading below.
The error «There are errors in the following switches» while trying to open a JAVA .JAR file usually occurs because of multiple installed versions of Java on the PC, or because the the .jar association has been hijacked.
This tutorial contains instructions to fix the following Java error while trying to open a .jar file:
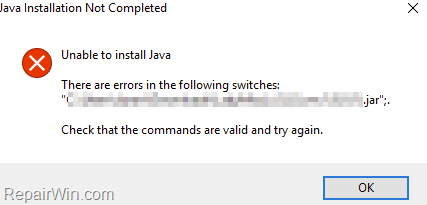
«Java Installation Not Completed.
Unable to install Java. There are error in the following switches: ‘C:\Users\…\file.jar’;.
Check that the commands are valid and try again.»
How to FIX: Unable to Open Java JAR Files – There are errors in the following switches: ‘file.jar’.
Method 1. Uninstall and re-Install JAVA on your system.
The first step, to resolve problems with JAVA, is to uninstall all installed versions of Java and to re-install the correct and most recent version of JAVA on your PC. To do that:
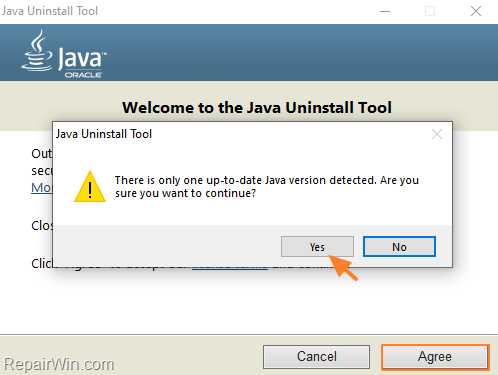
1. Download and run the Java Uninstall tool.
2. Choose Agree at the first screen. *
* Note: If prompted that «There is only one up-to-date Java version detected. Are you sure to continue?» click Yes.
3. Select all the installed Java versions and click Next.
![image_thumb[37]](https://www.repairwin.com/wp-content/uploads/2020/12/image_thumb37_thumb.png)
4. Click Yes again to clean the cache
![image_thumb[43]](https://www.repairwin.com/wp-content/uploads/2020/12/image_thumb43_thumb.png)
5. When the uninstall is completed, click the Get Java button or navigate to Java Download page to download and install the latest Java version. *
* Note: If you use 32-bit and 64-bit browsers, you will need to install both 32-bit and 64-bit Java in order to have the Java plug-in for both browsers. You can download both Java versions from here.
![image_thumb[44]](https://www.repairwin.com/wp-content/uploads/2020/12/image_thumb44_thumb.png)
6. After installing Java on your system, try to open the JAR file again and if you still face the same error, apply the instructions at method-2 below.
Method 2. Set «Java Platform SE Binary» as the Default program to Open .JAR files.
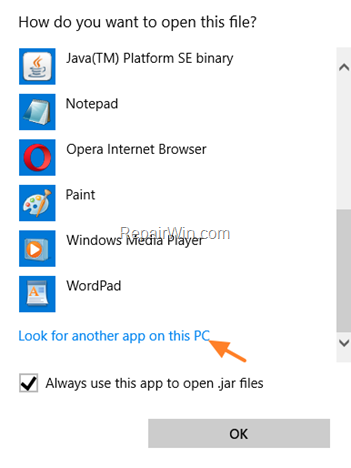
1. Right-click on the .jar file and choose Open with… -> Choose another app

2. Check Always use this app to open .jar files and click More apps.

3. Scroll down and click Look for another app in this PC.
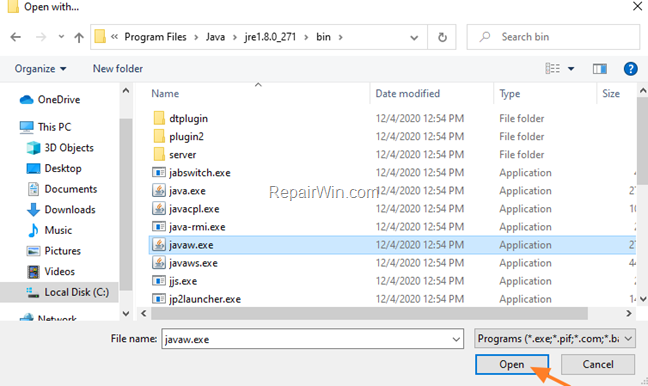
4. Now navigate to the folder where JAVA is installed.
- For 64-bit versions of Java navigate to C:\Program Files\Java\jre_version\bin
- For 32-bit versions of Java navigate to C:\Program Files(x86)\Java\jre_version\bin
5. Select the «javaw.exe» application (Java Platform SE Binary) and click Open.
6. Now, the jar file should open without problem, but If you still face the sane error, follow the instructions on method-3 below.
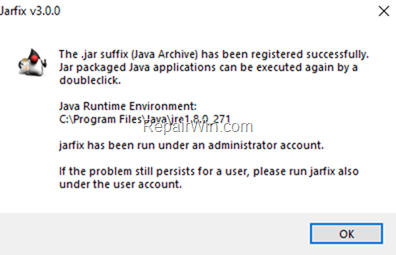
Method 3. Repair Invalid Java files Association with Jarfix.
1. Download the Jarfix.exe tool from here.
2. Double-click to run the Jarfix tool to restore the .jar file association.
That’s all folks! Did it work for you?
Please leave a comment in the comment section below or even better: like and share this blog post in the social networks to help spread the word about this solution.
If this article was useful for you, please consider supporting us by making a donation. Even $1 can a make a huge difference for us.
Related Posts
FIX: Source Path Too Long – Cannot Delete Folder/File (Solved)

How to Login to a Local User Account on a Active Directory Joined PC.
FIX: Sign in with a local account instead is missing. (Solved)
13 Comments
For months I have been trying to solve this issue, thanks to jarfix I’m problem free, thanks for making this it was very helpful.
ive been searching for a solution to this for at least an hour! this combined with another tutorial finally got me to the right place, thank you so much
I dont know how it worked but i just clicked the download button for jarfix and it accually worked!? Nice.