- Рецепт настройки удалённого мониторинга контейнеров Tomcat и Jetty штатными средствами JDK
- Инструменты мониторинга
- Настройка Tomcat
- Настройка Jetty
- Подключение JConsole
- Подключение JVisualVM
- Java VisualVM — Connecting to JMX Agents Explicitly
- When Are Explicit JMX Connections Necessary?
- Making an Explicit JMX Connection
- Local JMX Connections
- Remote JMX Connections
- Further Reading About JMX Technology
Рецепт настройки удалённого мониторинга контейнеров Tomcat и Jetty штатными средствами JDK
Проводя уже около 6 лет собеседования с Java-разработчиками заметил, что из приходивших кандидатов вообще никто не знает, что можно штатными средствами JDK удалённо мониторить состояние JVM с контейнерами сервлетов.
Поэтому далее пошаговый рецепт, как настроить и использовать эту замечательную возможность
Инструменты мониторинга
- JConsole — GUI-инструмент для мониторинга и управления как локальными, так и удаленными JVM и приложениями. Про него читаём официальные доки
- JVisualVM — упрощённо — это JConsole + профилировщик. Про этот инструмент отлично написалTheShade
Настройка Tomcat
%CATALINA_HOME% — каталог, в который установлен Tomcat.
- В каталоге %CATALINA_HOME%/conf создать конфиг-файл remote.users с содержимым вида
ЛОГИН_ПОЛЬЗОВАТЕЛЯ1 ПАРОЛЬ_ПОЛЬЗОВАТЕЛЯ1 ЛОГИН_ПОЛЬЗОВАТЕЛЯ2 ПАРОЛЬ_ПОЛЬЗОВАТЕЛЯ2 Имя файлу можно дать любое на ваше усмотрение. Файл содержит логины и пароли в явном (к сожалению) виде пользователей, которые будут иметь право осуществлять удалённый мониторинг.
Например:
tartaren from_tarascon portos passwordportos ЛОГИН_ПОЛЬЗОВАТЕЛЯ1 ПРАВА_ДОСТУПА ЛОГИН_ПОЛЬЗОВАТЕЛЯ2 ПРАВА_ДОСТУПА Имя файлу можно дать любое на ваше усмотрение. ПРАВА_ДОСТУПА — одна из двух констант readwrite или readonly.
Например:
tartaren readonly portos readwrite IP_АДРЕС — IP-адрес Tomcat-сервера.
НОМЕР_ПОРТА — Номер порта, на котором Tomcat-сервер будет отвечать на запросы JConsole или JVisualVM.
Например:
* * * fi CATALINA_OPTS="$CATALINA_OPTS $JPDA_OPTS" shift fi CATALINA_OPTS="$CATALINA_OPTS -Dcom.sun.management.jmxremote.password.file=/usr/share/apache-tomcat-7.0.22/conf/remote.users -Dcom.sun.management.jmxremote.access.file=/usr/share/apache-tomcat-7.0.22/conf/remote.acl -Dcom.sun.management.jmxremote -Dcom.sun.management.jmxremote.port=7777 -Dcom.sun.management.jmxremote.ssl=false -Djava.rmi.server.hostname=1.1.1.1" if [ "$1" = "debug" ] ; then if $os400; then echo "Debug command not available on OS400" exit 1 * * * Настройка Jetty
- Создать файлы remote.users и remote.acl (или с любыми иными именами на ваше усмотрение) в устраивающих вас каталогах.
- chmod 400 remote.users
- chmod 400 remote.acl
- chown jetty:jetty remote.users
(пользователя и группу jetty возможно необходимо заменить по ситуации) - chown jetty:jetty remote.acl
(пользователя и группу tomcat возможно необходимо заменить по ситуации) - Чаще всего Jetty используется в связке с Maven. Для запуска создать скрипт reboot.sh
export MAVEN_OPTS="-Dcom.sun.management.jmxremote.password.file=/ПОЛНЫЙ_ПУТЬ_К_ФАЙЛУ/remote.users -Dcom.sun.management.jmxremote.access.file=/ПОЛНЫЙ_ПУТЬ_К_ФАЙЛУ/remote.acl -Dcom.sun.management.jmxremote -Dcom.sun.management.jmxremote.port=ПОРТ_ДЛЯ_МОНИТОРИНГА -Dcom.sun.management.jmxremote.ssl=false -Djava.rmi.server.hostname=IP_СЕРВЕРА" mvn -P dev clean compile jetty:run Подключение JConsole
- запустить JConsole
- в появившейся форме:
- выбрать режим Remote Access
- ввести IP или доменное имя контейнера сервлетов c номером порта в формате
IP_ИЛИ_ДОМЕН: НОМЕР_ПОРТА - заполнить поля Username и Password
- нажать кнопку [Connect]
Подключение JVisualVM
- запустить JVisualVM
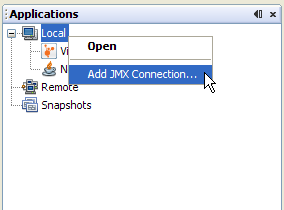
- выбрать в меню File->Add JMX connection
- в появившейся форме:
- Connection — ввести IP или доменное имя контейнера сервлетов c номером порта в формате
IP_ИЛИ_ДОМЕН: НОМЕР_ПОРТА - если есть желание — включить «галку» Display name и ввести желаемый псевдоним для этого подключения
- включить «галку» Use security credentials
- заполнить поля Username и Password
- по желанию — включить «галку» Save security credentials
- нажать кнопку [OK]
- в левом дереве, в пункте Remote появится новый раздел с нашим контейнером
- на этом контейнере нажать правую кнопку мыши и выбрать пункт Open
Java VisualVM — Connecting to JMX Agents Explicitly
Java Management Extensions (JMX) technology can be used to monitor and manage any Java technology-based applications (Java applications) that are running in either a local or a remote Java Virtual Machine (JVM). Java applications are automatically exposed for monitoring and management by JMX agents if they are run on the Java platform, Standard Edition (Java SE platform) version 6. If the Java applications are running on the Java 2 platform, Standard Edition (J2SE platform) 5.0, you can expose them manually for monitoring and management by setting the com.sun.management.jmxremote.* system properties when the applications are launched. Setting these system properties, or running your applications on version 6 of the Java SE platform, enables the platform’s out-of-the-box monitoring and management capability, automatically enabling the platform MBean server in the JVM software, and registering MBeans in it that expose the application for management by any appropriately configured JMX client application. VisualVM is one such JMX client application.
NOTE: For a very brief introduction to JMX technology, MBeans, the platform MBean server, and how to monitor and manage MBeans using Java VisualVM, see the Java VisualVM MBeans Tab page. For an introduction to the Java SE platform’s out-of-the-box monitoring and management capability, see Monitoring and Management Using JMX Technology in the Java SE Platform Monitoring and Management Guide.
When Are Explicit JMX Connections Necessary?
As stated above, Java VisualVM will automatically detect and connect to Java applications that are running on version 6 of the Java SE platform or that have been started with the correct system properties on version 5.0. However, because there are cases in which Java VisualVM cannot automatically discover and connect to JMX agents that are running in a target Java application, a means of creating explicit JMX connections has also been added to Java VisualVM.
The circumstances in which Java VisualVM will not automatically discover JMX agents, and thus the Java applications they expose, are the following:
- The target application is running on the J2SE 5.0 platform and the -Dcom.sun.management.jmxremote* properties have not been specified.
- The target application is running on the same host as Java VisualVM but was started by a different user than the one who started Java VisualVM. Java VisualVM discovers running applications using the jps tool (Solaris, Linux, or Mac OS X or Windows), which can only discover Java applications started by the same user as the one who starts the Java VisualVM tool.
- The target application is running on a remote host where jstatd (Solaris, Linux, or Mac OS X or Windows) is not running or is running but was started by a different user. The jstatd daemon provides an interface that allows remote monitoring applications to connect to Java applications on the host where it is running.
Making an Explicit JMX Connection
Before you can make an explicit JMX connection from Java VisualVM to a running application, this application must be started with the correct system properties. The system properties in question are the following:
- com.sun.management.jmxremote.port , to specify the port number through which the application will be exposed
- com.sun.management.jmxremote.ssl , to specify whether secure sockets layer (SSL) encryption will be activated to secure the connection to the application
- com.sun.management.jmxremote.authenticate , to specify whether the connection will be password protected
Local JMX Connections
This section shows an example of how to connect Java VisualVM to a local application via an explicit JMX connection.
- Start a Java application on the J2SE platform version 5.0, setting the system properties to enable the Java SE platform’s out-of-the-box monitoring and management capability, using the command shown below:
java -Dcom.sun.management.jmxremote.port=3333 \ -Dcom.sun.management.jmxremote.ssl=false \ -Dcom.sun.management.jmxremote.authenticate=false \ YourJavaApp
In the command above, YourJavaApp is launched with the Java SE platform’s out-of-the-box monitoring and management capability configured as follows:
- The application is exposed for monitoring and management via port 3333.
- SSL encryption is deactivated.
- Password authentication is deactivated.
 The host name localhost is already filled in. You only need to add the port number on which the application is exposed for monitoring and management.
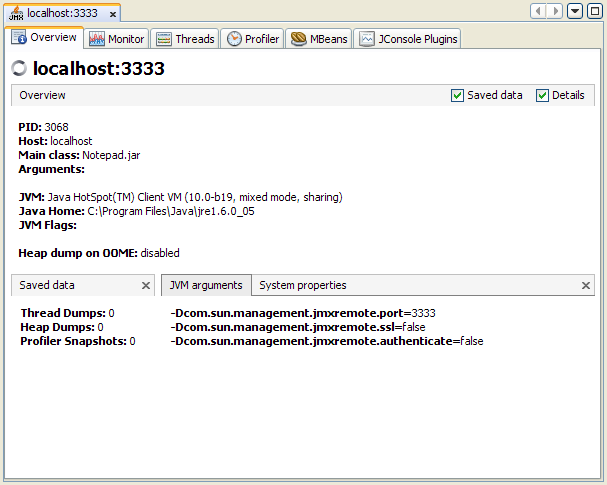
Remote JMX Connections
You can also make explicit JMX connections to applications running on remote hosts, as explained below:
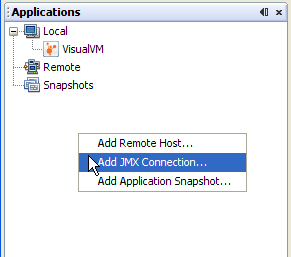
- Right click anywhere in the blank area under the application tree and select Add JMX Connection.

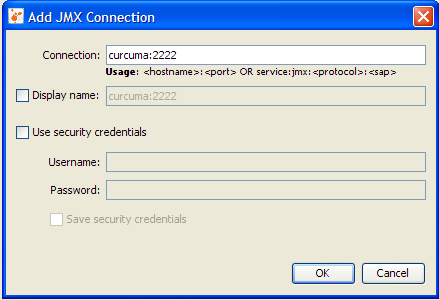
- Provide the machine name and port number for a running JMX agent, that has been started with the appropriate system properties to allow remote management. Here the JMX agent has been exposed on port 2222 of the machine curcuma . If you know that the JMX agent has been protected with a username and password, enter them in the Add JMX Connection dialog and specify whether you want the credentials to be saved so
that when Java VisualVM restarts it will silently reconnect to the JMX agent without prompting the user for the security credentials again. - If the JMX connection is secured and you did not provide a username and password in the Add JMX Connection dialog, you will be prompted to provide a username and password.
- If you know the correct username and password, the JMX connection will be established, and the JMX connection will appear in the application tree, with a special JMX connection icon.
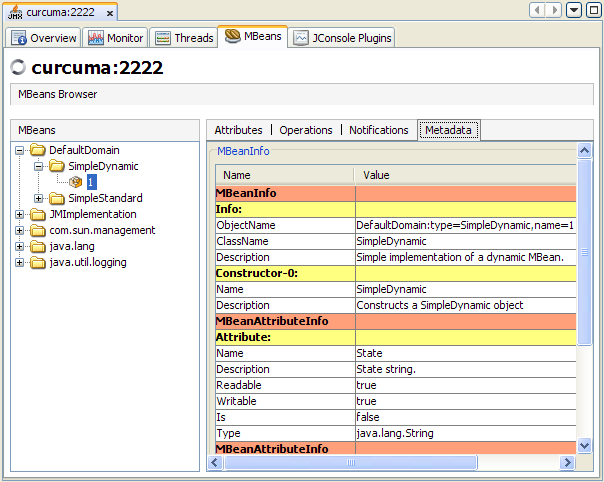
- Right click on the remote JMX connection and select Open. You can now monitor and manage remote applications via the JMX connection, and manipulate any MBeans that are registered in the MBean server exposed by this connection (note that the Java VisualVM-MBeans plugin must be installed if you want to access to the MBeans tab.)
 If you know that the JMX agent has been protected with a username and password, enter them in the Add JMX Connection dialog and specify whether you want the credentials to be saved so
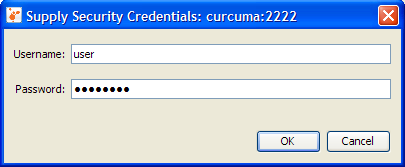
Further Reading About JMX Technology
For more information about JMX technology and monitoring and management of the Java SE platform, see the following documents.