- Install & Setup Android Studio Java JDK & SDK
- 1. Java
- 2. Android Studio
- 3. SDK
- The Android SDK includes The Following:
- Install & Setup Android Studio Java JDK & SDK
- 1. Install JAVA JDK
- Un-Install Older Version(s) of JDK/JRE
- Step 1: Download JDK
- Step 2: Install JDK
- Step 3: Verify the JDK Installation
- 2. Install “Android Studio IDE”
- 3. Installing the Android SDK
- 4. Now ready to launch your First Android App
- 5. Create a New Android Project
- 6. Run the App on Real Android Phones
- Warp Up
- Is it possible to install the JDK on an android device?
- 4 Answers 4
Install & Setup Android Studio Java JDK & SDK
Android Studio, Java JDK & SDK is part of Android Development for building Android Apps. In this post, we’re going to learn “How to install & Setup Android Studio Java JDK & SDK“. We’ll also see, how to download the Android Studio and Java JDK, as well as the SDK (Software Development Kit) setup. If you are a beginner and you don’t know, what is Android Studio, Java JDK, and SDK? So let me give you an overview.
1. Java
The Android developers mostly used Java programming languages to build Android apps. If we want to use Java tools or functionality, so for that we have need to download and install Java Development Kit (JDK) is a distribution of Java Technology by Oracle Corporation.
It implements the Java Language Specification and the Java Virtual Machine Specification and provides the Standard Edition of the Java Application Programming Interface.
2. Android Studio
Android Studio is an IDE. What is IDE? IDE is an integrated development environment. In simple words, this is a tool that gives us an environment to create an Android app. There are many tools are available in the market for different purposes like MS word for documentation creation, PowerPoint for presentation making, tally ERP 9 for accounting and Photoshop for photo editing, and much more, the same as Android studio is a tool or IDE for building Android apps.
3. SDK
The Android SDK stands for a software development kit. It is a set of development tools that are used to develop applications. The Android SDK includes the following:
The Android SDK includes The Following:
Platform tools are used to help the features for the current android platform including ADB, which is working as a bridge to communicate with emulators or devices.
Android SDK Tools is a part of the Android SDK. It is required for building Android apps.
SDK is a part of the Android SDK and it includes the complete set of development and debugging tools, such as an emulator, SD card, SQLite, APK builder, etc.
ADB is a tool that gives us to communicate with the device, such as installing and debugging the Android apps.
The Android Emulator is a virtual Android device. It’s called an emulator and it provides to live test your application on different devices including the Android API level without needing to have each physical device. The emulator provides you with almost all of the functionality of a real Android device.
Install & Setup Android Studio Java JDK & SDK
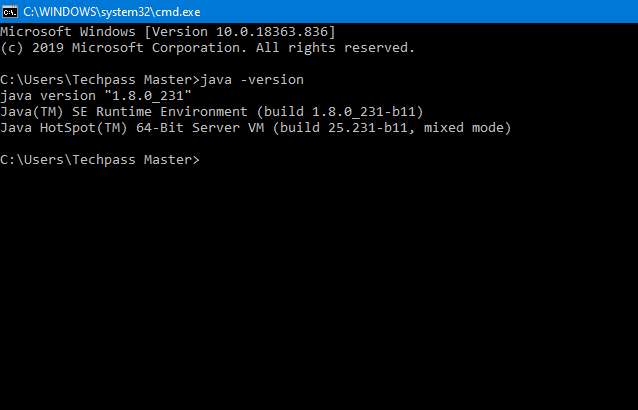
- Before installing the Android SDK, you need to install the JDK (Java Development Kit). if you want to verify the java version then go to run (start button+R) and open CMD after typing” javac -version “.
1. Install JAVA JDK
The Java Development Kit (JDK), officially called “Java SE”, is needed for writing Java programs. The JDK is freely available from Sun Micro-systems, now it is part of Oracle. check it– http://www.oracle.com/technetwork/java/javase/overview/index.html.
Un-Install Older Version(s) of JDK/JRE
- Install only the newest Java JDK.
- If you have installed the older versions of JDK/JRE, uninstall all of them.
- Go to Control Panel >> “Programs” >>Select Programs and Features” >>Uninstall ALL programs begin with “Java”, like “Java SE Development Kit, etc.
Step 1: Download JDK
- Goto Java SE download site http://www.oracle.com/technetwork/java/javase/downloads/index.html.
- Click the “Oracle JDK Download” button.
- Check “Accept License Agreement”.
- Choose the JDK as per your system requirement.
Step 2: Install JDK
- Double clicks on download to setup and Run.
- By default, JDK is installed in the directory “ C:\Program Files\Java\jdk-13.0. “, Accept the defaults.
Step 3: Verify the JDK Installation
Open a CMD via the following steps:
Click the Search button and Type “cmd” ⇒ Choose “Command Prompt”, or Right-click “Start” button ⇒ run ⇒ enter “cmd”.
the following commands to verify that JDK/JRE is properly installed and display their version.
2. Install “Android Studio IDE”
Android Studio, which is an Integrated Development Environment (IDE) based on IntelliJ is a popular Java IDE
(For Windows)
- Verify that environment variable JAVA_HOME is set to the JDK installation directory by the using command “ set JAVA_HOME “.
- Check the system requirements for Android Studio and SDK ( https://developer.android.com/studio#Requirements) e.g > For Windows 7,8,10, recommended 4GB of RAM, 4GB of disk space, and 1280×800 minimum screen resolution.
- Go to “Android Studio” @ https://developer.android.com/studio ⇒ Click “Download Android Studio for Windows 64-bit.
- Run .exe step >> Launch Android Studio. Continue to the Next Step.
Android Studio IDE by default will be installed in “ C:\Program Files\Android\Android Studio “.
Android SDK by default will be installed in the” c:\Users\username\AppData\Local\Android\Sdk “.
3. Installing the Android SDK
Note: You can copy the SDK from your friends or any other computer with the same OS because the download size is 3GB of zip data and expand to 5 GB of disk data.
- Start Android Studio.
- Select >Tools >SDK Manager.
- As you can see default Settings dialog box, click these tabs to install Android SDK platform packages and developer tools.
- SDK Platforms: Select the latest Android SDK package.
- SDK Tools: Select these Android SDK tools:
- Android SDK Build-Tools.
- NDK.
- Android SDK Platform-Tools.
- Android SDK Tools.

4. Click Apply. Android Studio starts installing your selected packages. After completing the installation, the Status of the installed packages and tools changes from Not Installed to Installed.
5. Click OK.
4. Now ready to launch your First Android App
Android native apps are basically written in Java and Kotlin and XML is use for UI design. I’ll hope that you have some basic knowledge of Java and XML.
5. Create a New Android Project
- Launch Android Studio.
- Choose “Start a new Android Studio Project”.
- Select a Project Template >>select “Phone and Tablet” tab >> Empty Activity >> Next.
- Configure your project :
- 1- ⇒ Set “Name” to “Hello Android” (this will be the “Title” in your phone’s app menu)
- 2- ⇒ The “Package name” and “Save Location” will be updated automatically
- 3- ⇒ In “Language”, select “Java”
- 4- ⇒ Leave the “Minimum API Level” and the rest to default ⇒ Finish.
- It could take a few minutes to set up your first app.
6. Run the App on Real Android Phones
Run the app on a real device. Follow step by step.
- Connect the real device to your computer. Make sure that you have the “USB Driver” for your device installed on your computer. If not, go to https://developer.android.com/studio/run/oem-usb.html to Install OEM USB Drivers.
- Enable “USB Debugging” mode on your real device:
Enable “Developer options” through “Settings” ⇒ About Phone ⇒ Scroll to the bottom and tap “Build number” seven (3 or 4) times until “Developer Mode” is displayed. - Return to the previous screen to find “Developeroptions” ⇒ Open “Developer options” ⇒ Enable “USB debugging”.
- Go to “Settings” ⇒ Select Developer options” ⇒ Check “USB Debugging“.
- In Android Studio, select the “Run” menu⇒ “Run app”⇒ Your device will be listed under “Choose a running device” ⇒ Select the device and press OK ⇒ “Hello-world” will appear on your phone.
All setup are done, Congratulation for your first Android App 🙂
Warp Up

And this wraps up this short blog post! You could’ve been doing a million other things, but you decided to sit and read through this article to know How to Install & Setup Android Studio Java JDK & SDK. It shows that you’re committed to improving your skills in Android development ! It shows your passion for Android development! Hopefully, you found this blog post helpful! If you liked this article, you can checkout my other articles. As always, I would like to thank you for taking the time to read this article :). I wish you the best of luck! Happy coding ! Cheers!
You May Also Like:
Is it possible to install the JDK on an android device?
I want to be able to compile and run basic java apps within the android terminal termux. I checked out Terminal IDE, but that is incompatible with Android 5.0+. Additionally, I tried to install the arm64 jdk from Oracle’s website, which android fails to recognize. I am running CM 13 and to clarify, I want to be able to run commands like javac and java directly from my phone.
I want to be able to run commands like javac and java directly from my phone Short answer; no. Longer answer; maybe if you want to run a full system emulator but it will be slow.
Which emulator would be sufficient and how would I implement it. My phone has a decent processor so I would like to try the emulator out
It’s promising that in the future Google will contribute to the OpneJDK project. So we should see new Java features on Android, but that’s only about Java language features. Google can still keep some own proprietary binary format, like dex is right now. It’s a question how much you’ll be able to find javac and other tools. But the embracement of the OpenJDK is a promising direction.
It would be great if the integration of OpenJDK into Android N would ensure capability to run it directly in the terminal, but historically Google has made many java updates for android that only serve the purpose of android app development rather than java development. I guess until then we can never be certain of the status of direct access to the jdk commands within android.
4 Answers 4
If you have Termux, you can download the deb file here, and install it with apt-get install /path/to/deb . A command to download and install the JRE and JDK for arm:
cd ~ # Change to home directory apt-get install -y wget # BusyBox wget doesn't support HTTPS hash -d wget # Forgets the BusyBox wget path so new one is used wget https://archive.org/download/openjdk-9-jre-headless_9.2017.8.20-1_x86_64/openjdk-9-jre-headless_9.2017.8.20-1_arm.deb # Download JRE wget https://archive.org/download/openjdk-9-jre-headless_9.2017.8.20-1_x86_64/openjdk-9-jdk-headless_9.2017.8.20-1_arm.deb # Download JDK apt-get install -y ./openjdk-9-jre-headless_9.2017.8.20-1_arm.deb ./openjdk-9-jdk-headless_9.2017.8.20-1_arm.deb # Install the files rm openjdk-9-*.deb # Remove the files after because they're huge Or a one-liner to copy and paste:
cd ~ && apt-get install -y wget && hash -d wget && wget https://archive.org/download/openjdk-9-jre-headless_9.2017.8.20-1_x86_64/openjdk-9-jre-headless_9.2017.8.20-1_arm.deb && wget https://archive.org/download/openjdk-9-jre-headless_9.2017.8.20-1_x86_64/openjdk-9-jdk-headless_9.2017.8.20-1_arm.deb && apt-get install -y ./openjdk-9-jre-headless_9.2017.8.20-1_arm.deb ./openjdk-9-jdk-headless_9.2017.8.20-1_arm.deb && rm openjdk-9-*.deb To install for another architecture, replace occurences of «arm» with the correct architecture. There are files for «arm» (most 32-bit phones), «aarch64» (ARM64/armv8, most 64-bit phones), «i686» (x86), and «x86_64». Most phones have either arm or aarch64. I believe the arm version should at least work on aarch64 (may be wrong?), so arm should work for almost everyone. But if you know what your device has, use that instead.
Edit: to find your device’s architecture, run uname -m from Termux.