- Human pose estimation with Python and Gluoncv
- Disassembling result array, adding some math to the example code
- Upgrade Update
- Saved searches
- Use saved searches to filter your results more quickly
- License
- Daniil-Osokin/lightweight-human-pose-estimation.pytorch
- Name already in use
- Sign In Required
- Launching GitHub Desktop
- Launching GitHub Desktop
- Launching Xcode
- Launching Visual Studio Code
- Latest commit
- Git stats
- Files
- README.md
- About
Human pose estimation with Python and Gluoncv
Human pose estimation is something useful for robotics/programming as you can see what position a person is in a picture. For last weekend’s Hackrithmitic I did an experiment for fun using computer vision pose estimation. To start with I found several possibilities with available libraries:
- Tensorflow js has been used to say, don’t touch your face, but it takes a massive amount of cpu.
- Openpose is a popular one, only licensed for noncommercial research use, and there is a Opencv example for it that doesn’t quite show how to use it.
- AlphaPose is supposedly faster and has a more clear license and possibility for commercial use – if you want that as a possibility. I checked out the install instructions and worked but for “python3” instead of “python”. It also misses obvious step of installing cuda for your Nvidia system before running.
- GluonCVis another, which seems more user friendly. This one I was able to get running in a few minutes with their example:
As in their documentation, the cv example based on what machine you have, should be installed. For my Ubuntu-18.04 (with the system nvidia-cuda-toolkit 9.1.85) this was:
pip3 install --upgrade mxnet-cu91mkl
pip3 install --upgrade gluoncv
Unlike others their examples are easy to quickly get up and running. In fact running the example here downloads and sets up a working example.
Disassembling result array, adding some math to the example code
Let’s say we want to use each of these points in a calculation – first let’s see what we have that it outputs, adding this below the example’s pred_coords line:
predicted_heatmap = pose_net(pose_input) pred_coords, confidence = heatmap_to_coord(predicted_heatmap, upscale_bbox) for person in (pred_coords): print( person )
Now I can see each of those pred_coords is apparently a numpy array with various parts – the first one being a head piece, looking at the matplotlib view and hovering the marked coordinates:
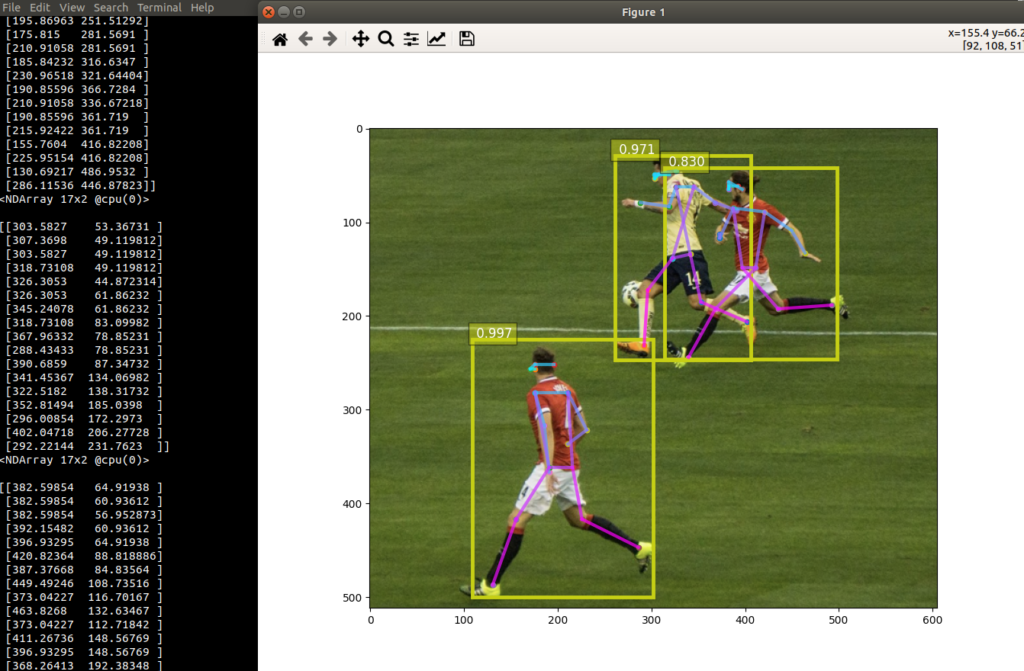
Cool, and looking at the data points as compared to the points zooming in on the Matplotlib figure, it appears the first 5 are coordinates on the head, the last two are the feet points. The 11th and 10th items being the hands – we can separate these and print out and verify we can get these:
for person in (pred_coords): print( person ) print(person[0]) hand1 = person[9] hand2 = person[10] leg1 = person[15] leg2 = person[16] print('feet:') print(leg1) print(leg2) print('hands:') print(hand1) print(hand2) Cool – now let’s do some basic math to see who is touching their face – or close to it. First we need to be able to do some basic math distances – in Numpy the euclidian distance command is the l2 norm in linear algebra-speak, and we can verify this seems to do what we want in python console:
$ python3
Python 3.6.9 (default, Jul 17 2020, 12:50:27)
[GCC 8.4.0] on linux
Type "help", "copyright", "credits" or "license" for more information.
import numpy as np
np.array

np.array([1,2])
array([1, 2])
np.array([1,2]) - np.array([1,3])
array([ 0, -1])
np.linalg.norm(np.array([1,2]) - np.array([1,3]))
1.0
np.linalg.norm(np.array([100,100]) - np.array([101,101]))
1.4142135623730951
np.linalg.norm(np.array([100,100]) - np.array([105,101]))
5.0990195135927845
Now there was unfortunately an odd type of array it gives with this library, so to get the one number that is the result distance I had to use .item().asnumpy().item():
def dist(np1, np2): return np.linalg.norm(np1-np2).item().asnumpy().item()
It makes since to make a dist function to get that distance, that would be very unwieldy to possibly change it if we found something wrong with the distance calculation. Then let’s compare distance of head to head point with head to end of arm – does the detected person have hand near their head, in other words?
head1 = person[0] headdist = dist(head1,person[1]) for i in range(4): d = dist(head1,person[i]) if d > headdist: headdist = d print('headdist about %s' % (headdist,)) #Is hand anywhere near head points - within one head distance in pixels, near any head point? close = False THRESHOLD = 2 # relative distance to consider it touching, within. for i in range(4): #print('handdist %s' % (dist(hand1,person[i]),) ) #print('handdist %s' % (dist(hand2,person[i]),) ) if dist(hand1,person[i]) < headdist*THRESHOLD: close = True if dist(hand2,person[i]) < headdist*THRESHOLD: close = True if close: print("Person touching face DONT TOUCH YOUR FACE") else: print("Person not touching face") Full code is available here and a quick demo shows the results with several different types of photo:
Upgrade Update
Suppose you update your drivers or update Ubuntu 20.04 or whatever is latest – Synaptic should help you track down the latest Nvidia drivers supported.
sudo apt install libnvrtc10.1 libcufft10 libcurand10 libcusolver10 libcusolvermg10 libcusparse10 libcublaslt10 libcublas10 libcudart10.1 libnvidia-compute-460-serverNow it should work with the latest library as linked –
pip3 install --upgrade mxnet-cu101mklNote “cu101” corresponds to that CUDA 10.1 as installed, otherwise you will get an error when running it.
Saved searches
Use saved searches to filter your results more quickly
You signed in with another tab or window. Reload to refresh your session. You signed out in another tab or window. Reload to refresh your session. You switched accounts on another tab or window. Reload to refresh your session.
Fast and accurate human pose estimation in PyTorch. Contains implementation of "Real-time 2D Multi-Person Pose Estimation on CPU: Lightweight OpenPose" paper.
License
Daniil-Osokin/lightweight-human-pose-estimation.pytorch
This commit does not belong to any branch on this repository, and may belong to a fork outside of the repository.
Name already in use
A tag already exists with the provided branch name. Many Git commands accept both tag and branch names, so creating this branch may cause unexpected behavior. Are you sure you want to create this branch?
Sign In Required
Please sign in to use Codespaces.
Launching GitHub Desktop
If nothing happens, download GitHub Desktop and try again.
Launching GitHub Desktop
If nothing happens, download GitHub Desktop and try again.
Launching Xcode
If nothing happens, download Xcode and try again.
Launching Visual Studio Code
Your codespace will open once ready.
There was a problem preparing your codespace, please try again.
Latest commit
Git stats
Files
Failed to load latest commit information.
README.md
Real-time 2D Multi-Person Pose Estimation on CPU: Lightweight OpenPose
This repository contains training code for the paper Real-time 2D Multi-Person Pose Estimation on CPU: Lightweight OpenPose. This work heavily optimizes the OpenPose approach to reach real-time inference on CPU with negliable accuracy drop. It detects a skeleton (which consists of keypoints and connections between them) to identify human poses for every person inside the image. The pose may contain up to 18 keypoints: ears, eyes, nose, neck, shoulders, elbows, wrists, hips, knees, and ankles. On COCO 2017 Keypoint Detection validation set this code achives 40% AP for the single scale inference (no flip or any post-processing done). The result can be reproduced using this repository. This repo significantly overlaps with https://github.com/opencv/openvino_training_extensions, however contains just the necessary code for human pose estimation.

🔥 Check out our new work on accurate (and still fast) single-person pose estimation, which ranked 10 th on CVPR'19 Look-Into-Person challenge.
- Download COCO 2017 dataset: http://cocodataset.org/#download (train, val, annotations) and unpack it to folder.
- Install requirements pip install -r requirements.txt
Training consists of 3 steps (given AP values for full validation dataset):
- Training from MobileNet weights. Expected AP after this step is ~38%.
- Training from weights, obtained from previous step. Expected AP after this step is ~39%.
- Training from weights, obtained from previous step and increased number of refinement stages to 3 in network. Expected AP after this step is ~40% (for the network with 1 refinement stage, two next are discarded).
- Download pre-trained MobileNet v1 weights mobilenet_sgd_68.848.pth.tar from: https://github.com/marvis/pytorch-mobilenet (sgd option). If this doesn't work, download from GoogleDrive.
- Convert train annotations in internal format. Run python scripts/prepare_train_labels.py --labels /annotations/person_keypoints_train2017.json . It will produce prepared_train_annotation.pkl with converted in internal format annotations. [OPTIONAL] For fast validation it is recommended to make subset of validation dataset. Run python scripts/make_val_subset.py --labels /annotations/person_keypoints_val2017.json . It will produce val_subset.json with annotations just for 250 random images (out of 5000).
- To train from MobileNet weights, run python train.py --train-images-folder /train2017/ --prepared-train-labels prepared_train_annotation.pkl --val-labels val_subset.json --val-images-folder /val2017/ --checkpoint-path /mobilenet_sgd_68.848.pth.tar --from-mobilenet
- Next, to train from checkpoint from previous step, run python train.py --train-images-folder /train2017/ --prepared-train-labels prepared_train_annotation.pkl --val-labels val_subset.json --val-images-folder /val2017/ --checkpoint-path /checkpoint_iter_420000.pth --weights-only
- Finally, to train from checkpoint from previous step and 3 refinement stages in network, run python train.py --train-images-folder /train2017/ --prepared-train-labels prepared_train_annotation.pkl --val-labels val_subset.json --val-images-folder /val2017/ --checkpoint-path /checkpoint_iter_280000.pth --weights-only --num-refinement-stages 3 . We took checkpoint after 370000 iterations as the final one.
We did not perform the best checkpoint selection at any step, so similar result may be achieved after less number of iterations.
We observe this error with maximum number of open files ( ulimit -n ) equals to 1024:
File "train.py", line 164, in args.log_after, args.val_labels, args.val_images_folder, args.val_output_name, args.checkpoint_after, args.val_after) File "train.py", line 77, in train for _, batch_data in enumerate(train_loader): File "//python3.6/site-packages/torch/utils/data/dataloader.py", line 330, in __next__ idx, batch = self._get_batch() File "//python3.6/site-packages/torch/utils/data/dataloader.py", line 309, in _get_batch return self.data_queue.get() File "//python3.6/multiprocessing/queues.py", line 337, in get return _ForkingPickler.loads(res) File "//python3.6/site-packages/torch/multiprocessing/reductions.py", line 151, in rebuild_storage_fd fd = df.detach() File "//python3.6/multiprocessing/resource_sharer.py", line 58, in detach return reduction.recv_handle(conn) File "//python3.6/multiprocessing/reduction.py", line 182, in recv_handle return recvfds(s, 1)[0] File "//python3.6/multiprocessing/reduction.py", line 161, in recvfds len(ancdata)) RuntimeError: received 0 items of ancdata To get rid of it, increase the limit to bigger number, e.g. 65536, run in the terminal: ulimit -n 65536
- Run python val.py --labels /annotations/person_keypoints_val2017.json --images-folder /val2017 --checkpoint-path
The model expects normalized image (mean=[128, 128, 128], scale=[1/256, 1/256, 1/256]) in planar BGR format. Pre-trained on COCO model is available at: https://download.01.org/opencv/openvino_training_extensions/models/human_pose_estimation/checkpoint_iter_370000.pth, it has 40% of AP on COCO validation set (38.6% of AP on the val subset).
Conversion to OpenVINO format
- Convert PyTorch model to ONNX format: run script in terminal python scripts/convert_to_onnx.py --checkpoint-path . It produces human-pose-estimation.onnx .
- Convert ONNX model to OpenVINO format with Model Optimizer: run in terminal python /deployment_tools/model_optimizer/mo.py --input_model human-pose-estimation.onnx --input data --mean_values data[128.0,128.0,128.0] --scale_values data[256] --output stage_1_output_0_pafs,stage_1_output_1_heatmaps . This produces model human-pose-estimation.xml and weights human-pose-estimation.bin in single-precision floating-point format (FP32).
To run the demo download Intel® OpenVINO™ Toolkit https://software.intel.com/en-us/openvino-toolkit/choose-download, install it and build the samples (Inferring Your Model with the Inference Engine Samples part). Then run /human_pose_estimation_demo -m /human-pose-estimation.xml -i for the inference on CPU .
We provide python demo just for the quick results preview. Please, consider c++ demo for the best performance. To run the python demo from a webcam:
- python demo.py --checkpoint-path /checkpoint_iter_370000.pth --video 0
If this helps your research, please cite the paper:
@inproceedings, title=, booktitle = , year = > About
Fast and accurate human pose estimation in PyTorch. Contains implementation of "Real-time 2D Multi-Person Pose Estimation on CPU: Lightweight OpenPose" paper.