- Как вывести ошибку в виде всплывающего окна?
- Simple Custom Error Messages With Pure CSS
- TABLE OF CONTENTS
- DOWNLOAD & NOTES
- QUICK NOTES
- EXAMPLE CODE DOWNLOAD
- CSS-ONLY ERROR NOTIFICATIONS
- 1) BASIC NOTIFICATION BAR
- 1A) THE HTML
- 1B) THE CSS
- 1C) THE DEMO
- 2) ADDING ICONS
- 2A) THE HTML
- 2B) THE CSS
- 2C) THE DEMO
- JAVASCRIPT ERROR NOTIFICATIONS
- 3) ADDING CLOSE BUTTONS
- 3A) THE HTML
- 3B) THE CSS
- 3C) THE DEMO
- 4) PACKAGED ERROR NOTIFICATIONS
- 4A) THE HTML
- 4B) THE JAVASCRIPT
- 4C) THE DEMO
- EXTRA BITS & LINKS
- LINKS & REFERENCES
- THE END
- Leave a Comment Cancel Reply
- Search
- Breakthrough Javascript
- Socials
- About Me
- Show Error Messages In HTML Forms (Simple Examples)
- TABLE OF CONTENTS
- DOWNLOAD & NOTES
- QUICK NOTES
- EXAMPLE CODE DOWNLOAD
- DISPLAY ERROR MESSAGES
- EXAMPLE 1) DEFAULT ERROR DISPLAY
- EXAMPLE 2) SHOW ERRORS AS-YOU-TYPE
- EXAMPLE 3) DISPLAY ERROR MESSAGES IN POPUP
- EXAMPLE 4) SHOW ERROR MESSAGE UNDER FIELD
- EXTRA BITS & LINKS
- LINKS & REFERENCES
- THE END
Как вывести ошибку в виде всплывающего окна?
Добрый вечер! Искал я значит в интернете, как же мне сделать так, чтобы запрос обрабатывался в PHP, но не открывалась пустая страница с описанием ошибки , а высвечивалось в виде всплывающего окна, как когда сайт запрашивает уведомления. И все бы ничего, нор я чувствую, что без JS тут не обойтись, а я в нем ноль. Суть такова: человек вводит свои данные для регистрации или авторизациия, эти данные сравниваются с требованиями( при регистрации и авторизации) и осуществляют поиск в БД, предварительно очистившись от неподходящих знаков с помощью filter. Но , как только происходит проверка, при нахождении открывается пустой файл с нужной надписью, чего мне не надо. В идеале, чтобы все проверки осуществлялись еще в момент написания того или иного поля. Вот код:
1 2 3 4 5 6 7 8 9 10 11 12 13 14 15 16 17 18 19 20 21 22 23 24 25 26 27 28 29
DOCTYPE html> html lang="en"> head> link rel="stylesheet" href="https://stackpath.bootstrapcdn.com/bootstrap/4.5.2/css/bootstrap.min.css" integrity="sha384-JcKb8q3iqJ61gNV9KGb8thSsNjpSL0n8PARn9HuZOnIxN0hoP+VmmDGMN5t9UJ0Z" crossorigin="anonymous"> meta charset="UTF-8"> title>Регистрацияtitle> head> body> div class="container mt-4"> div> h1>Регистрация на сайтеh1> form action="check.php" method="post"> input type="text" class="form-control" name="login" id="login" placeholder="Введите Ваш логин">br> input type="text" class="form-control" name="name" id="name" placeholder="Введите Ваше имя">br> input type="password" class="form-control" name="pass" id="pass" placeholder="Введите Ваш пароль">br> button class="btn btn-success" type="submit">Регистрацияbutton> form> div> div> h1>Авторизация на сайтеh1> form action="auth.php" method="post"> input type="text" class="form-control" name="login" id="login" placeholder="Введите Ваш логин">br> input type="password" class="form-control" name="pass" id="pass" placeholder="Введите Ваш пароль">br> button class="btn btn-success" type="submit">Авторизацияbutton> form> div> div> body> html> 1 2 3 4 5 6 7 8 9 10 11 12 13 14 15 16 17 18 19 20 21 22 23 24
$login = filter_var(trim($_POST['login']), FILTER_SANITIZE_STRING); $name = filter_var(trim($_POST['name']), FILTER_SANITIZE_STRING); $pass = filter_var(trim($_POST['pass']), FILTER_SANITIZE_STRING); if(mb_strlen($login) 5 || mb_strlen($login) > 30) { echo "Неверная длина имени ( Допустимая 5-30 символов"; exit(); } else if(mb_strlen($name) 2 || mb_strlen($name) > 20) { echo "Неверная длина имени ( Допустимая 2-20 символов"; exit(); } else if(mb_strlen($pass) 4 || mb_strlen($pass) > 20) { echo "Неверная длина пароля ( Допустимая 4-20 символов"; exit(); } $pass = md5($pass."werserusion12"); $mysql = new mysqli('localhost', 'root', 'dTp7)9vjcYEB8?uL', 'register-bd'); $mysql->query("INSERT INTO `users` (`login`, `pass`, `name`) VALUES('$login', '$pass', '$name')"); $mysql->close(); header('Location: index.php'); exit(); Тут могут быть еще ошибки, но если вы их найдете — напишите о них , пожалуйста, сюда! Заранее спасибо!
Simple Custom Error Messages With Pure CSS
Welcome to a quick tutorial on how to create custom error messages with pure CSS. By now, you should have experienced the intrusive default Javascript alert box. Every time it shows up, users get scared away.
We can create a custom non-intrusive error message with HTML .
Yep, it is that simple. Let us “improve and package” this simple error notification bar so you can reuse it easily in your project – Read on!
ⓘ I have included a zip file with all the source code at the start of this tutorial, so you don’t have to copy-paste everything… Or if you just want to dive straight in.
TABLE OF CONTENTS
DOWNLOAD & NOTES
Firstly, here is the download link to the example code as promised.
QUICK NOTES
If you spot a bug, feel free to comment below. I try to answer short questions too, but it is one person versus the entire world… If you need answers urgently, please check out my list of websites to get help with programming.
EXAMPLE CODE DOWNLOAD
Click here to download the source code, I have released it under the MIT license, so feel free to build on top of it or use it in your own project.
CSS-ONLY ERROR NOTIFICATIONS
Let us start with the raw basics by creating notification bars with just pure CSS and HTML.
1) BASIC NOTIFICATION BAR
1A) THE HTML
Information message Successful message Warning message Error message That is actually all we need to create a custom error message, an HTML with the notification message inside. Take note of the bar and info | success | warn | error CSS classes – We will use these to build the notification bar.
1B) THE CSS
/* (A) THE BASE */ .bar < padding: 10px; margin: 10px; color: #333; background: #fafafa; border: 1px solid #ccc; >/* (B) THE VARIATIONS */ .info < color: #204a8e; background: #c9ddff; border: 1px solid #4c699b; >.success < color: #2b7515; background: #ecffd6; border: 1px solid #617c42; >.warn < color: #756e15; background: #fffbd1; border: 1px solid #87803e; >.error
The CSS is straightforward as well –
- .bar is literally the “basic notification bar” with padding, margin, and border.
- .info | .success | .warn | .error sets various different colors to fit the “level of notification”.
Feel free to changes these to fit your own website’s theme.
1C) THE DEMO
2) ADDING ICONS
2A) THE HTML
To add icons to the notification bar, we simply prepend the messages with &#XXXX . For those who do not know – That &#XXXX is a “native HTML symbol”, no need to load extra libraries. Do a search for “HTML symbols list” on the Internet for a whole list of it.
P.S. Check out Font Awesome if you want more icon sets.
2B) THE CSS
Just a small addition to position the icon nicely.
2C) THE DEMO
JAVASCRIPT ERROR NOTIFICATIONS
The above notification bars should work sufficiently well, but here are a few small improvements if you are willing to throw in some Javascript.
3) ADDING CLOSE BUTTONS
3A) THE HTML
Not much of a difference here, except that we now add a that will act as the close button.
3B) THE CSS
/* (D) CLOSE BUTTON */ .bar < position: relative; >div.close
There is not much added to the CSS as well. We simply position the close button to the right of the notification bar, and that’s about it.
3C) THE DEMO
ℹ Information message
4) PACKAGED ERROR NOTIFICATIONS
4A) THE HTML
- target Target HTML container to generate the error message.
- msg The error or notification message.
- lvl Optional, error level.
4B) THE JAVASCRIPT
function ebar (instance) < // target : target html container // msg : notification message // lvl : (optional) 1-info, 2-success, 3-warn, 4-error // (A) CREATE NEW NOTIFICATION BAR let bar = document.createElement("div"); bar.classList.add("bar"); // (B) ADD CLOSE BUTTON let close = document.createElement("div"); close.innerHTML = "X"; close.classList.add("close"); close.onclick = () =>bar.remove(); bar.appendChild(close); // (C) SET "ERROR LEVEL" if (instance.lvl) < let icon = document.createElement("i"); icon.classList.add("ico"); switch (instance.lvl) < // (C1) INFO case 1: bar.classList.add("info"); icon.innerHTML = "ℹ"; break; // (C2) SUCCESS case 2: bar.classList.add("success"); icon.innerHTML = "☑"; break; // (C3) WARNING case 3: bar.classList.add("warn"); icon.innerHTML = "⚠"; break; // (C4) ERROR case 4: bar.classList.add("error"); icon.innerHTML = "☓"; break; >bar.appendChild(icon); > // (D) NOTIFICATION MESSAGE let msg = document.createElement("span"); msg.innerHTML = instance.msg; bar.appendChild(msg); // (E) ADD BAR TO CONTAINER instance.target.appendChild(bar); >
This may look complicated, but this function essentially just creates all necessary notification bar HTML.
4C) THE DEMO
EXTRA BITS & LINKS
That’s all for the tutorial, and here is a small section on some extras and links that may be useful to you.
LINKS & REFERENCES
THE END
Thank you for reading, and we have come to the end. I hope that it has helped you to better understand, and if you want to share anything with this guide, please feel free to comment below. Good luck and happy coding!
Leave a Comment Cancel Reply
Search
Breakthrough Javascript

Take pictures with the webcam, voice commands, video calls, GPS, NFC. Yes, all possible with Javascript — Check out Breakthrough Javascript!
Socials
About Me
W.S. Toh is a senior web developer and SEO practitioner with over 20 years of experience. Graduated from the University of London. When not secretly being an evil tech ninja, he enjoys photography and working on DIY projects.
Code Boxx participates in the eBay Partner Network, an affiliate program designed for sites to earn commission fees by linking to ebay.com. We also participate in affiliate programs with Bluehost, ShareASale, Clickbank, and other sites. We are compensated for referring traffic.
Show Error Messages In HTML Forms (Simple Examples)
Welcome to a quick tutorial on how to show error messages in HTML forms. This is probably one of the major bugbears for some beginners, how do we handle and show error messages for HTML forms?
There are no fixed ways to show errors in HTML forms, but the common methods to display error messages are:
- Simply add checking attributes to the HTML form fields, and the browser will automatically show the errors. For example,
- Use Javascript to show custom error messages as the user types in the fields.
- Collectively show all error messages in a popup box when the user submits an invalid form.
- Show error messages below the invalid fields.
That covers the broad basics, let us walk through detailed examples in this guide – Read on!
ⓘ I have included a zip file with all the source code at the start of this tutorial, so you don’t have to copy-paste everything… Or if you just want to dive straight in.
TABLE OF CONTENTS
DOWNLOAD & NOTES
Firstly, here is the download link to the example code as promised.
QUICK NOTES
If you spot a bug, feel free to comment below. I try to answer short questions too, but it is one person versus the entire world… If you need answers urgently, please check out my list of websites to get help with programming.
EXAMPLE CODE DOWNLOAD
Click here to download all the example source code, I have released it under the MIT license, so feel free to build on top of it or use it in your own project.
DISPLAY ERROR MESSAGES
All right, let us now get into the various examples of displaying error messages in an HTML form.
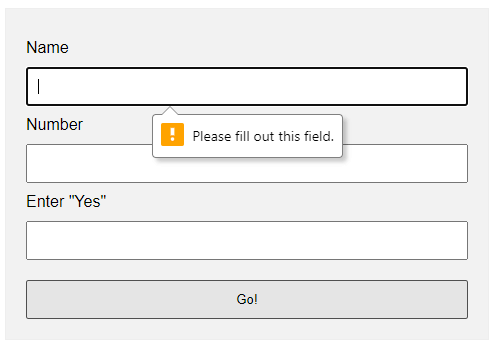
EXAMPLE 1) DEFAULT ERROR DISPLAY
Oh no, displaying error messages is SO DIFFICULT! Not. Just add the form checking attributes to the fields:
- required Self-explanatory. A required field that cannot be left blank.
- min-length max-length The minimum and maximum number of characters allowed.
- min max For number fields only, the minimum and maximum allowed values.
- pattern This field must match the custom pattern. Will leave a link in the extras section below if you want to learn more.
Yes, that’s all. The browser will do the rest of the magic.
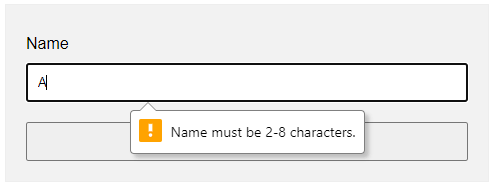
EXAMPLE 2) SHOW ERRORS AS-YOU-TYPE
This one is a little naggy and requires some Javascript. A couple of functions and properties to take note of here:
- document.getElementById(«ID») Get element by ID. Captain Obvious.
- FIELD.addEventListener(«input», FUNCTION) Run this function whenever the user types something in the field.
- FIELD.validity.tooLong FIELD.validity.tooShort FIELD.validity.valueMissing We can actually target various invalid statuses and show different messages. Will leave a link in the extras section below to the full list.
- FIELD.setCustomValidity(«MESSAGE») and FIELD.reportValidity() Show custom error message.
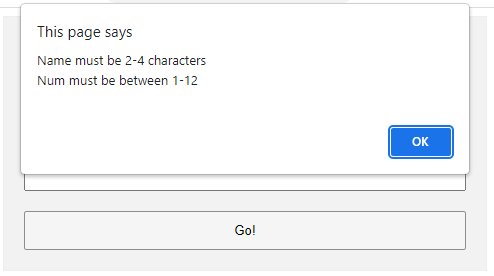
EXAMPLE 3) DISPLAY ERROR MESSAGES IN POPUP
- A novalidate has been added to the tag. This disables the default browser form checking, and we do our own in Javascript using onsubmit=»return check()» .
- The Javascript is pretty long-winded but straightforward.
- Use var error = «» to collect all the error messages.
- Fetch the field we want to check field = document.getElementById(«ID») .
- Add a message if it is invalid if (!field.checkValidity()) < error += "ERROR"; >
- That’s all, repeat the check for all fields.
- Lastly, show the error message if not empty and don’t allow the form submission if (error !=»»)
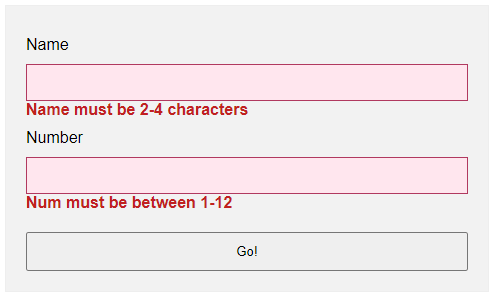
EXAMPLE 4) SHOW ERROR MESSAGE UNDER FIELD
.err < background: #ffe6ee; border: 1px solid #b1395f; >.emsg Number
Lastly, this is pretty much similar to the popup example.
- Use novalidate and onsubmit to do our own customization.
- But instead of showing in a popup, we attach a below all fields.
- On an invalid input, we show the error message in the instead.
EXTRA BITS & LINKS
That’s all for the tutorial, and here is a small section on some extras and links that may be useful to you.
LINKS & REFERENCES
THE END
Thank you for reading, and we have come to the end. I hope that it has helped you to better understand, and if you want to share anything with this guide, please feel free to comment below. Good luck and happy coding!