- Html show all text
- Раскрытие текста при нажатии на ссылку
- Открытие и закрытие контента на jQuery
- Кнопка «показать еще»
- Показать/скрыть текст. Примеры на JS, CSS
- Показать скрыть текст JS
- Показать скрыть текст CSS
- HTML-тег details: показать скрыть текст
- HTML tags for text
- The span tag
- The br tag
- The heading tags
- The strong tag
- The em tag
- Quotes
- Horizontal line
- Code blocks
- Lists
- Other text tags
Html show all text
Раскрытие текста при нажатии на ссылку
Раскрывающиеся блоки текста бывают очень удобны, когда требуется разместить на странице достаточно объемные текстовые и/или графические материалы второстепенной важности. Это могут быть какие-то пояснительные тексты к основному материалу, объемные цитаты и другая информация, которая может быть полезной для пользователя, но при этом не должна отвлекать от чтения. Сегодня я расскажу, как это можно сделать максимально просто с минимальным использованием скриптов и стилей.
Начнем с верстки. У нас есть блок текста, который будет раскрываться, и ссылка, при нажатии на которую это должно происходить. Все самое обычное, никаких нестандартных приемов верстки.
Что происходит при нажатии на ссылку? Блоку текста просто добавляется класс «opened». И да, это не обязательно должна быть именно ссылка, а любой HTML-элемент, который может обработать событие onclick. Теперь таблица стилей. Для удобства понимания я оставил только те параметры, которые относятся непосредственно к функционированию раскрываемых блоков.
Первоначально свернутый блок имеет высоту 100px, а свойство overflow: hidden не дает его содержимому выходить за эти размеры. При добавлении класса opened высота и перекрытие блока сбрасываются к дефолтным, в результате чего он раскрывается на всю высоту его содержимого. Последнее правило CSS скрывает уже ненужный блок со ссылкой.
Способ универсальный, работает во всех браузерах. Внутри раскрывающегося блока может находиться любой контент с любыми тегами и изображениями. Количество блоков тоже ничем не ограничивается, они просто должны иметь уникальные идентификаторы. Можно немного усовершенствовать скрипт, чтобы находить нужный текстовый блок через свойства parentNode и previousSibling и отказаться от использования идентификаторов. Здесь вы можете посмотреть готовую страницу с раскрывающимися текстовыми блоками.
Открытие и закрытие контента на jQuery
По своей сути «показать полностью» и «показать еще» это одно и тоже, но для каждого варианта в этой заметке используются разные решения.
В интернете масса различных примеров, как показать и скрыть контент, нажав на кнопку, но все они, как правило, реализованы для одного конкретного блока. В данной теме оба примера можно применять к неограниченному их числу.
Скрипты используемые в этих примерах сделаны для библиотеки jQuery
Кнопка «показать еще»
В этом примере часть контента с классом hide-content скрывается и показывается нажатием на кнопку или любой другой элемент с классом show-more
Каждая кнопка и скрытый текст должны находиться в контейнере content-block
Lorem ipsum dolor sit amet, consectetur adipiscing elit, sed do eiusmod tempor incididunt ut labore et dolore magna aliqua. Ut enim ad minim veniam, quis nostrud exercitation ullamco laboris nisi ut aliquip ex ea commodo consequat.
Duis aute irure dolor in reprehenderit in voluptate velit esse cillum dolore eu fugiat nulla pariatur. Excepteur sint occaecat cupidatat non proident, sunt in culpa qui officia deserunt mollit anim id est laborum.
Duis aute irure dolor in reprehenderit in voluptate velit esse cillum dolore eu fugiat nulla pariatur. Excepteur sint occaecat cupidatat non proident, sunt in culpa qui officia deserunt mollit anim id est laborum.
CSS в этом примере не выкладываю, т.к. оформление тут индивидуальное, но если кому нравится эта кнопка, ее код представлен ниже.
Показать/скрыть текст. Примеры на JS, CSS

Давайте рассмотрим разные примеры того, как можно показать/скрыть текст по нажатию на кнопку. Обычно такая функция называется спойлер или аккордеон. Это когда весь текст или половина его скрыта от просмотра, и только при нажатии на кнопку, или определённый элемент, открывается весь текст.
Разнообразие реализации такой фишки, как показать/скрыть текст может быть огромное количество. Есть разный подход к технической части: на чистой JavaScript, jQuery, чистый CSS, HTML. Для WordPress можно найти специальные плагины или сделать раскрывающийся текст без плагина.
Показать скрыть текст JS
Первые примеры будут с использованием JS/jQuery. Всё представленное ниже можно «прикрутить» к любому сайту на любой платформе. Внешний вид, то есть дизайн, легко редактируется с помощью CSS.
Первый пример Посмотреть демо
.spoiler_wrap < position: relative; margin-bottom: 20px; font-size: 22px; background: #fff; border-radius: 5px; height: fit-content; >.spoiler_title < cursor: pointer; >.spoiler_title, .spoiler_content < padding: 30px 26px; >.spoiler_content < padding-top: 0; padding-bottom: 10px; transition: 0.15s ease-out; height: auto; max-height: 0px; overflow: hidden; margin-top: -10px; opacity: 0; font-size: 14px; color: #444; >.spoiler_content p < font-size: 16px; margin: 20px 0; color: #333; line-height: 1.4; >.spoiler_content.open < margin-top: 0; max-height: 100%; opacity: 1; >.spoiler_title .spoiler_arrow < display: inline-block; margin-left: 15px; font-size: 20px; transition: all .1s; vertical-align: middle; >.spoiler_title .spoiler_arrow svg < fill: red; width: 13px; >.spoiler_title .spoiler_arrow.open
Второй пример Посмотреть демо
.morecontent span < display: none; >.morelink
Третий пример Посмотреть демо
.spoiler_wrap < border-bottom: 1px solid #999999; margin-bottom: 15px; >.spoiler_wrap.active .spoiler_content < max-height: 500px !important; padding-bottom: 25px; transition: max-height 0.5s ease, padding-bottom 0.3s ease; >.spoiler_wrap.active .spoiler_title < color: #808080; transition: color 0.3s ease; >.spoiler_content < color: #090909; font-family: serif; font-size: 16px; line-height: 24px; max-height: 0; overflow: hidden; transition: max-height 0.5s ease, padding-bottom 0.3s ease; >.spoiler_content p < margin-bottom: 25px; >.plus-minus-toggle < cursor: pointer; height: 21px; position: absolute; width: 21px; left: -40px; top: 50%; z-index: 2; >.plus-minus-toggle:before, .plus-minus-toggle:after < background: #000; content: ''; height: 4px; left: 0; position: absolute; top: 0; width: 21px; transition: transform 500ms ease; >.plus-minus-toggle:after < transform-origin: center; >.plus-minus-toggle.collapsed:after < transform: rotate(90deg); >.plus-minus-toggle.collapsed:before < transform: rotate(180deg); >.spoiler_title < color: #090909; font-family: sans-serif; font-size: 20px; font-weight: 800; text-transform: uppercase; position: relative; cursor: pointer; padding: 20px 0; transition: color 0.5s ease; >@media screen and (max-width: 767px) < .spoiler_title < font-size: 18px; >>
Четвертый пример Посмотреть демо
.spoiler_wrap < margin-bottom: 40px; >.spoiler_title_wrap < display: block; padding: 0px; >.spoiler_title < margin-bottom: 20px; font-size: 22px; font-weight: 600; color: #000; cursor: pointer; display: table; transition: all .3s ease-in-out; position: relative; >.spoiler_title:hover, .expanded .spoiler_title < opacity: 0.7; >.spoiler_content < font-size: 16px; border-radius: 5px; line-height: 26px; display: none; margin-bottom: 30px; padding: 30px; background: #333; position: relative; >.spoiler_content p < color: #999; margin-bottom: 25px; >.spoiler_content p:last-child < margin-bottom: 0px; >.arrow-t < transform: rotate(-45deg); display: block; position: absolute; top: 7px; right: -33px; width: 10px; height: 10px; background: transparent; border-left: 3px solid #000; border-bottom: 3px solid #000; transition: all .3s ease-in-out; >.arrow-b
Пятый пример Посмотреть демо
.text_hide_wrap < max-width: 700px; >.item_text < width: 100%; padding: 20px; >.item_text p < margin-bottom: 20px; >.io_item < width: 100%; padding-bottom: 20px; >.io_button_wrap < text-align: center; margin-top: 10px; >.io_button < display: inline-block; border: 1px solid #f00; width: auto; padding: 0 20px; line-height: 32px; vertical-align: top; text-transform: uppercase; color: #f00 !important; font-size: 10pt; border-radius: 22px; cursor: pointer; >a.io_button:hover < text-decoration: none; >.io_item .btn_close < display: none; >.io_item .btn_open < display: inline-block; >.io_item.open .btn_close < display: inline-block; >.io_item.open .btn_open < display: none; >.io_trans < width: inherit; position: absolute; height: 80px; bottom: 0; pointer-events: none; background: linear-gradient(to bottom, rgba(255, 255, 255, 0) 0%, rgba(255, 255, 255, 1) 100%); transition: 1s; >.io_item.open .io_trans < height: 0; transition: 1s; >.io_item_wrap < position: relative; overflow: hidden; max-height: 100px; width: inherit; transition: max-height 0.5; >.io_item.open .io_item_wrap
Показать скрыть текст CSS
Подобное скрытие текста можно реализовать одними средствами CSS и HTML. И это не значит какой-то недостаток. В том плане, что будет хуже, чем с помощью JS/jQuery. Да и в целом многое зависит от поставленной задачи. И помните, всегда можно отредактировать стили под свой дизайн сайта.
Первый пример Посмотреть демо
текстCSS
.spoiler_content < opacity: 1; transition: opacity 0.4s ease-in-out; >.spoiler_content p < text-align: left; margin-bottom: 5px; >.read-more-state < display: none; >.text_hide < opacity: 0; max-height: 0; font-size: 0; transition: opacity 0.4s ease-in-out; >.read-more-state:checked~.spoiler_content .text_hide < opacity: 1; font-size: inherit; max-height: 999em; >.read-more-state:checked~.spoiler_content p < margin-bottom: 20px; >.read-more-state~.read-more-trigger:before < content: 'Показать всё'; >.read-more-state:checked~.read-more-trigger:before < content: 'Скрыть текст'; >.read-more-trigger
Второй пример Посмотреть демо
.spoiler_wrap < position: relative; min-height: 30px; margin-bottom: 15px; >.spoiler_title < width: 100%; position: absolute; top: 0; left: 0; margin: 0; height: 30px; z-index: 1; font-weight: 600; font-size: 18px; >.toggle:checked~.spoiler_title, .spoiler_title:hover < color: #EA2816; >.icon < height: 18px; position: absolute; width: 18px; right: 0; top: 11px; z-index: 2; >.icon:before, .icon:after < background: #333; content: ''; height: 4px; right: 0; position: absolute; top: 0; width: 18px; transition: transform 500ms ease; >.toggle:checked~.icon:before, .toggle:checked~.icon:after < background: #EA2816; >.toggle:not(:checked)~.icon:before < transform: rotate(180deg); >.toggle:not(:checked)~.icon:after < transform: rotate(90deg); >.toggle < width: 100%; height: 40px; margin: 0; opacity: 0; cursor: pointer; position: absolute; top: 0; z-index: 3; >.border < height: 40px; border-bottom: 1px solid #333; >.toggle:checked~.border < border-bottom: 1px solid #EA2816; >.spoiler_content < padding: 15px 0 0 0; height: 0; overflow: hidden; z-index: -1; position: relative; opacity: 0; transition: .4s ease; >.toggle:checked~.spoiler_content < height: auto; opacity: 1; z-index: 2; >.spoiler_content>p
HTML-тег details: показать скрыть текст
Есть совсем простое решение, чтобы создать кнопку, при нажатии на которую открывается текст. Для этого существуют специальные теги в HTML 5, такие как , . По сути, их можно использовать даже без стилей CSS. Но чтоб всё сделать красиво, конечно, желательно применить каскадную таблицу.
Что такое спойлер?
текст
Открытый спойлер
текст
details < min-height: 5px; padding: 25px 70px 25px 25px; margin: 0 auto; position: relative; font-size: 22px; border: 1px solid #333; border-radius: 10px; box-sizing: border-box; transition: all .3s; >details+details < margin-top: 20px; >details[open] < min-height: 50px; >details[open] summary ~ * < animation: anspl .3s cubic-bezier(.52,.41,.75,.74); >@keyframes anspl < 0% 100% > details p < color: #444; font-weight: 400; margin: 15px 0; >details p:last-child < margin-bottom: 0px; >summary < display: flex; align-items: center; font-weight: 500; cursor: pointer; >summary:focus < outline: none; >summary::-webkit-details-marker < display: none >summary::before < content: '+'; padding-right: 0.5em; >details[open]>summary::before
HTML tags for text
Inside it, we can add any inline element we like, like span or a .
We cannot add block elements.
We cannot nest p elements one into another.
By default browsers style a paragraph with a margin on top and at the bottom. 16px in Chrome, but the exact value might vary between browsers.
This causes two consecutive paragraphs to be spaced, replicating what we think of a “paragraph” in printed text.
The span tag
This is an inline tag that can be used to create a section in a paragraph that can be targeted using CSS:
p>A part of the text span>and here another partspan>p>The br tag
This tag represents a line break. It’s an inline element, and does not need a closing tag.
We use it to create a new line inside a p tag, without creating a new paragraph.
And compared to creating a new paragraph, it does not add additional spacing.
The heading tags
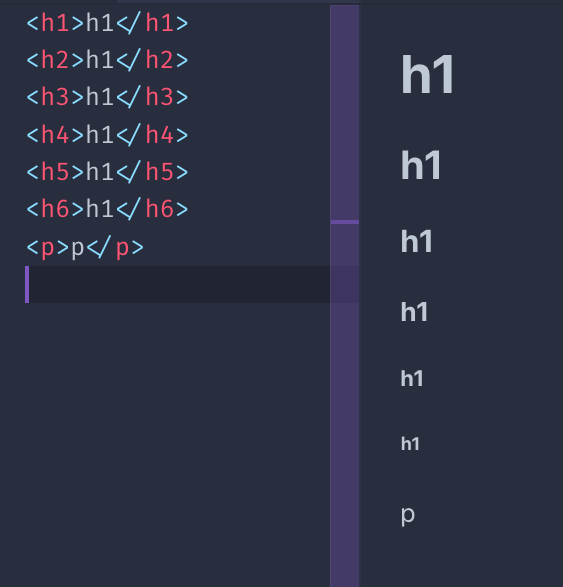
HTML provides us 6 heading tags. From most important to least important, we have h1 , h2 , h3 , h4 , h5 , h6 .
Typically a page will have one h1 element, which is the page title. Then you might have one or more h2 elements depending on the page content.
Headings, especially the heading organization, are also essential for SEO, and search engines use them in various ways.
The browser by default will render the h1 tag bigger, and will make the elements size smaller as the number near h increases:
All headings are block elements. They cannot contain other elements, just text.
The strong tag
This tag is used to mark the text inside it as strong. This is pretty important, it’s not a visual hint, but a semantic hint. Depending on the medium used, its interpretation will vary.
Browsers by default make the text in this tag bold.
The em tag
This tag is used to mark the text inside it as emphasized. Like with strong , it’s not a visual hint but a semantic hint.
Browsers by default make the text in this italic.
Quotes
The blockquote HTML tag is useful to insert citations in the text.
Browsers by default apply a margin to the blockquote element. Chrome applies a 40px left and right margin, and a 10px top and bottom margin.
The q HTML tag is used for inline quotes.
Horizontal line
Not really based on text, but the hr tag is often used inside a page. It means horizontal rule , and it adds an horizontal line in the page.
Useful to separate sections in the page.
Code blocks
The code tag is especially useful to show code, because browsers give it a monospaced font.
That’s typically the only thing that browsers do. This is the CSS applied by Chrome:
code font-family: monospace; >This tag is typically wrapped in a pre tag, because the code element ignores whitespace and line breaks. Like the p tag.
Chrome gives pre this default styling:
pre display: block; font-family: monospace; white-space: pre; margin: 1em 0px; >which prevents white space collapsing and makes it a block element.
Lists
Unordered lists are created using the ul tag. Each item in the list is created with the li tag:
ul> li>Firstli> li>Secondli> ul>Ordered lists are similar, just made with the ol tag:
ol> li>Firstli> li>Secondli> ol>The difference between the two is that ordered lists have a number before each item:
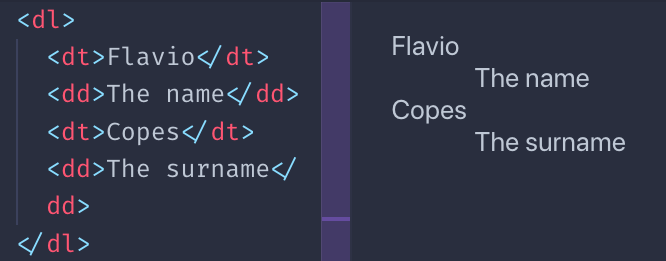
Definition lists are a bit different. You have a term, and its definition:
dl> dt>Flaviodt> dd>The namedd> dt>Copesdt> dd>The surnamedd> dl>This is how browsers typically render them:
I must say you rarely see them in the wild, for sure not much as ul and ol , but sometimes they might be useful.
Other text tags
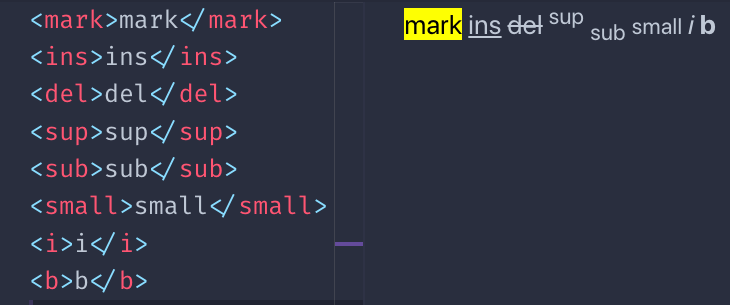
There is a number of tags with presentational purposes:
- the mark tag
- the ins tag
- the del tag
- the sup tag
- the sub tag
- the small tag
- the i tag
- the b tag
This is an example of the visual rendering of them which is applied by default by browsers:
You might wonder, how is b different than strong ? And how i is different than em ?
The difference lies in the semantic meaning. While b and i are a direct hint at the browser to make a piece of text bold or italic, strong and em give the text a special meaning, and it’s up to the browser to give the styling. Which happens to be exactly the same as b and i , by default. Although you can change that using CSS.
There are a number of other, less used tags related to text. I just mentioned the ones that I see used the most.