- Radio Button In HTML: Complete Guide
- HTML Radio Button
- HTML Radio Button Group
- Radio Button Value
- Checked Radio Button
- Radio Button Attributes
- Radio Button Label
- Radio button onclick
- Radio Button Style
- Data Representation Of Radio Group
- Conclusion
- Add Multiple Radio Button Groups in HTML
- Use the Different Value for the name Attribute for Different Groups of Radio Button in HTML
Radio Button In HTML: Complete Guide
In this article, you will learn everything about the HTML radio button. Its use, how to group it, how to style it using CSS, adding triggering events on it using JavaScript, etc.
You must have filled some online form before and would have interacted with options in a form where you have multiple choices to select but only one can be selected. Example gender selection , blood group selection , etc.
These are called radio buttons . Ideally, only one radio button can be selected for a single choice. For example, you can either select male , female , or transgender for gender selection.
HTML Radio Button
A radio button is an element of type=»radio» which is used to select only one choice among multiple choices.
It is generally used within a form but can be used alone.
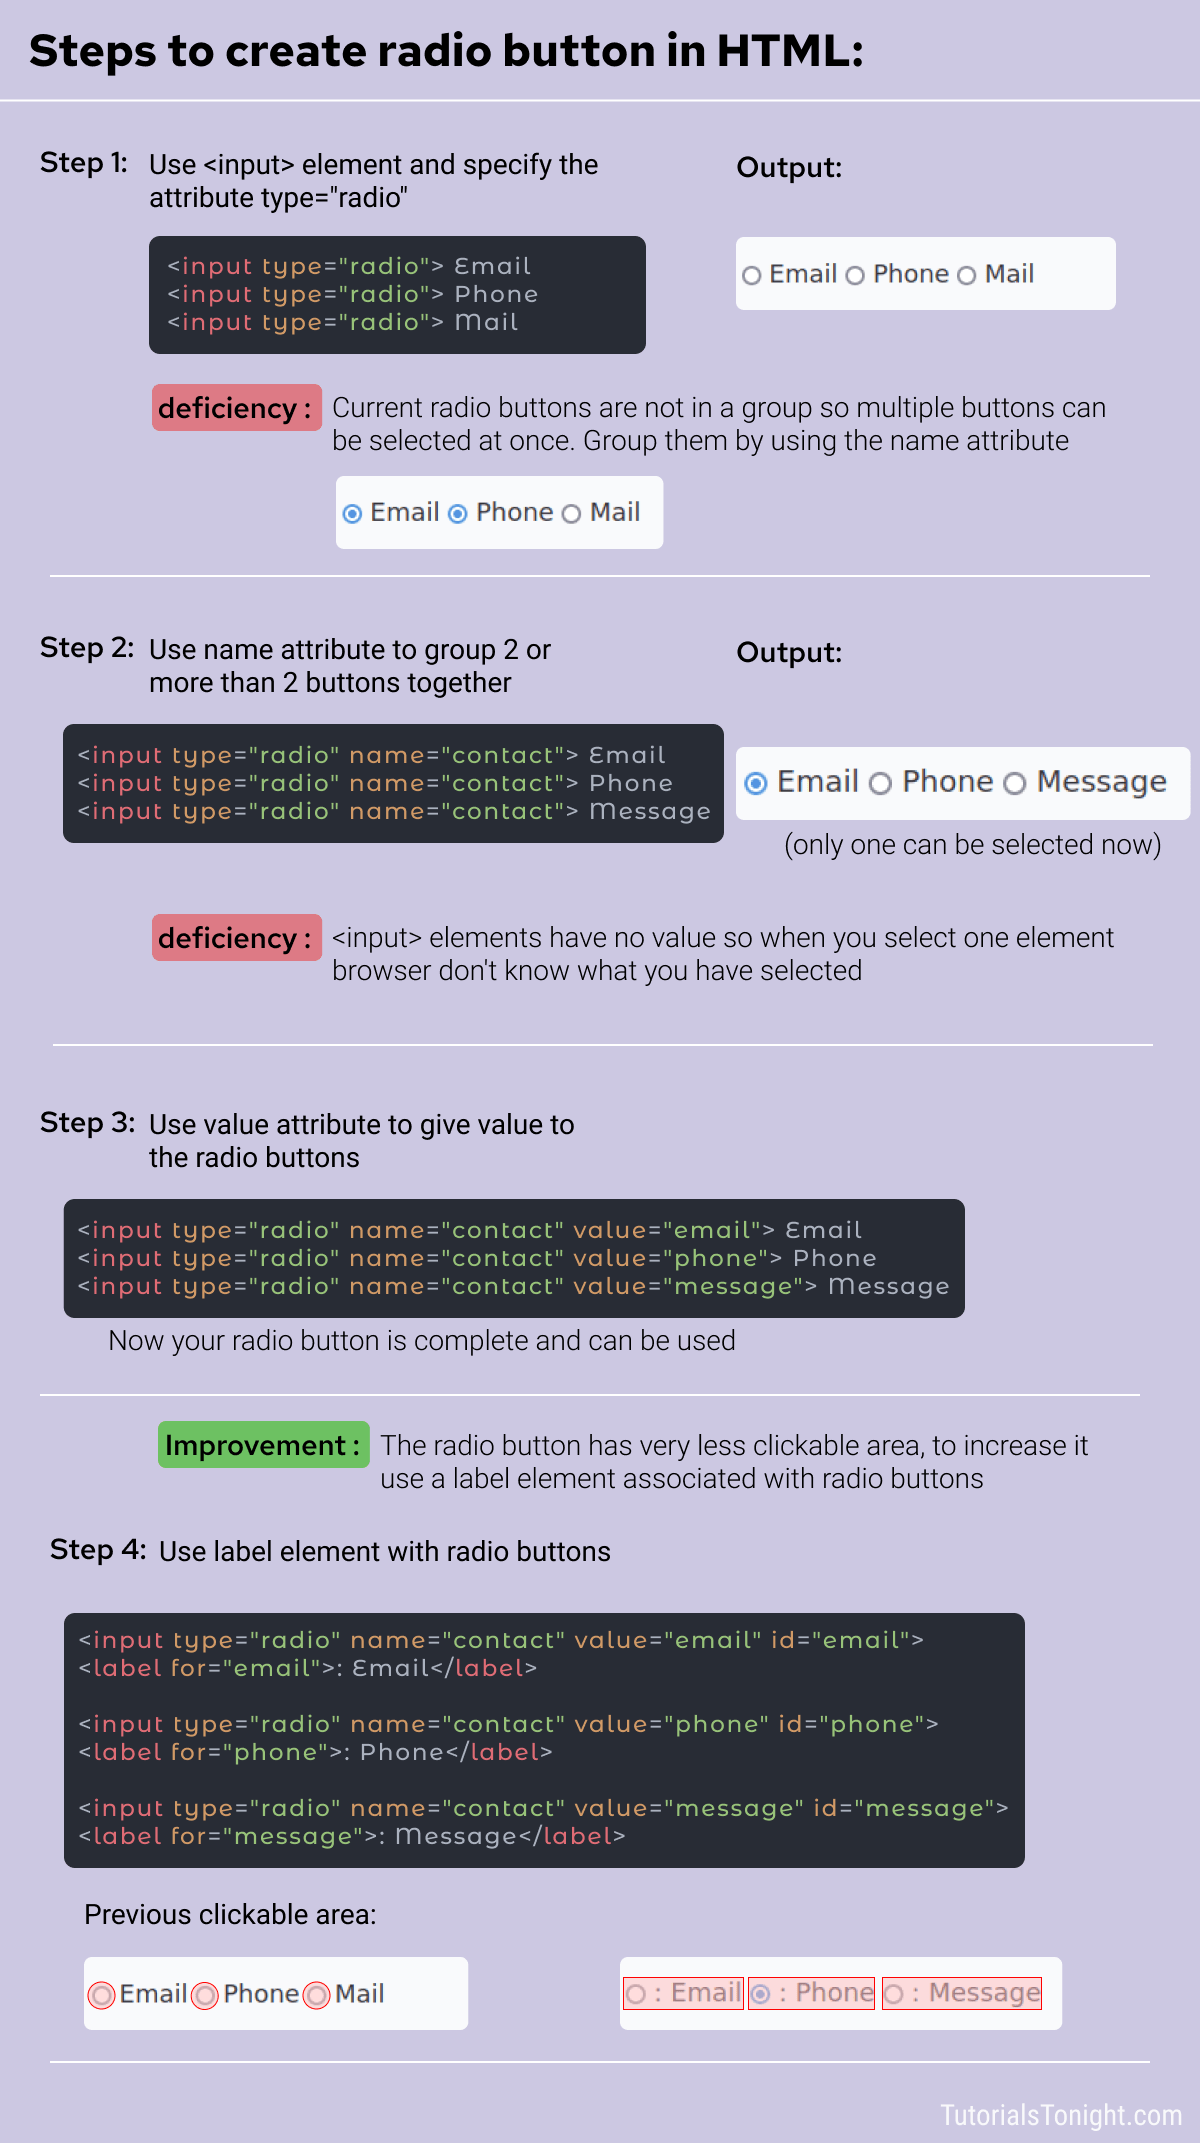
To create a radio button give element a type of radio . Example
Here is an example of an HTML radio button:
HTML radio button example
You can check the above output by clicking on the button and you will observe that not only one choice but multiple choices can be selected above. Thinking why? 💭🤔
This is because none of the radio buttons are connected to each other with a common purpose. They are all independent and can be used for different purposes that are multiple of them are selected at a time.
To connect them together give them a common purpose by specifying name attribute.
HTML Radio Button Group
Practically radio buttons are used in group . So that when one button is selected then the other already get unselected if it was previously selected.
In a group of radio buttons, all the radio elements are connected. Only one button can be selected at a time.
Here is an example where radio buttons are not part of a group .
Radio buttons in the above example are not part of any group.
A radio group is defined by the name attribute. When 2 or more radio buttons are in a group they have the same name attribute.
When multiple radio buttons are given the same name then it becomes part of a group and when you select any radio button of that group it automatically deselects any other selected button in that group.
In the above example, all three radio buttons are part of a single group with name=»contact» which put them in a single group.
Radio Button Value
All radio buttons shown above have no value. This means if you select one then they don’t know for what value you want to select it.
Just an option written in front of it doesn’t mean it will take it as input.
To specify value for radio button give it a value attribute. Example
Now if you select any radio button then it will take the value of that radio button as input.
You have done a lot😊 let’s relax for a minute🍸🍹

What we have covered till now:
- Radio button is created using element having type=»radio»
- Radio button must have name attribute to be part of a group.
- Radio button should have value attribute to specify value for that radio button.
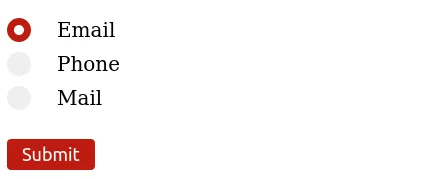
Checked Radio Button
It is better to select the most probable radio button by default because if no option is selected while submitting the form then the radio group is not included in the submitted data at all.
You can do it by using the checked attribute.
checked attribute is a boolean attribute. It is either true or false .
Just using checked is same as checked=»true» .
Example: HTML radio button default selected
Radio Button Attributes
Here is a brief description of some frequently used attributes in radio buttons.
| Attribute | description |
|---|---|
| type | It specifies input type, it must be added to create the type of button you want, i.e. radio |
| name | It creates a radio group, 1 or more than one radio buttons with the same name comes under same group |
| value | It delivers the selected button to the server if the radio button is checked |
| checked | It selects a radio button by default |
Radio Button Label
Radio buttons has a very small clickable area, you have to pin-point the small box to click it. But you can increase the clickable area by using a label with a radio button.
Radio button label is created using element.
Radio button label must have a for attribute that targets the radio button.
And the radio button must have an id attribute that with the same value is used in for attribute.
Example: HTML radio button label
Now the clickable area of the radio button is increased. You can select any radio button either by clicking on the label or by clicking on the radio button.
Radio button onclick
You can trigger an event to know which radio button is checked. For this select all radio buttons and add an onclick event to all button.
When the button is checked the event will be triggered and you can alert a message with it.
// selecting radio button const buttons = document.querySelectorAll("input[type='radio']"); // adding event to all radio buttons buttons.forEach(button => < button.onclick = () => < if (button.checked) < alert(button.value + " selected as contact option!"); >> >)Radio Button Style
Create your own custom radio button and style it using CSS since the browser’s radio button is styled by the browser itself.
Let the HTML code for the form with radio button be as follows:
Here is complete CSS code to create a custom styled radio button.
label < display: block; position: relative; padding-left: 50px; margin: 10px 0; cursor: pointer; font-size: 20px; >/* Hide the default radio button */ label input < position: absolute; opacity: 0; cursor: pointer; >/* Creating own radio button to style */ .custom-radio-button < position: absolute; top: 0; left: 0; height: 24px; width: 24px; background-color: #eee; border-radius: 50%; >/* hover effect on unchecked buttons */ label:hover input+.custom-radio-button < background: #fdd; >/* button checked */ label input:checked+.custom-radio-button < background-color: #bd1c10; >/* White dot on checked radio button (hidden) */ label .custom-radio-button::after < content: ""; display: none; position: absolute; width: 10px; height: 10px; border-radius: 50%; background: white; top: 50%; left: 50%; transform: translate(-50%, -50%); >/* Show the dot on checked button */ label input:checked+.custom-radio-button::after < display: block; >input[type="submit"]
Data Representation Of Radio Group
When a form is submitted with a radio button then the form’s data include an entry in the form name=value , here in the above case, one option could be contact=email .
If there is no value attribute in a radio button then data related to the radio button is not reported to the server.
Conclusion
You learned about radio buttons. Creating a group of radio buttons. Different types of attributes in it. Triggering an event when the button is checked and learned to style radio buttons.
You can also style the radio buttons using CSS.
Add Multiple Radio Button Groups in HTML

In this article, we will introduce a method to add multiple groups of radio buttons in one form in HTML.
Use the Different Value for the name Attribute for Different Groups of Radio Button in HTML
While working with radio buttons in HTML, sometimes you might need to use multiple groups of radio buttons in a single form. In such a case, selecting a group’s radio button may deselect the other group’s radio button.
To eliminate this problem, the value of the name attribute in the button element of the two groups must be different. It means that for the first group of radio buttons, we should use the same value for the name attribute in all of the radio buttons.
For the second group, the value of the name attribute should be different from the first group, but all the radio buttons in the second group should have the same value.
We can also use the fieldset element to separate the two groups visually. The tag groups the related elements in HTML.
In the example below, we will create two groups of radio buttons. In the first group, the user will be able to select a motorcycle, and in the second group, they will be able to select a car.
For example, create a form using the tag. Then, use the tag for the group of motorcycle radio buttons.
Create a radio button for Honda and set the value motorcycle for the name attribute. Next, create another radio button for Yamaha and again set the value of the name attribute to motorcycle .
After closing the tag, create another fieldset element for car radio buttons. In the car, create radio buttons for Hyundai and Toyota .
Set the name attribute’s value to car for both the buttons. The code example is shown below.
form> Select a Motorcyle fieldset id="motorcyle"> input type="radio" value="Honda" name="motorcycle"> label for="Honda">Hondalabel>br> input type="radio" value="Yamaha" name="motorcycle"> label for="Yamaha">Yamahalabel>br> fieldset>br> Select a Car fieldset id="car"> input type="radio" value="Hyundai" name="car"> label for="hyundai">Hyundailabel>br> input type="radio" value="Toyota" name="car"> label for="toyota">Toyotalabel>br> fieldset> form>