- Форма авторизации на простом HTML с пояснениями
- Базовая разметка простой формы авторизации:
- ✨Build a Login and Register Form with HTML and CSS✨
- Table of Contents
- 1. Gather Resources
- 2. Getting Started with Fire-UI
- Fire-UI : A User-Friendly and Reliable CSS Framework
- Stanley Owen ・ Dec 19 ’20 ・ 1 min read
- 3. Start building your Landing Page
- a. Setup Fire-UI
- Happy Coding! 🎉
Форма авторизации на простом HTML с пояснениями
Добрый день. Конечно всем эта тема знакома уже много лет, но она будет кому то полезна особенно новичкам, которые ищут форму авторизации. Формы бывают разные и я буду добавлять новые, чтобы кто то не тратил много времени на поиски готовых решений. Это будут формы авторизации из двух полей, форма авторизации по номеру телефона, форма авторизации с «галочкой» запомнить, а так же формы авторизации с капчей от гугл. Еще добавлю, что все формы будут иметь уникальные классы блоков, что позволит их использовать на любых проектах, чтобы не ломать действующие возможные стили и пересечения классов блоков.
Базовая разметка простой формы авторизации:
Базовая разметка HTML для простой формы авторизации:
Авторизация
В данной разметке мы создали простой блок родитель в котором будут храниться все остальные блоки, как видно их не так много. Блоки названы одноименными классами, так легче понять о чем идет суть и какие стили к чему относятся в структуре. Обратите внимание на type для двух input, поскольку первый является полем для ввода имейл адреса его тип выбран как email это позволит пользователю в простой проверке браузера избежать ошибки к примеру в отсутствии @ или попросту точки перед доменной зоной.
Второй input имеет тип password это скрывает пароль от глаз в виде точек. Это не так критично, многие предпочитают тип text, но правильнее все же будет использовать тип password, о других нюансах выбора типа поля input будет рассказано в другой статье.
Placeholder — простым словом «тег подсказка», он дает возможность указать для пользователя что ему требуется сделать, что разрешено, а что нет. Можно указать любое значение. Обратите внимание что тег placeholder можно изменить с помощью стилей CSS.
Обратите внимание что в input так же задано свойство name, оно необходимо для последующей работы с формой, когда дело доходит до ее обработки на сервере. Это значение нужно делать уникальным и желательно схожим по названию отражающем его сущность. Если это форма авторизации, то логичнее всего задать name=»auth_email», таким образом мы будем понимать что это свойство отвечает за передачу email адреса из формы авторизации. Многие новички в последующем делают частую ошибку работая с обработкой этих данных на сервере, особенно работая по паттерну MVC, когда в контроллере срабатывает событие к примеру submit а данные свойства name остаются везде одинаковые к примеру name=»email».
Простые стили к форме авторизации без адаптации под мобильные устройства:
.form_auth_block < width: 500px; height: 500px; margin: 0 auto; background: url(http://www.dailycompass.org/wp-content/uploads/2013/01/Bubbles.jpg); background-size: cover; border-radius: 4px; >.form_auth_block_content < padding-top: 15%; >.form_auth_block_head_text < display: block; text-align: center; padding: 10px; font-size: 20px; font-weight: 600; background: #ffffff; opacity: 0.7; >.form_auth_block label < display: block; text-align: center; padding: 10px; background: #ffffff; opacity: 0.7; font-weight: 600; margin-bottom: 10px; margin-top: 10px; >.form_auth_block input < display: block; margin: 0 auto; width: 80%; height: 45px; border-radius: 10px; border:none; outline: none; >input:focus < color: #000000; border-radius: 10px; border: 2px solid #436fea; >.form_auth_button < display: block; width: 80%; margin: 0 auto; margin-top: 10px; border-radius: 10px; height: 35px; border: none; cursor: pointer; >::-webkit-input-placeholder // Это стили для placeholder ::-moz-placeholder // Это стили для placeholder :-moz-placeholder // Это стили для placeholder :-ms-input-placeholder // Это стили для placeholder
И вот что у нас получилось в итоге:
Простая форма авторизации из двух полей и небольшим количеством стилей. Давайте усложним задачу и сделаем эту форму более отзывчивой и добавим ей немного мобильной адаптации.
✨Build a Login and Register Form with HTML and CSS✨

Photo By unsplash.com In this article, today we will learn how to build a simple but aesthetic Login and Register Form. 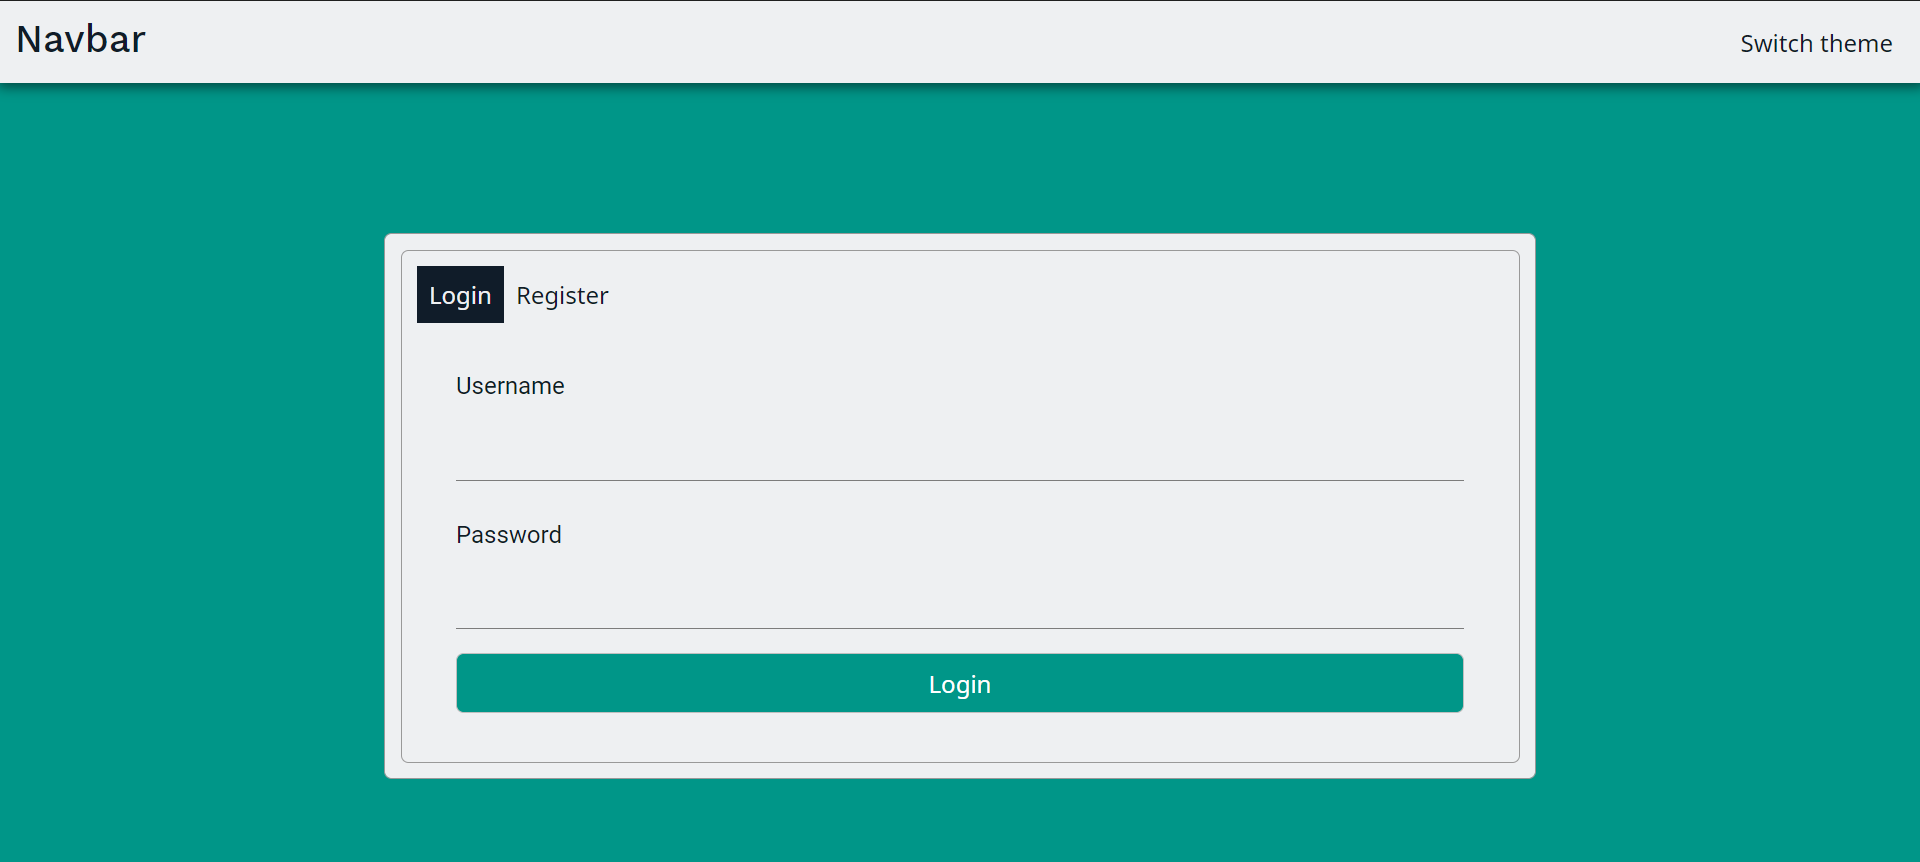 You can access the full code here and the demo page here!
Table of Contents
- Gather Resources
- Getting Started with Fire-UI
- Start building your Landing Page
- Setup Fire-UI
- Create Navigation Bar (Navbar)
- Create Login and Register Form
1. Gather Resources
Before we continue further, some resources you might need before we start coding 👩💻👩💻 :
- Basic knowledge of HTML
- Text Editor (Either Visual Studio Code or Sublime Text is recommended)
- A Search Engine (Google, Mozilla, etc will be fine)
So that’s all for our resources, and I believed that you have downloaded all these resources. If haven’t, you can open the link provided above.
2. Getting Started with Fire-UI
Fire-UI is a CSS Library allowing for easier and more standards-compliant web design.
You can read the following blog to know more about Fire-UI

Fire-UI : A User-Friendly and Reliable CSS Framework
Stanley Owen ・ Dec 19 ’20 ・ 1 min read
To keep it simple and fast, we will move on to the next part.
3. Start building your Landing Page
a. Setup Fire-UI
Now open your text editor and type the basic of HTML:
charset="utf-8"> name="viewport" content="width=device-width, initial-scale=1"> Login and Register Template Hello World Save the following files with index.html , then we will start setting up Fire-UI. There are some methods to configure and connect Fire-UI. But in this tutorial, we will keep it simple, which is using CDN through jsdelivr :
rel="stylesheet" type="text/css" href="https://cdn.jsdelivr.net/npm/@fire-ui/fire-ui@0.2.4/FireUI.min.css"> src="https://cdn.jsdelivr.net/npm/@fire-ui/fire-ui@0.2.4/FireUI.min.js"> Thus, your index.html will now look like this:
lang="en"> charset="utf-8"> name="viewport" content="width=device-width, initial-scale=1"> rel="stylesheet" type="text/css" href="https://cdn.jsdelivr.net/npm/@fire-ui/fire-ui@0.2.4/FireUI.min.css"> src="https://cdn.jsdelivr.net/npm/@fire-ui/fire-ui@0.2.4/FireUI.min.js"> Login and Register Template Hello World! 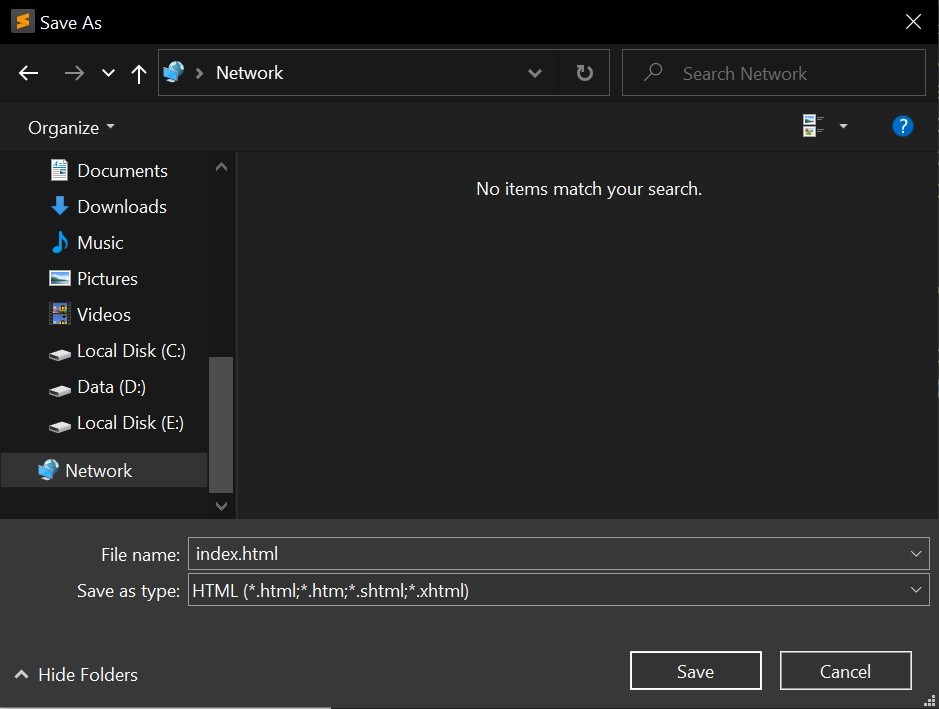
After that, save the file as .html extension like the picture below:
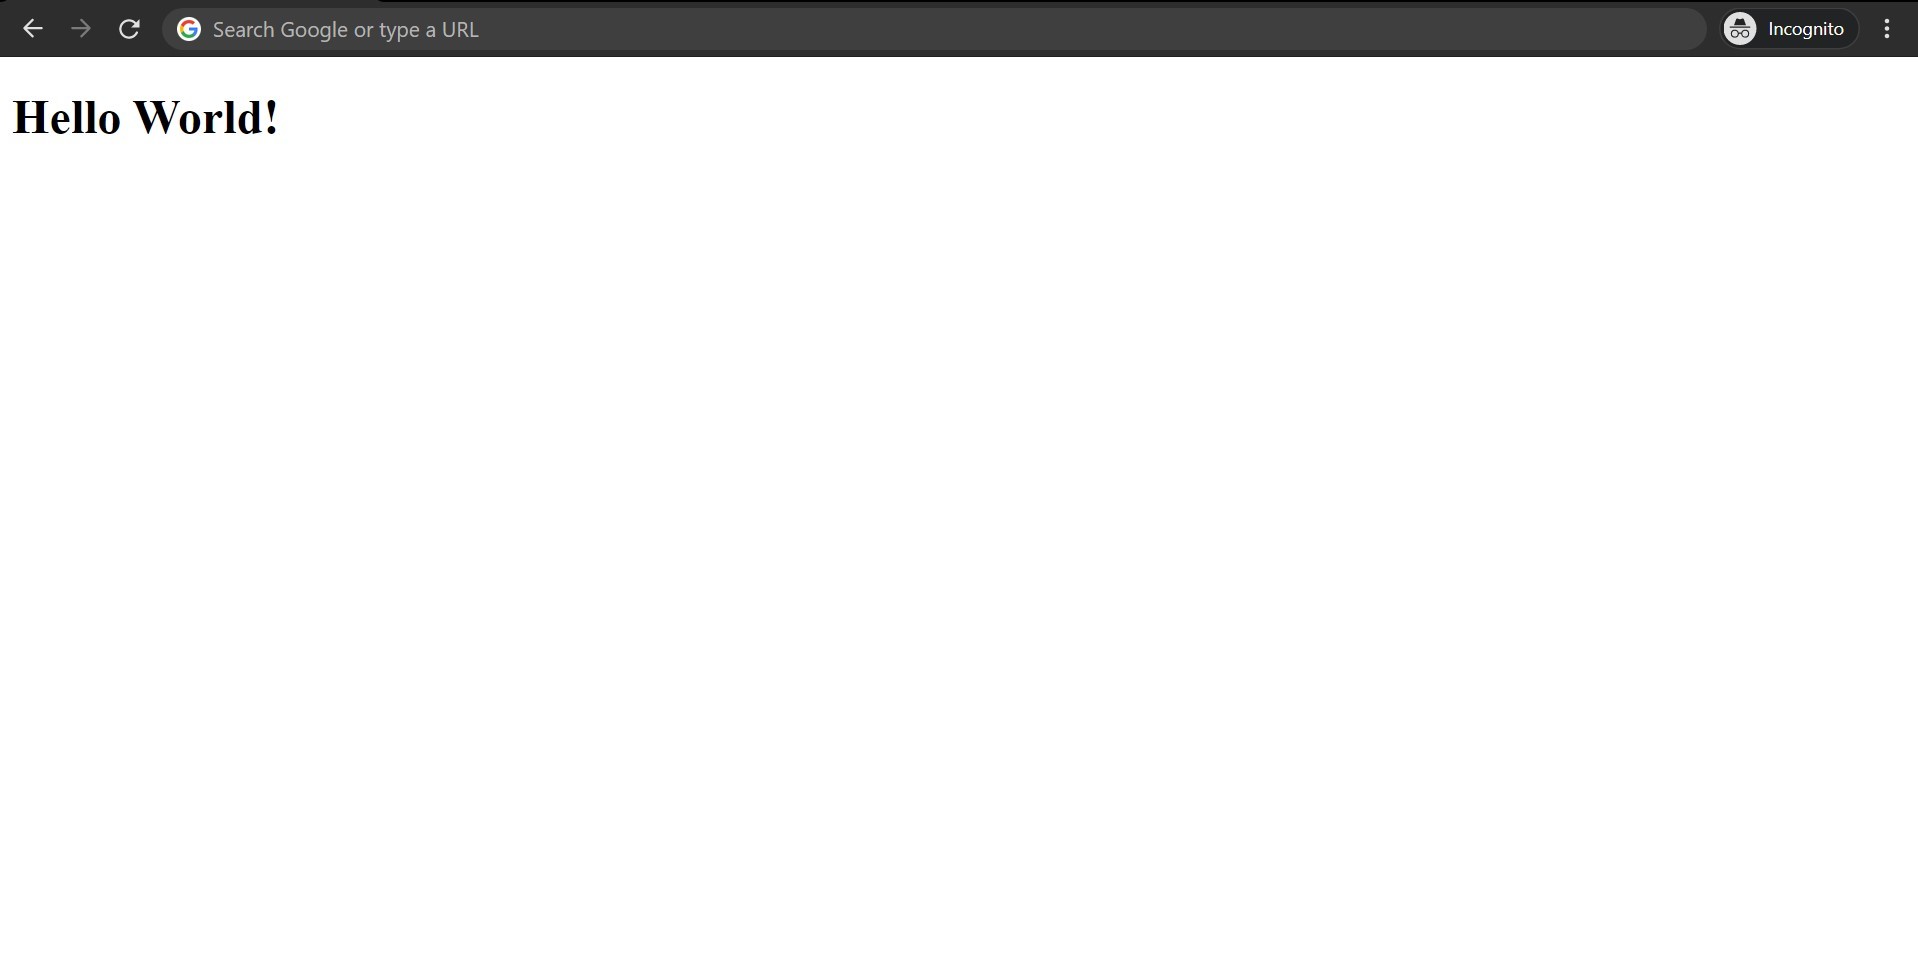
Find the file that you have just save it recently, run it with your default browser and you will see the result like this:
Before continuing further, you can access our full code in the following link: here

Now what we are going to to is to create navigation bar (navbar). If you didn’t sure what is navbar, here is how navbar look like:
- Remove the content of body
- Add the attribute theme = ‘light’ in the body element
- Copy and paste the Navbar code
class="topnav theme-reverse topnav-shadow"> class="topnav-brand">Navbar class="topnav-hamburger-menu" data-target = "myTopnav">☰ class="topnav-right" id="myTopnav"> class="topnav-item" data-switch-theme="light, dark, aqua, sky, phoenix, indigo, teal">Switch theme b. Create Login and Register Form
Then we come to the challenging part, which is building the login and register form.
Copy these code to your text editor:
id="form"> className="centeredForm"> class="box theme-reverse"> class="box"> class="tab" data-tab="formTab"> class="tab-btn btn-dark" data-content="login">Login class="tab-btn btn-light" data-content="register">Register class="tab-contents" id="formTab"> id="login" class="tab-content tab-content-active"> action="#" method="POST"> class="form-group form-animate"> for="login-username" class="form-label">Username type="text" class="input-animate" id="login-username" required autocomplete="username"> class="form-group form-animate"> for="login-password" class="form-label">Password type="password" class="input-animate" id="login-password" required autocomplete="current-password"> class="form-group"> class="btn form-control theme-adjust">Login id="register" class="tab-content"> id="helloWorld" class="tab-content tab-content-active"> action="#" method="POST"> class="form-group form-animate"> for="reg-username" class="form-label">Username type="text" class="input-animate" id="reg-username" required autocomplete="username"> class="row"> class="col-6"> class="form-group form-animate"> for="reg-password" class="form-label">Password type="password" class="input-animate" id="reg-password" required autocomplete="new-password"> class="col-6"> class="form-group form-animate"> for="confirm-password" class="form-label">Confirm Password type="password" class="input-animate" id="confirm-password" required autocomplete="new-password"> type="checkbox" id="label" required> for="label">By signing up, you agree to our href="#">Terms and Condition and our href="#">Privacy Policy class="form-group"> class="btn form-control theme-adjust">Register class="mb-5">