- Getting the Value of Checked Radio Buttons
- Free eBook
- Using querySelector
- Browser support
- Free eBook
- Learn JavaScript the right way.
- Как получить значение выбранной радиокнопки с помощью JavaScript?
- Перебор всех чекбоксов
- Использование селектора :checked
- Установленное значение в форме
- Radio Button In HTML: Complete Guide
- HTML Radio Button
- HTML Radio Button Group
- Radio Button Value
- Checked Radio Button
- Radio Button Attributes
- Radio Button Label
- Radio button onclick
- Radio Button Style
- Data Representation Of Radio Group
- Conclusion
Getting the Value of Checked Radio Buttons
The most complete guide to learning JavaScript ever built.
Trusted by 82,951 students .
In this post you’ll learn a few ways to get the selected value of a radio input ( ) and look at different ways of achieving the same result.
We’ll answer questions such as “How do I get the selected and checked value of a radio group?” and also “How do I get the selected and checked radio button Node?”. Let’s go!
Really, we would like to get the selected value from our radio buttons — so let’s create some markup to demonstrate:
name="demo"> Mario type="radio" value="mario" name="characters" checked> Luigi type="radio" value="luigi" name="characters"> Toad type="radio" value="toad" name="characters"> So now let’s get a reference to our form as well as the group of radio controls:
const form = document.forms.demo; const radios = form.elements.characters; Here we’re using the new HTMLFormElement.elements property which allows us to access the name=»characters» attribute on the input.
Note: All radio buttons that you’d like in the same group need to have the same name=»value» attribute for them to “link together”.
So, how do we get the value?

Free eBook
Directives, simple right? Wrong! On the outside they look simple, but even skilled Angular devs haven’t grasped every concept in this eBook.
- Observables and Async Pipe
- Identity Checking and Performance
- Web Components syntax
- and Observable Composition
- Advanced Rendering Patterns
- Setters and Getters for Styles and Class Bindings
That went smoothly, check your email.
If we log out the resulting value of const radios we’ll see something interesting:
// ▶ RadioNodeList(3) [input, input, input, value: "mario"] console.log(radios); Well, that certainly looks interesting, a RadioNodeList? Nice!
The RadioNodeList interface represents a collection of radio elements in a or a element.
You’ll also note that this is an Array-like object, which means we can iterate it as well as access the .value property — on the same object!
So, we could in fact go and Array.find our checked radio like so:
const radios = form.elements.characters; // returns an HTMLInputElement const checked = Array .from(radios) .find(radio => radio.checked); From here, we could access the value property on that checked item if we needed to, we’d be dealing with the specific Element in this case:
const radios = form.elements.characters; // returns a String value const value = Array .from(radios) .find(radio => radio.checked).value; BUT — we know that the RadioNodeList offers us a solution to keep things super minimal:
const radios = form.elements.characters; // returns a String value const value = radios.value; Even though RadioNodeList is a Node collection, it still exposes the value property — which is really handy.
Try the live StackBlitz demo which demonstrates both approaches:
Using querySelector
You could also look at using querySelector for also solving this — as we have the ability to select elements that can be accessed via a :checked pseudo-selector.
The :checked CSS pseudo-class selector represents any radio ( ), checkbox ( ), or option ( in a ) element that is checked or toggled to an on state.
Personally I prefer the “proper” forms API, but I totally agree that this is a great solution as well (hence the inclusion of it in this post!).
Let’s take a look, here’s what we’d need to do with querySelector :
const form = document.forms.demo; const checked = form.querySelector('input[name=characters]:checked'); // log out the value from the :checked radio console.log(checked.value); This is a quick and easy pattern, but I personally feel interacting with the form APIs to be a clearer pattern to us, instead of relying on strings and potentially not understanding or seeing the :checked part of the above string.
Here’s an example that’ll live update based on what you select on StackBlitz:
😎 Next up learn how to check a Radio Button to complete your Input Radio knowledge!
Browser support
Check the browser support for:
tl:dr; the browser support in evergreen browsers is super.
The .elements has no Internet Explorer support but has Edge support.
Free eBook
Directives, simple right? Wrong! On the outside they look simple, but even skilled Angular devs haven’t grasped every concept in this eBook.
- Observables and Async Pipe
- Identity Checking and Performance
- Web Components syntax
- and Observable Composition
- Advanced Rendering Patterns
- Setters and Getters for Styles and Class Bindings
That went smoothly, check your email.
I hope you enjoyed the post, and if you’d love to learn more please check out my JavaScript courses, where you’ll learn everything you need to know to be extremely good and proficient. Enjoy and thanks for reading!
Learn JavaScript the right way.
The most complete guide to learning JavaScript ever built.
Trusted by 82,951 students .
Как получить значение выбранной радиокнопки с помощью JavaScript?
Иногда нам может потребоваться получить значение выбранного переключателя в нашем веб-приложении JavaScript.
В этой статье мы рассмотрим, как получить значение выбранного переключателя с помощью JavaScript.
Перебор всех чекбоксов
Мы можем выбрать все радиокнопки в группе и получить радиокнопку, для которой установлено свойство checked: true .
Например, мы можем написать следующий HTML:
Затем мы можем получить все элементы переключателя с помощью document.querySelectorAll и получить тот, который чекнут, написав:
const fruits = document.querySelectorAll('input[name="fruit"]') for (const f of fruits) < if (f.checked) < console.log(f.value) >> fruits представляет собой объект HTMLCollection со всеми элементами переключателя.
Затем мы используем for-of для перебора переключателей.
В теле цикла мы получаем свойство checked .
И мы записываем значение того, что было проверено.
Следовательно, мы должны увидеть в консоли ‘grape’ .
Использование селектора :checked
Другой способ получить установленный переключатель — использовать селектор :checked .
Например, мы можем написать:
const selected = document.querySelector('input[name="fruit"]:checked').value; console.log(selected) Селектор input[name=”fruit”]:checked получает все элементы с именем атрибута, fruit и свойством checked:true .
Установленное значение в форме
Мы также можем получить установленное значение переключателя из значений формы.
Например, мы можем написать:
Затем мы получаем переключатель, который проверяется записью:
const form = document.getElementById("fruits"); console.log(form.elements["fruit"].value); Получаем элемент формы с getElementById .
Затем мы получаем входные данные с помощью form.elements[“fruit”] .
И тогда мы можем получить свойство value , чтобы получить выбранное значение.
Radio Button In HTML: Complete Guide
In this article, you will learn everything about the HTML radio button. Its use, how to group it, how to style it using CSS, adding triggering events on it using JavaScript, etc.
You must have filled some online form before and would have interacted with options in a form where you have multiple choices to select but only one can be selected. Example gender selection , blood group selection , etc.
These are called radio buttons . Ideally, only one radio button can be selected for a single choice. For example, you can either select male , female , or transgender for gender selection.
HTML Radio Button
A radio button is an element of type=»radio» which is used to select only one choice among multiple choices.
It is generally used within a form but can be used alone.
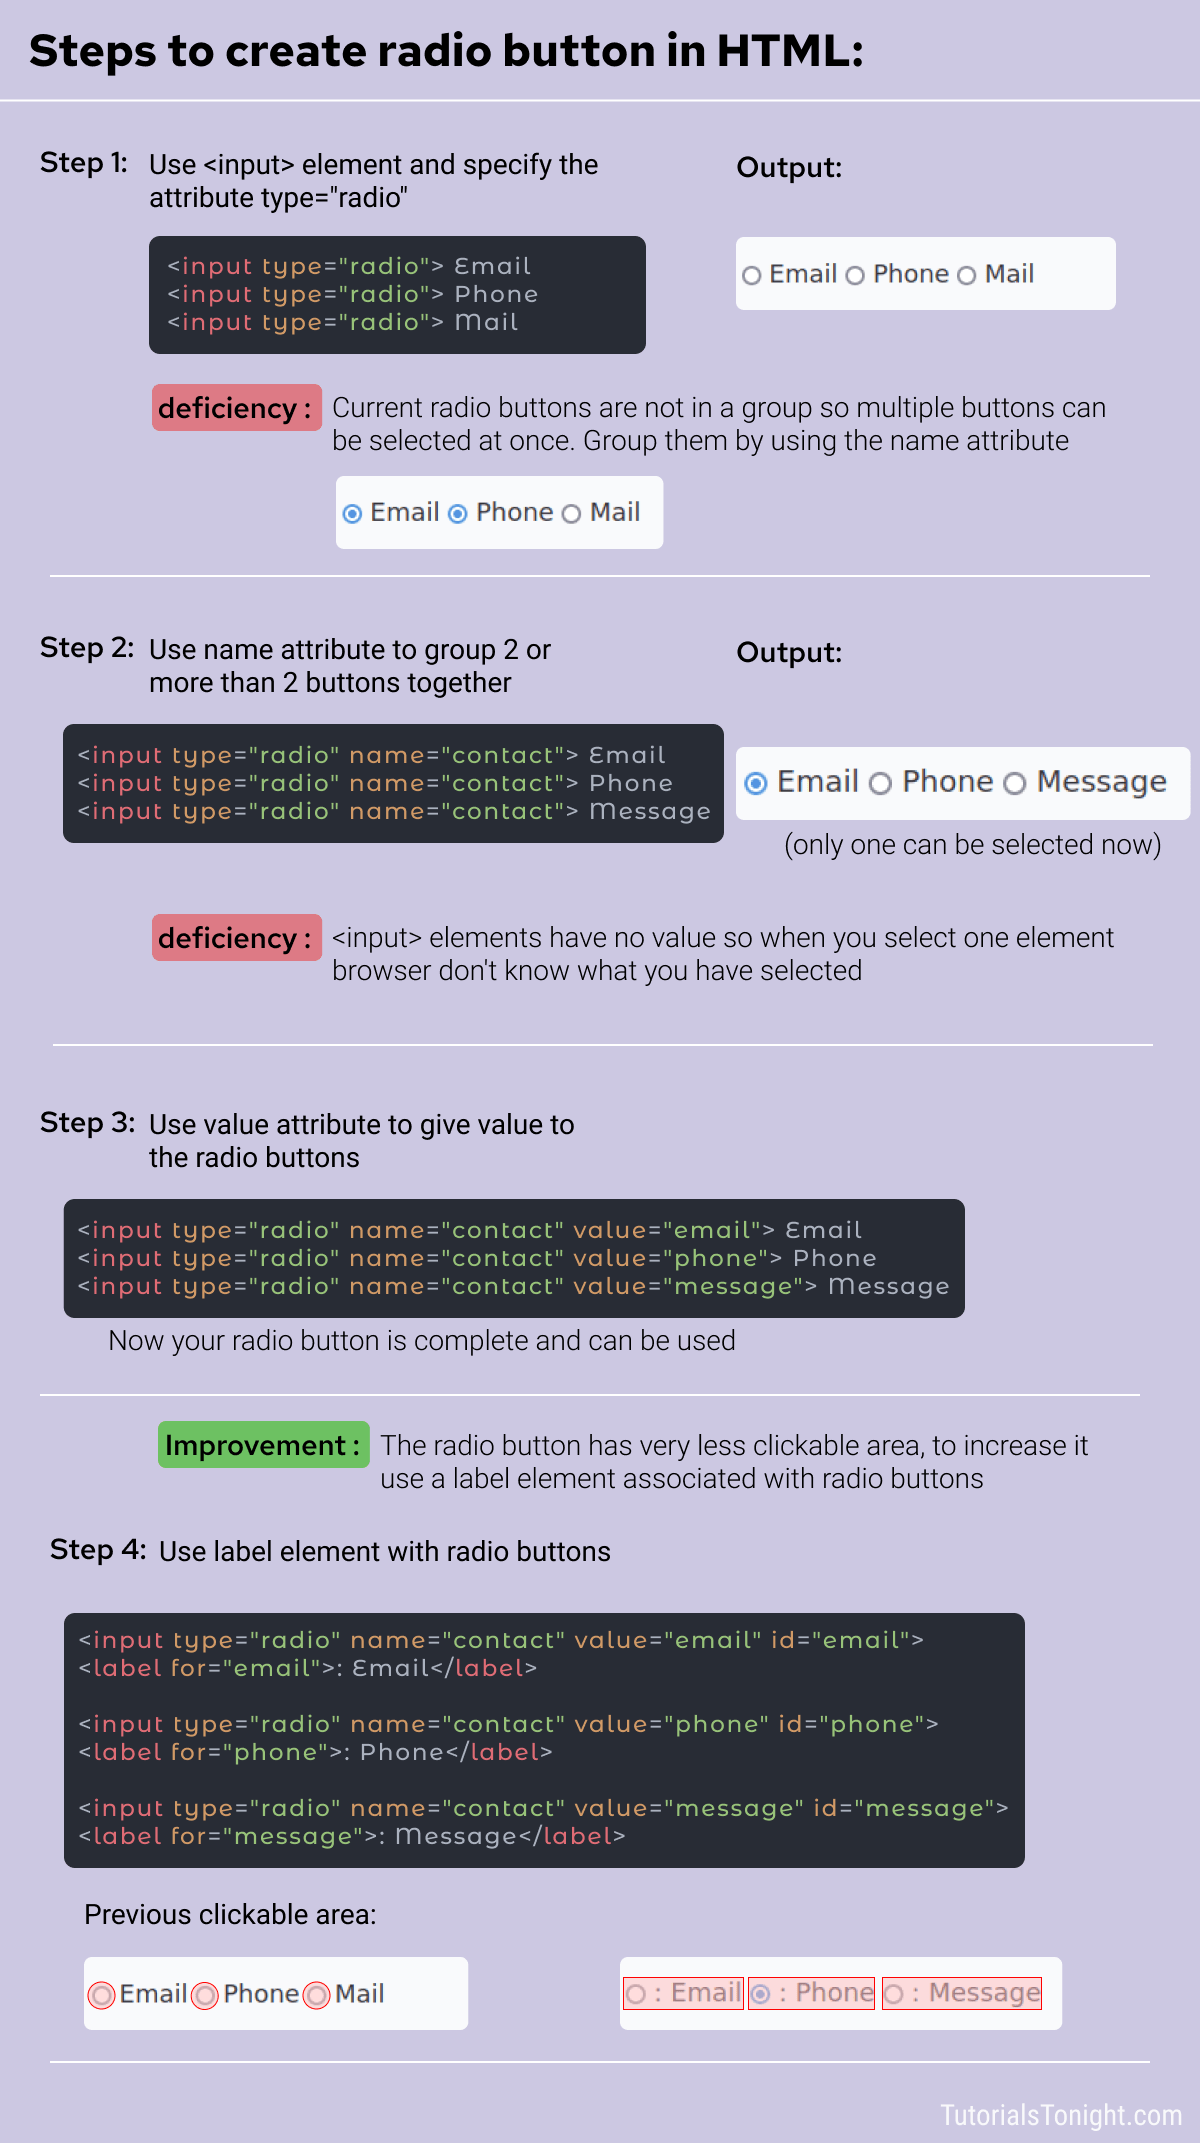
To create a radio button give element a type of radio . Example
Here is an example of an HTML radio button:
HTML radio button example
You can check the above output by clicking on the button and you will observe that not only one choice but multiple choices can be selected above. Thinking why? 💭🤔
This is because none of the radio buttons are connected to each other with a common purpose. They are all independent and can be used for different purposes that are multiple of them are selected at a time.
To connect them together give them a common purpose by specifying name attribute.
HTML Radio Button Group
Practically radio buttons are used in group . So that when one button is selected then the other already get unselected if it was previously selected.
In a group of radio buttons, all the radio elements are connected. Only one button can be selected at a time.
Here is an example where radio buttons are not part of a group .
Radio buttons in the above example are not part of any group.
A radio group is defined by the name attribute. When 2 or more radio buttons are in a group they have the same name attribute.
When multiple radio buttons are given the same name then it becomes part of a group and when you select any radio button of that group it automatically deselects any other selected button in that group.
In the above example, all three radio buttons are part of a single group with name=»contact» which put them in a single group.
Radio Button Value
All radio buttons shown above have no value. This means if you select one then they don’t know for what value you want to select it.
Just an option written in front of it doesn’t mean it will take it as input.
To specify value for radio button give it a value attribute. Example
Now if you select any radio button then it will take the value of that radio button as input.
You have done a lot😊 let’s relax for a minute🍸🍹

What we have covered till now:
- Radio button is created using element having type=»radio»
- Radio button must have name attribute to be part of a group.
- Radio button should have value attribute to specify value for that radio button.
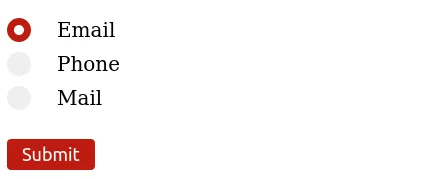
Checked Radio Button
It is better to select the most probable radio button by default because if no option is selected while submitting the form then the radio group is not included in the submitted data at all.
You can do it by using the checked attribute.
checked attribute is a boolean attribute. It is either true or false .
Just using checked is same as checked=»true» .
Example: HTML radio button default selected
Radio Button Attributes
Here is a brief description of some frequently used attributes in radio buttons.
| Attribute | description |
|---|---|
| type | It specifies input type, it must be added to create the type of button you want, i.e. radio |
| name | It creates a radio group, 1 or more than one radio buttons with the same name comes under same group |
| value | It delivers the selected button to the server if the radio button is checked |
| checked | It selects a radio button by default |
Radio Button Label
Radio buttons has a very small clickable area, you have to pin-point the small box to click it. But you can increase the clickable area by using a label with a radio button.
Radio button label is created using element.
Radio button label must have a for attribute that targets the radio button.
And the radio button must have an id attribute that with the same value is used in for attribute.
Example: HTML radio button label
Now the clickable area of the radio button is increased. You can select any radio button either by clicking on the label or by clicking on the radio button.
Radio button onclick
You can trigger an event to know which radio button is checked. For this select all radio buttons and add an onclick event to all button.
When the button is checked the event will be triggered and you can alert a message with it.
// selecting radio button const buttons = document.querySelectorAll("input[type='radio']"); // adding event to all radio buttons buttons.forEach(button => < button.onclick = () => < if (button.checked) < alert(button.value + " selected as contact option!"); >> >)Radio Button Style
Create your own custom radio button and style it using CSS since the browser’s radio button is styled by the browser itself.
Let the HTML code for the form with radio button be as follows:
Here is complete CSS code to create a custom styled radio button.
label < display: block; position: relative; padding-left: 50px; margin: 10px 0; cursor: pointer; font-size: 20px; >/* Hide the default radio button */ label input < position: absolute; opacity: 0; cursor: pointer; >/* Creating own radio button to style */ .custom-radio-button < position: absolute; top: 0; left: 0; height: 24px; width: 24px; background-color: #eee; border-radius: 50%; >/* hover effect on unchecked buttons */ label:hover input+.custom-radio-button < background: #fdd; >/* button checked */ label input:checked+.custom-radio-button < background-color: #bd1c10; >/* White dot on checked radio button (hidden) */ label .custom-radio-button::after < content: ""; display: none; position: absolute; width: 10px; height: 10px; border-radius: 50%; background: white; top: 50%; left: 50%; transform: translate(-50%, -50%); >/* Show the dot on checked button */ label input:checked+.custom-radio-button::after < display: block; >input[type="submit"]
Data Representation Of Radio Group
When a form is submitted with a radio button then the form’s data include an entry in the form name=value , here in the above case, one option could be contact=email .
If there is no value attribute in a radio button then data related to the radio button is not reported to the server.
Conclusion
You learned about radio buttons. Creating a group of radio buttons. Different types of attributes in it. Triggering an event when the button is checked and learned to style radio buttons.
You can also style the radio buttons using CSS.