- Показать/скрыть пароль
- Показать пароль по чекбоксу
- Результат:
- Показать пароль по ссылке
- Результат:
- Показать пароль по иконке
- Результат:
- Без jQuery
- Результат:
- Комментарии
- Другие публикации
- Html input hide show
- Value
- Additional attributes
- name
- Using hidden inputs
- Tracking edited content
- Improving website security
- Validation
- Examples
- Technical summary
- Specifications
- Browser compatibility
- See also
- Found a content problem with this page?
- MDN
- Support
- Our communities
- Developers
- Как использовать input type hidden
- Пример использования input type hidden
- Hide/Show Password using Eye icon in HTML and JavaScript
- 1. Create HTML Login form with Eye Icon
- 2. Add JavaScript to Toggle Show/Hide Password
- Show/Hide Password in Django
Показать/скрыть пароль
Чтобы включить отображение пароля в поле password нужно заменить атрибут type=»password» на type=»text» , сделать это можно на jQuery или чистом JS.
Показать пароль по чекбоксу
$('body').on('click', '.password-checkbox', function() < if ($(this).is(':checked'))< $('#password-input').attr('type', 'text'); >else < $('#password-input').attr('type', 'password'); >>); Результат:
Показать пароль по ссылке
$('body').on('click', '.password-control', function() < if ($('#password-input').attr('type') == 'password')< $(this).html('Скрыть пароль'); $('#password-input').attr('type', 'text'); >else < $(this).html('Показать пароль'); $('#password-input').attr('type', 'password'); >return false; >); Результат:
Показать пароль по иконке
.password < position: relative; >.password-control < position: absolute; top: 11px; right: 6px; display: inline-block; width: 20px; height: 20px; background: url(/view.svg) 0 0 no-repeat; >.password-control.view < background: url(/no-view.svg) 0 0 no-repeat; >$('body').on('click', '.password-control', function() < if ($('#password-input').attr('type') == 'password')< $(this).addClass('view'); $('#password-input').attr('type', 'text'); >else < $(this).removeClass('view'); $('#password-input').attr('type', 'password'); >return false; >);Результат:
Без jQuery
function show_hide_password(target) < var input = document.getElementById('password-input'); if (input.getAttribute('type') == 'password') < target.classList.add('view'); input.setAttribute('type', 'text'); >else < target.classList.remove('view'); input.setAttribute('type', 'password'); >return false; >Результат:
Комментарии
Другие публикации
Если добавить атрибут contenteditable к элементу, его содержимое становится доступно для редактирования пользователю, а.
По спецификации HTML в option нельзя вставить ссылку, если все-таки её туда вставить, то работать она не будет. В таких случаях можно сделать перенаправление браузера по клику на JS или имитацию.
Html input hide show
Note: The input and change events do not apply to this input type. Hidden inputs cannot be focused even using JavaScript (e.g. hiddenInput.focus() ).
Value
The element’s value attribute holds a string that contains the hidden data you want to include when the form is submitted to the server. This specifically can’t be edited or seen by the user via the user interface, although you could edit the value via browser developer tools.
Warning: While the value isn’t displayed to the user in the page’s content, it is visible—and can be edited—using any browser’s developer tools or «View Source» functionality. Do not rely on hidden inputs as a form of security.
Additional attributes
name
This is actually one of the common attributes, but it has a special meaning available for hidden inputs. Normally, the name attribute functions on hidden inputs just like on any other input. However, when the form is submitted, a hidden input whose name is set to _charset_ will automatically be reported with the value set to the character encoding used to submit the form.
Using hidden inputs
As mentioned above, hidden inputs can be used anywhere that you want to include data the user can’t see or edit along with the form when it’s submitted to the server. Let’s look at some examples that illustrate its use.
Tracking edited content
One of the most common uses for hidden inputs is to keep track of what database record needs to be updated when an edit form is submitted. A typical workflow looks like this:
- User decides to edit some content they have control over, such as a blog post, or a product entry. They get started by pressing the edit button.
- The content to be edited is taken from the database and loaded into an HTML form to allow the user to make changes.
- After editing, the user submits the form, and the updated data is sent back to the server to be updated in the database.
The idea here is that during step 2, the ID of the record being updated is kept in a hidden input. When the form is submitted in step 3, the ID is automatically sent back to the server with the record content. The ID lets the site’s server-side component know exactly which record needs to be updated with the submitted data.
You can see a full example of what this might look like in the Examples section below.
Improving website security
Hidden inputs are also used to store and submit security tokens or secrets, for the purposes of improving website security. The basic idea is that if a user is filling in a sensitive form, such as a form on their banking website to transfer some money to another account, the secret they would be provided with would prove that they are who they say they are, and that they are using the correct form to submit the transfer request.
This would stop a malicious user from creating a fake form, pretending to be a bank, and emailing the form to unsuspecting users to trick them into transferring money to the wrong place. This kind of attack is called a Cross Site Request Forgery (CSRF); pretty much any reputable server-side framework uses hidden secrets to prevent such attacks.
Note: Placing the secret in a hidden input doesn’t inherently make it secure. The key’s composition and encoding would do that. The value of the hidden input is that it keeps the secret associated with the data and automatically includes it when the form is sent to the server. You need to use well-designed secrets to actually secure your website.
Validation
Hidden inputs don’t participate in constraint validation; they have no real value to be constrained.
Examples
Let’s look at how we might implement a simple version of the edit form we described earlier (see Tracking edited content), using a hidden input to remember the ID of the record being edited.
The edit form’s HTML might look a bit like this:
form> div> label for="title">Post title:label> input type="text" id="title" name="title" value="My excellent blog post" /> div> div> label for="content">Post content:label> textarea id="content" name="content" cols="60" rows="5"> This is the content of my excellent blog post. I hope you enjoy it! textarea> div> div> button type="submit">Update postbutton> div> input type="hidden" id="postId" name="postId" value="34657" /> form>
Let’s also add some simple CSS:
html font-family: sans-serif; > form width: 500px; > div display: flex; margin-bottom: 10px; > label flex: 2; line-height: 2; text-align: right; padding-right: 20px; > input, textarea flex: 7; font-family: sans-serif; font-size: 1.1rem; padding: 5px; > textarea height: 60px; > The server would set the value of the hidden input with the ID » postID » to the ID of the post in its database before sending the form to the user’s browser and would use that information when the form is returned to know which database record to update with modified information. No scripting is needed in the content to handle this.
The output looks like this:
Note: You can also find the example on GitHub (see the source code, and also see it running live).
When submitted, the form data sent to the server will look something like this:
Even though the hidden input cannot be seen at all, its data is still submitted.
Technical summary
Specifications
Browser compatibility
BCD tables only load in the browser
See also
Found a content problem with this page?
This page was last modified on Mar 13, 2023 by MDN contributors.
Your blueprint for a better internet.
MDN
Support
Our communities
Developers
Visit Mozilla Corporation’s not-for-profit parent, the Mozilla Foundation.
Portions of this content are ©1998– 2023 by individual mozilla.org contributors. Content available under a Creative Commons license.
Как использовать input type hidden
С помощью input type hidden разработчики веб-форм могут хранить и отправлять информацию, скрытую от пользователей.
Скрытые поля можно использовать для сохранения текущего состояния многостраничных форм, собирать cookie-файлы для отправки вместе с формой, а также хранить данные, которые не вводятся пользователем.
Это может быть как неизменяемая информация, так и данные, генерируемые с помощью JavaScript , о которых пользователь может и не подозревать ( например, время загрузки формы ).
Примечание : Не забывайте, что скрытые поля нельзя назвать полностью скрытыми — они просто недоступны большинству пользователей, но легко просматриваются в исходном коде страницы. Поэтому никогда не храните в них пароли или другие конфиденциальные данные.
Пример использования input type hidden
Синтаксис использования input type hidden должен соответствовать строке, выделенной в коде, приведенном ниже в качестве примера:
Как видно из примера, мы сохраняем в скрытом поле значение страны “ US ”, поэтому, когда пользователь отправит форму, мы будем знать, что он из США. Разумеется, эти данные можно поменять на другие, изменив HTML-код .
Можно использовать input type hidden для хранения даты и времени ( в примере это сделано с помощью MySQL ):
В PHP можно воспользоваться следующим методом:
МК Михаил Кузнецов автор-переводчик статьи « How to Use the «hidden» HTML INPUT Tag »
Пожалуйста, опубликуйте ваши комментарии по текущей теме статьи. За комментарии, дизлайки, отклики, подписки, лайки низкий вам поклон!
Hide/Show Password using Eye icon in HTML and JavaScript
In this tutorial, I will learn how to hide and show password using eye icon in HTML and JavaScript. I implemented it for one of my projects as below.
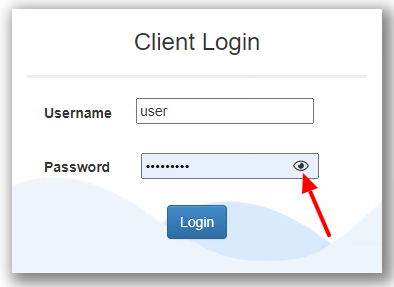
This very useful feature you should have on your login form.
There are simple two steps to follow. First, create the HTML login form. Secondly, show/hide password when the user clicks on the eye icon.
Watch live demo
Don’t miss any of such tips…
Let’s see it step-by-step. I will walk you through the complete code.
1. Create HTML Login form with Eye Icon
We are going to place the eye icon inside the password text field. We can use the eye icon from the awesome font script library.
First of all import the awesome font Stylesheet into your HTML form page.
Use the tag to display the eye icon. This icon is also known as the visibility eye icon.
Use the below CSS to put the eye icon at the end of the password text field.
margin-left: -30px; cursor: pointer;
If you are new to CSS, refer to how to add CSS in HTML.
Put this tag below the passwords input field. This is how the sample form will look like with the password field.
2. Add JavaScript to Toggle Show/Hide Password
Copy and paste the below code into your JavaScript. This code is self-explanatory if you are familiar with the JavaScript basics.
const togglePassword = document.querySelector('#togglePassword'); const password = document.querySelector('#id_password'); togglePassword.addEventListener('click', function (e) < // toggle the type attribute const type = password.getAttribute('type') === 'password' ? 'text' : 'password'; password.setAttribute('type', type); // toggle the eye slash icon this.classList.toggle('fa-eye-slash'); >); You can also insert this code in your HTML page with tag.
Show/Hide Password in Django
In the sample picture shown above, I have implemented it for one of my websites developed using the Django Python framework. If you are developing it for Django, refer registration and login form in Django.
That’s all. Now you can hide and show password using eye icon in HTML with simple JavaScript and CSS code.
If you find any difficulties or need any customization, let me know in the comment section below.