- Show Error Messages In HTML Forms (Simple Examples)
- TABLE OF CONTENTS
- DOWNLOAD & NOTES
- QUICK NOTES
- EXAMPLE CODE DOWNLOAD
- DISPLAY ERROR MESSAGES
- EXAMPLE 1) DEFAULT ERROR DISPLAY
- EXAMPLE 2) SHOW ERRORS AS-YOU-TYPE
- EXAMPLE 3) DISPLAY ERROR MESSAGES IN POPUP
- EXAMPLE 4) SHOW ERROR MESSAGE UNDER FIELD
- EXTRA BITS & LINKS
- LINKS & REFERENCES
- THE END
- Pure CSS Custom Error Messaging for Default Form Elements
- HTML
- CSS
- Basic Error Message
- Input Field Error
- Input Field Error with Tooltip
- Codepen/Tutorial Links
- Leave a Reply Cancel reply
Show Error Messages In HTML Forms (Simple Examples)
Welcome to a quick tutorial on how to show error messages in HTML forms. This is probably one of the major bugbears for some beginners, how do we handle and show error messages for HTML forms?
There are no fixed ways to show errors in HTML forms, but the common methods to display error messages are:
- Simply add checking attributes to the HTML form fields, and the browser will automatically show the errors. For example,
- Use Javascript to show custom error messages as the user types in the fields.
- Collectively show all error messages in a popup box when the user submits an invalid form.
- Show error messages below the invalid fields.
That covers the broad basics, let us walk through detailed examples in this guide – Read on!
ⓘ I have included a zip file with all the source code at the start of this tutorial, so you don’t have to copy-paste everything… Or if you just want to dive straight in.
TABLE OF CONTENTS
DOWNLOAD & NOTES
Firstly, here is the download link to the example code as promised.
QUICK NOTES
If you spot a bug, feel free to comment below. I try to answer short questions too, but it is one person versus the entire world… If you need answers urgently, please check out my list of websites to get help with programming.
EXAMPLE CODE DOWNLOAD
Click here to download all the example source code, I have released it under the MIT license, so feel free to build on top of it or use it in your own project.
DISPLAY ERROR MESSAGES
All right, let us now get into the various examples of displaying error messages in an HTML form.
EXAMPLE 1) DEFAULT ERROR DISPLAY
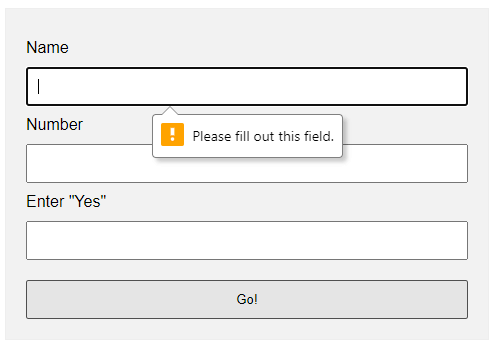
Oh no, displaying error messages is SO DIFFICULT! Not. Just add the form checking attributes to the fields:
- required Self-explanatory. A required field that cannot be left blank.
- min-length max-length The minimum and maximum number of characters allowed.
- min max For number fields only, the minimum and maximum allowed values.
- pattern This field must match the custom pattern. Will leave a link in the extras section below if you want to learn more.
Yes, that’s all. The browser will do the rest of the magic.
EXAMPLE 2) SHOW ERRORS AS-YOU-TYPE
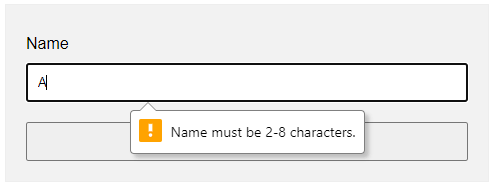
This one is a little naggy and requires some Javascript. A couple of functions and properties to take note of here:
- document.getElementById(«ID») Get element by ID. Captain Obvious.
- FIELD.addEventListener(«input», FUNCTION) Run this function whenever the user types something in the field.
- FIELD.validity.tooLong FIELD.validity.tooShort FIELD.validity.valueMissing We can actually target various invalid statuses and show different messages. Will leave a link in the extras section below to the full list.
- FIELD.setCustomValidity(«MESSAGE») and FIELD.reportValidity() Show custom error message.
EXAMPLE 3) DISPLAY ERROR MESSAGES IN POPUP
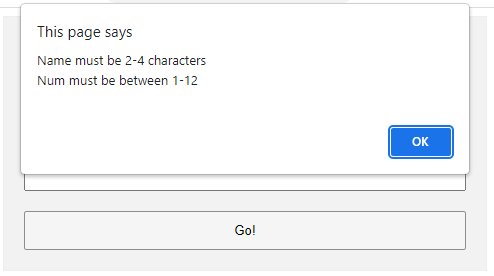
- A novalidate has been added to the tag. This disables the default browser form checking, and we do our own in Javascript using onsubmit=»return check()» .
- The Javascript is pretty long-winded but straightforward.
- Use var error = «» to collect all the error messages.
- Fetch the field we want to check field = document.getElementById(«ID») .
- Add a message if it is invalid if (!field.checkValidity()) < error += "ERROR"; >
- That’s all, repeat the check for all fields.
- Lastly, show the error message if not empty and don’t allow the form submission if (error !=»»)
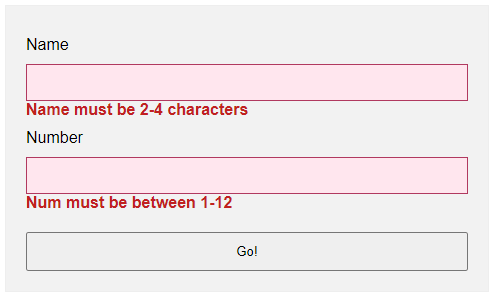
EXAMPLE 4) SHOW ERROR MESSAGE UNDER FIELD
.err < background: #ffe6ee; border: 1px solid #b1395f; >.emsg Number
Lastly, this is pretty much similar to the popup example.
- Use novalidate and onsubmit to do our own customization.
- But instead of showing in a popup, we attach a below all fields.
- On an invalid input, we show the error message in the instead.
EXTRA BITS & LINKS
That’s all for the tutorial, and here is a small section on some extras and links that may be useful to you.
LINKS & REFERENCES
THE END
Thank you for reading, and we have come to the end. I hope that it has helped you to better understand, and if you want to share anything with this guide, please feel free to comment below. Good luck and happy coding!
Pure CSS Custom Error Messaging for Default Form Elements
This tutorial will show you how to create and customize error messaging for various form elements. In this tutorial, we will customize everything from a basic error message to input field errors and tooltips. The best part? We will be using only CSS for customizations – that means no images or javascript required!
HTML
Below is the markup for the form elements we will be creating error messaging for. This is all of the HTML used throughout this tutorial. Copy and paste this code into your working file:
Checkout could not be completed. Please check your login information and try again.Password is a required field.Enter a quantityCSS
Now onto my personal favorite: the CSS. We will keep the basic functionality of the form elements but completely customize their appearance. In the end, they will stand on their own as custom design elements that thoughtfully guide the user through the form process, making it as straightforward and painless as possible .
Basic Error Message
Let’s start with a basic error message. We are going to customize the HTML above to look like this:
This is what we start out with, by default, after adding the HTML:

Customizing a basic error message is really simple. All we have to do is give our text a colored background and a couple font styles using CSS. To style the error message background, add the following styles to your CSS stylesheet:
Now let’s style the text itself by adding the following font styles:
That’s it! Keep reading to learn how to style input field and tooltip errors .
Input Field Error
Now that we have our basic error message styled, let’s work on input field errors. This is what the final product will look like:

And this is what we start out with by default:

First, we want to override the browser’s default styles. Add the following CSS to give your input field a custom look:
/* Basic Input Styling */ .input-group < color: #333; float: left; font-family: Helvetica, Arial, sans-serif; font-size: 13px; line-height: 20px; margin: 0 20px 10px; width: 200px; >label < display: block; margin-bottom: 2px; >input[type=text]
Next, we need to add the styling for the error message that displays when a user does not correctly fill out an input field (i.e. the “This is a required field” message):
Lastly, add the error-specific styling for the input field elements:
.error label < color: #cc0033; >.error input[type=text] >
Input Field Error with Tooltip
The last element we’re tackling is the tooltip. It is slightly more complicated than the others but well worth the effort. We will also be utilizing Sass nesting to better organize our code, and because we are only using SCSS it is 100% editable and scalable.
Once we are done, the tooltip will look like this:

And by default, this is what we start with after adding the HTML:
First, we override the browser’s default styles with our own custom styling:
/* Basic Input Styling */ .input-group < color: #333; float: left; font-family: Helvetica, Arial, sans-serif; font-size: 13px; line-height: 20px; margin-bottom: 10px; width: 100%; >label < display: block; margin-bottom: 5px; >input[type=text]
Just like our previous example, we need to add the tooltip error message styling that displays when a form error occurs. Note: we are using Sass here to nest the tooltip’s left arrow properties. This comes in handy when trying to keep track of which values are assigned to the tooltip specifically:
/* Tooltip Styling */ .error-tip < background-color: #fce4e4; border: 1px solid #fcc2c3; border-radius: 7px; -moz-border-radius: 7px; -webkit-border-radius: 7px; display: inline; color: #cc0033; float: left; font-weight: bold; line-height: 24px; position: relative; padding: 7px 11px 4px; margin-left: 17px; // Left Arrow Styling Starts Here &:after, &:before < content: ''; border: 7px solid transparent; position: absolute; top: 11px; >&:after < border-right: 7px solid #fce4e4; left: -14px; >&:before < border-right: 7px solid #fcc2c3; left: -15px; >> // end .error-tip
Now all that’s left to do is define the input’s error-specific styling. Again, we will nest these styles under an “error” class selector to make classification and future changes easier:
/* Error Styling */ .error.input-group < label < color: #cc0033; font-weight: bold; >input < border: 2px solid #cc0033; line-height: 37px; outline: none; >.status < display: none; >.error-tip < display: inline; >> // end .error
And that’s it! All the code you need to customize error messaging for default form elements. To experiment with the final results and copy and paste to your heart’s content (without fear of breaking anything), jump on over to Codepen by selecting any of the tutorial links below.
Codepen/Tutorial Links
Leave a Reply Cancel reply

I’m Sarah Holley, the designer and blogger behind «Sarah Holley Design,» a graphic design and entrepreneurial resource for creative businesses. Welcome and enjoy!