- PHP Form Handling
- PHP — A Simple HTML Form
- Example
- Example
- GET vs. POST
- When to use GET?
- When to use POST?
- Отправка данных формы
- GET
- POST
- HTML Form Action: POST and GET
- The GET Method
- The POST method
- GET vs POST
- Table of Contents
- Handling an HTML Form – GET and POST Methods, and Data Encoding [Dev Concepts #38]
- HTML Form Structure
- Form Action Attribute
- Form Method Attribute
PHP Form Handling
The PHP superglobals $_GET and $_POST are used to collect form-data.
PHP — A Simple HTML Form
The example below displays a simple HTML form with two input fields and a submit button:
Example
When the user fills out the form above and clicks the submit button, the form data is sent for processing to a PHP file named «welcome.php». The form data is sent with the HTTP POST method.
To display the submitted data you could simply echo all the variables. The «welcome.php» looks like this:
The output could be something like this:
The same result could also be achieved using the HTTP GET method:
Example
and «welcome_get.php» looks like this:
The code above is quite simple. However, the most important thing is missing. You need to validate form data to protect your script from malicious code.
Think SECURITY when processing PHP forms!
This page does not contain any form validation, it just shows how you can send and retrieve form data.
However, the next pages will show how to process PHP forms with security in mind! Proper validation of form data is important to protect your form from hackers and spammers!
GET vs. POST
Both GET and POST create an array (e.g. array( key1 => value1, key2 => value2, key3 => value3, . )). This array holds key/value pairs, where keys are the names of the form controls and values are the input data from the user.
Both GET and POST are treated as $_GET and $_POST. These are superglobals, which means that they are always accessible, regardless of scope — and you can access them from any function, class or file without having to do anything special.
$_GET is an array of variables passed to the current script via the URL parameters.
$_POST is an array of variables passed to the current script via the HTTP POST method.
When to use GET?
Information sent from a form with the GET method is visible to everyone (all variable names and values are displayed in the URL). GET also has limits on the amount of information to send. The limitation is about 2000 characters. However, because the variables are displayed in the URL, it is possible to bookmark the page. This can be useful in some cases.
GET may be used for sending non-sensitive data.
Note: GET should NEVER be used for sending passwords or other sensitive information!
When to use POST?
Information sent from a form with the POST method is invisible to others (all names/values are embedded within the body of the HTTP request) and has no limits on the amount of information to send.
Moreover POST supports advanced functionality such as support for multi-part binary input while uploading files to server.
However, because the variables are not displayed in the URL, it is not possible to bookmark the page.
Developers prefer POST for sending form data.
Next, lets see how we can process PHP forms the secure way!
Отправка данных формы
Сама форма обычно предназначена для получения от пользователя информации для дальнейшей пересылки её на сервер, где данные формы принимает программа-обработчик. Такая программа может быть написана на любом серверном языке программирования вроде PHP, Perl и др. Адрес программы указывается в атрибуте action тега , как показано в примере 1.
Пример 1. Отправка данных формы
В этом примере данные формы, обозначенные атрибутом name ( login и password ), будут переданы в файл по адресу /example/handler.php. Если атрибут action не указывать, то передача происходит на адрес текущей страницы.
Передача на сервер происходит двумя разными методами: GET и POST, для задания метода в теге используется атрибут method , а его значениями выступают ключевые слова get и post . Если атрибут method не задан, то по умолчанию данные отправляются на сервер методом GET. В табл. 1 показаны различия между этими методами.
| GET | POST | |
|---|---|---|
| Ограничение на объём | 4 Кб | Ограничения задаются сервером. |
| Передаваемые данные | Видны сразу всем. | Видны только при просмотре через расширения браузера или другими методами. |
| Кэширование | Страницы с разными запросами считаются различными, их можно кэшировать как отдельные документы. | Страница всегда одна. |
| Закладки | Страницу с запросом можно добавить в закладки браузера и обратиться к ней позже. | Страницы с разными запросами имеют один адрес, запрос повторить нельзя. |
Какой метод используется легко определить по адресной строке браузера. Если в ней появился вопросительный знак и адрес стал похож на этот, то это точно GET.
Уникальное сочетание параметров в адресной строке однозначно идентифицирует страницу, так что страницы с адресами ?q=node/add и ?q=node считаются разными. Эту особенность используют системы управления контентом (CMS, Content management system) для создания множества страниц сайта. В реальности же используется один файл, который получает запрос GET и согласно ему формирует содержимое документа.
Ниже перечислены типовые области применения этих методов на сайтах.
GET
Передача небольших текстовых данных на сервер; поиск по сайту.
Поисковые системы, формы поиска по сайту всегда отправляются методом GET, это позволяет делиться результатами поиска с друзьями, слать ссылку по почте или выкладывать её на форуме.
POST
Пересылка файлов (фотографий, архивов, программ и др.); отправка комментариев; добавление и редактирование сообщений на форуме, блоге.
Работа с формой по умолчанию происходит в текущей вкладке браузера, при этом допустимо при отправке формы изменить этот параметр и открывать обработчик формы в новой вкладке или во фрейме. Такое поведение задаётся через «имя контекста», которое выступает значением атрибута target тега . Популярные значения это _blank для открытия формы в новом окне или вкладке, и имя фрейма, которое задаётся атрибутом name тега (пример 2).
Пример 2. Открытие формы во фрейме
В данном примере при нажатии на кнопку «Отправить» результат отправки формы открывается во фрейме с именем area .
Элементы формы традиционно располагаются внутри тега , тем самым определяя те данные, которые будут передаваться на сервер. В то же время в HTML5 есть возможность отделить форму от её элементов. Это сделано для удобства и универсальности, так, сложный макет может содержать несколько форм, которые не должны пересекаться меж собой или к примеру, некоторые элементы выводятся с помощью скриптов в одном месте страницы, а сама форма находится в другом. Связь между формой и её элементами происходит в таком случае через идентификатор формы, а к элементам следует добавить атрибут form со значением, равным этому идентификатору (пример 3).
Пример 3. Связывание формы с полями
В этом примере тег однозначно отождествляется через идентификатор auth , а к полям, которые следует отправить с помощью формы, добавляется form=»auth» . При этом поведение элементов не меняется, при нажатии на кнопку логин и пароль пересылаются на обработчик handler.php.
Хотя параметры передачи формы традиционно указываются в теге , их можно перенести и в кнопки отправки формы ( и ). Для этого применяется набор атрибутов formaction , formmethod , formenctype и formtarget , которые являются аналогами соответствующих атрибутов без приставки form. В примере 4 показано использование этих атрибутов.
Все новые атрибуты форм не поддерживаются некоторыми браузерами, в частности, Internet Explorer и Safari.
HTML Form Action: POST and GET
The method attribute in the element specifies how the data is sent to the server.
HTTP methods declare what action is to be performed on the data that is submitted to the server. HTTP Protocol provides several methods, and the HTML Form element is able to use two methods to send user data:
- GET method — used to request data from a specified resource
- POST method — used to send data to a server to update a resource
The GET Method
The HTML GET method is used to get a resource from the server. For example,
When we submit the above form by entering California in the input field, the request sent to the server will be www.programiz.com/search/?location=California .
The HTTP GET method adds a query string at the end of the URL to send data to the server. The query string is in the form of key-value pair followed by ? symbol.
From the URL, the server can parse the user-submitted value where:
Note: If there is more than one query, the query string will be separated by a & symbol.
The POST method
The HTTP POST method is used to send data to the server for further processing. For example,
When we submit the form, it will add the user input data to the body of the request sent to the server. The request would look like
POST /user HTTP/2.0 Host: www.programiz.com Content-Type: application/x-www-form-urlencoded Content-Length: 33 firstname=Robin&lastname=WilliamsThe data sent is not easily visible to the user. However, we can check the sent data using special tools like the browsers’ dev tools.
GET vs POST
| GET | POST |
|---|---|
| Data sent with the GET method is visible in the URL. | Data sent with the POST method is not visible. |
| GET requests can be bookmarked. | POST requests can’t be bookmarked. |
| GET requests can be cached. | POST requests can’t be cached. |
| GET requests have a character limit of 2048 characters. | POST requests do not have a limit. |
| Only ASCII characters are allowed in GET requests. | All data is allowed in POST request |
Table of Contents
Handling an HTML Form – GET and POST Methods, and Data Encoding [Dev Concepts #38]
In this lesson, we discuss HTML Forms and how to use GET and POST methods to send encoded data to the server for processing.

HTML Forms are used to collect input from users and send it to the server for processing.
Examples are registration form that users fill out to sign up on a website and order submission forms on e-commerce sites.
HTML Form Structure
HTML has input elements displayed in different ways such as input field, checkbox (for selecting zero or more of multiple choices), radio buttons (for selecting one of multiple choices), submit button etc. The basic structure of a form consists of input fields and a submit button. The user fills out the input fields with the required information and upon clicking the submit button the data is sent to a form handler. Typically, the form handler is a file on the server with a script for processing input data.
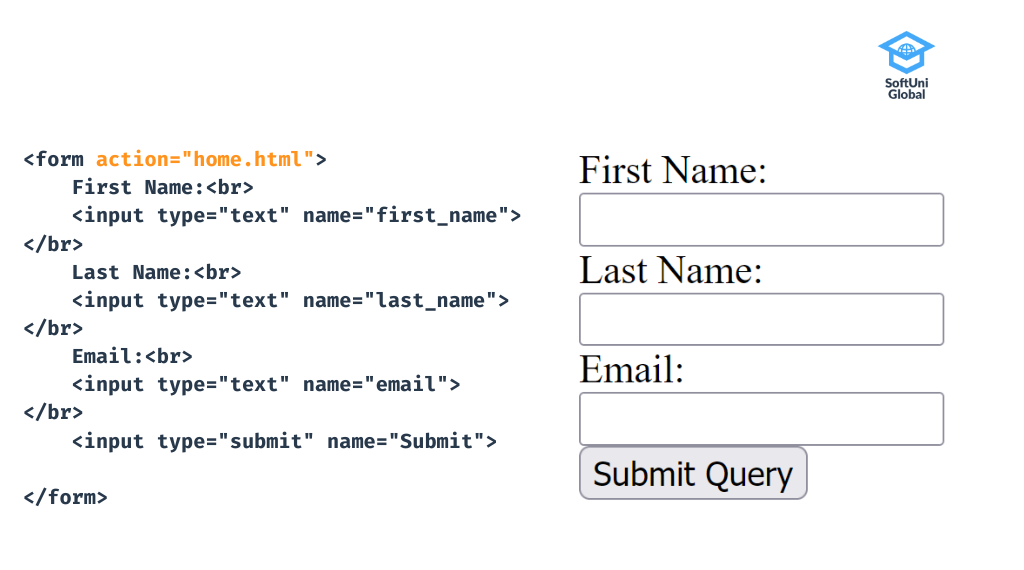
Form Action Attribute
You add an action attribute to the form to define where the submitted data goes. In the example above the submitted information will be handled by the script of the home.html document.
In this case, the URL is called relative. Relative URLs are compared to the current URL that is loaded in the Web browser. We can use slashes and the “double dot” notation to address a different folder or the parent folder of the virtual folder structure on the Web server.
Full URLs are used to submit the form data to completely different Web site. For example, a Web site may embed an HTML form for newsletter subscription which submits its form fields to an external Web site, which provides email newsletter services.
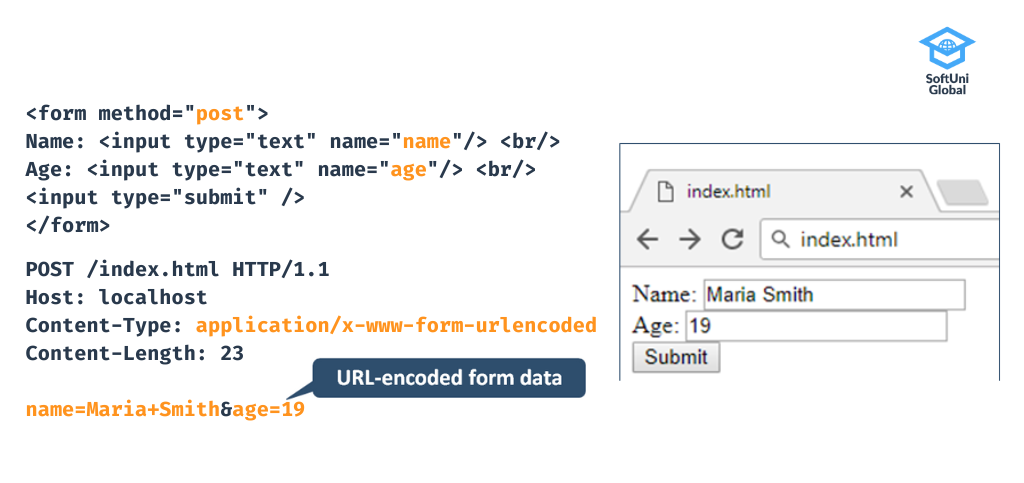
Form Method Attribute
In the following example, we have added an HTTP method attribute to the form. The method can be either GET or POST. Both methods are used to transfer data from client to server.
The GET method transfers data in the URL with a query string. Therefore, the length of the URL is limited. GET is preferable for images, word documents or data that does not require any security.
POST is an HTTP method that encodes form data in a specified format and sends it to the server via the HTTP message body. The World Wide Web frequently uses POST to send user-generated data or an uploaded file to the web server.
In the example above, you can see the standard URL encoding used to encode the HTML form fields and URLs. The URL encoding is a long string of name and value pairs. Each pair is separated from one another by an ampersand (&) sign and each name is separated from the value by an equals (=) sign. For example: key1=value1&key2=value2.
This encoding can be used for text and other data fields, but it does not support file upload fields. We can overcome this limitation by switching to multipart encoding.