- How to add horizontal line in HTML?
- Approaches
- Approach 1: Using the tag
- Example
- Welcome to Tutorials Point
- Welcome to Tutorials Point
- Approach 2: Using CSS
- Example
- Welcome to Tutorials Point
- Example
- Welcome to Tutorials Point
- Conclusion
- 2 Ways To Create Horizontal Lines In HTML (HR & Border)
- QUICK SLIDES
- TABLE OF CONTENTS
- DOWNLOAD & NOTES
- QUICK NOTES
- EXAMPLE CODE DOWNLOAD
- HORIZONTAL RULE HTML TAG
- WHAT IS A THEMATIC BREAK!?
- THEMATIC BREAK EXAMPLE
- MY STORY
- CHAPTER 1
- CHAPTER 2
- ANOTHER EXAMPLE
- CSS BORDER
- BORDER EXAMPLE
- USEFUL BITS & LINKS
- DOES IT REALLY MATTER!?
- LINKS & REFERENCES
- INFOGRAPHIC CHEAT SHEET
- THE END
- How to Draw Horizontal and Vertical Lines in CSS
- How to Draw a Line with CSS?
- Conclusion
- About the author
- Sharqa Hameed
How to add horizontal line in HTML?
In this article, we will show you how to add a horizontal line to your webpage using HTML. A horizontal line, also known as a horizontal rule, is a way to separate content on a webpage and can be used for visual appeal or to indicate a change in content.
There are multiple ways to add a horizontal line to your webpage in HTML, but the most common approach is by using the
tag. The
tag is a self-closing tag that creates a horizontal line on the webpage. This approach is simple and straightforward, and it requires minimal code. However, it does not provide much flexibility in terms of customization. The horizontal line created using the
tag will have a default look and feel, and it may not blend well with the design of your webpage.
Another approach to adding a horizontal line in HTML is by using CSS. By using CSS, you can customize the appearance of the horizontal line to match the design of your webpage. You can change the color, width, height, and other properties of the horizontal line to make it fit seamlessly into your webpage.
We will be discussing both these approaches in detail in the later sections of this article with examples and code snippets.
Approaches
There are two main ways to add a horizontal line in HTML −
Approach 1: Using the
tag
The first approach to adding a horizontal line in HTML is by using the
tag. This approach is quick and easy to implement, making it perfect for situations where you need a simple horizontal line to separate content on your webpage. Additionally, the
tag is supported by all major web browsers, so you can be sure that it will be rendered correctly on your webpage. However, the default appearance of the
tag may not always match the design of your webpage.
If you need more control over the appearance of the horizontal line, you can use CSS to customize the
tag or use the second approach of using CSS. With CSS you can change the color, width, height, and many more properties of the horizontal line to make it look more in sync with your webpage design.
Example
The following is an example of how to add a horizontal line using the
tag −
Step 1 − Create an html file (index.html).
Step 2 − Add the
tag where you want the horizontal line to appear.
Welcome to Tutorials Point
This is some text that will appear below the horizontal line.
Step 3 − Save the file and view it by opening it in a web browser.
Welcome to Tutorials Point
This is some text that will appear below the horizontal line.
Approach 2: Using CSS
The second approach to adding a horizontal line in HTML is by using CSS. Using CSS to create a horizontal line allows you to have more control over the appearance of the line. You can change the color, and thickness, and even add a background color or an image to the line. Additionally, you can also use CSS animations and transitions to create interesting effects on the line.
By using CSS, you can create a line that stands out and adds a unique touch to your webpage. With CSS, you can also create multiple lines with different styles and apply them to different sections of your webpage, which can be useful for creating visual separations between different elements on your page.
Example
The following is an example of how to add a horizontal line using CSS −
Step 1 − Create an html file (index.html).
Step 2 − Add a tag where you want the horizontal line to appear.
Welcome to Tutorials Point
This is some text that will appear below the horizontal line.
Step 3 − In your CSS file (style.css), use the border-bottom property to create a horizontal line.
border-bottom: 2px solid black;
Step 4 − Apply the class to the tag.
Step 5 − Save the file and view it by opening it in a web browser.
Example
.horizontal-lineWelcome to Tutorials Point
This is some text that will appear below the horizontal line.
Conclusion
In this article, we have shown you two ways to add a horizontal line to your webpage using HTML. The first approach is by using the
tag, which is a simple and easy way to add a horizontal line to your webpage. The second approach is by using CSS, which allows you to customize the appearance of the horizontal line to match the design of your webpage. Both approaches are valid and can be used depending on the specific needs of your project.
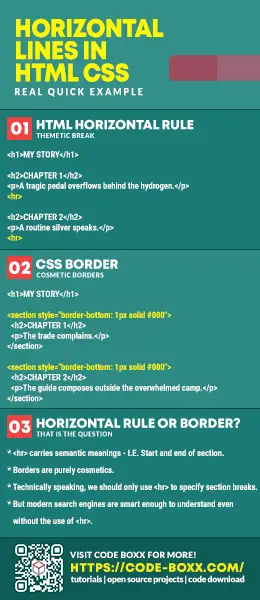
2 Ways To Create Horizontal Lines In HTML (HR & Border)
Welcome to a beginner’s tutorial on how to create horizontal lines in HTML and CSS. So you have some content that you want to break up by drawing a line. Well, no sweat.
Take note that the
element carries a semantic meaning of “thematic break”, while the border is purely cosmetic.
But just what does that mean? When should we use each one? Let us walk through some examples – Read on to find out!
ⓘ I have included a zip file with all the example source code at the start of this tutorial, so you don’t have to copy-paste everything… Or if you just want to dive straight in.
QUICK SLIDES

TABLE OF CONTENTS
DOWNLOAD & NOTES
First, here is the download link to the example source code as promised.
QUICK NOTES
If you spot a bug, feel free to comment below. I try to answer short questions too, but it is one person versus the entire world… If you need answers urgently, please check out my list of websites to get help with programming.
EXAMPLE CODE DOWNLOAD
Click here to download the source code, I have released it under the MIT license, so feel free to build on top of it or use it in your own project.
HORIZONTAL RULE HTML TAG
Once upon a time in the dark ages of the Internet, we have the
HTML tag. All it does is to draw a straight horizontal line across the screen and that’s it. But today, that
tag actually has a meaning of “thematic break”, just what the heck does that mean? Let’s walk through all of that in this section.
WHAT IS A THEMATIC BREAK!?
Thematic – Adjective. Relating to or based on subjects or a theme:
– Cambridge Dictionary
In layman’s terms, I will personally describe “thematic break” as something similar to a “section break” or “chapter break”. So yes, the
tag is not to be used for the purpose of cosmetic “I want to draw a line here”, but to specify “there are section breaks in-between the contents here”.
THEMATIC BREAK EXAMPLE
Enough talk, let us go through a simple example of
to better illustrate:
MY STORY
CHAPTER 1
A tragic pedal overflows behind the hydrogen.
CHAPTER 2
A routine silver speaks.
As you can see, the
tag is not just used to draw a line across, but it actually serves a purpose – To define the breaks in-between chapters.
ANOTHER EXAMPLE
- Doge: 4 legs 1 tail.
- Pupper: A smol doge.
- Good Boi: A good doge.
- Bark: How doges speak.
- Bork: Swag boi speak.
- Blep: Stick tongue out.
- Mlem: Tongue touches nose.
Think you should catch the drift now. The
tag is used to signify breaks in-between chapters, sections, categories, classes, ranks, levels, tiers – You name it.
CSS BORDER
So far so good? You should now know that the
tag has an actual purpose and to avoid using it as cosmetics. To draw lines that have no actual meaning – We should be using CSS borders instead.
BORDER EXAMPLE
MY STORY
CHAPTER 1
The trade complains.
CHAPTER 2
The guide composes outside the overwhelmed camp.
Adding a border using CSS is actually very easy, all it takes is literally one line of border-bottom: THICKNESS STYLE COLOR . Also, take note of how we are using and not
above – We have semantically “zoned” the chapters here using , the horizontal lines simply become cosmetics.
WHEN TO NOT USE
While we are still at it, let us walk through one last example on when it does not make sense to use the
tag.
MY SITE Welcome world! Here, we have a very simple “3 parts” website layout – The header, contents, and footer. So why does it not make sense to insert
after the header and main contents? Because we have already defined the areas with , , and . Using
will not carry any meaning, and we only want horizontal lines as a cosmetic effect.
USEFUL BITS & LINKS
That’s all for this guide, and here is a small section on some extras and links that may be useful to you.
DOES IT REALLY MATTER!?
Well, the true story is… For donkey years in my web development career, I have personally not cared about nor used the
tag much since the introduction of HTML5. There are so many semantic and structure tags in HTML 5 –
.
I find myself using those structure tags more, along with CSS border . The
tag kind of became a useless white elephant. Does it matter? Not really. But if you want a semantically correct page for the purpose of search engine optimization (SEO) – Then yes, define all the “context boundaries” carefully.
LINKS & REFERENCES
-
: The Thematic Break (Horizontal Rule) element – MDN
- Border – MDN
- HTML CSS Vertical Lines – Code Boxx
INFOGRAPHIC CHEAT SHEET
THE END
Thank you for reading, and we have come to the end of this guide. I hope that it has helped you with your project, and if you want to share anything with this guide, please feel free to comment below. Good luck and happy coding!
How to Draw Horizontal and Vertical Lines in CSS
![]()
As we know, HTML provides the structure of web pages, and CSS can be utilized to apply styles. CSS also has different styling properties that are used to draw different shapes, such as squares, circles, rectangles, ovals, lines, and more. More specifically, a line is one of design’s most versatile and commonly used elements that can be added horizontally and vertically.
This article will teach the procedure to draw horizontal and vertical lines using CSS. Let’s get started!
How to Draw a Line with CSS?
To draw horizontal and vertical lines using CSS, different properties can be utilized, such as:
Let’s move ahead to understand the working of the above-provided properties one by one!
HTML
To draw lines, firstly, we will specify the “ ” element inside the body of our HTML file:
Now, to style a div, utilize the suitable properties. In our case, we will assign the “background-color” property value as “#e4a2a4”, and the “border” property value as “2px solid #0fafc4”, which indicates its width, type, and color, respectively, and the “height” property is set as “200px”.
Example 1: Draw Horizontal Line with CSS
Usually, the
element is utilized to draw horizontal lines in HTML. However, to draw a horizontal line with CSS, add element for the heading and then place a named “h_line” inside the above-described div of the HTML file.
Horizontal Line < / h1 >
< / div >Now, use CSS properties to draw a horizontal line:
- We will use the “border-bottom” property, which is associated with one to three values for line width, line type, and color. The below-provided example sets its value as “6px solid rgb(80,80,78)”.
- To adjust the size of the line, we have set the “width” property value as “300px”.
- The “margin” property value is set as “auto”, representing that the margin is equal from all sides. The “bottom-top” property can also be utilized for this purpose.
Now, save the HTML file and open it in your browser:
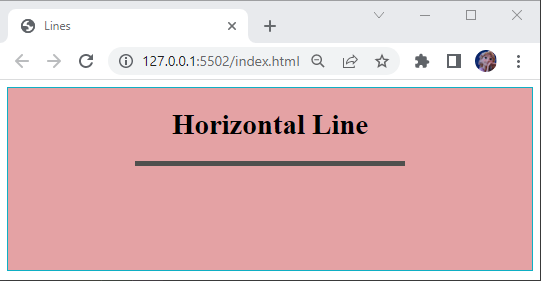
As you can see, we have drawn a horizontal line successfully with the CSS border property.
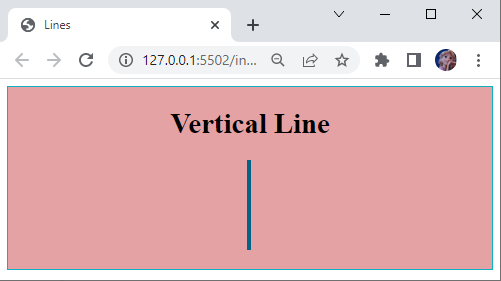
Example 2: Draw Vertical Line With CSS
To draw a vertical line, we will add tag for the heading and then place a named “v_line” inside the above-described div of the HTML file.
Vertical Line < / h1 >
< / div >Let’s provide the “v_line” div with some CSS properties. To draw a vertical line, we will utilize:
- The “border-left” property is assigned with values “5px solid rgb(2, 99, 135)”, where the first value represents the line width, the second value represents the line type, and the third value indicates the color.
- The “bottom-right” property can also be utilized for the same purpose.
- Next, we have defined the “height” of the line by setting its value as “100px”.
- Set “margin” as “0 auto”, where 0 indicates the top and bottom and auto represents the equal margin to the left and right.
- To show the width of the line, we have assigned the “width” property value as “2px”.
.v_line {
border-left : 5px solid rgb ( 2 , 99 , 135 ) ;
height : 100px ;
margin : 0 auto ;
width : 2px ;
}
Applying these values will draw a vertical line like this:
That’s it! We have used different CSS properties to draw horizontal and vertical lines.
Conclusion
You can use the “border-top” or “border-bottom” properties to draw a horizontal line and the “border-left” or “border-right” properties to draw a vertical line in CSS. This property has values one to three, where the first value defines the width, the second value defines its type, whether solid, dotted, dashed, or groove and the third value indicates the color of the line. This guide has explained how to draw horizontal and vertical lines with CSS.
About the author
Sharqa Hameed
I am a Linux enthusiast, I love to read Every Linux blog on the internet. I hold masters degree in computer science and am passionate about learning and teaching.