- Bootstrap CSS Forms Reference
- Bootstrap Form Example
- Form Classes
- Input Classes
- Style HTML Form or CSS Form Design Examples
- CSS Forms Design
- Example 1 – Basic HTML form with input text box, and submit button
- Example 2 – HTML forms style with basic CSS properties
- HTML Form Drop Down Design Example
- Example 3 – Style a Drop Down element.
- Example 4 – Drop-Down style with colors
- HTML Input Type Textarea Design Examples
- Example 5 – Textarea HTML tag design
- HTML Checkbox Design Example with CSS Style Property
- Example 6 – Checkbox design example
- Radio Button Input Design with CSS
- Example 7 – Radio Button design example with CSS Style Properties
- Click on your Nearest City
- Делаем красивую форму на HTML и CSS.
- Первым делом.
- Делай два.
- Поля ввода, подсказки.
- Немного анимации, завершаем.
Bootstrap CSS Forms Reference
Individual form controls automatically receive some global styling with Bootstrap.
All textual , , and elements with are set to width: 100%; by default.
Standard rules for all three form layouts:
- Wrap labels and form controls in (needed for optimum spacing)
- Add class .form-control to all textual , , and elements
The following example creates a simple Bootstrap form with two input fields, one checkbox, and a submit button:
Bootstrap Form Example
Form Classes
| Class | Description | Example |
|---|---|---|
| .form-inline | Makes a left-aligned with inline-block controls (This only applies to forms within viewports that are at least 768px wide) | Try it |
| .form-horizontal | Aligns labels and groups of form controls in a horizontal layout | Try it |
| .form-control | Used on input, textarea, and select elements to span the entire width of the page and make them responsive | Try it |
| .form-control-feedback | Form validation class | Try it |
| .form-control-static | Adds plain text next to a form label within a horizontal form | Try it |
| .form-group | Container for form input and label | Try it |
Input Classes
| Class | Description | Example |
|---|---|---|
| .input-group | Container to enhance an input by adding an icon, text or a button in front or behind it as a «help text» | Try it |
| .input-group-lg | Large input group | Try it |
| .input-group-sm | Small input group | Try it |
| .input-group-addon | Together with the .input-group class, this class makes it possible to add an icon or help text next to the input field | Try it |
| .input-group-btn | Together with the .input-group class, this class attaches a button next to an input. Often used as a search bar | Try it |
| .input-lg | Large input field | Try it |
| .input-sm | Small input field | Try it |
Style HTML Form or CSS Form Design Examples
 April 18th, 2019
  Nilesh Chaurasia
CSS Forms Design
CSS form design is used to change the look and feel of the HTML Form by the use of some CSS Properties.
Example 1 – Basic HTML form with input text box, and submit button
In the above code, we used two input fields one is an input text box and another is a submit button.
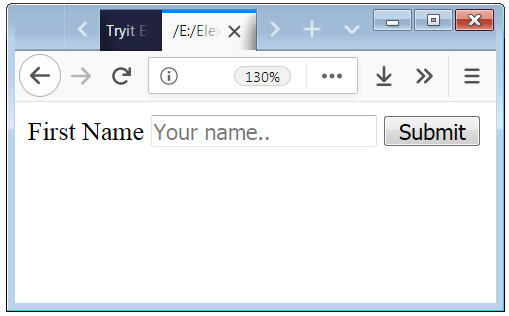
The above screenshot shows how the default form looks.
If you want to change the look and feel of the default HTML Form so you have to apply some particular CSS Properties on the input box and submit button.
Example 2 – HTML forms style with basic CSS properties
.form < background-color: #FACC5F; padding: 10px; >input[type=text] < width: 100%; padding: 7px 10px; margin: 6px 0; display: inline-block; border: 1px solid black; border-radius: 4px; box-sizing: border-box; font-Weight: 100; font-size: 15px; >form label < font-Weight: 800; font-size: 20px; >input[type=submit] < width: 120px; margin: 0 auto; background-color:grey; color: white; padding: 10px 15px; border: none; border-radius: 4px; >.submit
In the above code, we have used CSS Properties to enhance the look of the HTML Form.

HTML Form Drop Down Design Example
The below code shows how to apply the CSS Properties to design the Drop-Down input form element.
Example 3 – Style a Drop Down element.
.dropdown < font-size: 14px; height: 35px; width: 420px background-color: red; >select

You also change the color of the options. The below code is used to apply the color to the options.
Example 4 – Drop-Down style with colors
.dropdown < font-size: 14px; height: 35px; width: 220px >select < background-color: #308b7d; >select option[value="0"] < background-color: #117868; >select option[value="1"] < background-color: #249281; >select option[value="2"] < background-color: #34a997; >select option[value="3"] < background-color: #49ceb9; >select option[value="4"] < background-color: #79e5d4; >select option[value="5"]

HTML Input Type Textarea Design Examples
Textarea is not an input type. It is a tag . Textarea means that area where you can write a message.
Example 5 – Textarea HTML tag design
textarea
In the above code, we apply some css properties to the tag to improve the looks.

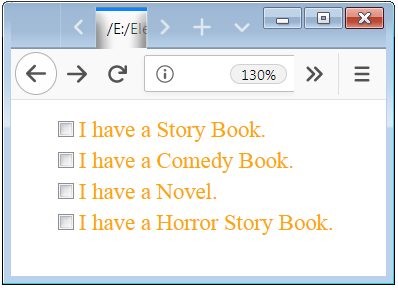
HTML Checkbox Design Example with CSS Style Property
The default look of the checkbox is not appealing, with the use of CSS Properties you can improve the look and feel of checkbox.
Example 6 – Checkbox design example
.checkbox
In the above code, we apply some css properties to the checkbox box input.
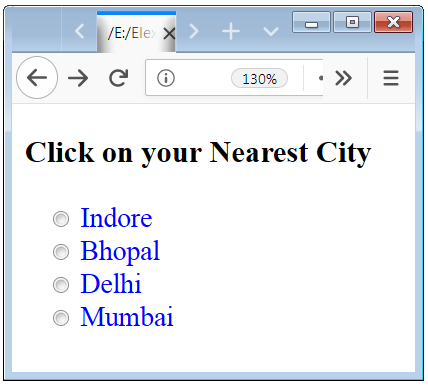
Radio Button Input Design with CSS
The default visualization of the Radio Button is not appealing, with the use of CSS Properties you can improve the visualization of Radio Button.
Example 7 – Radio Button design example with CSS Style Properties
.radio
In the above code, we apply some css properties to the Radio buttons.
 Posted in Learn CSS
  Tags: CSS, HTML, Web Design
Делаем красивую форму на HTML и CSS.
В этой статье мы познакомимся с CSS и сделаем симпатичную форму входа на HTML.

Да уж, согласитесь убогенько. Что бы сделать все красивей мы воспользуемся CSS(Cascading Style Sheets — каскадные таблицы стилей) — язык описания внешнего вида документа, написанного с использованием языка разметки. Преимущественно используется как средство описания внешнего вида веб-страниц, написанных с помощью языков разметки HTML и XHTML.
Первым делом.
Первым делом мы подключаем внешний файл стилей c помощью тега , атрибут href=»style.css» указывает на путь к файлу.
Теперь давайте создадим файл style.css и напишем первый стиль в нем . Разместим нашу форму по середине экрана в центре.
Тут мы используем Flexbox систему компоновки элементов на веб-странице — display: flex; Выравниваем по осям justify-content: center; align-items: center; Ну и body <> говорит нам что этот стиль применяется ко всему телу тега .
Теперь создадим стиль для всей формы , добавим тень , поменяем шрифт и расстояние между буквами.
Ну и конечно не забудем добавить этот стиль в HTML файл:

Делай два.
Едем дальше. Создадим стиль для кнопочки(Войти) поменяем цвет , шрифт и поправим заголовок(Вход)
.form_title < text-align: center; # Текст по центру margin: 0 0 32px 0; # Внешний отступ на всех четырех сторонах элемента. font-weight: normal;# Насыщенность шрифта, убираем жирность. >
.form_button < padding: 10px 20px; border: none; # Без границы блока. border-radius: 5px; # Радиус закругления font-family: sans-serif; letter-spacing: 1px; font-size: 16xp; color :#fff ; # Цвет текста background-color: #0071f0; # Цвет фона outline: none; # Внешней границы элемента cursor: pointer; # Тип курсора при наведение transition: 0.3s; # transition позволяет делать плавные переходы между двумя значениями какого-либо CSS свойства >

Поля ввода, подсказки.
Дальше на очереди поля в вода. Если вы обратили внимание каждое поле находиться в своем блоке . Задаем стиль для блоков :
.form_label < position: absolute; # Абсолютное позиционирование. top: 0; # Смещение позиционированного элемента относительно верхнего края z-index: -1; color: #9e9e9e; # Цвет текска. transition: 0.3s; >
CSS свойство z-index определяет порядок расположения позиционированных элементов по оси Z. Это позволяет контролировать наложение перекрывающихся элементов.
Уже намного лучше выглядит ?

Немного анимации, завершаем.
Начнем с кнопки , если она в фокусе или на нее нажимают меняем цвет бэкграунд:
.form_button:focus, .form_button:hover < background-color: rgba(0, 113, 240, 0.7);RGBA Цвет фона и значение прозрачности. >
Когда поле ввода в фокусе , поменяем цвет нижней границы:
Так же поменяем свойства подсказок, сдвинем их в верх и уменьшим шрифт :
.form_input:focus ~ .form_label
Уже совсем хорошо , но есть один косяк. Когда уходит фокус, подсказка возвращается на место.

Мы исправим это с помощью псевдоэлемент placeholder для стилизации дефолтного текста в элементе input или textarea . Большинство современных браузеров поддерживают это. Первым делом добавим его в HTML :
Теперь под правами CSS стиль :
.form_input:focus ~ .form_label, .form_input:not(:placeholder-shown) ~ .form_label

Надеюсь вам эта статья пригодилась и понравилась . Успехов.
Ошибка в тексте? Выделите её и нажмите «Ctrl + Enter»